Advertisement
Quick Links
Technical Support and E-Warranty Certificate www.vevor.com/support
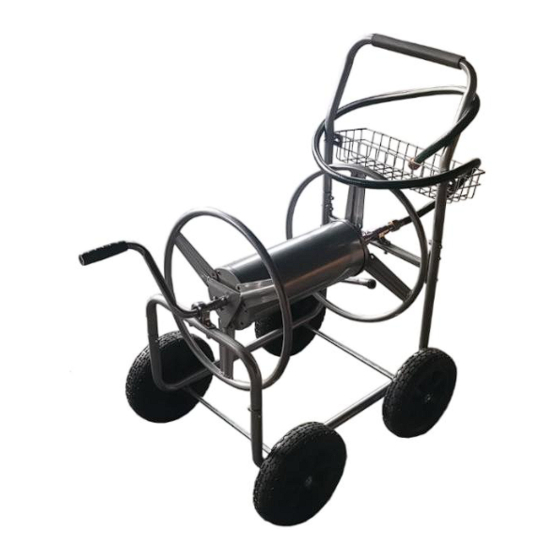
PRESSURE WASHER HOSE REEL CART
MODEL:GT0707A
We continue to be committed to provide you tools with competitive price.
"Save Half", "Half Price" or any other similar expressions used by us only represents an
estimate of savings you might benefit from buying certain tools with us compared to the major
top brands and doses not necessarily mean to cover all categories of tools offered by us. You
are kindly reminded to verify carefully when you are placing an order with us if you are
actually saving half in comparison with the top major brands.
Advertisement

Related Manuals for VEVOR GT0707A


Summary of Contents for VEVOR GT0707A
- Page 1 Technical Support and E-Warranty Certificate www.vevor.com/support PRESSURE WASHER HOSE REEL CART MODEL:GT0707A We continue to be committed to provide you tools with competitive price. "Save Half", "Half Price" or any other similar expressions used by us only represents an estimate of savings you might benefit from buying certain tools with us compared to the major top brands and doses not necessarily mean to cover all categories of tools offered by us.
- Page 3 CustomerService@vevor.com This is the original instruction, please read all manual instructions carefully before operating. VEVOR reserves a clear interpretation of our user manual. The appearance of the product shall be subject to the product you received. Please forgive us that we won't inform you again if there are any technology or software updates on our product.
-
Page 4: Assembly Precautions
Warning-To reduce the risk of injury, user must read instructions manual carefully. This symbol, placed before a safety comment, indicates a kind of precaution, warning, or danger. Ignoring this warning may lead to an accident. To reduce the risk of injury, fire, or electrocution, please always follow the recommendation shown below. - Page 5 6.Product capabilities apply to properly and completely assembled product only. 7.Assemble on a flat, level, hard and smooth surface capable of safely supporting a fully loaded Pressure Washer Hose Reel Cart. SAVE THESE INSTRUCTIONS Model GT0707A Maximum Capacity (5/8”Flexible Pipe) 250ft Number of Wheels Colour Silver gray Carton Contents Ref.
- Page 6 Hose Reel Ends Push Handle Hose Reel Center Water Coupling Tube Crank Handle Hose Extension Wire Basket Painted Water Coupler U-Bracket Crank U-Bracket Crank Bracket Bushing Hose Washer M6 x 35 Bolt - 4 -...
- Page 7 M6 x 25 Bolt M6 x 15 Screws Cotter Pin 12 mm Large Washer 21 6mm Small Washer M6 Nylock Nuts 23 Front Crank Frame 24 M6 Small Washer Assembly Instructions Tools Needed for Cart Assembly (1) Screwdriver. (2) M10 Wrench or Adjustable Wrench. 1.
- Page 8 2. Install wheels using 12mm large washer and cotter pin. See figure 2. 3. Attach hose reel end to the reel connecting rods using (4) M8 Nylock Nuts & Washers. Repeat on the opposite side. See figure 3A. - 6 -...
- Page 9 Attach water coupler Tube to the center hub using the painted water coupler u-bracket and (1) M8 u-bracket bolt Set. See figure 3B. 4. Insert crank bushing into crank u-bracket and attach to the front crank frame using (2) M6 x 35 bolt sets. Insert crank handle through the rank bushing then slide hose reel onto crank handle securing with (2) M6 x 25 bolt sets.
- Page 10 5.Attach opposite end of the hose reel to the cross brace using (2) M6 x 35 bolt sets.See figure 5. - 8 -...
- Page 11 Assemble push handle onto cart frame using (2) M6x35 bolt sets. See figure 6. 7. Attach basket to handle using (2) M6x35 bolt sets. See figure 7. - 9 -...
- Page 12 8. Insert rubber washers into hose extension and water coupler. See figure 8. 9. Attach hose extension to water coupler. See figure 9. - 10 -...
- Page 13 Connect the water pipe - 11 -...
- Page 14 Address:Baoshanqu Shuangchenglu 803long 11hao 1602A-1609shi Shanghai Imported to AUS: SIHAO PTY LTD, 1 ROKEVA STREETEASTWOOD NSW 2122 Australia Imported to USA: Sanven Technology Ltd., Suite 250, 9166 Anaheim Place, Rancho Cucamonga, CA 91730 Made In China - 12 -...
- Page 16 Technical Support and E-Warranty Certificate www.vevor.com/support...
Need help?
Do you have a question about the GT0707A and is the answer not in the manual?
Questions and answers