Table of Contents
Advertisement
Quick Links
Advertisement
Table of Contents

Summary of Contents for DURRIDGE RAD8
- Page 1 PRELIMINARY SUBJECT TO CHANGE User Manual USER MANUAL...
-
Page 2: Safety Warning
Using this instrument in a manner not specified by the manufacturer may impair the protection provided by the instrument. Service Records It is recommended that the RAD8 be returned to Durridge Company annually for recalibration. Date: Service: Owner: ________________________________ Serial #: _________________ Shipping and Contact Information Durridge U.S. -
Page 3: Table Of Contents
TABLE OF CONTENTS Safety Warning Service Records Shipping and Contact Information INTRODUCTION 1 GETTING STARTED: YOUR FIRST DAY WITH THE RAD8 1.1 Unpacking 1.2 General Safety Instructions 1.2.1 Air Travel 1.3 Taking a Look 1.4 Starting a Two-Day Test 1.4.1 Connecting the RAD8 Hardware 1.4.2 Setting Up the RAD8... - Page 4 2.6.12 Capture Cloud Settings 2.6.13 Firmware Update Settings 2.7 Viewing RAD8 Device Information 3 COMPUTER CONNECTIVITY 3.1 Computer Connection Basics 3.1.1 Connecting the RAD8 to a Computer via USB 3.2 Capture Software 3.2.1 Introduction to Capture 3.2.2 Capture Installation 3.2.3 Feature Summary 3.2.4 Downloading RAD8 Data...
- Page 5 4.11.3 Concentration Uncertainties 4.12 Spectrum Examples 4.12.1 Operational Radon Spectra 4.12.2 Thoron Spectra 4.12.3 Combination Spectra 4.12.4 Pathological Spectra 5 USING THE RAD8: MEASURING RADON AND THORON IN AIR 5.1 Introduction 5.2 Continuous Monitoring 5.2.1 Preparation 5.2.2 Purging 5.2.3 Test Location 5.2.4 Test Protocol...
- Page 6 5.7.2 Minimum Airflow Rate 5.8 Harsh and Hazardous Environments 5.8.1 Dusty Environment 5.8.2 Radiation Hazard 6 USING RAD8 ACCESSORIES: TESTING SOIL AND WATER 6.1 Introduction 6.2 Radon in Water 6.2.1 The RAD H2O and Big Bottle Systems 6.2.2 The RAD AQUA Accessory 6.2.3 The Water Probe Accessory...
- Page 7 8.1 Readings 8.1.1 No Counts 8.1.2 Excessive Uncertainty In Reading 8.2 Relative Humidity High 8.3 Water Ingress 8.4 Capture RAD8 Detection Failure Appendix 1: THERMAL PRINTER A1.1 Thermal Printer Description A1.1.1 General Printer Information A1.1.2 Printer Features A1.1.3 Power Switch A1.1.4 Indicator LEDs...
-
Page 8: Introduction
While you can start to make good measurements on the first day of ownership of the RAD8, it can take months to master the subtleties of radon and thoron behavior, and to appreciate the full capabilities of the instrument. -
Page 9: Unpacking
YOUR FIRST DAY WITH THE RAD8 This section will cover unpacking the RAD8, reviewing the package contents, safety fundamentals, examining the controls and ports on the RAD8 front panel, and setting up the instrument to perform basic radon tests. 1.1 Unpacking First make sure you have everything. -
Page 10: General Safety Instructions
The RAD8 measures radon and thoron activity concentration in air. For your own safety and the proper operation of the RAD8, do not allow liquid to be pulled into the inlet. If you intend to measure radon in water using one of Durridge’s water-air exchange accessories, please consider also using the Durridge Water Switch accessory to prevent water ingress. -
Page 11: Air Travel
If such devices are packed in checked baggage, they must be turned completely off, protected from accidental activation, and packed so they are protected from damage. Since the RAD8 contains lithium ion batteries, it should be in carry-on baggage whenever possible. DURRIDGE IS NOT LIABLE FOR ANY DAMAGES RESULTING FROM IMPROPER PROCEDURES RELATING TO AIR TRAVEL. -
Page 12: Starting A Two-Day Test
The radon testing guidelines published by the U.S. Environmental Protection Agency stipulate that home radon tests should be taken for a minimum of 48 hours. The RAD8 can provide dependable results more rapidly, but for the purpose of learning to use the instrument, we will initiate a standard 48-hour test. -
Page 13: Setting Up The Rad8
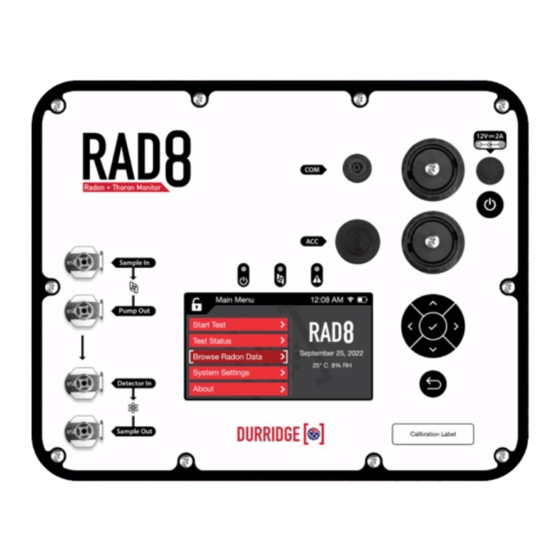
1.4.2 Setting Up the RAD8 Connect the RAD8 power supply to the DC Power In Port at the top right corner of the RAD8 front panel, and turn on the RAD8 using the nearby power button. As the instrument starts up, the touchscreen will display the Main Menu as shown below. -
Page 14: Purging The Rad8
1.4.3 Purging the RAD8 Next the air inside the RAD8 should be purged. This practice removes any radon that may be left over from an earlier test, to prevent it from influencing the measurement. Using the... -
Page 15: Completing The Test
Test Status. 1.4.5 Completing the Test If you allow the RAD8 to complete the entire 2-Day test, the graph will expand to a total of 48 data points. (The stored test data will be saved for later viewing, as described in Section 2.5.) Additionally, if the RAD8 printer is connected and enabled a test summary... -
Page 16: Starting A Sniff Test
Tube should be used, instead of the Laboratory Drying Unit. Also, for portability, you may remove the external power from the RAD8, and run the RAD8 on battery power. If you have not already done so, set the RAD8 clock, as described above. - Page 17 Note that the radon daughter, polonium-218, has a 3-minute half-life. After moving the RAD8 to a new location, it will take about 12 minutes for the count rate in Window A to reach equilibrium with the new radon concentration. So not until after the third 5-minute Cycle will the reading indicate the new level.
-
Page 18: Basics Of Rad8 Operation
2 BASICS OF RAD8 OPERATION This section will explain how to navigate the RAD8’s user interface to perform operations including starting a radon test, viewing the test status, modifying test settings, configuring custom test protocols, and changing system settings. For instructions on choosing the appropriate test protocols and techniques based on particular goals and conditions, please see Section 5. -
Page 19: Main Menu Organization
The five buttons on the Main Menu screen lead to submenus used for starting a test, monitoring the current test status, browsing stored radon data, configuring system settings, and viewing information about the RAD8. These options will be explored in this section. -
Page 20: Starting A Radon Test
The sensitivity is scaled with respect to the water volume and the air-water partition coefficient. Once a protocol has been selected, the RAD8 will begin the radon test, and the Test Status Screen will appear. This screen consists of multiple status panels, and it will be explained in detail in Section 2.4, Monitoring the Test Status. - Page 21 Manual Config from the Test Protocol menu. This makes it possible to individually specify each test parameter. User Protocols Screen Custom Protocols consisting of user-specified parameters may be edited and run using the User Protocols menu. Section 2 Basics of RAD8 Operation...
-
Page 22: Test Parameters
Pre-Test Purge Duration: The duration of pump activity before the RAD8 begins recording the first Cycle in the test. The pre-test purge clears the RAD8 of any residual radon and airborne daughter particles that may be left over from an earlier test. -
Page 23: Pump Modes
On while sniffing for radon, and while measuring thoron, due to its short half-life. Off Mode: When the RAD8 pump is set to Off, the instrument will not actively draw air into the measurement chamber. The pump may be Off if an external pump is being used, or if the RAD8 is known to already contain an air sample that was pumped in previously. -
Page 24: Purging The Rad8
In order to dry out the RAD8 without using up much desiccant, connect the hoses from the RAD8 to the Laboratory Drying Unit in a closed loop. When the pump runs, the same air will circulate repeatedly through the desiccant. This procedure will efficiently remove residual moisture from the RAD8. -
Page 25: Monitoring The Test Status
Finally, the Live Test Options screen can be used to save the test data to Capture Cloud on demand. Note that it is also possible to configure the RAD8 to automatically log data to Capture Cloud as it is being recorded, as described in Section 2.6.10. - Page 26 Live Test Options Screen The Gear menu activates the Live Test Options screen, which is used to change the RAD8’s operating parameters while a test is active. It is also used to adjust the appearance and time range of the real-time Graph, to print Test and Cycle summaries on demand, and to save the test data to Capture Cloud.
-
Page 27: Browsing Stored Radon Data
2.5 Browsing Stored Radon Data When the RAD8 conducts a radon test, the test data is automatically saved to the instrument’s local storage, allowing it to be viewed, printed, or exported at any time. These operations are covered in this section. -
Page 28: Configuring System Settings
The Gear Menu also makes it possible to upload the data file to Capture Cloud, if it was not automatically uploaded while the RAD8 was performing the test. This option requires a Wi-Fi internet connection. 2.6 Configuring System Settings The System Settings button in the Main Menu provides access to numerous settings affecting the RAD8’s functionality and visual output. -
Page 29: Clock Settings
2.6.2 Clock Settings An accurate clock setting ensures that each RAD8 data point contains the correct Set Date, timestamp. To set the clock, go to the System Settings screen and use the Set Time Set Time Zone , and panels. The RAD8 will remember the specified clock settings when it is powered off, even if the main battery is depleted. -
Page 30: Audio Settings
If the Button Press Sound is On, the RAD8 will play a clicking sound each time a button press is registered on the touchscreen. If the End of Cycle Sound is turned On, the RAD8 will play a chime sound each time it reaches the end of a Cycle. - Page 31 RAD8 measurement chamber, and the battery’s state of charge. If the Test Summaries box is checked, then when a test concludes the RAD8 will print relevant details pertaining to the entire test. This summary includes an average of the radon concentrations, the highest value, lowest value, and standard deviation.
- Page 32 Note that even if the RAD8 is not configured to print cycle and test summaries as tests are being conducted, these summaries can still be printed at a later time, when browsing data from within the Stored Test Details Screen.
-
Page 33: Display Settings
If a passcode has been assigned in the System Settings, it will be necessary to enter the code to return to the Main Menu and regain access to RAD8 functionality. The passcode is a multi-digit number that you must remember to avoid losing access to the RAD8. If you forget the passcode, it will be necessary to contact Durridge. -
Page 34: Graph View Settings
Manual Configuration. 2.6.10 Managing Storage Space If the RAD8’s ample internal storage space ever fills up, it can be restored by deleting data. Make sure the data has been copied to a computer or to Capture Cloud, then use the System Settings menu to erase the data stored in the RAD8. -
Page 35: Firmware Update Settings
2.7 Viewing RAD8 Device Information To view information about the RAD8, go to the Main Menu and choose the About button. The screen will display the following information: RAD8 Serial Number: The unique identification number for this RAD8. -
Page 36: Computer Connectivity
3.1.1 Connecting the RAD8 to a Computer via USB The RAD8 can be connected to a computer using the included USB-A to USB Mini-B cable, with the USB-A end of the cable connected to the computer, and the USB-B end connected to the RAD8’s COM port. -
Page 37: Capture Software
3.2 Capture Software 3.2.1 Introduction to Capture Capture simplifies the transfer of data from the RAD8 to a computer. It also provides a wealth of graphing and data analysis options, plus the ability to export data to other programs for further review. Additionally, Capture can be used to browse RAD8 data that has been saved to Capture Cloud, which is a subscription-based service for securely storing, organizing, and sharing RAD8 data. -
Page 38: Feature Summary
A statistics panel is automatically refreshed as new data arrives at regular intervals. In addition to being able to track the state of each connected RAD8, it is also possible to issue menu commands, performing such tasks as starting and stopping tests and setting the device protocol. -
Page 39: Capture Cloud
RAD8s that are owned by the organization(s) to which the user belongs. Search queries may be issued to locate specific RAD8 record sets based on criteria such as date range, organization, device serial number, and custom data tags. Users can be easily added or deleted by an organization administrator upon request. -
Page 40: Basics Of Rad8 Technology: How It Works
This section deals with a number of fundamental facts concerning radon and thoron, their measurement in general and their measurement, specifically, with the RAD8. It is not necessary to master the underlying physics to become proficient in the use of the instrument, but some understanding of what is happening is helpful. - Page 41 It may be noted that only alpha decays change the atomic weight, and then only in steps of four. Therefore the atomic weights of all the members of the radon-220, thoron, decay chain are divisible by four, while none of the radon-222 are. Radon Decay Chain Thoron Decay Chain Section 4 Basics of RAD8 Technology...
-
Page 42: Radon-222 (Radon)
With each transformation along this path the nucleus emits characteristic radiations: alpha particles, beta particles, or gamma rays, or combinations of these. The RAD8 was designed to detect alpha particles only, so we will emphasize alpha radiation. -
Page 43: Continuous Monitors
3. Ion chambers Each of these types has advantages and disadvantages relative to the others. The Durridge RAD8 uses a solid state alpha detector. One important advantage of this detector is its ruggedness. Another advantage is the ability to electronically determine the energy of each alpha particle. -
Page 44: Radon Sniffers
RAD8 does not measure radon daughter concentrations (working levels), only radon (and thoron) gas concentrations. Do not confuse the RAD8's spectrum with that of a working level instrument. The alpha peaks may appear the same, but the RAD8 is really measuring radon gas, not the working level. -
Page 45: Rad8 Solid-State Detector
4. Thoron sensitivity for ON pump mode, counting polonium-216 decays for thoron with increased sensitivity to thoron. In calibration, the RAD8 is exposed to a known concentration of radon (or thoron) and the count rates are measured. Your radon calibration certificate gives the two radon sensitivities. -
Page 46: Rad8 Spectrum
4.6 RAD8 Spectrum The RAD8 spectrum is a scale of alpha energies from 0 to 10 MeV. Of particular interest are the radon and thoron daughters that produce alpha particles in the range of 6 to 9 MeV. When the radon and thoron daughters inside the RAD8 decay, they emit alpha particles of characteristic energy. -
Page 47: Windows
Now introduce some radon into the RAD8. What do you see? At first, nothing. But within a few minutes, you begin to get counts in Window A. The RAD8 may produce an audible chirp with each count. This is polonium-218, a result of the decay of radon-222 within the RAD8 sample chamber. - Page 48 The effect of time in Windows B and D is comparable, but much more pronounced. There is no delay in the RAD8 to polonium-216, so the count rate in Window B is always in equilibrium with the thoron gas in the measurement chamber. In contrast, there is a 10- hour half-life in the decay chain down to polonium-212, so it takes days for Window D to reach equilibrium.
-
Page 49: Analysis Modes: Rapid, Precise, And Automatic
Rapid Analysis Mode for continuous monitoring. The best of both worlds is provided by the default Auto mode. Here, the RAD8 starts a test in Rapid Analysis Mode, and then, after three hours, switches automatically to Precise Analysis Mode. -
Page 50: Background
RAD8’s sophisticated species discrimination. 4.10.2 Adsorbed Radon Gas Radon atoms can adsorb on or absorb into internal surfaces of the RAD8, on the inside of tubing or on desiccant granules. This radon can stay behind after you purge the instrument, then desorb (or out-gas) from these surfaces and enter the measurement chamber volume. -
Page 51: Intrinsic Background
However, if you suspect that a source of radon or thoron has made its way past the filter and into the RAD8, please call Durridge. We would like to discuss your experience with you and help you solve your problem. -
Page 52: Precision And Accuracy
We estimate the overall calibration accuracy of your RAD8 to be better than 5%. The table on the following page summarizes the precision of the RAD8 according to the contribution of counting statistics. Counting statistics depend on sensitivity (calibration factor) and background count rate. -
Page 53: Humidity Correction
4.11.2 Humidity Correction Much of the superior functionality of the RAD8 is a result of the high-precision real-time spectral analysis that it performs. The high resolution of the energy spectrum is obtained by precipitating the radon daughters, formed by the decay of radon, right onto the active surface of the alpha detector. -
Page 54: Spectrum Examples
7.69 MeV Po214 B. New radon The RAD8 spectrum after less than one hour of exposure to radon. The peak in Window C is just beginning to grow in, but its count rate is still much less than in Window A. -
Page 55: Thoron Spectra
4.12.2 Thoron Spectra A. New thoron The RAD8 spectrum while continuously sampling thoron-laden air 6.78 MeV Po216 B. Thoron in equilibrium The spectrum after continuously sampling thoron- laden air for more than 12 hours. The count rate in Window A should be about half the count rate in Window D 6.05 MeV... -
Page 56: Combination Spectra
Window A (due to the bismuth-212 branching ratio discussed in Section 4.8). The RAD8 takes this into account, and always adjusts the Window A count rate to correct for the bismuth-212 count, before calculating the radon concentration. The spectra below have comparable amounts of radon and thoron, but you will usually see one of the two much stronger than the other. - Page 57 Window A is significantly more than half the count rate of Window D. G. New thoron with old radon. Peaks form in Window B, representing new thoron, plus Window C, representing old radon. Section 4 Basics of RAD8 Technology...
-
Page 58: Pathological Spectra
4.12.4 Pathological Spectra If any of the following occur, and an external cause is not identified, the RAD8 may be malfunctioning and it may be necessary to contact Durridge for service. A. No counts. Try a longer counting time. If there is not a single count in an hour, that is a clear indication of an instrument malfunction. - Page 59 G. Shifted peaks. Peaks appear normal, but are shifted in position. Shows a malfunction of the RAD8, which should be returned to Durridge for service without delay. H. Heavy tails on alpha peaks. The peaks are narrow, but have unusually thick tails.
-
Page 60: Using The Rad8: Measuring Radon And Thoron In Air
5.2 Continuous Monitoring 5.2.1 Preparation The RAD8 battery should be fully charged so that, even if there is a power cut, the test will be completed. Similarly, there should be more than sufficient active (blue) desiccant in the Laboratory Drying Unit. -
Page 61: Purging
5.2.2 Purging For the RAD8 to be all set to go, ready to start a test, it should be purged for at least five minutes beforehand. Locate a Laboratory Drying Unit and a length of tubing to connect it to the RAD8. The tubing will have a sleeved end which attaches to the Laboratory Drying Unit. - Page 62 When the Laboratory Drying Unit is used to dry the sampled air, the desiccant will have to be replaced every 7 to 14 days, depending on the humidity. The RAD8 needs external power for indefinite operation, but it can continue to record data during a power outage until the battery is depleted.
-
Page 63: To Print Or Not To Print
Even if no printout has been made at the end of every cycle, it may still be useful to have a printout at the end of the test. If the RAD8 can be accessed before the test is finished, simply connect the optional printer to the RAD8 and switch it on. After the last cycle is completed, the RAD8 will print the test summary, including the mean value, a bar chart of all the readings, and a cumulative spectrum. -
Page 64: Examining The Data
RAD8 configuration, see Section 1.5. Connect a Small Drying Tube to the RAD8 using 3 ft. of tubing. The end of the tube attached to the filter assembly should be connected to the RAD8’s Sample In port, and the other end should be connected to the Small Drying Tube. -
Page 65: Running The Test
While making this map, the RAD8 can be taking a benchmark radon measurement in the center of the room. Take at least four 5-minute-cycle readings. Later radon readings, at likely entry points, can then be compared with this benchmark. -
Page 66: Drilled Sampling Points
Cycle Time to 10 minutes, or more, and ignore the first reading. To measure a radon level of 4 pCi/L with a standard deviation of no more than 10%, the RAD8 must run for 60 minutes (for example six Cycles of ten minutes). Section 5... -
Page 67: Grab Sampling
5.4 Grab Sampling 5.4.1 Applicability The ability of the RAD8 to “grab” a collected sample is useful when it is not possible to take the RAD8 to the location to be tested, or when the RAD8 is preoccupied with continuous monitoring and will not be available until later. The Grab functionality is also useful when many samples must be gathered from different rooms of a building within a... -
Page 68: Thoron Measurement
The RAD8 responds virtually instantly to the presence of thoron; its time constant for response to thoron is less than 1 minute. The chief limit on the thoron response speed is the RAD8 pump's ability to fill the Section 5... -
Page 69: Calculation And Interference Correction
In thoron measurement the sample pump must run in a continuous fashion, at a steady consistent flow rate. If the flow rate of the sampling pump changes, the RAD8 thoron result will also change. Flow rate affects the amount of thoron in the RAD8’s internal measurement chamber, since a significant fraction of the thoron decays in the sample... -
Page 70: Standard Thoron Setup, Thoron Calibration And Flow Rate
The RAD8 factory calibration for thoron is based on a standard RAD8 inlet filter, a standard 3-foot long, 3/16 inch inner diameter vinyl hose, and a standard Small Drying Tube, which is about 6 inches in length. Deviation from this arrangement can change your thoron results. -
Page 71: Measurement Chamber Thoron Sensitivity Calibration
This thoron calibration is offered as an option and for this we claim an overall accuracy of ± 20%. The RAD8 has a typical radon Sniff sensitivity of 0.40 cpm/(pCi/L), so we estimate the typical thoron sensitivity to be around 0.13 cpm/(pCi/L). -
Page 72: Sniff Protocol For Thoron Measurement
5.5.10 Sniff Protocol for Thoron Measurement The Sniff Protocol causes the RAD8 pump to run continuously to assure a fresh sample, increasing the instrument's effective thoron sensitivity. Under Standard pump operating conditions, the pump runs for two minutes in every five. The thoron sensitivity is close to zero when the pump is not running, so running the pump continuously increases the thoron sensitivity by a factor of approximately 2. -
Page 73: Thoron Measurements In Standard Pump Mode
The RAD8 is only sensitive to thoron whilst the pump is running (and for a short time thereafter), giving an effective thoron sensitivity approximately 2/5ths of the value when the instrument is running in dedicated Sniff... -
Page 74: Airflow Rate Limits
RAD8’s chamber is less than one hour. The RAD8 has a volume of less than 1 L, so a flow rate of 1 L/hour, or Section 5... -
Page 75: Harsh And Hazardous Environments
filter becomes partially blocked. 5.8.2 Radiation Hazard If the RAD8 is to be placed in a location that is hazardous to the health of individuals, remote communication may be established through a wireless network connection. For details please see Section 6, and the Long Distance Connectivity section of the Capture user’s manual. -
Page 76: Using Rad8 Accessories: Testing Soil And Water
O uses a standard, pre-calibrated degassing system and pre-set protocols, built into the RAD8, which give a direct reading of the radon concentration in the water sample itself. The most widely supported sample sizes are 40 mL and 250 mL, as these correspond to the RAD8’s built-in RAD H... -
Page 77: The Rad Aqua Accessory
The RAD AQUA functions by bringing the air in a closed loop into equilibrium with water passing through an exchanger. The RAD8 is set to operate in continuous mode (as described in Section 4.2), sampling the air in the loop and recording its radon and thoron activity concentration. -
Page 78: Soil Gas Sampling
Laboratory Drying Unit, and the inlet filter. Set the RAD8 to the Sniff Protocol. Soil gas is normally so high in radon that it is not necessary to use long Cycle Times to achieve good statistical precision. The minimum five minute Cycle Times are usually sufficient. -
Page 79: Running The Test
RAD8. If desired, an external pump may be used, but it should be placed upstream of the RAD8’s measurement chamber (pump outlet pushing the sample air directly into the ‘Detector In’... -
Page 80: Closed-Loop Configuration
flow rate. With ambient air, the RAD8’s internal pump may be set to On, for a continuous flow. In both cases, a flow meter is required. Once a steady state has been achieved, a long-term measurement may be made. -
Page 81: Surface Emission
RAD8 (see Section 5.5.6). In closed loop mode, another correction must be made for the portion of thoron that makes it all the way around the loop to get fed back into the enclosure. -
Page 82: The Drystik
The DRYSTIK reduces the humidity of the air entering the RAD8 by transferring moisture from the sample about to enter the RAD8 to the air being pumped out of the instrument. As the air enters the desiccant in the Laboratory Drying Unit (which is not included with the DRYSTIK) on its way to the RAD8, it will have already lost most of its moisture, greatly extending the life of the desiccant. -
Page 83: Maintenance
(Laboratory Drying Unit). This unit will last for days under continuous operation at high humidity before it needs regeneration. When using the RAD8 as a Sniffer, the Small Drying Tube is recommended. It will last for several hours before replacement or refilling of the tube is necessary. -
Page 84: Small Drying Tube
The Small Drying Tubes each contain 30 grams of Drierite desiccant. The water capacity of each tube is 3 grams. We will assume that the RAD8 pump operates continuously, for an average flow rate of 0.6 L/min. The following table shows the expected lifetime of a Small Drying Tube under a variety of temperature and humidity conditions. -
Page 85: Filters
For thoron sniffing, use a single Small Drying Tube, and set the pump for continuous (on) operation. Keep hose length to 3 feet in keeping with the Standard Thoron Setup, unless your RAD8 has been calibrated for thoron using a non-standard inlet tubing setup. -
Page 86: Batteries
90 mA Table 7.2 RAD8 Operating Ranges *The RAD8 should not be placed in direct sunlight if the outside temperature is over 38° Celsius (100° Fahrenheit). Instead it should be moved to a shady location. **The humidity must be non-condensing... -
Page 87: Service And Repair
Durridge website. Email the form to service@durridge.com before you send your RAD8 back to us. Include a printed copy of the form in the box with the RAD8. You can send your RAD8 to either one of our Calibration facilities (USA and UK), listed below (see important, specific instructions for each below). - Page 88 2. We need the RAD8 in house for 10 days, so the total time a RAD8 will be away from your facility will be 10 days plus the time the RAD8 spends in transit. If additional service or repair is required, this may delay the return of the instrument.
- Page 89 Please fill out the declaration form provided at http://durridge.com/services/RAD8- calibration/ . Attach the completed declaration form to the commercial invoice. If the invoice is scanned and submitted electronically, please scan the declaration form and submit it electronically as well.
-
Page 90: Rad8 Quality Assurance
7.4.1 Spectrum The alpha energy spectrum that forms the RAD8’s raw data can be viewed in real-time during a test, or at the end of a test, via the Spectrum panel on the Test Status screen. -
Page 91: Troubleshooting
RAD8 and it should be returned to Durridge Company. Check that air is flowing using any of the following measures: a) Feel the air exiting the outlet when the pump is running. -
Page 92: Water Ingress
RAD8 still to prevent the water from sloshing. Put a piece of tubing on the RAD8 outlet with the other end in a sink. Use the RAD8 pump if it still works or otherwise use an external pump to blow air through the instrument. When water ceases to be blown out of the outlet, put desiccant upstream of the RAD8 to dry out the air path. -
Page 93: Capture Rad8 Detection Failure
5. It may be necessary to install driver software on your computer. The drive software is provided on the Durridge website, at http://durridge.com/software/software-drivers/. 6. If the RAD8 is not detected when connected to a particular USB port, try connecting it to a different USB port on the computer. -
Page 94: Appendix 1: Thermal Printer
A1.1 Thermal Printer Description A1.1.1 General Printer Information A portable printer is offered as an optional accessory for the RAD8. The printer is designed around a patented easy-loading paper mechanism, which consists of a main cavity into which a paper roll is dropped for loading. The thermal print head is at the front of the cavity and a rubber roller is attached to the lid of the mechanism. -
Page 95: A1.1.5 Push Buttons
This condition is indicated by the Error LED flashing red. Infrared Sensor: Located at the front of the printer, this sensor receives the infrared output of an external instrument. The RAD8 does not utilize this sensor. Instead, the printer is connected to the RAD8 with the included data cable. - Page 96 Thermal Printer Component Locations and Functions Appendix 1 Thermal Printer...
-
Page 97: A1.2 Thermal Printer Operation
A1.2 Thermal Printer Operation A1.2.1 Precautions To ensure the proper operation of the printer and prevent the possibility of voiding the warranty, be sure to observe the following precautions: • Avoid dirty or dusty locations, or those with excessive heat or humidity •... - Page 98 If necessary, the default parameters can be changed as follows: 1. With the printer initially switched OFF, press and hold down the SEL pushbutton; and then switch ON the printer. 2. The printer now goes into its set-up mode as indicated by the red LED flashing. At this time all of the printer’s current parameter settings are printed, followed by the first parameter that can be modified.
-
Page 99: A1.2.4 Using The Printer
A1.2.4 Using the Printer Turn the printer ON and observe that the Power LED should glow green. Connect the printer to the RAD8 with the included data cable. Choose a RAD8 print command to initiate printing. If the printer does not print, or if random characters are printed, check that the baud rate of the printer is set to the correct value. -
Page 100: A1.3.3 Cleaning The Printer
Thermal Printer Maintenance A1.3.3 Cleaning the Printer External surfaces of the printer may be kept clean by simply wiping with a damp cloth. Do not use any solvents that may attack the plastic case. Be sure that the inside surfaces are kept dry at all times. -
Page 101: A1.4 Thermal Printer Specifications
3. Using a cotton swab dampened with alcohol, wipe the heating dots of the print head. Be careful not to touch the heating dots with your fingers. 4. Allow the alcohol to dry. 5. Reload the paper and close the paper cover. A1.4 Thermal Printer Specifications The following table contains the physical and technical specifications for the thermal printer. -
Page 102: Appendix 2: Rad8 Specifications
Appendix 2: RAD8 Specifications The following tables detail the functional, technical, and physical specifications of the RAD8. Table A2.1 Functional Specifications Analysis Modes • Rapid: Quick response and rapid recovery radon measurement • Precise: High sensitivity radon measurement • Auto: Automatic switch from Rapid to Precise Analysis Mode after three hours •... - Page 103 IPS 480 x 272 full color touchscreen, sunlight readable, wide viewing angle Case Material Indestructible, MIL-SPEC certified, IP67 11-15V DC (12V nominal) @ 2A, center pin positive Power Supply Battery Rechargeable lithium ion battery provides 3 days continuous operation Appendix 2 RAD8 Specifications...
-
Page 104: Appendix 3: Glossary Of Terms
Appendix 3: Glossary of Terms The following RAD8-related terms appear throughout this manual. It is important for RAD8 users to understand the meanings of these terms. Term Definition See Section(s) Analysis Mode The RAD8’s Analysis Mode determines which Spectrum Window(s) 2.3.5... - Page 105 DC Spill Factors, respectively. These phenomena are accounted for automatically by the RAD8 firmware when calculating reported radon and thoron concentrations. A RAD8 Test consists of all the data that is recorded between the time 1.4.5 Test the instrument is started and when it is stopped. A test consists of multiple Cycles, each of which may be between 5 minutes and several hours in duration.
- Page 106 © Copyright 2022 Durridge Company Inc. All rights reserved. Durridge, the Durridge logo, and the Works with the Durridge logo are trademarks of Durridge Company Inc., registered in the U.S. Note: Durridge frequently updates its product manuals with new information. The latest version of this manual can be downloaded in PDF format from the following location: http://durridge.com/support/product-manuals/...
Need help?
Do you have a question about the RAD8 and is the answer not in the manual?
Questions and answers