Advertisement
- 1 IMPORTANT SAFEGUARDS
- 2 Overview
- 3 Cleaning & Care
- 4 General Operating Instructions
-
5
Directions for Each Display Panel
- 5.1 LED Display
- 5.2 To Start Cooking
- 5.3 Control Panel
- 5.4 Pause/Clear Function
- 5.5 Setting Clock And am/pm Button
- 5.6 Fahrenheit to Celsius Conversion
- 5.7 Lock And Unlock Function
- 5.8 Wattage Function
- 5.9 Setting Cooking Temperature
- 5.10 Setting Temperature Continued
- 5.11 Setting Cooking Time
- 5.12 Warm Function
- 5.13 Stage Cook Function
- 5.14 End Time Function
- 5.15 Programming Function
- 5.16 Using Pre-Programmed Recipes
- 5.17 Programming Your Own Recipes
- 5.18 Total Cooking Time
- 5.19 Save Function
- 6 Golden Beets
- 7 Programming
- 8 Cooking Directions
- 9 Troubleshooting
- 10 Documents / Resources
IMPORTANT SAFEGUARDS
When using electrical appliances, basic safety precautions should always be followed including the following:

To reduce the risk of electrocution:
- Read all instructions, safeguards and warnings before using the appliance.
- Do not place appliance where it can fall or be pulled into water or other liquids.
- Do not reach for an appliance that has fallen into water. Unplug immediately.
- Do not immerse cord, plug, or any portion of appliance in water or other liquids.

For individuals with pacemakers:
- This appliance emits an electromagnetic field that is strongest within two feet of the cooking surface.
- Scientific tests have proven inconclusive as to whether the electromagnetic field will disrupt the function of a pacemaker. Please consult your doctor or medical professional for guidance before use.
To reduce the risk of burns, electrocution, fire, or injury:
- This appliance is not meant for continuous use.
- This appliance includes a heating function. Surfaces may develop high temperatures. Do not touch hot surfaces. Cooktop may retain residual heat after cookware has been removed. The use of pot holders or alternative safety measures is highly recommended.
- This appliance should not be used by children. Close supervision is necessary when this product is used near children.
- Do not place on any gas or electric burner or in a heated oven.
- Do not place metallic objects such as knives, forks, spoons, or lids on the cooktop as they may become hot.
- This appliance is not intended for commercial use.
- Use this appliance for its intended purpose as described in this manual. Do not use any other accessories or attachments not recommended by the manufacturer. They may result in fire, electrical shock, or personal injury.
- Never operate this appliance if it has a damaged cord or plug, is not working properly, has been dropped or damaged, or dropped in water. Contact customer service for inspection, repair, or adjustment.
- Do not operate broken cooktop. If cooktop should break, cleaning solutions and spillovers may penetrate the appliance and create a risk of electric shock.
- Keep cord away from heated surfaces. Do not let the cord hang over the edge of the table or counter. Never force the plug into an outlet. Always unplug power cord by pulling on the plug. Turn the unit off before removing the plug from the wall.
- Do not operate where aerosol (spray) products are being used or where oxygen is being administered.
- Use proper judgment and caution while using cooktop in outdoor environments and public areas. This appliance should never be set up around unattended children or those unaware of its presence. The appliance should be situated on flat, stable surfaces, away from water sources such as pools, spas, sprinklers, hoses, etc.
- Do not move the appliance while hot.
- This appliance is for household use only; it is designed to process normal household quantities. It is not suitable for continuous or commercial operation.
- Do not disassemble the product. There are no user serviceable parts.
- Do not leave the appliance unattended while in use.
- This appliance is not intended for operation by means of an external timer.
- Clean cooktop with caution. Cleaning a hot surface with wet applications can cause steam and some cleaners can produce dangerous fumes. Unplug from outlet before cleaning.
- Use caution when disposing of hot grease.
- Keep this manual handy for future reference.
Electrical Information
- The cord length of this appliance was selected to reduce Safety Hazards that may occur with a long cord. Extension cords are available and may be used if care is exercised in their use. If an extension cord is used:
- the marked electrical rating of the extension cord should be at least as great as the electrical rating of the appliance, and
- the longer cord should be arranged so that it does not drape over the counter or table top where it could be accidentally pulled off the counter or table or tripped over.
- Certain models of the appliance may have a polarized plug (one blade is wider than the other). This plug is intended to fit into a polarized outlet only one way. If the plug does not fit fully into the outlet, reverse the plug. If it still does not fit properly, contact a qualified electrician. Do not attempt to modify the plug in any way.
Electric shock hazard. Use with adequate electrical system. Do not use if cord or plug is damaged.
All items on the cooktop can get very hot during cooking. Please be careful when removing these items from the unit. Always wear oven mitts or use pot holders. Cooktop may retain residual heat after cookware has been removed. Allow everything to cool completely before cleaning.

FCC Information:
Changes or modifications to this unit not expressly approved by the party responsible for compliance could void the user's authority to operate the equipment.
Note: The device complies with part 18 of the FCC Rules.

Correct Disposal of This Product
This marking indicates that this product should not be disposed of with other household wastes throughout the EU. To prevent possible harm to the environment or human health from uncontrolled waste disposal, recycle it responsibly to promote the sustainable reuse of material resources. To return your used device, please use return and collection systems or contact the retailer where the product was purchased. They can handle environmentally safe recycling.
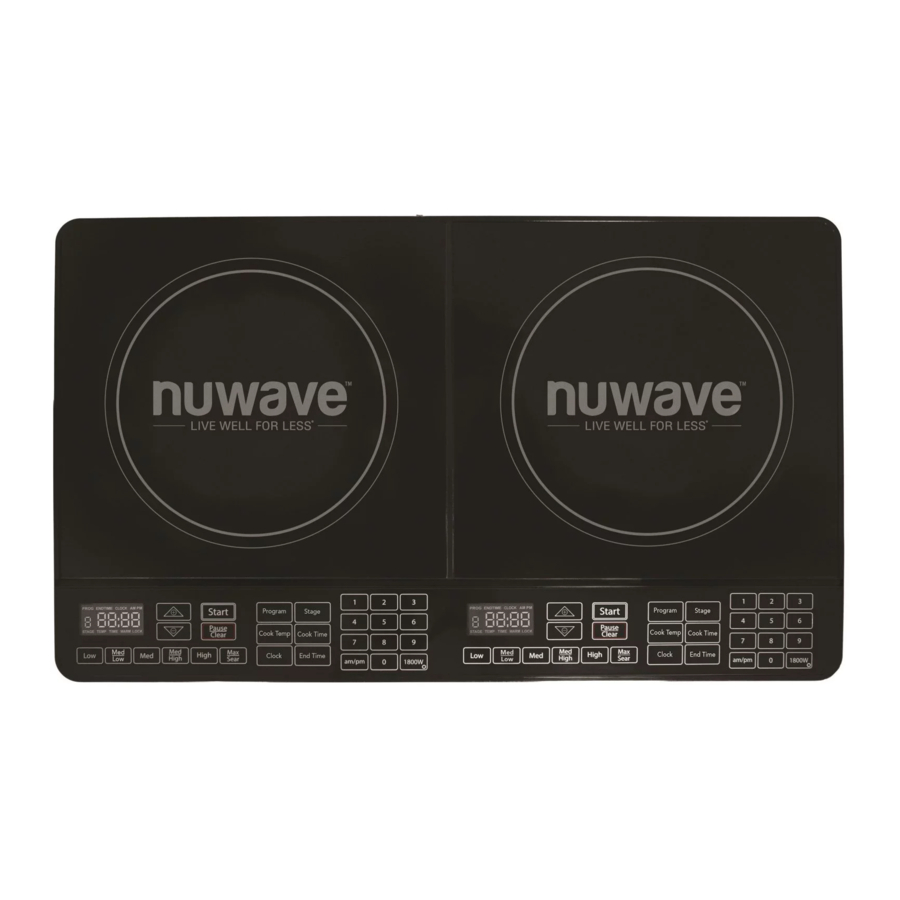
Overview
- Ventilation: Air vents are located on the sides and back of the product to allow any heat generated by the heating element to escape. This design feature prevents the unit from overheating and ensures efficient performance of the NuWave™ PIC Double.
- Surface: The NuWave™ PIC Double's heat-resistant glass surface stays cool to the touch and cleans easily with the simple wipe of a damp cloth.
- Control Panel with LED Display: Clearly lit, easy-to-read control panels.
- Heat Source: Located beneath each of the glass cooking surfaces is a copper electromagnetic coil that transfers heat directly to induction-ready cookware.
- 5 On/Off Switch: The NuWave™ PIC Double has an on/off switch located on the back of the unit.

While the NuWave™ PIC Double is in operation, do not touch the appliance's surface as it may become very hot, leading to the risk of burns. Cooktop may retain residual heat after cookware has been removed. Do not remove pots and pans during cooking process. Push "Pause/Clear" button to turn off power before removal.
Induction Cooktop-Compatible Cookware
As induction technology is based on magnetic principles, compatible cookware must have a ferrous (iron-based, magnetic) bottom. Some types of cookware are made of naturally magnetic metals (such as pure iron), while others are rendered magnetic by "sandwiching" a thin layer of a ferrous metal within the base. This layer will be acted upon by the magnetic field of the induction cooktop to distribute heat. Tri-ply, high-quality stainless steel and cast iron cookware will work with induction cooktops. Copper, glass and aluminum cookware will not work unless they have a sandwiched magnetic base. Pots that function optimally with the NuWave™ PIC Double tend to be medium to heavy gauge.
ATTENTION:
Each heating coil is located inside the thicker silver ring. You may use pans measuring up to the total width of the NuWave™ PIC Double's cooking surfaces, each of which measures 11.5 inches. It may accomodate pans up to 10.5 inches when using both sides and 12.0 inches when using a single side. However, in these situations, heat will transfer more slowly to the outer edges. Not recommended for pans larger than 12.0 inches.
Examples of compatible cookware:
- All NuWave™ Cookware
- NuWave™ Duralon™ Ceramic Non-Stick Cookware
- Cast iron
- Enameled iron and steel
- Stainless steel with magnetic base
Non-induction-compatible cookware:
- Copper
- Glass
- Aluminum
- Pottery type vessels
How do I check my cookware for induction compatibility?
Three simple ways to check if your existing pots and pans, or future cookware purchases, are compatible with the NuWave™ PIC Double:
- A magnet is typically a great indicator. If it sticks to the bottom of a piece of cookware, this typically means the pot or pan is induction-ready. However be cautioned that there are instances when a cooking vessel's magnetic properties may not be strong enough for the pot to work efficiently with the NuWave™ PIC Double.
- Place a small amount of water in a particular pot or pan. If induction compatible, water will begin to boil.
- An induction-ready symbol may be printed on the bottom of the cookware.
![]()

Cleaning & Care
BEFORE USE:
Wipe surface with a cloth soaked in warm, soapy water.
Do not immerse unit in water or attempt to cycle through dishwasher. The outer surface may be cleaned by wiping carefully with a damp dishcloth or sponge. Make sure unit has cooled completely prior to cleaning.
General Cleaning Instructions:
- Clean after each use.
- Make sure unit has cooled completely prior to cleaning.
- The outer surface may be cleaned by wiping carefully with a damp dishcloth or sponge.
- Remove the power plug prior to cleaning the NuWave™ PIC Double. Do not use caustic cleaning agents and water should not penetrate the interior of the induction cooktop.
- Never immerse the NuWave™ PIC Double, its cables or plug in water or other liquids.
- Wipe the glass surface with a damp cloth or use a mild, non-abrasive soap solution. Make sure the unit has cooled completely before cleaning.
- Wipe casing and operating panel with a soft cloth dampened with water or a mild detergent.
- Do not use oil-based cleansing products as their use may damage plastic parts or the casing/operating panel.
- Do not use flammable, acidic or alkaline materials or substances near the NuWave™ PIC Double, as this may reduce the service life of the induction cooktop or pose a fire risk when the induction cooktop is in use.
- In order to keep your NuWave™ PIC Double looking like new, take measures to ensure that the bottom of cookware does not scrape the unit's glass surface, although a scratched surface will not impair the use of the induction cooktop.
- Make sure to properly clean the unit before storing it in a cool, dry place.
IMPORTANT TIPS:
- Check power outlets to ensure proper operation. Do not use in an outlet where other major appliances are engaged. Check settings if the unit is cooking too slowly.
- The electrical plug must be properly plugged into the outlet.
- Always turn off and unplug the unit before wiping.
General Operating Instructions
- Place the cooktop on a stable, level, non-metallic surface.
- Never use the cooktop on a flammable surface (e.g. table cloth, carpet, etc.).
- Do not block the ventilation slots of the induction cooktop. This may cause the unit to overheat. Maintain a minimum distance of 3-5 inches from walls and other objects, appliances, etc.
- Do not place devices or objects that are sensitive to magnetic fields on top of or next to the NuWave™ PIC Double. (e.g. credit cards, cell phones, radios, TVs, video recorders, etc.).
- Do not use the induction cooktop in the proximity of open fires, heaters or other heat sources.
- Do not place on stove top.
- Ensure that the power cable is not damaged or compressed beneath the induction cooktop.
- The power cable must not come into contact with sharp edges and/or hot surfaces.
- Prior to connecting the NuWave™ PIC Double, confirm that the voltage needs indicated in this manual correspond to the voltage supply in your home. A wrong connection may lead to the unit's damage and possible injury to persons.
- The cooktop's surface is designed from temperature-resistant glass. In the event that damage to the unit is observed, even a small crack on the glass surface, immediately disconnect the NuWave™ PIC Double from the power supply.
Directions for Each Display Panel

LED Display

To Start Cooking
Note: Ensure that your NuWave PIC Double is turned on by flipping the on/off switch located on the back of the PIC.
Control Panel
LED Display should read "0" when program is clear or power is on.
There are several ways to begin cooking with your NuWave™ PIC Double:
- Select one of the temperature functions (Low - Max/Sear) then press "Start". Default cooking time is 1 hour.
- Press "Cook Temp", then press "Start". Default cooking will be 375˚F for 1 hour.
- Press "Cook Temp" then set the cooking temperature using the numeric touchpad and press "Start". Default time is 1 hour.
- Press "Cook Time" then set the cooking time using the numeric touchpad and press "Start". Default cooking temperature is 375˚F.
- Set the temperature and time using the numeric touchpad, then press "Start".
The NuWave™ PIC Double will automatically stop cooking once time has expired and a "beep" sound will alert users. The display will always show the current temperature during the cooking cycle. To display time lapse, press "Cook Time" while cooking.
NOTE: After 3 seconds, the display will revert to the cooking temperature.
NOTE: Due to ETL regulations regarding touchpad control panels, pressing the "Start" button only will not begin the cooking process.
Pause/Clear Function
- To interrupt cooking time, press the "Pause/Clear" button once.
This will pause the NuWave™ PIC Double at the current stage. - The temperature will remain listed in the display panel, but the "F" will be blinking.
- To resume, press "Start."
- To clear the cooking mode or display while the NuWave™ PIC Double is in operation, press the "Pause/Clear" button twice. The screen will be fully cleared and a "0" or the current time will appear and the unit will turn off.
Setting Clock And am/pm Button
- Press the "Clock" button. CLOCK indicator will flash on LED display and "00:00" will be displayed.
- Enter digits to match the current time. For example, 1:25 would be entered by pressing "1,2,5".
- Once entered, the time will be set as AM as a default.
- To change to PM, press the "am/pm" button.
- Press the "Clock" button again to set.
- "End Time" feature will not work unless the clock is set on each control panel.
- If the NuWave™ PIC Double is cut from a power supply or turned off, the clock must be reprogrammed on each control panel.
Fahrenheit to Celsius Conversion
- The NuWave™ PIC Double's LED display is defaulted to display cooking temperature in Fahrenheit (F) and the F will appear on display panel.
- To switch the display to Celsius (C), press the "Cook Temp" and "Cook Time" buttons simultaneously.
- To close out of the F/C conversion option, press the "Pause/Clear" button until "0" or the current time appears on the unit's screen.
- Each control panel can be changed from Fahrenheit/Celsius individually.
Lock And Unlock Function
The PIC can be locked by pressing "Low" and "Max/Sear" simultaneously until "LOCK" is displayed on the LED display. To unlock, press "Low" and "Max/Sear" simultaneously until "LOCK" is no longer displayed on the LED display.

- Each control panel locks and unlocks itself independently from the other.
Wattage Function
The PIC Double operates on a default of 1800 watts when using one plate.
- To change the wattage to 900 watts, press the "1800W" button and light will turn off.
- To change to 1800 watts, simply press the "1800W" button again and the light will turn on.
NOTE: EACH PLATE CAN USE UP TO 1800W INDIVIDUALLY. WHEN USING BOTH PLATES, THE PIC DOUBLE WILL AUTOMATICALLY SWITCH TO 900W ON EACH PLATE.
Setting Cooking Temperature
The NuWave™ PIC Double is defaulted to cook on Med/High (375°F).
- To start, press temperature key "Low" - "Max/Sear," the TEMP indicator will flash, then press "Start." The temperature range will appear on the display panel.
- To start, press the "Cook Temp" button. The TEMP indicator will flash and 375F will be displayed. To raise or lower the temperature in 5°F increments, press the "+" and "-" buttons until desired temperature is displayed.
Refer to chart below for setting temperature and preset temperatures.
The minimum temperature is 100°F while the maximum temperature reaches 575°F.
NOTE: Display temperature represents temperature of 1.5L of oil in the NuWave™ 3.5-quart Stainless Steel Pot. Thermometer location for test at the origin (middle) of the NuWave™ 3.5-quart Stainless Steel Pot and an equidistant length between the pot base and top of the oil.
| Press Button | Range Temperature | Panel Display | Examples |
| Low | 100°F (38°C) | 100F / 38C | Warm |
| Med Low | 175°F (79°C) | 175F / 79C | Simmer |
| Med | 275°F (135°C) | 275F / 135C | Steam |
| Med High | 375°F (191°C) | 375F / 191C | Stir/Deep Fry |
| High | 425°F (218°C) | 425F / 218C | Boil/Saute |
| Max/Sear | 575°F (302°C) | SEAR | Sear |
Setting Temperature Continued
The desired cooking temperature can be set by pressing the numeric touchpad. See right for examples.
- Press "Cook Temp" button.
- Press a desired cooking temperature by using the numeric touchpad. If a number not ending in "5" or "0" is entered, the PIC Double will automatically set itself to the nearest temperature ending in a "5" or "0". For example, when you press "2,2,2" for cooking at 222ºF, the LED display will read 220F. press
![]() three times, then press "Start"
three times, then press "Start" ![]()
 three times, then press "Start"
Setting Cooking Time
- Press the "Cook Time" button. The "TIME" indicator will flash.
- Enter the time in hours and minutes using the numeric touchpad.
![]()
- For example, 1 hour and 30 minutes would be entered by pressing "1,3,0". The display panel will show 1:30.
- The time can be adjusted in 1 minute increments by pressing the "-" or "+" arrows.
- To check the time during the cooking process, press the "Cook Time" button, the PIC will automatically revert to the temperature in 3 seconds.
- If the required time is in minutes, you only need to enter 1 or 2 numbers.
- For example, for 5 minutes just enter "5"; for 46 minutes, enter "4,6".
- If the number needs to be corrected, clear the entry by pressing "0" button four times.

- The blinking TIME indicates that the time can be adjusted.
The maximum amount of programmable time is 99 hours and 60 minutes. - The display shows hours and minutes, but not seconds.
Warm Function
After the initial cooking is complete, the cooktop can be used to keep the food warm (between 100ºF - 200ºF). The default setting is programmed at 120ºF for 2 hours.
- Press the "Low" and "Med/Low" buttons simultaneously. until the display flashes "WARM". The "WARM" indicator will blink.
- 120F will be displayed, then press "Start".
![]()
- The PIC can be programmed to keep foods warm for up to 100 hours.
- Once the initial cooking cycle is finished, the PIC will "beep" twice before switching to the WARM function. Warm will always be the last stage in the program.

- The temperature of the WARM function can be increased or decreased by pressing "+" or "-" buttons or using the numeric touchpad.
- To change the warm time press "Cook Time" button. You can increase/decrease the cooking time by pressing the "+" or "-" buttons or using the numeric touchpad.
Stage Cook Function
This function is used when programming or cooking for more than one time and temperature setting.
- Press the "Stage" button. "STAGE" will begin flashing on the display. All the stages have a default temperature of 375ºF.
![]()
- To change the temperature, press the "Cook Temp" button. "TEMP" will flash on the display. Enter the desired temperature.
- Press the "Cook Time" button. "TIME"will flash on the display. Enter the desired cooking time.
![]()
- You can also start with the "Cook Time", followed by the "Cook Temp".
- Press the "Stage" button to move onto programming stage "2".
- Repeat the process until all desired stages are programmed, then press the "Start" button.


- There is a maximum number of 10 programmable stages.
Stage 10 will be displayed as "0." - If would like to edit an already programmed stage at any time, press the "Stage" button until desired stage is displayed. At that point, you may change the COOK TEMP, COOK TIME or both.
End Time Function
the correct "CLOCK" time must be set before "END TIME" function can be used (see "Setting Clock Time"). This feature is designed to allow cooking to end at a specific time. It is possible to delay the end of a program for up to 24 hours.
- Press the "End Time" button, "END TIME" indicator will flash on LED display with AM and "00:00" being displayed.
- Use the numeric touchpad to input the desired end time.
- For example, 5:00 would be entered by pressing "5,0,0".
- Press "am/pm" button to change from "AM" default if appropriate.
- After programming the cooking temperature and time, press "Start". NOTE: "COOK TIME" cannot overlap with the "END TIME".
Programming Function
NOTE: Numbers 1-50 are pre-programmed recipes.
NOTE: Numbers 51-200 are your own programmed recipes.
See Programmable Recipe Example.
NOTE: Programs 1-50 – wattage is automatically set for 1800 watts, if you are using programs 1-50 and you press the "1800W" button it will display "Err" and default back to cook temperature. NOTE: Programs 51-200 – after you program your appropriate wattage, you are not able to change the wattage unless you override the programmed recipes. If you press the "1800W" button while cooking it will display "Err" and default back to cooking temperature.
The "Program" button represents a variety of functions available to users of the NuWave™ PIC Double, including Memory Entry (the storage of frequently used stage cooking programs), Memory Recall (retrieval of stage cooking sequences), and Stage Cooking Mode.
Using Pre-Programmed Recipes
- Press the "Program" button. "PROG" indicator will flash and "0" will appear on the display screen.
![]()
- Enter the number associated with the pre-programed recipe using the numeric touchpad. Exp "3,1" is 31.
- Then press "Start".

Programming Your Own Recipes
- Enter your stages with temperatures and times, then press "Program". Enter the number you wish to save it as. Exp: "1,3,7" is 137.
![]()
- Press the "Program" button to confirm the number you selected.

- Up to 10 cooking functions can be stored with each Memory Entry (10 additional stages of cooking time and temperature).
- If you are unsure of the remaining cooking time at the current stage while the NuWave™ PIC Double is cooking, press "Cook Time" to display the remaining time. The display will automatically revert to the cooking temperature after several seconds.
Total Cooking Time
Before starting a programmed recipe, you can view the total number of cooking stages and total cooking time.
- Press the "Program" button, then enter the appropriate recipe number on the numeric touchpad.
- Then press the "Program" button again.
- The total number of cooking stages will be displayed above "STAGE" and the total cooking time will be displayed on the LED display.
NOTE: Individual stages may also be edited and saved when displaying the total cooking time.
- Press the "Stage" button to select which stage to edit.
- To change the temperature press the "Cook Temp" button and enter the desired temperature using the numeral keys or the "+" and "-" buttons. To change the time, press the "Cook Time" button and enter the desired time using the numeral touchpad or the "+" and "-" buttons.
- Press the "Start" button to begin your edited recipe.
NOTE: You can also save your edited recipe.
- Press the "Program" button, and "PROG" will flash and a "0" will show on the screen.
- Enter the desired number for your program using the numeral touchpad or the "+" and "-" buttons.
- Press the "Program" button again to save your new program.
Save Function
You can adjust and save the cooking time or temperature of an existing programmed recipe at any point during the cooking process. Once cooking is done, "SAVE" will be displayed on the LED display. At this point, you may choose to save your new recipe onto the NuWave™ PIC Double by pressing the " Program" button and entering your desired recipe number.
- If you choose to save the adjusted recipe in a slot that is already taken by another programmed recipe, the new recipe will override the old recipe. THIS OPTION IS ONLY AVAILABLE FOR RECIPE SLOTS 51-200.
Golden Beets
Serves: 6-8
Pre-Programmed Cooking Stages: Stage 1: Max/Sear - 1 minute
Stage 2: 375°F - 20 minutes
Total Cook Time: 21 minutes
Ingredients:
4 large golden or red beets, washed and trimmed
1 quart water
1 teaspoon salt
½ teaspoon freshly ground black pepper
Prep Directions:
- Add beets and water to Pressure Cooker.
Programming
Stage 1: Max/Sear - 1 minute
- Press "Stage" button. Stage will flash on the display panel.
- Press "Cook Temp" button and press "5, 7, 5" buttons or "Max/Sear" button. "SEAR" will be displayed.
- Press "Cook Time" button and press "1" to cook for 1 minute.
Stage 2: 375˚F - 20 minutes
- Press "Stage" button again, Stage will flash on the display panel.
- Press "Cook Temp" button and press "3, 7, 5" buttons or "Med/High" button. "375˚F" will be displayed.
- Press "Cook Time" button and press "2,0" to cook for 20 minutes.
To save the recipe
- After entering all your stages, press "Program".
- Enter any number between 51-200 using the numeric touchpad. Exp: "1,3,7" is program 137.
- Press Program again to set it.
Cooking Directions
To cook immediately:
- Cover and lock in push plate.
- Turn pressure regulator to 2 for high pressure.
- Press "Start".
Troubleshooting
| Error Message | Solution |
| E1 | An E1 reading typically means that your NuWave™ PIC Double does not detect cookware on its surface. This can occur for one of two reasons.
|
| E2 E3 | The unit is malfunctioning. Contact customer service. The unit's voltage is too low. Minimum = 85 volts |
| E4 | The unit's voltage is too high. Maximum = 144 volts |
| E5 | The unit is malfunctioning. Contact customer service. |
| E6 | The unit is malfunctioning. Contact customer service. |
| E7 | Overheating, or air ventilation is obstructed. If internal temperature exceeds 230ºF, operation will cease and a "beep" noise will be produced. Press "Pause/Clear" twice. Wait for the unit to cool. |
| E8 | Overheating, if unit exceeds a temperature 20ºF higher than sear, the appliance will turn off. Contact customer service. |
| E9 | The unit is malfunctioning. Contact customer service. |
| FULL | In programming mode, when the total entered time reaches the appliance's limit of 99:60, no additional stages can be inputted. |
- When any of the above error messages display on the LED, the unit will "beep" at least once.
- The fan will run up to a maximum of 60 seconds after pressing the "Pause/Clear button once. Continue cooking by pressing the "Start" button within 45 minutes.
- The unit will turn off after 45 minutes if no buttons (such as "Start") are pressed. When the unit shuts off, it will clear all previous cooking history.
- After pressing the "Pause/Clear" button twice or cooking has stopped, the fan will run up to a maximum of 60 seconds until the unit cools. At that point the NuWave™ PIC Double will turn off.
| After removing cookware | Beep sound | Display | Reference |
| Initial | Single beep | "F" or "C" or "Sear" Flashing | After returning the pot, NuWave™ PIC Double will automatically resume cooking. |
| < 10 seconds | None | "F" or "C" or "Sear" or ":" Flashing | |
| 11- 70 seconds | Yes | E1 | Resume cooking by pressing "Start" button. |
| After 70 seconds | None | 0 | Cooking stops. |

Documents / ResourcesDownload manual
Here you can download full pdf version of manual, it may contain additional safety instructions, warranty information, FCC rules, etc.
Download NuWave PIC DOUBLE - Precision Induction Cooktop Manual
Advertisement
Need help?
Do you have a question about the PIC DOUBLE and is the answer not in the manual?
Questions and answers