Table of Contents
Advertisement
Quick Links
Download this manual
See also:
User Manual
Advertisement
Table of Contents

Related Manuals for Sirius Satellite Radio SC-V1


Summary of Contents for Sirius Satellite Radio SC-V1
- Page 2 Your new SCV1 SiriusConnect Audio/Video Tuner allows you to enjoy SIRIUS ® Satel- lite Radio programming on the main audio system, while your rear seat passengers enjoy the family friendly SIRIUS Backseat TV programming. For the latest information about this and other SIRIUS products and accessories, visit http://www.sirius.com.
-
Page 3: Table Of Contents
Sirius ID ......55 FM Transmitter ......56 Settings . -
Page 4: Warning And Safety Information
Warning and Safety Information FCC Information This device complies with part 15 of the FCC Rules. Operation is subject to the fol- lowing two conditions: This device may not cause harmful interference, and This device must accept any interference received, including interference that may cause undesired operation. -
Page 5: Copyrights & Trademarks
® “SIRIUS”, the SIRIUS dog logo, “SIRIUS Backseat TV”, channel names and logos are trademarks of SIRIUS Satellite Radio Inc. “NFL” and the NFL Shield logo, and the NFL Sunday Drive name and logo are registered trademarks of the National Football League. -
Page 6: Package Contents
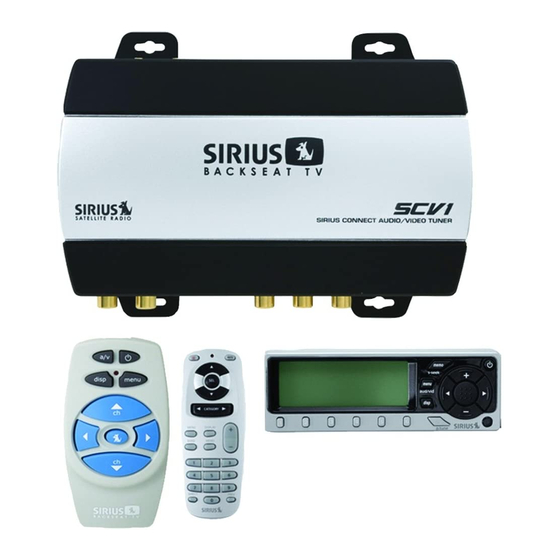
Package Contents The following items are included with your purchase of the SCV1 SiriusConnect Audio Plus Video Tuner. memo s-seek menu disp band Audio/Video Audio/Video display Control unit (dCu) display Control unit (dCu) remote Control remote Control dCu mounting bracket dCu mounting bracket SCV1 Tuner module (with SCV1 Tuner module (with... -
Page 7: Connectors & Controls
Audio output for a direct connection to an auxiliary audio input to the vehicle’s radio. This output will send either SIRIUS Satellite Radio audio or SIRIUS Backseat TV audio to the vehicle headunit, depending on mode selected by the DCU. - Page 8 Tuner Connectors Reference Guide SIRIUS Backseat TV Audio and video connections to the rear seat monitor sys- tem. These connections will only output SIRIUS Backseat Audio & Video Output TV audio and video. Connection for the infrared receiver eye for the video Infrared Input remote control.
-
Page 9: Display Control Unit Buttons And Connector Reference Guide
Press the power button again to turn the system on. A/V: Pressing and releasing this button toggles the mode between the SIRIUS Satellite Radio mode and SIRIUS Backseat TV mode. When in the audio/video mode, the A/V / Menu button DCU controls the backseat TV operation. -
Page 10: Radio Remote Control Reference Guide
Preset buttons (1—6) When in Video mode, presets 1, 2, and 3 are preassigned to directly tune to the three SIRIUS Backseat TV channels. Preset buttons 4, 5, and 6 are inoperative. Connectors & Controls... -
Page 11: Video Remote Control Reference Guide
Menu button Pressing and releasing: Toggles the mode between the SIRIUS Satellite Radio audio mode and SIRIUS Backseat TV video mode. Video Remote Control Reference Guide Figure 5 and the section following identify the buttons unique to the video remote control. -
Page 12: Installation
The SCV1 includes a Display Control Unit (DCU) which provides an interface to con- trol the SIRIUS A/V tuner. The DCU can tune and display the SIRIUS radio channels, and can also control the SIRIUS Backseat TV and change TV channels, as well as displaying TV programming information. -
Page 13: Wiring Diagram Using The Display Control Unit (Dcu) And Connecting To An Aux Audio Input
Wiring Diagram using the Display Control unit (DCu) anD ConneCting to an auX auDio input Sirius Vehicle Antennas Antennas must be installed at least 24” apart To headunit audio input memo s-seek menu disp band Display Control Unit (DCU) figure 1... -
Page 14: Wiring Diagram Using The Display Control Unit (Dcu) And The Fmda Adapter
Wiring Diagram using the Display Control unit (DCu) anD the FmDa aDapter Sirius Vehicle Antennas Antennas must be installed at least 24” apart Connection from vehicle FM antenna To headunit FM antenna connection memo s-seek menu disp band Display Control Unit (DCU) -
Page 15: Tuner Module, Display Control Unit, Infrared Eye, & Power Harness Installation
Tuner Module, Display Control Unit, Infrared Eye, & Power Harness Installation Figure 4 shows a typical installation of the tuner module, DCU, and IR eye in a vehicle. The exact placement of these devices will be dependent upon the interior design of your particular vehicle. -
Page 16: Power Harness
If your vehicle has a potential obstruction, be sure that the SIRIUS antenna is mounted at least 3 inches away from it (but no closer than 3 inches from the roof edge). - Page 17 SuV/mini-Van SuV/mini-Van Pickup Truck Pickup Truck Separation = 36 in. or greater for optimum performance A minimum separation of 24 in. is required for the diversity system to be effective. figure 7 figure 7 Note: The SCV1 uses a special diversity antenna system that requires the use of two antennas mounted at opposite ends of the vehicle to maximize video signal reception when driving in areas with heavy foliage or lots of buildings.
- Page 18 figure 9 figure 9 mounting the Antennas on the Vehicle Follow this procedure for mounting each antenna: Select an appropriate mounting position for your type of vehicle according to the instructions in the previous section. Attach the rubber cover/tail to the antenna, as shown in Figure 10, and press the antenna cable into the rubber cover/tail.
-
Page 19: Installing The Fm Direct Adapter
Weatherstripping and Route Under interior Trim To hear the SIRIUS audio, the vehicle’s headunit and the SCV1 will need to be tuned to the same FM channel. Refer to the FM Transmitter section on page 56 for more detailed instructions on how to tune the SCV1 to an FM channel. -
Page 20: Subscribing To The Sirius Service
Subscribing to the SIRIUS Service Before you can listen to the SIRIUS service, you need to subscribe to the SIRIUS Satellite Radio service. To subscribe, do the following: Be sure that the SCV1 is correctly installed according to the previous installation instructions. -
Page 21: Audio Mode Operation
Subscription Updated Press Any Key to Continue figure 5 figure 5 You are now ready to begin enjoying SIRIUS Satellite Radio’s digital radio and TV entertainment! Subscribing to the SIRIUS Service Audio Mode Operation Basic Operation After you have successfully activated your SIRIUS subscription, the Default display screen will be displayed (Figure 1). -
Page 22: Changing Channels
Backseat TV service by pressing the A/V button on the DCU, or the menu button on the audio remote control. When the DCU is in the video mode, the audio will switch from SIRIUS radio to the Backseat TV, and the TV channel information and programming will be displayed on Audio Mode Operation the DCU. -
Page 23: Direct Tuning (Remote Control Only)
between Channel Name, Artist Name, and Song Title displays to preview what is playing on other channels before selecting one. (Figure 3) To exit this mode without changing to a new channel, press and hold the DISPLAY (diSP) button for 1½ seconds. Channel Name 1 Channel Name 2 Channel Name 3... -
Page 24: Recalling Channel Presets
Select the channel you want to preset by pressing the + or – button to move up or down through the channels. When the channel is selected, hold the numbered preset button in which you want the channel stored for at least 1½ seconds. You will hear a beep and the preset bank number will indicate the memory location to which the channel has been stored. -
Page 25: Memory (Memo) And Song-Seek (S-Seek) Functions (Audio Mode Only)
CH NAME 12:00 Preset Tune Mode Channel Name 1 Channel Name 2 P.TUNE Channel Name List Display Channel Name 3 Channel Name 4 Artist Name 1 Artist Name 2 P.TUNE Artist Name List Display Artist Name 3 Artist Name 4 Song Title 1 Song Title 2 P.TUNE Song Title List Display... - Page 26 To store a song title, artist name, or a sports event: Song Titles/Artist Names: While at the Default display screen, momentarily pressing and releasing the memo button stores the current program data information in memory. A Song Stored or Artist Stored pop-up screen, followed by a X Used / Y Empty screen will appear for 1 and 2 seconds respectively, X being the total number of listings saved in memory, and y being the total number of memory listings still available for storage.
- Page 27 CH NAME 12:00 Artist Nmae Replace Cancel Song Name figure 12 figure 12 replace: The list of stored memory items will be displayed. (Figure 13) Replace Artist 1 Artist 2/Song 2 Artist 3/Song 3 figure 13 figure 13 Use the + or – buttons to highlight the programming that you would like to over- write with the new artist name, song title or sports game.
-
Page 28: Video Mode Operation
(Figure 1) The power button only controls the Backseat TV audio and video (to turn it on and off) and does not affect the operation of the SIRIUS satellite radio. To change the TV channel, use the ch up and down buttons on the video remote con- trol. -
Page 29: Activating Backseat Tv
Displays your 12 digit SIRIUS ID (SID). (Figure 2) The SID is unique to your SCV1 and is required to activate your service. It is recommended that you write this number in the space provided on the last page of this guide. -
Page 30: Menu Options
Sirius ID SID 000123456789 figure 2 figure 2 To exit this option, press the SeleCT or menu button. Fm transmitter The FM transmitter can be turned On/Off and the FM channel that the SCV1 transmits on can be changed with this option. (Figure 3) If you are using the FMDA, the FM transmitter must be turned on, and the channel on your headunit must be set to the same FM channel as the SCV1. -
Page 31: Settings
Sports Alert allows you to store your favorite sports teams in memory. The SCV1 will constantly scan the SIRIUS channels and will sound an alert when a team you stored in memory is playing, or when there is a score update for a team, depending on which option you have chosen for the team. - Page 32 11 figure 11 When the SCV1 is powered in SIRIUS radio mode, and Alert is set to On, it will sound an alert when the team you have chosen is playing a game. To exit the Sports Alert menu, press the menu button.
- Page 33 memory options The Auto Memory Search feature controls whether a channel highlighted in a list will be immediately tuned, or whether the SeleCT button needs to be pressed before the channel will be tuned. When this feature is on, the channel is immediately tuned when it is highlighted in the list.
- Page 34 (Figure 17) Use the + and – buttons to highlight On or Off and press the SeleCT button. (Figure 18) Power On/Off Tone figure 18 figure 18 To exit the Audio Settings menu, press the menu button. Confirmation Tone An audio tone alert can be set to confirm when presets are stored and for S-Seek alerts.
- Page 35 Lock / Unlock Confirm Code _ _ _ _ figure 22 figure 22 If you should exit without entering a code, you will be prompted to set a code next time you attempt to lock a channel. Lock/Unlock Channels To lock or unlock channels Use the + and –...
-
Page 36: Clock Settings
Daylight Savings Time figure 28 figure 28 Note: The time data for the SCV1’s clock is provided via the SIRIUS signal, and will update based on the data received from SIRIUS. Clock Format To change the clock display format to a 12 hour or 24 hour format: Use the + and –... -
Page 37: Signal Indicator
To exit the Clock Settings menu, press the menu button. signal inDiCator The signal indicator menu displays the strength of the SIRIUS signal from each satel- lite antenna and also from terrestrial (ground) transmitters for each of the two anten- nas. -
Page 38: Factory Default
FaCtory DeFault The Factory Default option will restore most every feature to the original factory set- tings. To set the SCV1 back to the factory defaults: Use the + and – buttons to select Yes and press the SeleCT button to restore all settings to the settings from the factory. -
Page 39: Troubleshooting
Troubleshooting Symptom Solution SCV1 does not power Blown fuse, or the power cable is not properly connected. Check for a bad fuse and check power cable connection One or both satellite antennas are not connected to the Antenna Not Detected Tuner Check the satellite antenna connections. -
Page 40: Sirius Id
Connector Type ........... SMB Specifications SIRIUS ID (4.49” x 1.58” x 0.73”) Write down the SIRIUS ID (SID) of your SIRIUS SCV1 in the space provided below. (6.47” x 3.65” x 1.50”) SID: ___________________________________ (1.61” x 4.09” x 0.59”) (2.17”... - Page 41 SIRIUS Customer Service: 1-888-539-7474 customercare@sirius-radio.com SIRIUS Satellite Radio Inc. 1221 Avenue of the Americas New York, NY 10020 1-888-539-7474 http://www.sirius.com...
- Page 42 SCV1(SBTV091807a) 00.ABCD1.001...
Need help?
Do you have a question about the SC-V1 and is the answer not in the manual?
Questions and answers