Advertisement
Safety Instructions
To avoid an electric shock or injury, read and follow the instructions. If at all unsure seek advice from a suitably competent and qualifies person before use. Retain instructions for future reference.
- Check the meter and leads before use, if damaged do not use. Ensure insulation around leads and connectors are not damaged. This product has no serviceable parts
- Do not use in area where there is flammable vapour or gas
- Do not use above the marked voltages
- When measuring current, turn off the circuit before using the meter
- Keep fingers behind the fingers guards on the probes and remove probes before replacing the battery. Do not use without the battery cover. Replace battery when the low battery indicator appear
- Connect the common test lead before the live test lead, when disconnecting, disconnect the live lead first
![]()
When working above 30V AC, 42V peak or 60V DC as these pose a shock hazard. Do not measure voltages above 500V in category 1 installations

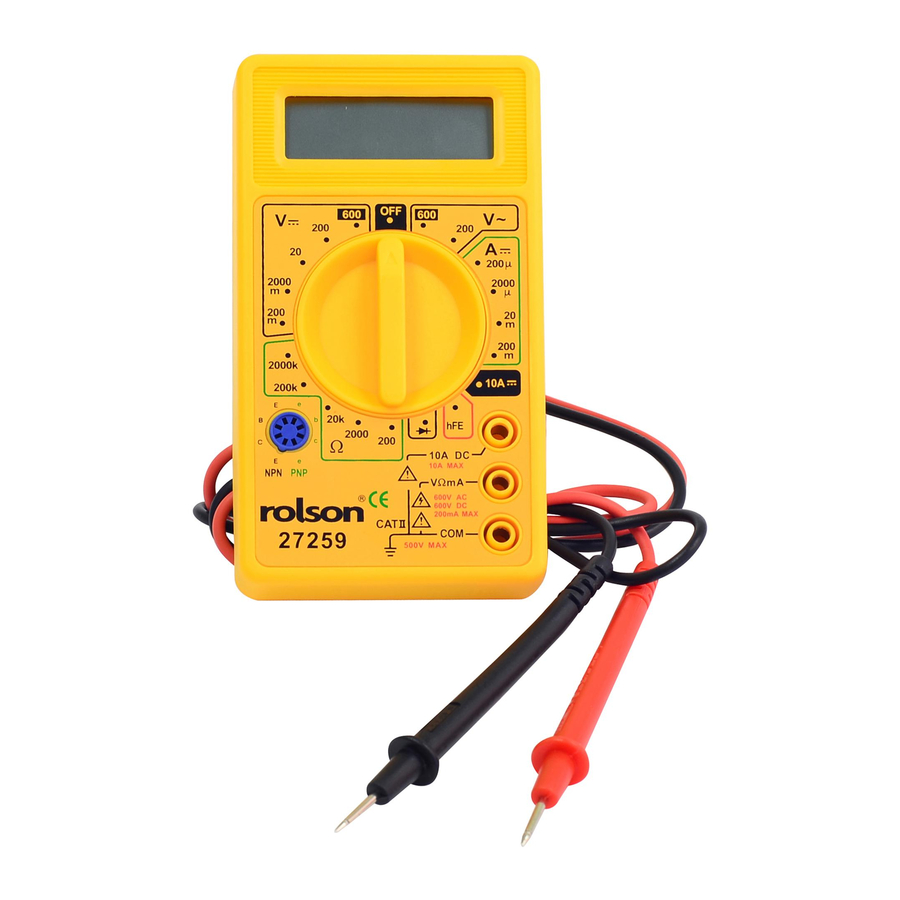
INTRODUCTION

- Switch
Our DMM adopt rotational switch which situated at the middle of the front case.
It is used for the selection of FUNCTION, RANGE AND POWER ON - OFF.
In order to save energy, please turn the switch to "OFF" position when not in use. - Display
3 12mm Height LCD Display. - "COM" Jack
Common Jack - "VΩmA" Jack
Voltage, resistance, no more than 200Ma, current and battery input test jack, 50Hz sine wave output jack. - "10A" Jack
For the input of more than 200mA current
FEATURES
Display: 3 LCD With Maximum Display 1999.
Polarity: Auto Polarization
Overrange: Maximum Display "1"
Working Environment: Temp. 0 - 40˚C Relative
Storing Environment: - 15 - 50˚C
Battery: 9V /hFE Jack
High Voltage Symbol: DC 1000V or AC 750V range will show  high voltage symbol "HV"
Low Voltage Indication: Left side of LCD will show or BAT symbol.
Weight: 126g Not Include Battery III.
TECHNICAL SPECIFICATION
Accuracy: +a% Reading + No. Of Digits
Guaranteed For 1 Year.
Environmental Temperature: 23˚C + 5˚C
Relative Humidity: <75%
- DC Voltage:
| Range | Resolution | Accuracy |
| 200mv | 100uv | ±0.5% of Rdg ±2 Digit |
| 2mV | 1mV | |
| 20mV | 10mV | |
| 200V | 100mV | |
| 1000V | 1V | ± 0.8% of rdg ±3 Digit |
Input impedance: 1M
Overload protection: DC or AC peak value of 1000V.
- DC Current:
| RANGE | RESOLUTION | ACCURACY |
| 200uA | 100nA | ±1% of rdg ±2D |
| 2000uA | 1uA | |
| 20mA | 10uA | |
| 200mA | 100uA | ±1.2% of rdg ±2D |
| 10A | 10mA | ±2% of rdg ±2D |
Overload protection: 02A/250V fused 10 A range not fused.
- AC Voltage:
| RANGE | RESOLUTION | ACCURACY |
| 200V | 100mV | ±1.2% of rdg ±10D |
| 1000V | 1V |
Frequcucy range: 45Hz to 400Hz
Overload protection: AC 750V rms
Indication: Average value(rms of sine wave.)
- Resistance:
| RANGE | RESOLUTION | ACCURACY |
| 200Ω | 100mΩ | ±0.8% of rdg ±20D |
| 2000Ω | 1Ω | |
| 20KΩ | 10Ω | |
| 200KΩ | 100Ω | |
| 2000KΩ | 1KΩ |
Overload protection: 250VDC or AC rms. Less than 10 sec.
Maximum open circuit voltage: 2.8V
- Transistor hFE:
Vce approximately 2.8V,1b approximately 10A. Display show approximately hFE 0-1000. - Dlode and Audible Continulty:
Diode: Testing voltage approx. 2.4V, current 1.5Ma. indicate forward diode approx. value.
Buzzer: Sounds when measure less than 70 ± 20. - Battery Test:
| RANGE | CURRENT CONSUNED |
| 1.5V | 50mA |
| 9V | 5mA |
OPERATION INSTRUCTION
- DC Voltage Measurement V(DCV):
- Connect RED test lead to "V mA" jack, BLACK test lead to "COM" jack.
- Set the FUCTION switch to the desired V(DCV) position. If not sure, set to the highest range.
- Connect the test leads across the source or load under measurement.
- DC Current Measurement A (DCA):
- Connect the RED test lead to "V mA" jack when the current is less that 200 mA and to "10A" jack when the current is larger than 200 mA. Connect the BLACK test lead to the "COM" jack. Set the FUNCTION switch to the desired DCA position. Connect the test leads across the source or load under measurement.
- AC Voltage Measurement V (ACV):
- Connect the RED test lead to "V mA" jack and BLACK test lead to the "COM" jack.
- Set the FUCTION switch to the desired ACV position3.3 Connect the test leads across the source or load under measurement.
- Resistance Measurement:
- Connect the RED test lead to "V mA" jack and BLACK test lead to "COM" jack.
- Set the FUNCTION switch to the OHM position.
- Connect the test leads across the resistor under measurement.
- When measuring the resistance, the power should be turned off and in short circuit staues by connecting the two test leads.
- Transistor hFE Measurement:
- Set the FUNCTION switch to the hFE position.
- Insert the E.B.C. of the PNP or NPN transistor to the proper jack in the socket on the front panel.
- Diode and Audible Continuity Measurement
- Connect RED test lead to the "V mA" jack and BLACK test lead to the "COM" jack.
- Set the FUNCTION switch to the
![]() position and connect the RED test leads to the ANODE of diode and BLACK to CATHODE. The display will the show the approx. Forward voltage of the diode. If connect the test leads on the other way round, the display will show an overrange status"1"
position and connect the RED test leads to the ANODE of diode and BLACK to CATHODE. The display will the show the approx. Forward voltage of the diode. If connect the test leads on the other way round, the display will show an overrange status"1" - Buzzer sounds if the resistance between the two probes less than approximately 70.
- Battery Test:
- Connect RED test lead to the "VΩmA"jack and BLACK test lead to the "COM" jack.
- Turn the FUNCTION switch to the BATT position. Connect the test lead across the battery under measurement. The display will show the voltage of the battery.
 position and connect the RED test leads to the ANODE of diode and BLACK to CATHODE. The display will the show the approx. Forward voltage of the diode. If connect the test leads on the other way round, the display will show an overrange status"1"
 BATTERY AND FUSE REPLACEMENT
When the voltage of the battery is low, the symbol  "BATT" will appear on the display. Then the battery should be replaced. You should check the fuse when no measurement could be taken for current using mA range.

Documents / ResourcesDownload manual
Here you can download full pdf version of manual, it may contain additional safety instructions, warranty information, FCC rules, etc.
Advertisement

Need help?
Do you have a question about the 27259 and is the answer not in the manual?
Questions and answers