Bang & Olufsen BeoCenter 2 - Sound System Manual
- Service manual (64 pages) ,
- Repair manual (55 pages) ,
- User manual (44 pages)
Advertisement
- 1 Introduction
- 2 How to use your music system
- 3 How to read the menu symbols
- 4 How to use the menus
- 5 First-time setup
- 6 Call up additional sources, functions and menus
- 7 Tune in and edit radio programs
- 8 Audio CD settings
- 9 Make your music system start and stop automatically
- 10 Make sound settings
- 11 Make option settings
- 12 DVD operation
- 13 Use the Beo4 remote control
- 14 Documents / Resources
Introduction
This Guide explains how to operate your BeoCenter 2.
It describes operation of BeoCenter 2 both with and without DVD function. This means that information about DVD functions is included in the Guide whether your BeoCenter 2 is equipped with DVD or not.
lnstructions regarding setting-up and the Socket unit are found in the separate Guide included with the Socket unit.
How to use your music system
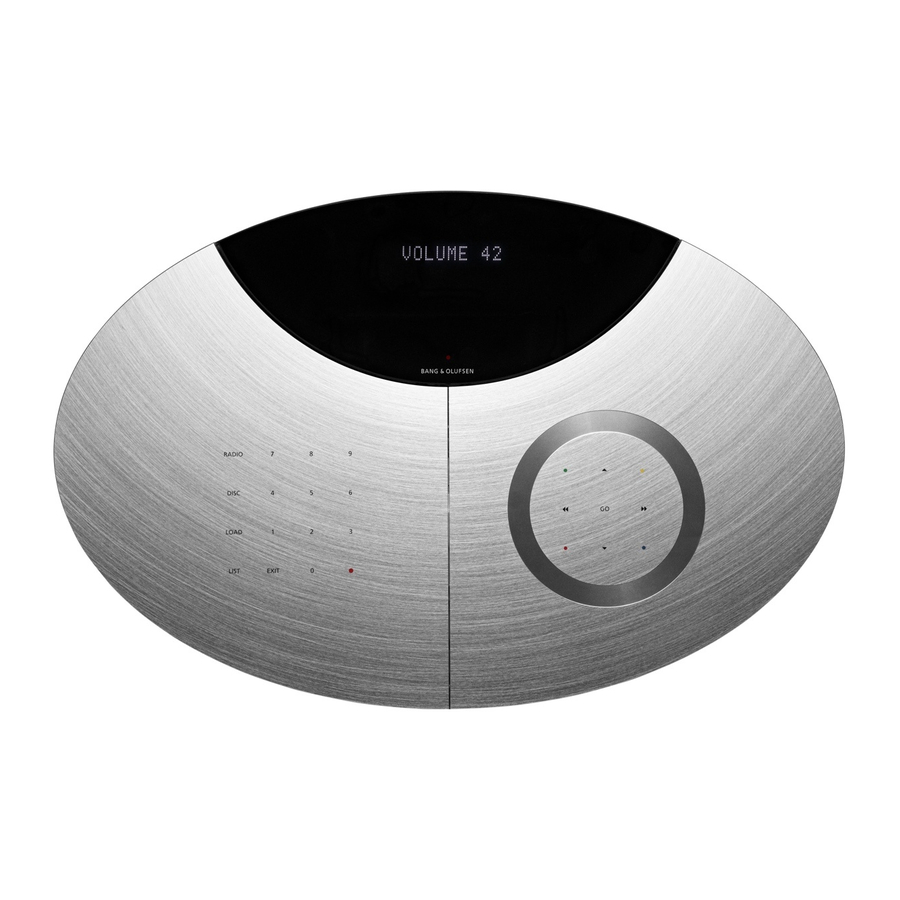
Your music system is designed for close-up operation. Use the music system to listen to radio or CD. Just press a single button on the close-up operation panel to listen to the sound of your choice.

| RADIO | Switches on the radio |
| DISC | Starts playback of a loaded disc |
| LOAD | Opens and closes the disc compartment |
| LIST | Brings up extra sources, functions and menus in the display |
| 0-9 | Selects radio programs, tracks on a CD, or N.MUSIC* tracks, or menu items |
| EXIT | Leaves the menu system |
 | Switches BeoCenter 2 to standby. Press twice to switch the entire system to standby |
 | Searches through a CD, steps between folders in N.MUSIC mode*, and moves the cursor sideways in menus |
 | Steps between radio programs, tracks on a CD or in N.MUSIC mode* and moves the cursor up or down in menus |
| GO | Enters fill-in menus, confirms and stores choices in menus. While listening to a CD, press to pause playback, press again to resume playback |
 | Used for selected DVD functions, for example to bring up the subtitle menu while watching a DVD. These buttons are used only if your BeoCenter 2 is equipped with DVD* |
*NOTE! The coloured buttons are also used when listening to N.MUSIC, refer to the BeoPort Guide for further information.

Socket for headphones
When headphones are plugged in, the speakers, connected to your music system, are muted.
Loading a disc
Press LOAD to open the disc compartment.
When the disc compartment is open, load the disc* with the label facing you.
Press LOAD again to close the disc compartment or just press DISC to play the loaded disc. Note that depending on the status of the audio system, this may take a while.
*Make sure you place the disc inside the area created by the four guide tabs! If the disc is placed on top of one or more of the tabs, the loader can not retract and close properly. This may cause damage to the system or to the disc.
The status display

The extended status display is not switched on permanently. Only the first line is displayed all the time. When you operate the music system, the display shows additional information, such as track time and CD name briefly. If you change the display setting to EXTENDED, the display always shows current status and additional information.
Indicator light
The indicator light below the display flashes when you touch a button. The light shines continuously when the music system is in standby.
NOTE! BeoCenter 2 can also be operated with the Beo4 remote control.
How to read the menu symbols
The menu system of BeoCenter 2 gives you several options. Choose extra functions and features via the menus or make your own setup preferences.
The current settings for the functions are shown in the menu, for example 'RANDOM – ON or OFF'.
The symbols explained to the right help you find your way around the menus. Use the arrow keys to move around the menu system. To enter a fill-in menu, press GO or ![]() .
.
Whenever you leave a menu by pressing EXIT, the system detects if any changes have been made and asks you whether or not to store them.
If you try to access a menu which requires that a specific source is switched on, the display informs you what to do. If your system is set up in a Audio/Video system, some settings must be made on the connected television or a connected radio.
Menu level symbols
![]() One dot in front of a menu indicates that you have moved down one level in the menu system.
One dot in front of a menu indicates that you have moved down one level in the menu system.
![]() Two dots in front of a menu indicates that you have moved down two levels in the menu system.
Two dots in front of a menu indicates that you have moved down two levels in the menu system.
![]() Three dots in front of a menu indicates that you have moved down three or more levels
Three dots in front of a menu indicates that you have moved down three or more levels
The arrow cursor
![]()
 An arrow in front of a menu indicates the position of your cursor as well as the availability of submenus, to move to the next level, press
  or GO.
 A hollow arrow indicates that these particular menus are not available at the moment.
The square cursor

 A square in front of a menu name indicates the position of your cursor and that this is a fill-in menu. To enter these menus, press or GO.
 A hollow square indicates that settings for these particular menus are not available at the moment.
How to use the menus
How to change a setting

Press LIST to bring up the menu system
Press ![]() to move down to SETUP
to move down to SETUP
Press ![]() or GO to enter the SETUP menu
or GO to enter the SETUP menu

Press ![]() to move down to SOUND
to move down to SOUND
Press ![]() or GO to enter the SOUND menu
or GO to enter the SOUND menu

Press ![]() or GO to enter the PRESET VOLUME menu
or GO to enter the PRESET VOLUME menu

Press ![]() or
or ![]() to adjust the PRESET LEVEL up or
to adjust the PRESET LEVEL up or
Press GO to store your settings directly, then STORED appears in the display

Press EXIT to leave the menu
– If you choose not to store your settings, press ![]() to move the cursor to IGNORE and press GO, or just press EXIT again
to move the cursor to IGNORE and press GO, or just press EXIT again

STORED appears in the display
Main menus
| LIST | Enters the menu system |
 | Moves up or down |
 | Enters a fill-in menu or sub-menu |
 | Backs up through menus |
| GO | Enters a fill-in menu or sub-menu |
| EXIT | Exits the menus |
Fill-in menus
 | Adjusts up or down, selects or deselects in menus |
| GO | Stores settings and leaves the menu |
 | Moves between settings or brings up additional information in the display |
| EXIT | Exits a menu, press twice to exit without storing |
First-time setup
Once your music system is installed and switched on for the first time, you are guided through the first-time setup procedure. The first time setup consists of:
- Menu language selection
- Auto tuning of radio programs
- Setting the time and date
- Adding to the list of sources and functions which appear in the display when you press LIST
- Setting display preferences

The FIRST-TIME SETUP menus appears automatically when you switch the system on for the first time.
What's on the FIRST-TIME SETUP menus
SELECT LANGUAGE...
Select your preferred language for the menus in the display from the list of available languages.
AUTO TUNING...
Let the music system tune in all available FM and DAB* radio programs for you.
SET CLOCK...
Set the built-in clock to the correct time and date.
LIST OPTIONS...
Add sources, functions and menus to the list which appears in the display when you press the LIST button.
DISPLAY SETUP...
Select the display reading, you prefer for radio, CD and status respectively.
Useful hints
All the settings you make during first-time setup, can be changed via the OPTIONS menu at any time. For further information on the OPTIONS menu refer to the instructions.
If your music system is connected to a Bang & Olufsen television or radio with clock function, the SET CLOCK menu does not appear. You set the clock via the television or radio.
*NOTE! DAB (Digital Audio Broadcast) radio programs are only available if they are broadcast in your area and your music system is equipped with the built-in DAB module. For further information about tuning DAB programs, refer to the chapter 'Tune in and edit radio programs'
Call up additional sources, functions and menus
The options, which appear when you press LIST, are additional sources, functions or menus.
From the factory, the only menu entry available when you press the LIST button is SETUP. To switch on additional sources or create shortcuts to frequently used functions, such as CD RANDOM or TIMER, add these sources or functions to the list.

Press the LIST button to call up additional sources, functions and menus. The contents of the list depends on what you have added to it.
N.MUSIC...
Select to listen to N.Music.
N.RADIO...
Select to listen to N.Radio.
A.AUX...
Select to access equipment connected to the AUX socket. This only activates the AUX socket.
CD RANDOM (ON/OFF)...
Select to activate or deactivate the random playback function for CD.
CD REPEAT (ON/OFF)...
Select to activate or deactivate the repeated playback function for CD.
CD EDIT (ON/OFF)...
Select to activate or deactivate playback of the edited series of the loaded
CD. TIMER (ON/OFF)...
Select to activate or deactivate the Timer function.
SHOW CLOCK...
Select to call up the clock briefly in the display.
SETUP...
Select to call up the setup menu, for details on the contents of the setup menu, refer to the following pages.
Useful hints
You can select a menu by its number (1–9), or toggle a function on or off by pressing the appropriate number. If for example the function CD RANDOM ON/OFF is number 4 in the menu system, press 4 to toggle the function on or off.
You navigate in the menus by means of the arrow keys. You can also select a specific menu by means of the number keys. Press the EXIT button twice if you wish to leave the menu system without storing your settings.
If you add for example CD RANDOM to the LIST options, you actually create a shortcut to this function. For further information about special CD playback functions, refer to the instructions.
NOTE! If your BeoCenter 2 is set up in a Master Link system and a computer with BeoPort is connected, you can listen to N.Music or N.Radio via BeoCenter 2. For further information refer to the BeoPort Guide.
Tune in and edit radio programs
Let the music system find available radio programs for you. You can store up to 99 radio programs.
Once a program is stored, you access it directly by keying in the program number or by stepping through all the stored programs.
You can rearrange the order in which tuned radio programs appear or delete them via the MOVE PROGRAM or DELETE PROGRAM menus.
A name, transmitted by the broadcaster, may be shown in the display, but you can name the radio programs yourself.
To store an added program, you must enter the STORE PROGRAM menu.
If your music system is equipped with the built-in DAB module and DAB programs are broadcast in your area, you can store digital radio programs as well.

To enter the RADIO menu, press LIST, enter the SETUP menu and then enter the RADIO menu.
What's on the RADIO menu
AUTO TUNING...
Use this menu to tune in all radio programs automatically. Only FM and DAB programs can be tuned in automatically.
UPDATE TUNING...
Use this menu to tune in new DAB programs. For further information, refer to the description on the opposite page.
MOVE PROGRAM...
Use this menu to change the order in which your tuned radio programs appear.
DELETE PROGRAM...
Use this menu to delete unwanted radio programs from the list of available programs.
ADD PROGRAM...
Use this menu to add new programs, name and store an added program.
EDIT PROGRAM (1–99)...
Use this menu to fine tune programs, name and store the relevant programs.
In the TUNE menu, accessible via both the ADD PROGRAM and EDIT PROGRAM menus, you can press and
and  to move between options, and press
  or
or  to change settings for an option. The options that are available depend on which band you are currently listening to: FM, AM or DAB. For example, the options for TUNE in the ADD PROGRAM menu for FM are:
FREQUENCY... Shows the current frequency.
Press or ![]() to start tuning.
to start tuning.
BAND...
Shows the current band. Select FM, AM or DAB.
FINE...
Fine-tune a tuned station.
STEREO...
Select YES for stereo sound.
DAB AERIAL ADJUSTMENT...
This menu contains an indicator bar. The length and colour of the bar indicate the strength of DAB signal reception and the risk of signal drop-out. Watch the indicator bar while you adjust your aerial. There is no sound while you adjust the aerial.
- The indicator bar extends rightward if signal strength increases, and reverses direction if it decreases.
- The indicator bar moves through a grey and a white field. The grey field to the left indicates that there is a significant risk of periodic signal drop-out. The white field to the right indicates that the risk of signal drop-out is minimal.
Note that you must select a channel number with a signal before adjusting the aerial. Check your DAB broadcasters' websites for channel numbers.
DAB DRC...
For certain DAB programs, you can adjust audio signal compression with the DRC (Dynamic Range Control) function. Compression compensates for sources of noise in your immediate surroundings.
In the DAB DRC menu...
There are twelve possible settings, with three values to guide you:
OFF (no compression)
NOM (recommended by the DAB provider)
MAX (maximum compression, twice that recommended by the DAB provider).
- Press
![]() or
or ![]() to adjust the setting. If you have adjusted audio signal compression and you are listening to a DAB program broadcast with DRC, 'DRC' appears in the lower right corner of the display. DAB DRC menu settings have no effect for programs not broadcast with DRC.
to adjust the setting. If you have adjusted audio signal compression and you are listening to a DAB program broadcast with DRC, 'DRC' appears in the lower right corner of the display. DAB DRC menu settings have no effect for programs not broadcast with DRC.
Update tuning of DAB programs
Digital Audio Broadcast (DAB) providers send programs in groups called ensembles*. A channel contains a single ensemble, and an ensemble typically contains 5–10 programs*.
When new DAB programs become available, you can tune them in with the update tuning function. This tunes in new programs and leaves previously stored programs unchanged.
When a DAB signal is found, all the programs in the signal are registered. When tuning is complete, you go through a list of the individual programs and select the ones you wish to store.
When tuning in new DAB programs...
- The available programs appear in the STORE DAB PROGRAM menu.
- Press
![]() or
or ![]() to move between programs.
to move between programs. - Press GO to store a program.
- If the STORE DAB PROGRAM menu is empty, or if you do not want to store more programs, press EXIT to leave the menu.
*Some DAB providers call an ensemble a 'multiplex', or call a program a 'service'.

DAB radio programs are broadcast in groups, or ensembles, located on channels.
Useful hints
Radio program names can contain up to 17 characters including numbers. When you name a program, choose characters by pressing ![]() . To delete a character you have entered, press
. To delete a character you have entered, press ![]() .
.
To change between upper and lower case letters, choose either the arrow pointing upwards or downwards in the menu.
If you have found a radio program but the reception is poor, you can fine tune it via the EDIT PROGRAM menu. You can also key in the exact frequency of a radio program and store it with a program number.
Radio text – text information about the current program and broadcaster – is supported by BeoCenter 2. You can set your system to display radio text via the DISPLAY menu. For further information, refer to the chapter 'Make option settings'.
If you tune in programs via the ADD PROGRAM or UPDATE TUNING menu, your previously tuned programs are left unchanged. They keep their program names, their order in the program list, and any special settings you may have stored for these programs. However, if you tune in programs via the AUTO TUNING menu, your settings for previously tuned programs are deleted.
About FM...
If the stereo signals are not strong enough to produce acceptable sound, the music system automatically switches to mono sound.
Audio CD settings
Additional CD functions are available via the AUDIO CD menu. This includes naming CDs, editing series of tracks and the random and repeat playback functions.
The random playback function plays all the tracks on the loaded CD in random order. The repeat playback function plays the loaded CD over and over – for up to 12 hours on end.
The random and repeat functions can be used in conjunction or separately.
If some of the tracks on an audio CD are not to your liking, you can edit the CD, so that only the tracks you select are played. Once you select a series of tracks, and activate the edit function, the music system plays the series of tracks you have chosen every time you play this CD.

To enter the AUDIO CD menu, press LIST, enter the SETUP menu and then enter the AUDIO CD menu.
What's on the AUDIO CD menu
THIS CD...
Use this menu to name or edit a loaded CD. By default, all tracks are selected when you edit a CD, so you must press to deselect each track you do not want.
ALL CDs (RANDOM, REPEAT, EDIT)...
Use this menu to activate the random or repeated playback functions for all CDs, and switch the edited playback function on or off.
Useful hints
You can only name a CD when it is playing. You can store a total of 200 CD names in your music system. Each name may contain up to 17 characters, including numbers.
If the CD name list is full, the music system will require you to delete a CD name before entering a new one. When you delete a CD name, you also remove the stored series of tracks with it, if you have edited the CD.
When you have edited a CD, the selected track are played in numerical order. But you can still listen to the entire CD, if you deactivate the edit function. You can also delete the series of tracks you have made, to always play the entire CD.
With the extended display switched on, you can see the CD name, track number and track time in the display. For further information on the extended display
If your BeoCenter 2 is equipped with DVD and connected to a television, and you wish to play a loaded disc with mp3 tracks, press DVD* on Beo4. This lets you navigate through tracks using the Disc Navigator menu. If you press CD or DISC, you can still play tracks and step between them, but you can not search through tracks, use the random playback function, or bring up the Disc Navigator menu.
*If your system is connected to a television with a built-in DVD player, press LIST to bring up DVD2 in the display and press GO to play the disc.
Make your music system start and stop automatically
You can make the music system start or stop playing at designated times throughout the day and week.
The music system remembers up to 8 such Timers. Set one to wake you up in the morning to the sound from either your favourite CD or radio program and another to switch the music system to standby at a specific time in the evening, or make individual Timers for workdays, weekends and holidays.
You can name your Timers for easy recognition and switch each of your Timers on or off individually.
You can change your Timers at any time.

To enter the TIMER menu, press LIST, enter the SETUP menu and then enter the TIMER menu.
What's on the TIMER menu
ON/OFF...
Use this menu to activate or deactivate each of your programmed Timers.
SOURCE...
Use this menu to select a source for your programmed Timer. If you select radio as your Timer source, select a program number too.
START/STOP...
Use this menu to enter the start and stop times of your Timer.
DAYS...
Use this menu to select which specific days of the week, this Timer should be activated.
NAME...
Use this menu to name your different Timers for easy recognition.
Useful hints
To stop the music system, make a Timer with standby as the source.
If you set a Timer for Monday, Tuesday and Thursday, the Timer will be repeated on these days only, every week.
If you have connected the music system to a Bang & Olufsen television or radio with Timer function, you must enter your Timer settings on the television or radio, as described in its Guide. If you want these settings to apply to BeoCenter 2 as well, you must activate the Timer function on BeoCenter 2.
If you want to make use of the Timer function, it is necessary that the built-in clock in the music system is set correctly.
Make sound settings
All sound levels are set to neutral values from the factory, but you can make your own sound adjustments and store them.
You can adjust the volume, bass and treble levels, or alter the balance between the left and right speaker.
If you store a volume level, your music system starts playing at this level every time you switch it on.
The music system also features a loudness function which you can activate or deactivate. The loudness function makes the music more dynamic. It compensates for the human ear's lack of sensitivity to high and low frequencies when listening to music at low volume.

To enter the SOUND menu, press LIST, enter the SETUP menu and then enter the SOUND menu.
What's on the SOUND menu
PRESET VOLUME...
Use this menu to preset a volume level for your music system. The maximum volume level that can be stored in this menu is 75.
ADJUST BALANCE...
Use this menu to adjust the balance between your speakers.
SET TONE (BASS, TREBLE, LOUDNESS)...
Use this menu to adjust bass and treble to your liking and switch the loudness feature on or off.
Useful hints
If you do not store the sound adjustments you make, the music system will return to the preset sound levels once you switch it off.
Volume level can always be adjusted via the closeup operation panel or the Beo4 remote control.
When the music system is connected to a Bang & Olufsen television, sound must be adjusted as described in the Guide for the television.
Make option settings
You can change the basic settings of your music system to your liking. The OPTIONS menu allows you to set the clock, switch the Timer function on or off, set DVD options* or choose language.
You can also set your preferences for the display and select the sources and functions which should appear

To enter the OPTIONS menu, press LIST, enter the SETUP menu and then enter the OPTIONS menu.
What's on the OPTIONS menu
SET CLOCK...
Use this menu to set the built-in clock to the correct time and date. – This menu only appears if your music system is not connected to a television.
ACTIVATE TIMER (ON/OFF)...
Use this menu to switch the Timer function on or off. Select ON to include speakers connected to the music system in a Timer.
SELECT LANGUAGE...
Use this menu to select your preferred language for the texts in the display from the list of available languages.
DISPLAY SETUP...
Use this menu to select the type and amount of display information for radio and CD. The settings for RADIO and CD determine what is shown at the top of the display, such as radio text, or a CD name. The setting for STATUS determines whether display information is shown temporarily – that is, during use of the close-up operation panel – or permanently.
LIST OPTIONS...
Use this menu to add functions, features and menus to the list which appear when you press LIST.
DVD OPTIONS...
Use this menu to select settings for DVD.
Useful hints
From the factory, the only menu entry available when you press LIST is SETUP.
If you change the STATUS DISPLAY from DEFAULT to EXTENDED, the information, which is otherwise only briefly shown in the display, will be shown continuously.
You can call up the time in the display. Press the LIST button on BeoCenter 2 and select SHOW CLOCK, or press the LIST button on the Beo4 remote control and select CLOCK.
When the system is connected to a Bang & Olufsen television or radio, you must set the clock as described in the Guide for the television or radio.
When your music system is connected to a television, Timers are programmed via the television, but if you want them executed on BeoCenter 2, you must set the ACTIVATE TIMER menu to ON. This requires that you have connected speakers to BeoCenter 2.
If by accident, you have chosen a language you do not want, you can enter the language menu by pressing LIST, move down to the last menu entry, press  , then press 5 and then 3.
*Appears in the menu only if your BeoCenter 2 is equipped with DVD.
How to use the pincode system
You choose whether or not to activate the pincode system. The pincode system is deactivated when you delete your pincode.
The use of a pincode means that if your music system has been disconnected from the mains for more than approximately 30 minutes, it can only be activated again by switching it on and keying in your pincode via the close-up operation panel.
If the pincode is not entered, the music system automatically switches to standby after 3 minutes.
You can change your pincode, but it is only possible to change it five times within a period of 3 hours.
If you enter the wrong pincode or Mastercode, or if you try to change the pincode more often than possible, the message PINCODE ERROR appears in the display.

To call up the pincode menu, press LIST and then press ![]() twice followed by EXIT.
twice followed by EXIT.
What's on the PINCODE menu
NEW PINCODE...
Use this menu to enter or change your pincode.
DELETE PINCODE...
Use this menu to deactivate the pincode system.
To open for Mastercode input
- While the music system asks for your pincode, press
![]() three times to open for Mastercode input.
three times to open for Mastercode input. - Enter the Mastercode.
- Once you have entered the Mastercode, the pincode system is disabled and the music system is ready for use. To activate the pincode system again, you must enter a new pincode.
Useful hints
If you enter a wrong pincode, you get four more attempts to key in the code, after which the music system switches to standby – you must leave it in standby. The system cannot be switched on again for three hours.
If PIN appears in the display the first time you activate a function, and you have not received a PIN code from your Bang & Olufsen retailer, contact your retailer to receive a PIN code.
Should you forget your pincode, please contact your Bang & Olufsen retailer who will assist you in getting a Mastercode from Bang & Olufsen. You need the Mastercode to reactivate your music system.
DVD operation
This chapter is only relevant if your BeoCenter 2 is equipped with DVD. Use the Beo4 remote control to operate the DVD.
While playing a DVD, you can search at varying speeds, step through the disc, or bring up a DVD disc menu.
You can always resume playback of the loaded DVD at the point where you left off provided that you have just stopped playback of the DVD by pressing STOP twice, not three times.
Some discs do not register, whether the DVD player is in "play mode" or "menu mode" when being operated. In these few cases, you must press the yellow button before sending a command to the player; in menus, for example, you must press the yellow button and then GO, to store a selection.
If your BeoCenter 2 is set up in a system with speakers connected to the BeoCenter 2, you can listen to radio while watching DVD. In such a setup, the operations via the close-up operation panel are directed at the radio.
Play and change chapters on a DVD...
| Press to start playing a DVD | DVD |
| Press to step between chapters. Press repeatedly to jump to another chapter on the disc |  |
| Enter the chapter number to step directly to a chapter | 1 – 9 |
| Press to cue backwards or forwards during playback. |  |
| Press to resume playback | GO |
Pause, slow playback or stop playback of a DVD...
| Press to pause playback | STOP |
| Press for playback in slow motion either forwards or backwards | |
| Press again to stop playback completely, or... | STOP |
| ... press to resume playback, or... | GO |
| ... press a third time to return to the beginning of the disc | STOP |
Use DVD on-screen menus...
| Press the red button to bring up the audio language menu*. Press repeatedly to switch between the available options. When you have made your selection, the menu disappears |  | |
| Press the green button to bring up the subtitle language menu*. Press repeatedly to switch between the available options. When you have made your selection, the menu disappears |  | |
| Press the blue button to bring up the disc menu |  | |
In the disc menus...
| Use the arrow keys to move between options in the menus |  |
| Press to enter your choice or setting | GO |
*Not all discs have separate subtitle and audio language menus, in those cases you must use the main or disc menu.
While DVD is selected...
| Press the yellow button, then 1 to bring up the disc's own top menu* |  |
| Use the arrow keys to move between options in the menus |  |
| Press to enter your choice or setting | GO |
| Press the yellow button, then 2 to bring up the status display menu. Press 2 again to change to the next display. Press 2 a third time to remove the status display |  |
| Press the yellow button, then 3 to bring up the DVD setup menu. This is described on the next page |  |
| Press the yellow button, then 4 to zoom in on the picture. Press 4 to increase the zoom factor. Press 4 a third time to exit the zoom feature |  |
| Press the yellow button, then 5 to bring up the camera angle menu. Press 5 to switch between the available options. When you have made your selection the menu disappears. However, if you have switched on the angle indicator in the disc setup menu, the icon remains on the screen. |  |
*Not all discs contain a top menu.
To play other disc formats
BeoCenter 2 is designed to play back different disc formats. Supported formats are:
- DVD–Video
- Audio CD
- Video CD
- CD–R/RW
- DVD–R/RW, provided that these are recorded using the DVD Video format and the disc is finalized.
- Discs containing mp3 files are supported, if the sampling frequency is set to either 32, 44.1 or 48 Khz.
- WMA (Windows Media Audio) When playing discs with mp3 or WMA files, use
![]() and
and ![]() to step between tracks, and
to step between tracks, and ![]() and
and ![]() to wind. Note that you can only wind through mp3 tracks if you started playback by pressing DVD on Beo4. Bring up the Disc Navigator menu and browse in the content. Press EXIT to remove the list.
to wind. Note that you can only wind through mp3 tracks if you started playback by pressing DVD on Beo4. Bring up the Disc Navigator menu and browse in the content. Press EXIT to remove the list. - JPEG files up to a resolution of 3072 x 2048. When playing discs with JPEG files, use the yellow button, then
![]() and
and ![]() ,
, ![]() and
and ![]() to rotate the picture.
to rotate the picture. - DivX versions 3, 4, 5 and DivX VOD are supported.
In general, playback of data generated files is only possible if the files are recorded onto a CD-R/RW.

How to use the DVD menus...
- Press the yellow button, then 3 to bring up the DVD main menu.
- Press
![]() or
or ![]() to move to the menu you wish to enter and press GO.
to move to the menu you wish to enter and press GO. - Use the arrow keys;
![]() ,
, ![]() ,
, ![]() and
and ![]() to move between menus and settings.
to move between menus and settings. - Press GO to store your choice.
- Press EXIT to leave on-screen menus.
 or
or  to move to the menu you wish to enter and press GO.
 and
and  to move between menus and settings.
You must load a disc in BeoCenter 2 to be able to access the menus.
NOTE! These menus are only available if your BeoCenter 2 is equipped with DVD.

What's on the Play mode menu
The Play mode menu allows you to make selections for playback. The following options are available:
A–B Repeat...
The A–B repeat function allows you to specify two points on a disc that form a loop to be played over and over.
Repeat...
The repeat function allows you to repeat a title or a chapter on a disc over and over.
Random...
The random play function allows you to play titles or chapters on a disc in random order.
Search Mode...
The search mode function allows you to search through a disc, either by searching for a specific title or chapter, or by searching for a moment in elapsed time on a disc.

What's on the Initial Settings menu
The Initial Settings menu enables you to choose your preferred settings for DVD playback. Settings in this menu cannot be entered during playback. The following options are available:
Digital Audio Out...
Choose the sound output for your system. Options for Dolby Digital Out are: Dolby Digital or Dolby Digital > PCM (stereo). Options for DTS Out are: DTS and DTS > PCM (stereo).
Video Output ...
This menu allows you to select a picture format suitable for your television; Options are 4:3 (Letter Box), 4:3 (Pan & Scan) and 16:9 (Wide). In '4:3 (Letter Box)' the film is shown with black bars at the top and bottom of the screen. Component Out; Do not change, unless you change AV Connector Out setting to Video. AV Connector Out, Set for best quality; RGB.
Language ...
The language menu allows you to store your preferred language for audio, subtitle and the disc menu, and to decide whether or not available subtitles should be shown during playback. If the languages you choose in this menu are available on the loaded disc, they will be used.
Some DVDs will require you to choose a subtitle language from a disc menu, even if you have previously selected a default subtitle language from the 'Language' menu.
Display ...
The display menu allows you to select the language of the DVD player menus, to decide whether or not operation displays should be shown on the screen, and whether the angle indicator should be shown. The angle indicator is only available if the disc contains the alternate camera angle feature.
Options ...
Some DVDs feature a Parental Lock level. If you specify a level lower that the one contained on the disc, the disc will not play, unless your pincode is entered. Some discs also support the Country Code feature. This means that the player does not play certain scenes on a disc, depending on the Country Code and the Parental Lock level you set. Before you can set the Parental Lock level or the Country Code, you must enter a pincode. You can change the pincode at any time.
If you forget your pincode, you must enter the DVD OPTIONS menu and reset the PARENTAL LOCK. The function is then deactivated. The DVD OPTIONS menu is described to the right.
DivX VOD is used for video on demand. Use the menu to generate a DivX VOD registration code which you submit to your provider. Contact your DivX VOD provider for further instructions.
The DVD OPTIONS menu on BeoCenter 2
It is necessary to enter the following settings in the DVD OPTIONS menu on BeoCenter 2.

What's on the Disc Navigator menu
SCART SENSE OUT...
If your system is connected directly to a television from the BeoVision MX-series (that is 4000/4002, 6000/7000), an AV 9000, or to a Bang & Olufsen television without a 21-pin SCART socket, choose OFF. If your system is connected to a BeoVision MX via an AV 2 Expander box, or if it is connected to any other Bang & Olufsen television, choose ON.
DVD SOUND...
If you want DVD sound via the speakers connected to the music system, choose PL/SCART.
If you want DVD sound via the television speakers only, choose SCART, even if your television has no 21-pin SCART socket.
SCART VIDEO OUT...
If your system is connected to an AV 9000, BeoVision LX, BeoVision MS or BeoVision MX 4000/4002/6000/7000 television, choose CVBS.
If your system is connected to a BeoVision Avant 50 Hz television, or to a Bang & Olufsen television without a 21-pin SCART socket, choose Y/C.
If your system is connected to any other television, choose RGB/CVBS.
PARENTAL LOCK...
If you have forgotten your DVD pincode or you wish to reset the code, enter this menu and select YES.
Use the Beo4 remote control
If your music system is used together with other Bang & Olufsen products, refer to the Guides delivered with these products for further explanation on their operation.
In order to display the relevant extra 'buttons' on the Beo4, you must add them to the Beo4 list: Add RANDOM and REPEAT to Beo4 to use these functions. Add A.AUX to be able to switch on any other source connected to the AUX-socket. Refer to Beo4's own Guide for further information.

 | Steps through your radio programs, or tracks on a CD. When RANDOM or REPEAT is shown in the Beo4 display, press to activate the function, and press to deactivate it |
 | Searches through a CD, or moves left or right in menus |
| GO | Resumes playback, activates the source and accepts settings, or activates a function shown in the Beo4 display, such as CLOCK |
LIST  | Displays extra 'buttons', such as RANDOM, REPEAT or N.MUSIC* – Not the same as LIST on BeoCenter 2! |
| STOP | Pauses CD playback at any time or moves back one level in menus |
 | Turns the volume up or down. Press in the middle to mute speakers, press again to restore sound |
| RADIO | Switches on radio |
| DVD | Switches on DVD – if your BeoCenter 2 is equipped with DVD |
| CD | Switches on CD |
| 0-9 | Enters radio program numbers, CD track numbers or DVD chapter numbers. Use the number keys to select a numbered menu item |
| MENU | Enters the menu system – Corresponds to the LIST button on BeoCenter 2 |
 | Used for selected DVD functions, for example to bring up the subtitle menu while watching a DVD. These buttons are used only if your BeoCenter 2 is equipped with DVD* |
| EXIT | Leaves the menu system |
 | Switches your music system to standby |
*NOTE! The coloured buttons are also used when listening to N.MUSIC, refer to the BeoPort Guide for further information.

Documents / ResourcesDownload manual
Here you can download full pdf version of manual, it may contain additional safety instructions, warranty information, FCC rules, etc.
Advertisement


Need help?
Do you have a question about the BeoCenter 2 and is the answer not in the manual?
Questions and answers