
Related Manuals for Blue Demon TRUE VIEW PANO V2

Summary of Contents for Blue Demon TRUE VIEW PANO V2
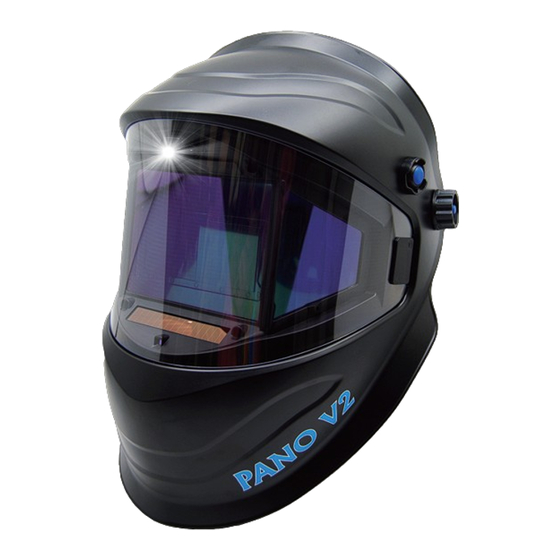
- Page 1 AUTO DARKENING WELDING HELMET PANO V2 TRUE VIEW TRUE COLOR Digital Product 180° SIDE VIEW...
-
Page 2: Table Of Contents
TRUE VIEW PANO V2 *TRUE COLOR vision on the work piece both prior and during welding, which means improved quality and higher efficiency. *Overall-process protection against ultraviolet (UV) and infrared (IR ) radiation. TRUE VIEW PANO V2 is equipped with lithium battery and solar cells that extends the life of the battery. -
Page 3: Shade Number
TRUE VIEW PANO V2 SHADE NUMBER Adjust shade pursuant to the field condition. -
Page 4: Warning
INSTRUCTIONS BEFORE USING THE HELMET WARNING TRUE VIEW PANO V2 welding helmets are designed to protect the eyes and face from sparks, spatter and harmful radiation under normal welding conditions. The welding helmets may only be used for welding and not for other purposes. They are suitable for use with virtually all welding process, except oxy-acetylene, laser and gas welding procedures. -
Page 5: Correct Use Of The Welding Helmet
TRUE VIEW PANO V2 CORRECT USE OF THE WELDING HELMET • Before using the helmet, make sure that: • the front cover lens, and the filter are in the correct position and correctly fixed in place; • all the sensors and the cells are not obstructed;... - Page 6 TRUE VIEW PANO V2 • Place the helmet in a way that does not allow its dimension to deform, or the viewing filter to break. • Do not allow the filter to come into contact with liquid and dirt. •...
-
Page 7: Operating Instructions
TRUE VIEW PANO V2 OPERATING INSTRUCTIONS Check the front cover lens to make sure that they are clean, and that no dirt is covering the sensors on the front of filter cartridge. Also check the front / rear cover lens and the front lens retaining snap joint to make sure that they are secure. -
Page 8: Adjustment Instructions
TRUE VIEW PANO V2 ADJUSTMENT INSTRUCTIONS Basic Functional Parameters PANO V2 has one main window and two side windows. The main window and two side windows have independent working modes to choose from. The main window has three operating modes: GRIND, WELD and CUT. The specific function of the three operation modes parameters are shown in table 1. - Page 9 TRUE VIEW PANO V2 3, the side window darkening follows the main window with high sensitivity. When sensitivity set to 4, the side window will stay dark. Main window Advanced Function PANO V2 in order to improve the convenience and comfort of users, add 4 optional features and one-button grinding outside: Automatic Shade Number Adjust, Automatic Sensitivity Adjust, Automatic Delay Time Adjust and Gradual Return.
- Page 10 TRUE VIEW PANO V2 (1)Main window Function Buttons Buttons Function The usage the Buttons 1.Short Press-Switching Mode: 1.Short Press-Press 0.1s to switch the MODE GRIND—WELD—CUT—GRIND. mode. Release the button and press again to switch mode again. 1.Short Press-In the welding mode 1.
- Page 11 TRUE VIEW PANO V2 1.Short Press-Increase the delay time. 1、Short Press-Press 0.1s to increase 2.Long Press- In the weld mode, enter the delay time. Release the button and or exit automatic shade number gradual press again to increase the delay time return.(...
- Page 12 TRUE VIEW PANO V2 2)Sensitivity: In the WELD or CUT mode, SENS area will be shown the number. 0 for the grinding. For main window, 1 is the minimum sensitivity, and 8 for the maximum sensitivity. For side window, 1 is the minimum sensitivity, and 4 for the maximum sensitivity.
- Page 13 TRUE VIEW PANO V2 the environmental light intensity is more than 1lx, auto darkening welding filter will be working normally in 10s. Basic function of the headlamp For different welding environments, the lens is integrated with a built-in headlamp. Headlamps have two levels of brightness, high (100lm) and low (50lm).
- Page 14 TRUE VIEW PANO V2 Headgear Headgear adjustment: The helmet should be adjusted to cover the eyes and face effectively while welding. The position of the forehead band and rear headband can be manually adjusted to fit securely. Rotate the gear to adjust the tightness until it feels comfortable.The front and rear headbands should be adjusted to tightly cover the forehead and the backside of head.
-
Page 15: Technical Specifications
TRUE VIEW PANO V2 TECHNICAL SPECIFICATIONS Main Window: Light state: DIN3 Dark state: DIN 4-8/8-13 Main window viewing area: 114.5x85.5 mm (4.50” x 3.36”) Side Window: Light state: DIN3 Dark state: DIN 10 Side window viewing area: 2(pcs)x36.2(Top)/81.8(Bottom)x68.6(Height) mm (2(pcs)x1.42(Top)” /3.22(Bottom) x2.70(Height)”) -
Page 16: Illustration
TRUE VIEW PANO V2 ILLUSTRATION Main Part Side Window Light Barrier Front protection plate Rear protection plate 02 Helmet shell light Snap joint for protection plate Grinding button Lock for snap joint of protection plate Light switch button Auto darkening lens... - Page 17 TRUE VIEW PANO V2 Headgear 1.Sweatband 10.Right adjustable washer 2.Forehead band 11.Right slider 3.Right belt 12.Side trim 4.Left belt 13.Rotating shaft inside trim 5.Occipital pad 14.Rotating shaft outside trim 6.Headband adjusting nut 15.Left slider 7.Washer 16.Left adjustable washer 17.Left limitation washer 8.Right limitation washer...
-
Page 18: Disassembly And Assembly Instructions
TRUE VIEW PANO V2 DISASSEMBLY AND ASSEMBLY INSTRUCTIONS Protection Plate 1. Unlock the snap joint of protection plate if it is locked (A). Unlock Press Press the snap joint for protection plate and then take out the plate (A). 2. Change another protection plate and insert the snap joint (make sure “a”... - Page 19 TRUE VIEW PANO V2 DISASSEMBLY AND ASSEMBLY INSTRUCTIONS Battery 4. Using the battery remover to take out the battery (D). Change the battery and then put them back. Filter 5. Peel off the control panel (E). 6. Loose the screw (F) and take out the filter (G) assembly from the shell.
-
Page 20: Troubleshooting
Ambient light is too bright Reduce light level Weld spatter is damaging Missed, damaged, broken, distorted front cover Replace front cover lens the filter ATTENTION! If the described malfunctions cannot be solved, stop using the helmet immediately and contact Blue Demon Welding Products... -
Page 21: Related Parts List And Warranty
Blue Demon will replace any warrantied parts or components that fail due to such defects in material and manufacturing defects. Blue Demon must be notified in writing within thirty (30) days of such defect or failure, at which time Blue Demon will provide instructions on the warranty claim procedures to be followed for replacement parts and components. - Page 22 TRUE VIEW PANO V2 NOTE...
- Page 23 TRUE VIEW PANO V2 NOTE...
- Page 24 BLUE DEMON WELDING PRODUCTS ST CHARLES,IL 60174 WWW.BLUEDEMONWELDING.COM TEL: 888-905-6737 FOLLOW US @BLUEDEMONWELD...
Need help?
Do you have a question about the TRUE VIEW PANO V2 and is the answer not in the manual?
Questions and answers