Table of Contents
Advertisement
User's Manual
Welcome:
Thank you for purchasing this PocketCinema V50 from Aiptek. PocketCinema V50 is the latest
generation of Pico Projectors with DLP technology inside. DLP offers a brighter picture which
much higher contrast and a compact size. V50 combines this features with a media player and
battery so that PocketCinema V50 is the best solution for mobile use.
Before you start using the product, we recommend reading this manual step by step to obtain
the best results with your new Pico Projector. We wish you a lot of fun.
Best regards
Your Aiptek Team
Safety Notice:
1. Keep the device and packaging materials out of the reach of infants and children.
2. Avoid subjecting the power adapter and other contacts to dripping or splashing water and
dry your hands before you use it. Do not place objects filled with liquids such as vases, etc.
on or near the device.
3. Make sure that the used power outlet is always readily available and never hidden. In case
of emergency, use the power adapter to separate the device from the power network.
4. Keep your device away from all flames such as candles and do not set them up in the
vicinity of the device.
5. Keep the unit at least 10 cm away from other objects. Make sure the ventilation is not
covered by newspapers, tablecloths, curtains, etc.
6. For your own safety, do not use the projector during thunderstorms or lightning.
7. To ensure safety and the display effect, always use the power adapter supplied by the
manufacturer.
8. The battery is integrated with the device. Do not dissemble and modify. The battery should
be replaced by qualified service staff only.
9. To ensure normal operation of this product and avoid any damage, do not use or store this
product under the following conditions: environment with too low/high temperature; places
with high humidity or long-term direct sunshine; bad conditions involving strong impacts.
10. During the operation, this product may heat lightly, which is normal.
11. Wait before connecting the mains adapter if the device has been moved from a cold
location into a warm one. Any condensation that has formed may in certain circumstances
destroy the device. As soon as the device has reached room temperature it can be used
without risk.
12. Handle the product with care. Avoid contact with sharp objects. Keep device away from
metallic objects.
13. Place the projector on a flat surface. Any collision or falling to the ground is likely to
damage the product.
14. Do not drop or disassemble the product otherwise the warranty voids. Opening or
removing covers may expose you to dangerous voltage or other hazards. Refer all
servicing to qualified service personnel.
15. This product supports hot plugging of memory cards. However, it is suggested to power off
the product before plugging/unplugging your memory card to protect the memory card.
16. Use only the accessories supplied by the manufacturer.
17. Both product and user's manual are subject to further improvement or supplement without
further notice.
18. Avoid facing directly into the projector's lens.
www.aiptek.eu
Page 1
Advertisement
Table of Contents

Related Manuals for AIPTEK POCKETCINEMA V50


Summary of Contents for AIPTEK POCKETCINEMA V50
- Page 1 User’s Manual Welcome: Thank you for purchasing this PocketCinema V50 from Aiptek. PocketCinema V50 is the latest generation of Pico Projectors with DLP technology inside. DLP offers a brighter picture which much higher contrast and a compact size. V50 combines this features with a media player and battery so that PocketCinema V50 is the best solution for mobile use.
-
Page 2: Fcc Compliance Statement
If this product is going to be end of life, please recycle it properly. -
Page 3: Eye Safety Warnings
► In extremely hot, cold or humid environments. ► In areas susceptible to excessive dust and dirt. ► Near any appliance generating a strong magnetic field. ► In direct sunlight. www.aiptek.eu Eye Safety Warnings! Avoid staring/facing directly into the projector beam at all time. -
Page 4: Table Of Contents
Converting presentation files ... 19 System Requirements ... 19 To install the converting utility... 19 To convert PPT/PDF to MPtG ... 19 Limitations and Settings ... 20 Specifications ... 21 Troubleshooting... 22 Reset Your Device... 22 www.aiptek.eu Table of Contents Page 4... -
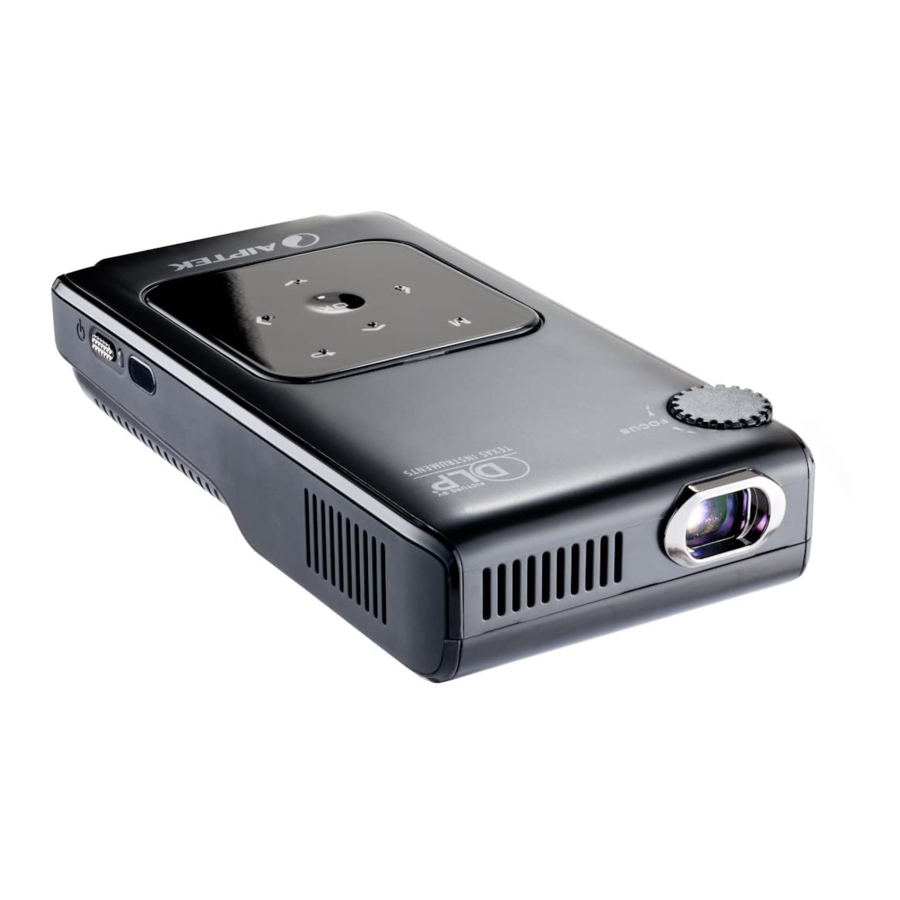
Page 5: Knowing The Device
Lens Focus switch SD Card Slot Speaker Keypad Reset USB Connector DC-IN Keypad Menu button Left button www.aiptek.eu IR Receiver Power ON/OFF AV Input/Headphone or Speaker Output Up button Return button OK button Right button Down button Page 5 Tripod Socket... -
Page 6: Remote Control
User’s Manual Remote Control Power Button Home Button Menu Button OK Button Left Button Zoom Button Volume Up Button Down Button www.aiptek.eu Lumens Button Mute Button Delete Button Up Button Return Button Right Button Rotate Button Volume Down Button Page 6... -
Page 7: The Projector
You should have the following items: Projector Pouch Software CD User’s Manual USB Host cable USB cable AV cable (RCA female AC Power Adapter to mini jack) Quick Start Guide Service Guide Remote Controller www.aiptek.eu Page 7... -
Page 8: Getting Started
Connect a USB Dongle Use the USB Host cable and connect the small end with the USB Connector of the Projector. Connect the USB dongle on the big end of the cable. www.aiptek.eu Charging Time around 3 hours around 8 hours... -
Page 9: Adjusting The Focus
81.7 148.5 58.5 92.8 166.2 65.4 103.8 176.8 69.6 110.4 212.1 83.5 132.5 247.5 97.4 154.6 300.0 118.1 188.2 www.aiptek.eu Screen Size-Height inch inch 12.3 20.9 29.8 11.7 32.2 46.0 18.1 36.5 52.2 20.5 40.9 58.4 23.0 43.5 62.1 24.5 52.2... -
Page 10: Functions And Operations
Memory : internal memory : SD/SDHC/MMC card : USB Dongle Use the left (◄) and right key (►) to navigate through the main menu and choose the option you like to enter by pressing OK. www.aiptek.eu Description Page 10... -
Page 11: General Settings
It’s also possible to performance a firmware update from here. For latest firmware please visit Aiptek website and follow the instructions in the update SOP provide with the firmware file. To configure the setting: 1. -
Page 12: General Operation
Brightness Color Setting Contrast Saturation Delete Exit Exit www.aiptek.eu ) to back to the previous menu. Description Enable the sound during video playback. Disable the sound during video playback. Play the video clips in order. Repeat the selected video clip. -
Page 13: Playing Music
Brightness Color Setting Contrast Saturation Delete Exit Exit www.aiptek.eu ) to back to the previous menu. Description Enable the sound during music playback. Disable the sound during music playback. Play the music files in order. Repeat the selected track. Repeat playing all tracks in the folder. -
Page 14: Playing Photo
Color setting Contrast Saturation Delete Exit Exit www.aiptek.eu ) to back to the previous menu. Description Enable or disable the transition effect while changing photos during the slideshow. Enable or disable the slideshow function. If disable the selected picture will be shown after manually change by using Left/Right (◄/►) button... -
Page 15: Playing Files
Press the Left/Right (◄/►) button to move to previous/next page. ● Press the Up/Down (▲/▼) button to move page up/down. ● 4:3 (Width: Height) PDF file are not supported. www.aiptek.eu ) to back to the previous menu. Description Set the brightness level (1 ~ 5) of projection screen. -
Page 16: Playing Files In Other Devices
2. Connect both AV cables (yellow to yellow, white to white and red to red). 1. White might be black on some media players or cables. 2. Please make sure that your media player is enabled with AV-out function. www.aiptek.eu Page 16... -
Page 17: Usb Projection
User’s Manual USB Projection System Requirements Your system should have at least the following specifications to make PocketCinema V50 working smoothly on your system: Operating System: Windows XP SP2 or higher, Windows Vista, Windows 7 CPU: Dual Core CPU or higher... -
Page 18: Start The Projection
1. To adjust the resolution of video under 640x480. 2. Select “Compatible Mode” to project. 3. Use the following license free media player for video playback from http://kmplayer.en.softonic.com In order to save power, unplug the USB cable from Notebook/PC when you finished your presentation. www.aiptek.eu Page 18... -
Page 19: Converting Presentation Files
(if there is not any removable disk detected) with the same name of the source file. 4. Click OK to start converting. When done, you can directly play the file on your projector! www.aiptek.eu ) will appear on your desktop. Page 19... -
Page 20: Limitations And Settings
The embedded VBA object and OLE object. ● To change the maximum of animation effect time, click the ● control panel and then select 10/20/30/60 seconds from the Maximum Animation Display Time dropdown menu. www.aiptek.eu Page 20 icon on the... -
Page 21: Specifications
Power Supply Battery Life Power Consumption Weight Dimension Model Code Humidity Operating Temperature www.aiptek.eu Description RGB LED 16:9 (4:3 compatible) Up to 50 Peak Lumens (*ANSI Lumens: 40 Lumens) 854 x 480 Pixel (WVGA) 25cm ~ 215cm (9” ~ 85”) 35cm ~ 300cm (14”... -
Page 22: Reset Device
Locate the small hole on the down of the device shown as the RESET. Using the tip of paper clip, gently push the button inwards. www.aiptek.eu Check Point Check if the USB Cable is plugged correctly. ● Make sure the PC has been switched to projector ●...
Need help?
Do you have a question about the POCKETCINEMA V50 and is the answer not in the manual?
Questions and answers