Table of Contents
Advertisement
Quick Links
Advertisement
Table of Contents

Related Manuals for DeWalt DHS790


Summary of Contents for DeWalt DHS790
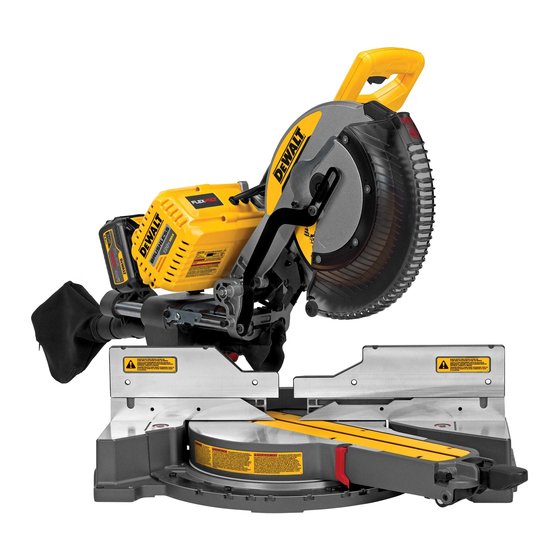
- Page 1 DHS790...
- Page 2 English 繁體中文 Fig. A 圖...
- Page 3 English Definitions: Safety Alert Symbols and Words This instruction manual uses the following safety alert symbols and words to alert you to hazardous situations and your risk of personal injury or property damage. DANGER: Indicates an imminently hazardous situation which, if not avoided, will result in death or serious injury. WARNING: Indicates a potentially hazardous situation which, if not avoided, could result in death or serious injury.
-
Page 4: General Power Tool Safety Warnings
English Technical Data DHS790 Voltage 2 x 54 (60V Max) Battery Type Li-Ion Blade diameter Blade bore 25.4 Blade body thickness 1.75 Max. blade speed 3 800 Max. cross-cut capacity 90° Max. mitre capacity 45° Max. depth of cut 90°... - Page 5 English s ) Do not use the power tool if the switch does not turn it on and off. Any power tool that is no gap between the workpiece, fence and table along the line of the cut. Bent or cannot be controlled with the switch is dangerous and must be repaired.
-
Page 6: Batteries And Chargers
English • DO NOT REACH UNDERNEATH THE SAW unless it is unplugged and turned off. Contact with ..... read all documentation saw blade may cause personal injury. For your convenience and safety, the following warning labels are on your miter saw. • SECURE THE MACHINE TO A STABLE SUPPORTING SURFACE. - Page 7 If battery liquid gets into the eye, rinse water over the open eye for 15 minutes and end-user application. or until irritation ceases. If medical attention is needed, the battery electrolyte is composed of a For more information regarding fuel gauge battery packs, please visit our website www.dewalt. mixture of liquid organic carbonates and lithium salts. com.
-
Page 8: Specifications
English Wall Mounting CAUTION: Burn hazard. To reduce the risk of injury, charge only D WALT rechargeable battery packs. Other types of batteries may overheat and burst resulting in personal injury DCB107, DCB112, DCB113, DCB115, DCB118, DCB132 and property damage. These chargers are designed to be wall mountable or to sit upright on a table or work surface. If NOTICE: Under certain conditions, with the charger plugged into the power supply, the wall mounting, locate the charger within reach of an electrical outlet, and away from a corner or charger can be shorted by foreign material. -
Page 9: Intended Use
An accidental 1 DHS790 miter saw start-up can cause injury. 1 Base extension (right) nOTE: Your miter saw is fully and accurately adjusted at the factory at the time of manufacture. - Page 10 English handle 1 to bring the saw blade close to the wood. The shadow of the blade will appear on the pawl 31 can be rotated to contact the crown adjustment screw 36 . The saw is factory set to be wood.
- Page 11 English If the condition persists, there may be a fault condition. Have the tool serviced by an authorized Fig. L WALT service center. Always be sure the blade has stopped before raising the arm and removing the blade from the kerf plate. The brake is not a substitute for guards. Ensure your own safety by giving the saw your complete attention.
-
Page 12: Operation
English Fig. O To adjust the left 45° bevel angle, first loosen the bevel lock knob and tilt the head to the 26 left. If the bevel pointer 16 does not indicate exactly 45°, turn the right 45° bevel adjustment screw ... - Page 13 English Fig. R Fig. S Installing and Removing the Corded Power Supply into and from Tool (Fig. S–U) Before inserting the corded power supply into your tool, remove the end of the dust cover 59 from the tool's corded power supply receptacle .
-
Page 14: Bevel Cuts
English Fig. T Fig. U Fig. Y Trigger Switch (Fig. V) To turn the saw on, push the lock-off button 3 to the left, then depress the trigger switch 2 The saw will run while the switch is depressed. Allow the blade to spin up to full operating speed before making the cut. - Page 15 English Non-Through-Cutting (Grooving and Rabbeting) Fig. Z Fig. AA Instructions in the Crosscuts, Bevel Cuts and Cutting Compound Miters sections are for cuts made through the full thickness of the material. The saw can also perform non-through cuts to form grooves or rabbets in the material. Groove Cut (Fig.
- Page 16 English Fig. DD Fig. CC Fence Table Crown molding flat on table and against fence PRETESTING WITH SCRAP MATERIAL IS EXTREMELY IMPORTANT! Alternative Method for Cutting Crown Molding (Fig. EE) Place the molding on the table at an angle between the fence and the saw table, as shown in Figure EE.
-
Page 17: Maintenance
English Cutting Large Material (Fig. JJ) Fig. FF Occasionally you will encounter a piece of wood a little too large to fit beneath the lower guard. If this occurs, simply place your right thumb on the upper side of the guard and roll the guard up just enough to clear the workpiece, as shown in Figure JJ. -
Page 18: Optional Accessories
English Cleaning the D WALT Corded Power Supply Optional Accessories WARNING: Never use solvents or other harsh chemicals for cleaning the non-metallic parts The following accessories, designed for your saw, may be helpful. In some cases, other locally of the tool. These chemicals may weaken the plastic materials used in these parts. Use a obtained work supports, length stops, clamps, etc., may be more appropriate. - Page 19 English TABLE 1: COMPOUND MITER CUT (POSITION WOOD WITH BROAD FLAT SIDE ON THE TABLE AND THE NARROW EDGE AGAINST THE FENCE) SET THIS BEVEL ANGLE ON SAW...
- Page 20 繁體中文 繁體中文 定義:安全警示符號與用詞 本使用手冊使用以下安全警示符號與用詞,讓您注意危險狀況以及人身傷害或財產損失的風險。 危險: 表示緊急危險狀況,若未能避免,將導致死亡或嚴重傷害。 警告: 表示潛在危險情況,若未能避免,可能導致死亡或嚴重傷害。 小心: 表示潛在危險情況,若未能避免,可能導致輕微或中度傷害。 (僅有標示符號時) 表示安全相關訊息。 注意:表示一種非人身傷害的行為,若未能避免,可能導致財產損失。 圖 操作手柄 斜面刻度尺 觸發開關 斜面刻度尺指針 觸發鎖止按鈕 鎖定銷 下部防護罩 提舉手柄 安裝孔 工作燈開關 CUTLINE™ 斜角鎖定桿 電池組 斜角釋放按鈕 導軌 斜角鎖銷重疊桿 導軌鎖定旋鈕 鋸縫平臺 導軌調整螺絲 警告! 請閱讀所有安全警告及所有指示。不遵循這些警告及 斜接刻度尺指針 排塵口 說明可能會導致觸電、火災及/或嚴重傷害。 斜接刻度尺 六角扳手 警告:為了降低受傷的風險,必須仔細閱讀使用手冊。...
- Page 21 繁體中文 繁體中文 技術資料 DHS790 伏特 最大 標稱 電壓 2x54 2x60 直流 電池類型 鋰電池 鋸片直徑 公釐 鋸片孔徑 公釐 鋸片厚度 公釐 最大鋸片速度 轉/分 3800 最大橫切能力 公釐 90° 最大斜切能力 公釐 45° 最大切割深度 公釐 90° 最大斜面橫切深度 公釐 45° 斜角切 (最大位置) 左 50° 右 60°...
- Page 22 繁體中文 繁體中文 在執行任何調整、更換配件或儲存電動工具之前,必須從電源上拔掉插頭及/或卸下電池 若工件或鋸片卡住,請關閉斜切鋸。等到所有活動部件停止後,從電源上拔掉插頭及/或卸 組 (若可卸下) 。這類防護性措施可降低電動工具意外啟動的風險。 下電池組,然後才清理卡住的材料。繼續鋸切卡住的工件可能會導致失控或損壞斜切鋸。 將閒置的電動工具儲存在兒童無法接觸的地方,並且不要讓不熟悉電動工具或對這些使 鋸切完成後,鬆開開關並按住鋸頭,等待鋸片停止,然後取下切割件。用手靠近滑動的鋸 用指示不瞭解的人員操作電動工具。電動工具在未經培訓的使用者手中會發生危險。 片很危險。 維護電動工具與配件。檢查活動部件是否對準或卡住、破損情況以及是否存在影響電動工 進行局部切割或鬆開開關時,請在鋸頭完全處於向下位置之前牢牢握住手柄。鋸的制動動 具運行的其他情況。若有損毀,必須在使用之前修理電動工具。許多事故都是由於電動工 作可能導致鋸頭突然向下拉,從而產生受傷的風險。 具欠缺維護所導致。 斜切鋸的其他安全規定 保持切削工具鋒利和清潔。妥善維護的帶利刃的切削工具不會輕易卡住並可更輕鬆控制。 警告:請勿自恃熟悉工具 (因頻繁使用鋸) 而忽略安全規定。請務必記住,即使不到一秒的 在使用電動工具、配件及刀頭等部件時,請遵循上述指示,並將工作條件與要執行的工作 粗心也足以導致嚴重的傷害。 考慮在內。不按照設計目的使用電動工具會導致危險。 手柄和抓握表面都應保持乾燥、清潔及遠離油脂。光滑手柄和抓握表面不便於在意外情況 警告:請勿改動本電動工具或其任何部件,否則可能導致損壞或人身傷害。 下對工具進行安全處理與控制。 在根據指示將機器完整組裝並安裝之前,請勿操作此機器。組裝不正確的機器會導致嚴重 電池工具的使用與注意事項 • 傷害。 只能使用製造廠商指定的充電器為電池充電。使用僅適合一種電池組的充電器為其他類型 若您不太熟悉此機器的操作,請向您的主管、指導者或其他符合資格的人員請教。知識將帶來 的電池組充電會導致火災危險。 • 安全。 請使用原廠的電動工具電池組。使用其他非原廠的電池組會導致人身傷害及火災風險。 遵循所有連線規程及建議的電氣連接,以避免發生觸電或電擊致死。請使用至少 安培的延 •...
- Page 23 繁體中文 繁體中文 其他特定使用指示 警告: 使用本工具會產生及/或驅散灰塵,可能造成嚴重且永久的呼吸或其他傷害。始終使 用 認可的呼吸保護裝置,適當保護自己對粉塵的接觸。請將粉塵引向遠離身 在使用期間,觸摸插電式電源供應器時可能會感到很熱。這是正常現象,並不代表出現任何問題。 NIOSH OSHA 體和臉部的方向。 重要說明。電源供應器不是使用者可維修的裝置。此電源供應器內不含使用者可維修的部件。 警告: 在使用期間,請始終佩戴合適的聽力保護裝置。在某些使用情況下,使用了一定時間 需要在授權服務中心進行維修,以避免損害對靜電敏感的內部元件。 後,產品所產生的噪音將有可能讓您的聽力受損。 電池和充電器 通風口通常會蓋住活動部件,應予以避免。寬鬆衣服、佩飾或長髮可能會捲入活動部件。 • 您的工具上可能包含下列符號。符號及其定義如下 : 包裝內的電池組並未完全充電。在使用電池組和充電器之前,請先閱讀以下安全指示並遵循所列的 伏特 或 交流電 充電程序。購買更換電池組時,務必附上目錄號和電壓資料。 V ......AC ..赫茲 或 交流電或直流電 本工具使用 充電器。請在使用充電器前請閱讀所有安全指示。如需瞭解充電器與電池組的 Hz ......AC/DC ... WALT 分鐘...
- Page 24 冷延遲 * DCB107 、 、 、 、 、 :紅燈會繼續閃爍,但在執行此操作 註:電量計只指示電池組的剩餘電量。它並不指示工具功能, 且根據工具組件、溫度和最終使用者 DCB112 DCB113 DCB115 DCB118 DCB132 期間黃色指示燈將亮起。電池組達到適當溫度後,黃色指示燈將熄滅,充電器將恢復充電程序。 的應用而有所不同。 相容的充電器不會為有故障的電池組充電。充電器會透過不亮燈來表示電池組故障。 如需有關電量計電池組的詳細資訊,請造訪我們的網站 。 www.dewalt.com 註:亦有可能是充電器發生故障。 所有電池充電器之重要安全指示 如果充電器指示故障,請將充電器和電池組拿到授權維修中心進行測試。 警告:請閱讀電池組、充電器與電動工具的所有安全警告與所有指示。不遵循這些警告及 電池組熱/冷延遲 說明可能會導致觸電、火災及/或嚴重傷害。 若充電器偵測到電池組過熱或過冷,會自動啟動電池組熱 冷延遲,在電池組達到適合的溫度之前 請勿嘗試使用本手冊未提到的充電器為電池組充電。充電器和電池組是為了一同使用而特別 暫停充電。然後,充電器會自動轉換到電池組充電模式。此功能可確保電池組的使用壽命最大化。 • 設計。 冷電池組的充電速度大約是暖電池組的一半。在整個充電週期,電池組會以較慢的充電速度進行充 除了為 可充電電池充電之外,這些充電器不可以用於其他用途。否則可能會導致火 電,即使電池組變暖,充電速度亦不會回復至最大充電速度。 • WALT 災、觸電或觸電致死。...
- Page 25 英 40 45° 吋 ( 公釐) 、高度為 英吋 ( 公釐) 的基板模塑進行鋸切。 調節後應確保結果準確。現在,請花一點時間仔細遵循這些指示,以維持本鋸能夠達到的準確度。 6.75 打開斜切鋸包裝 組裝底座延長桿 (圖 ) 請檢查斜切鋸包裝箱內容物,確保您已收到所有零件。除了本使用手冊外,包裝箱內還應包含: 警告:在使用電鋸之前,必須在電鋸底座的兩側組裝底座延長桿。 個 斜切鋸 DHS790 找到電鋸底座下方預先組裝的螺紋螺柱 。 個 底座延長桿 (右) 55 延長桿 應位於如圖所示的位置,在 形支架中完全向後滑動。 個 底座延長桿 (左) 13 將夾具 插入到螺紋螺柱上方,然後放置墊圈 ,最後旋緊蝶形螺母 ,以便將延長桿 可能包括:...
- Page 26 繁體中文 繁體中文 使用 工作燈 (圖 ) 齒尖斜面爪 (圖 ) CUTLINE™ LED I 在平放狀態下執行齒尖模塑切割時,此鋸可以在左側或右側準確快速地設定齒尖止動位置 (請參閱 小心: 請勿凝視工作燈 。否則可能導致嚴重的眼部傷害。 執行齒尖模塑切割 下的平放狀態下執行齒尖模塑切割與使用複合功能的指示) 。可以旋轉 33.9° 可以使用瞬時開關 開啟 工作燈。若電鋸不在使用中達 秒, 工作燈會自動熄 齒尖斜面爪 以接觸齒尖調節螺絲 。本鋸已原廠設定為用於北美的典型 ( ) 齒尖切割, 19 CUTLINE™ LED 31 36 52/38 滅。每次按工具的主觸發開關 時, 工作燈也會自動開啟。 但是可以翻轉以執行非典型的...
- Page 27 繁體中文 繁體中文 自動電動鋸片制動器 圖 本鋸配備自動電動鋸片制動器,可以在鬆開觸發開關的 秒內停止鋸片。此值不可調整。在少數情 況下,制動器可能不會接合,鋸片將滑行到止動位置。若發生此狀況,請等候數分鐘,然後再繼續使 用。若仍發生此狀況,可能已出現故障。請將工具送交授權的 維修中心進行維修。 WALT 在提升鋸臂並從鋸縫平臺中取出鋸片之前,請務必確保鋸片已停止。不可使用保護罩代替制動器。 請全神貫注於電鋸,以確保您自身的安全。 防護罩的啟動與可見度 小心:夾手危險。若要降低受傷風險,在向下拉動手柄時,請將拇指放在手柄下方。向下拉 動手柄時, 下部防護罩會隨之向上移動,這會導致夾手。 此鋸上的鋸片防護罩經過特定設計,在鋸臂下壓時,鋸片防護罩會自動升高;在鋸臂抬起時,鋸片防 護罩會在鋸片上自動降低。 在安裝或取下鋸片或在檢查鋸時,可以手動升高防護罩。除非鋸已關閉,否則切勿手動升高鋸片防 護罩。 註:對大型材料的某些特殊切割作業需要您手動升高防護罩。請參閱 特殊切割操作 下的切割大型 材料 。 防護罩前部裝有氣窗,以便於切割時視野開闊。儘管氣窗可顯著減少飛散的碎屑,但它們使護罩有 圖 了開口,因此,透過氣窗檢視時,請務必佩戴護目鏡。 調整 警告:若要降低嚴重人身傷害的風險,請在運輸、進行調整、清潔、維修或卸下/安裝附件 或配件之前,關閉工具並取出電池組或電源供應器。意外啟動工具可能會造成傷害。 更換或安裝新鋸片 (圖 、 ) A L–N 小心: 切勿在鋸片上電或滑動時按下軸心鎖按鈕。 • 請勿使用本斜切鋸切割含鐵金屬...
- Page 28 繁體中文 繁體中文 斜角鎖定調整 (圖 、 ) 操作 警告:若要降低嚴重人身傷害的風險,請在運輸、進行調整、清潔、維修或卸下/安裝附件 在斜角鎖定桿 遭鎖定 (向下) 時,若可以移動支撐鋸的工作臺,則應調整斜角鎖栓 。若要調 6 50 或配件之前,關閉工具並取出電池組或電源供應器。意外啟動工具可能會造成傷害。 整斜角鎖定,請將斜角鎖定手柄置於解鎖 (向上) 位置。使用 英吋開口扳手,旋鬆斜角鎖栓 50 上的鎖定螺母 。使用平口開槽螺絲起子,順時針轉動以旋緊斜角鎖栓。轉動鎖栓,直到鎖緊為 警告:始終佩戴護目鏡。所有使用者及旁觀者必須配戴符合 51 ANSI Z87 . 1 ( CAN / CSA Z94 . 3 ) 止,然後逆時針方向轉動一圈。若要確保斜角鎖定功能正常,請將斜角鎖定重新鎖定到斜接刻度尺 標準的護目鏡。 上的非鎖銷量測值 (例如 )...
- Page 29 繁體中文 繁體中文 身體及手的位置 (圖 、 ) 確保其在工具中已完全到位,並且不會斷開。 將塵罩 置於插電式電源供應器內的塵罩夾持器 ( ,圖 ) 中。 操作斜切鋸時,正確放置身體與手至關重要。在鋸片轉動時,切勿將手置於底座上兩條紅線之間 59 60 將電線夾 固定在工具的電線夾持器 ( ,圖 ) 中。用力將夾按入夾持器中。 的鋸切區域內。鋸切時,請將工件牢牢夾持或固定到工作臺上及擋板旁。將雙手放在適當的位置, 56 55 在關閉工具電源的狀況下,將插電式電源供應器插頭插入到標準 家用電源插座中。請勿 直到鬆開觸發開關,以及鋸片完全停止為止。請務必在執行精細切割之前進行演練 (不接通電源) , 120V 嘗試使用其他電壓。 以便檢查鋸片的運轉路徑。請勿讓手穿過鋸片的運轉路徑,如圖 所示。 按照工具指示使用工具,確保電線的位置不會遭踐踏、令人絆倒或容易受到其他方式的損壞或 請雙足平穩地站在地上,保持正常的身體平衡。在左右移動斜接臂時,身體隨之移動,站位稍傾向 受壓。 於鋸片一側。沿鉛筆線進行切割時,視線應穿過防護罩的氣窗。 若要從工具中卸下插電式電源供應器,請先從插座上拔出插電式電源供應器插頭,按下釋放按 貫穿鋸切操作 鈕...
- Page 30 繁體中文 繁體中文 圖 不正確切割 不正確切割 不正確切割 圖 若需要進行最平滑的切割以供模塑及其他精確工作使用,鋒利 ( 齒硬合金) 的鋸片與較為緩慢且 平穩的切割速度會產生理想結果。 請確保材料在切割時不會發生移動或小幅移動,應將其牢固地夾持定位。請務必先等候鋸片完全停 止,然後再抬起鋸臂。 若工件後部仍帶有小的植物鬚根,請在木材上要進行切割的位置粘貼紙膠帶。切割時對木材與紙膠 帶一併進行切割,切割完成後請仔細移除紙膠帶。 對於不同的鋸切應用,請參閱針對您的鋸所建議之鋸片的清單,然後選取最適合您需求的鋸片。請 參閱 配件 下的鋸片。 非貫通鋸切 (開槽與開榫) 橫切、斜角切割 與 執行複合式斜切 諸節內的指示適用於針對材料的整體厚度執行的貫穿鋸切。此鋸 還可以執行非貫穿鋸切,以便在材料中製作槽或榫。 切槽 (圖 ) 如需設定在工作臺上牢牢按住木材並讓其緊靠擋板 的詳細指示,請參閱 限深器 。在鋸片下方對 14 齊切割區域。將鋸臂完全向前放置,讓鋸片向下。壓下圖 所示的觸發開關 以啟動鋸。向後平滑 2 推動鋸臂,以便在工件上切槽。 在鋸臂向下時釋放觸發開關。在鋸片完全停止後,抬起鋸臂。請務必先等候鋸片完全停止,然後再...
- Page 31 繁體中文 繁體中文 切割相框、暗箱及其它四邊形物件 (圖 、 ) 切割基本模塑的範圍是 英吋至 英吋 ( 公釐至 公釐) 高,且垂直緊靠擋板 6.75 註:在執行切割基本模塑的範圍是 英吋至 英吋 ( 公釐至 公釐) 高, 且垂直緊靠擋板的 若要最全面瞭解如何製作此處列示的項目,建議您先使用廢棄的木材嘗試製作一些簡易的物件,直 6.75 鋸切時,請使用滑動鎖定桿 ,如圖 所示。 到您取得對此鋸的一些 「使用心得」 為止。 43 按照圖 所示放置材料。 此鋸非常適用於斜切諸如圖 中所示的角。圖 中的草圖 展示透過斜面調整而製作的接頭,該 方法對兩塊木料的邊緣分別進行 的斜角切割,從而構成 的角。對於此接頭,斜接臂鎖定在 圖...
- Page 32 繁體中文 繁體中文 使用廢棄材料進行預先測試,這一點極為重要! 圖 齒尖模塑切割的其他方法 (圖 ) 在工作臺上將模塑以某角度放置在擋板與電鋸工作臺之間,如圖 所示。強烈建議使用齒尖模塑 擋板配件 ( ),因為該配件具有良好的準確度及便利性 (請參閱 可選配件 ) 。您可向當地經銷 DW7084 商購買齒尖模塑擋板配件。 使用該方法進行齒尖模塑切割的優勢在於不需要進行斜角切割。可以在不影響斜面角度的狀況下對 斜切角度進行微小變更。如此在遇到非 的角時,可以針對這些角對電鋸進行快速輕鬆的調整。 90° 使用齒尖模塑擋板配件可保持模塑與牆面所呈的角度。 執行齒尖模塑切割 (執行所有切割作業時,鋸的擋板與底座之間呈某個角度) 的 指示 鋸片 調整模塑角度,讓模塑的底部 (安裝時將緊靠牆面的部分) 緊靠擋板,讓模塑的頂部倚靠在鋸的 工作臺上,如圖 中所示。 模塑背面呈某角度的 「平面」 必須與鋸的擋板及工作臺垂直。 擋板 內角 外角 不正確 斜切角度為向右...
- Page 33 繁體中文 繁體中文 維護 工作燈清潔 CUTLINE™ LED 若要取得最優的工作燈效能,請定期在卸下電池或插電式電源供應器的狀況下執行以下維護。 警告:若要降低嚴重人身傷害的風險,請在運輸、進行調整、清潔、維修或卸下/安裝附件 使用棉籤仔細清除工作燈鏡頭上的鋸屑與碎屑。 或配件之前,關閉工具並取出電池組或電源供應器。意外啟動工具可能會造成傷害。 • 請勿使用任何類型的溶劑,否則可能會損壞鏡頭。 警告:在執行維護時,若要降低嚴重人身傷害的風險,請勿以手指或手觸摸鋸片上的尖銳 • 之處。 灰塵積聚會妨礙工作燈,導致工作燈無法準確指示切割線。 • 請勿在塑膠防護罩附近使用潤滑劑或清潔劑 (尤其是噴霧或氣霧劑) 。防護罩中使用的聚碳酸酯材 遵循斜切鋸的使用手冊卸下及安裝鋸片。 • 料會受到特定化學品的侵害。 從鋸上卸下鋸片後,清除鋸片上的瀝青與積聚的灰塵。瀝青與碎屑會妨礙工作燈,導致工作燈無 • 所有軸承都已密封。軸承已進行終生潤滑,不需要進一步的維護。 法準確指示切割線。 • 定期清潔底座與旋轉平臺周圍與下方的所有灰塵與木材碎屑。即使提供了用於移走碎屑的槽, 配件 • 也會積累一些灰塵。 警告:由於非 所提供的配件未在本產品上進行過使用測試,因此在本產品上使用 卸下及更換皮帶 (圖 、 ) WALT 這些配件可能會導致危險。為降低傷害危險,在本產品上只應使用 所推薦的配件。...
- Page 34 繁體中文 繁體中文 表格 :複合式斜切 (木材的放置方式是寬而平的一側緊靠工作臺,窄的一側緊靠擋板) 對鋸設定此斜面角度...
- Page 36 N754944 08/2019...
Need help?
Do you have a question about the DHS790 and is the answer not in the manual?
Questions and answers