Advertisement
Quick Links
r is
in e
n ta
e n
.C o
w h
ll e d
r.
c e
in e
n s ta
p la
R e
n ta
y is
t c o
n tl y.
e rl
e n
ro p
u e
is p
e q
e m
la c
e r
g fr
re p
b a
ta in
e d
c o n
c k
h e
n d
s s
. C
m e
o n
n le
o m
r u
ra ti
re c
IN G
ri o
w e
ly a
m o
e ti e
R N
d d
o n
ra te
s e
W A
a n
p e
a r
. U
t o
e d
n o
w e
a g
D o
t to
a m
je c
r d
s u b
d o
c k e
c ra
n s ta
y is
e rl
n tl y.
ro p
u e
e m
is p
e q
la c
g fr
e r
re p
ta in
b a
c k
e d
c o n
h e
n d
m e
s s
. C
o n
o m
n le
ra ti
r u
re c
IN G
w e
ri o
e ti e
ly a
m o
o n
R N
d d
ra te
s e
W A
p e
a n
. U
a r
e d
t o
w e
n o
a g
t to
a m
D o
je c
r d
s u b
d o
c k e
c ra
O WNER'S MANUAL
Model No. CES42A
Product No. 964 77 51-00
42 Inch Mower
Grass Catcher
•
Assembly
•
Operation
•
Customer Responsibilities
•
Repair Parts
r is
in e
n ta
e n
.C o
w h
ll e d
c e
r.
in e
p la
R e
n ta
t c o
e n
532182126
2.11.02 rad
PRINTED IN U.S.A.
Advertisement

Related Manuals for Husqvarna CES42A


Summary of Contents for Husqvarna CES42A
- Page 1 O WNER’S MANUAL Model No. CES42A Product No. 964 77 51-00 42 Inch Mower Grass Catcher • Assembly • Operation •...
- Page 2 SAFETY RULES Safe Operation Practices for Ride-On Mowers IMPORTANT: THIS CUTTING MACHINE IS CAPABLE OF AMPUTATING HANDS AND FEET AND THROWING OBJECTS. FAILURE TO OBSERVE THE FOLLOWING SAFETY INSTRUCTIONS COULD RESULT IN SERIOUS INJURY OR DEATH. I. GENERAL OPERATION DO NOT: •...
-
Page 3: Table Of Contents
SAFETY RULES Safe Operation Practices for Ride-On Mowers • Be sure the area is clear of other people before mowing. Look for this symbol to point out impor- Stop machine if anyone enters the area. tant safety precautions. It means CAU- •... -
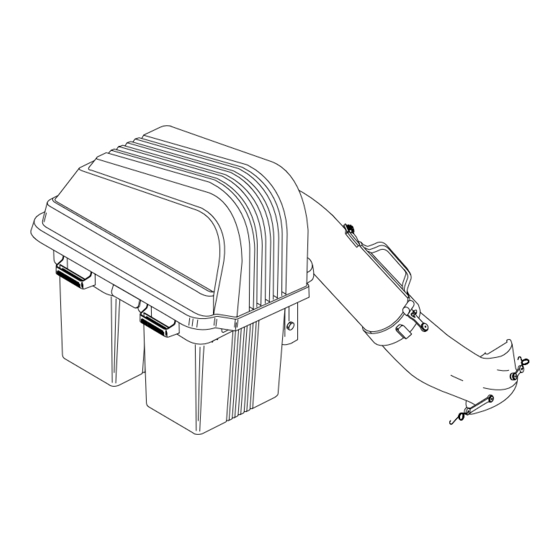
Page 4: Bag Of Parts
KNOW YOUR GRASS CATCHER READ THIS OWNER'S MANUAL AND SAFETY RULES BEFORE ASSEMBLING OR OPERATING YOUR GRASS CATCHER. Compare the illustrations with the carton contents to familiarize yourself with the parts before starting the assembly. Study the operating instructions and safety precautions thoroughly to insure proper functioning of your Grass Catcher and to prevent injury to yourself and others. - Page 5 BAG OF PARTS CONTENTS (continued) GROUP "D" (2) Latch Hook Assembly LOWER CHUTE ASSEMBLY (2) Screw #10 x 5/8 (2) Washer, Lock #10 MOWER DECK (2) Nut, Weld #10 (2) Washer 3/16 x 3/4 x 16 Ga. GROUP "E" CHUTE LATCH ASSEMBLY (1) Screw #10 x 1-1/8...
-
Page 6: Assembly
ASSEMBLY PARTS IDENTIFICATION NEW BLADE BOLT COVER UPPER CHUTE ADAPTER DUMP NEW CROSS BLADE INDICATOR r is in e n ta .C o lle d in e n s ta p la n ta y is t c o e rl n tl y. - Page 7 ASSEMBLY BOLTS REAR MOUNTING BRACKET (See Figs. 1A, 1B & 1C) NOTE: If your tractor already has four (4) shoulder bolts installed on the rear drawbar, simply hang the mounting bracket, lanced tabs towards bottom, on the bolts. Discard LOCKNUTS hardware group "A"...
- Page 8 ASSEMBLY MOUNTING TO TRACTOR (See Fig. 4) CONTAINER ASSEMBLY (See Fig. 5) Use Hardware - - GROUP "C" No hardware required NOTE: For ease of assembly, you may wish to obtain the 1. Place bottom half inside of top half, as shown. assistance of another person for mounting assembly to 2.
- Page 9 ASSEMBLY LOWER REAR EDGE LOWER CHUTE (See Figs. 6A & 6B) OPTIONAL BETWEEN GAUGE WHEEL GAUGE BRACKET TAB AND Use Hardware - - GROUP "D" WHEEL MOWER HOUSING 1. Press weld nut into rubber latch and install two latch BRACKET hook assemblies to lower chute using screw, washer, and lock washer nut as shown.
- Page 10 ASSEMBLY UPPER CHUTE (See Fig. 9A & 9B) CHUTE LATCH ASSEMBLY No hardware required (See Fig. 7) Use Hardware - - GROUP "E & F" 1. Lower mower deck to its lowest cutting position. 1. Assemble latch pin to upper chute, as shown. 2.
-
Page 11: Operation
ASSEMBLY OPERATION TIPS FOR IMPROVED BAGGING OPERATION: INSTALL CROSS BLADES Follow the mower operation instructions in your tractor owner's (See Fig. 10) manual. New Blade Bolts supplied When operating your grass catcher on a lawn where grass and The blade mounting bolts provided in this kit must be used leaf bagging equipment has not been used, you are picking up when mounting the cross blades to your mower. -
Page 12: Customer Responsibilities
OPERATION • Avoid cutting wet grass or in the morning while the dew is still heavy. Grass clippings collected under these conditions tend to be sticky and adhere to the walls of the flow path causing clogging. CAUTION • Your bagger is equipped with a dump bag indicator. As the bags become full, the flow indicating ball will drop down in its slot, indicating that the bags are full or the chutes •... - Page 13 SERVICE NOTES...