
Related Manuals for Renolux Trottine TOPFIX


Summary of Contents for Renolux Trottine TOPFIX
- Page 1 TOPFIX TAILLE DE L’ENFANT 100-150cm POIDS DE L’ENFANT ≤36kg CHILD HEIGHT 100-150cm CHILD WEIGHT ≤36kg...
-
Page 2: Table Of Contents
SOMMAIRE SUMMARY Présentation du siège.....................p3 Presentation of the seat....................p3 Information........................p4 Information........................p4 Ouverture/Fermeture......................p5 Opening/Closing......................p5 Installation du siège avec pinces iso x................p6-7 Installation of the seat with iso x clamps..............p6-7 Installation du siège sans pinces iso x................p8 Installation of the seat without iso x clamps ..............p8 Installation de l’enfant ....................p9 Installation of the child ....................p9 Déhoussage........................p10... -
Page 3: Présentation Du Siège
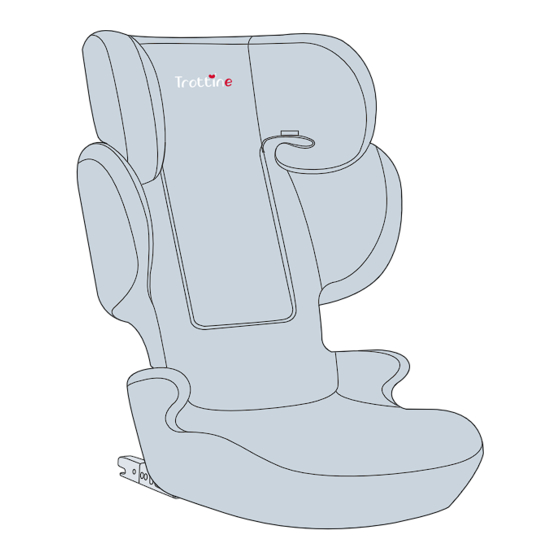
Présentation du siège Presentation of the seat Appui-tête/ Headrest Guide épaule de la ceinture de sécurité/ Shoulder safety belt guide. Notice d’utilisation/ Instruction book Pince Iso x/ Iso x clamp Poignée de réglage de l'appui-tête Head rest adjusting handle Étiquettes d'installation Installation labels Poignée de pliage Folding handle... -
Page 4: Information
Information Information DIRECTION MODE DE FIXATION TAILLE POIDS DU SIÈGE L’INSTALLATION Pinces iso x 100-150cm Face à la route Ceinture de sécurité ≤36kg Ceinture de 100-150cm sécurité SEAT INSTALLATION WEIGHT HEIGHT FIXING MODE DIRECTION Attachements iso x 100-150cm Adult Forward-facing safety-belt ≤36kg Adult... -
Page 5: Ouverture/Fermeture
Ouverture/Fermeture Opening/Closing DÉPLIER LE SIÈGE D’AUTO AVANT DE L’UTILISER. UNFOLD THE CAR SEAT BEFORE USE. TIRER LA POIGNÉE VERS LE HAUT POUR RABATTRE LE SIÈGE D’AUTO. PULL THE HANDLE UP TO FOLD DOWN THE CAR SEAT. page 5... -
Page 6: Installation Du Siège Avec Pinces Iso X
Installation du siège avec pinces iso x Installation of the seat with iso x clamps ISOFIX DÉPLIER LE CONNECTEUR ISOFIX DES DEUX CÔTÉS. UNFOLD THE ISOFIX CONNECTOR ON BOTH SIDES. page 6... - Page 7 CLIC INSÉRER DES DEUX CÔTÉS, LES PINCES ISOFIX AU VÉHICULE JUSQU'À ENTENDRE UN "CLIC" ET QUE LE TÉMOIN S'AFFICHE EN VERT. SI VOUS NE L'INSÉREZ PAS CORRECTEMENT L'INDICATEUR SERA TOUJOURS ROUGE. INSERT FROM BOTH SIDES, THE ISOFIX CLAMPS TO THE VEHICLE UNTIL YOU HEAR A "CLICK"...
-
Page 8: Installation Du Siège Sans Pinces Iso X
Installation du siège sans pinces iso x Installation of the seat without iso x clamps REPLIEZ LES PINCES ISOFIX DES DEUX CÔTÉS. FOLD THE ISOFIX SYSTEM ON BOTH SIDES. PLACER LE SIÈGE AUTO CONTRE LE SIÈGE DU VÉHICULE. LE DOSSIER PEUT ÊTRE LÉGÈREMENT AJUSTÉ. -
Page 9: Installation De L'enfant
Installation de l’enfant Installation of the child 0-2cm CLIC PLACER L'ENFANT SUR LE SIÈGE AUTO EN VOUS ASSURANT QU'IL SOIT ASSIS BIEN DROIT CONTRE LE DOSSIER. RÉGLER L'APPUI-TÊTE POUR L'ADAPTER À L'ÉPAULE DE L'ENFANT. TIRER LA CEINTURE DE SÉCURITÉ AUTOUR DE L'ENFANT, FAIRE PASSER LA CEINTURE D'ÉPAULE PAR LE GUIDE AU BAS DE L'APPUI-TÊTE, FAIRE PASSER LA CEINTURE ABDOMINALE AU-DESSUS DE... -
Page 10: Déhoussage
Déhoussage Removal of cover OUVRIR LES BOUTONS PRESSION SITUÉS DE CHAQUE CÔTÉ DE L'APPUI-TÊTE ET DU DOSSIER ET RETIRER LA HOUSSE EN TISSU. OPEN THE SNAP BUTTONS ON BOTH SIDES OF THE HEADREST AND BACKREST AND REMOVE THE FABRIC COVER. page 10... -
Page 11: Liste Des Véhicules
Liste des véhicules Vehicles list Emplacement du Constructeur automobile Modèle siège approuvé Liste des véhicules permettant l’utilisation du rehausseur Car manufacturer Model Location of the « spéci que au véhicule». approved seat La position du siège dans une autre voiture peut également Alfa Romeo convenir à... - Page 12 Emplacement du Emplacement du Constructeur automobile Modèle Constructeur automobile Modèle siège approuvé siège approuvé Car manufacturer Model Car manufacturer Model Location of the Location of the approved seat approved seat Ford Spark B-max Trax C-max Ecosport Fiesta 300 CC Focus Chrysler Dodge Caliber Focus...
- Page 13 Emplacement du Emplacement du Constructeur automobile Modèle Constructeur automobile Modèle siège approuvé siège approuvé Car manufacturer Model Car manufacturer Model Location of the Location of the approved seat approved seat Carens/Rondo CLA C 117 Carens CLA shooting break Carnival/Sedona CLC 180 C 204 Cee’d CLK CL 203 Cerato/Spectra...
- Page 14 Emplacement du Emplacement du Constructeur automobile Modèle Constructeur automobile Modèle siège approuvé siège approuvé Car manufacturer Model Car manufacturer Model Location of the Location of the approved seat approved seat Ibiza Peugeot Leon Toledo Citigo Skoda Fabia 1,2,4 Fabia Octavia 308 SW Octavia 1,2,4...
- Page 15 Emplacement du Constructeur automobile Modèle siège approuvé Car manufacturer Model Location of the approved seat Caddy 4 Golf IV Golf V Golf VI Golf VII Golf Sportsvan Jetta Lupo Passat Passat B8 Saloon Passat B8 Estate Phaeton Polo Scirocco Sharan 2,3,4 T4 Multivan/Caravelle T5 Multivan/Caravelle...
-
Page 16: Avertissements Et Conseils D'utilisation
N’utiliser pas de nettoyants chimiques. Faire sécher naturellement. GARANTIE La société RENOLUX France Industrie garantit ce siège auto pendant 2 ans à dater de son achat. Toute utilisation non conforme à cette notice ne saurait engager la responsabilité de la société RENOLUX. Pour toute réclamation, retourner cette notice au magasin accompagné... -
Page 17: Warnings And Instructions For Use
GUARANTEE Renolux France Industries guarantees this child safety seat for 2 years from date of purchase. The Renolux Company is not responsible for any damage resulting from use other than that which is described in the manufacturer's instructions. All complaints should be referred to the store where purchased along with this warranty and original sales slip. - Page 18 NOTES NOTES NOTES NOTES NOTES NOTES page 18...
- Page 19 NOTES NOTES NOTES NOTES NOTES NOTES page 19...
- Page 20 RENOLUX FRANCE INDUSTRIE ZI de Montbertrand 38230 CHARVIEU FRANCE Tél: +33 (0)472 469 737 - Fax : +33 (0)472 029 371 E.Mail: contact@renolux.fr page 20...
Need help?
Do you have a question about the Trottine TOPFIX and is the answer not in the manual?
Questions and answers