
Related Manuals for Akw Larenco


Summary of Contents for Akw Larenco
- Page 1 Larenco Shower Screens INSTALLATION INSTRUCTIONS Please read all instructions before installation and leave this document with the end user for future reference as it contains important warranty information.
- Page 2 Larenco glass screens are a modular screen system. Consequently, there are many possible configurations which can accommodate most showering areas. Determine which configuration is to be installed before starting on the installation.
- Page 3 (A smart phone screen with the screen turned off will do the trick.) These instructions advise the minimum standards of installation. Due to the variety of installation conditions, AKW cannot account for all circumstances. This information is provided on the condition that the installer determine its suitability for each case.
- Page 4 Plain, duo, and bi-fold doors close onto a magnet strip housed in a panel or a close-to column. These three door types are the same from a sizing point of view. The saloon door closes onto itself. This difference is why it is listed separately in the Sizing section. General: 01905 823 298 www.akw-ltd.co.uk...
- Page 5 The images of the panels here do not show the support means (see step 5). This is merely for the sake of clarity. Order: 01905 823 299 orders.akw-ltd.co.uk Technical Support: 01905 560 219...
- Page 6 Here, again, flipping the orientation of the door produces no fundamental difference in how the screen fits together. The same is not true for Panel + door, in which the close-to column must be placed on the wall or in the panel, depending on the door's orientation. General: 01905 823 298 www.akw-ltd.co.uk...
- Page 7 Panel + door __| Door Panel + door __| Panel Door + panel __| Panel Panel + door + panel __| Panel other configurations are possible. These listed here are the common ones. Order: 01905 823 299 orders.akw-ltd.co.uk Technical Support: 01905 560 219...
- Page 8 Panel in a wall comp normal close-to in a wall comp narrow close-to (This has its own wall comp which nothing else uses.) Extra narrow close-to (This has its own wall comp which nothing else uses.) General: 01905 823 298 www.akw-ltd.co.uk...
- Page 9 Simply add 20 to the sizes on the following pages if a wide wall comp is used. For example, 774 - 787 becomes 794 - 807. Order: 01905 823 299 orders.akw-ltd.co.uk Technical Support: 01905 560 219...
- Page 10 These sizes are for a 1000 door on the front and an 800 door on the side. A 900 door is 874 - 887. Front Side (800) (700) Door __| Panel 782 - 796 × 677 - 695 800 door on the front, 700 panel on the side. Add 100 mm increments to get other the sizes. General: 01905 823 298 www.akw-ltd.co.uk...
- Page 11 Accordingly, the images use the same screen elements so that it is easy to track the progress of the screen as it is installed. Order: 01905 823 299 orders.akw-ltd.co.uk Technical Support: 01905 560 219...
- Page 12 The upper part can be installed once the lower door has been fixed to its wall comp. When the upper wall comp is ready to be installed, place the joining piece, 10-010-125, on top of the lower wall comp and repeat the steps above. Figure 1.4 Fig. 1.1 Fig. 1.2 General: 01905 823 298 www.akw-ltd.co.uk...
- Page 13 Step 1: Planning and Placement Fig. 1.3 Fig. 1.4 Order: 01905 823 299 orders.akw-ltd.co.uk Technical Support: 01905 560 219...
- Page 14 • You may need to temporarily fix the corner extrusion to the side panel to stop the corner enabling panel from falling over. Make sure that each panel sits properly on the shower floor. Any obstructions under a panel could result in the screen not fitting together properly and/or leaks. Fig. 2.1 General: 01905 823 298 www.akw-ltd.co.uk...
- Page 15 2: Placement of Panels Fig. 2.2 Fig. 2.3 Order: 01905 823 299 orders.akw-ltd.co.uk Technical Support: 01905 560 219...
- Page 16 *Alternatively, lift the screen element very slightly so that the template can be slid underneath. Then use masking tape to keep the template in place. There are three close-to columns: normal, narrow, and extra narrow (see page 8). Their installation is the same. Fig. 3.1 General: 01905 823 298 www.akw-ltd.co.uk...
- Page 17 3: Placement of Doors Showering area Bathroom Fig. 3.2 Fig. 3.3 Fig. 3.4 Order: 01905 823 299 orders.akw-ltd.co.uk Technical Support: 01905 560 219...
- Page 18 V. Fix the panel(s) in place using 4.2 x 9.5 mm pan head screws. Figure 4.3 • Side panels must be put in before a corner enabling panel. Apply some silicone sealant to any screw holes in the shower floor before screwing the screw in. Fig. 4.1 General: 01905 823 298 www.akw-ltd.co.uk...
- Page 19 Step 4: Installing Panels Fig. 4.2 Fig. 4.3 Order: 01905 823 299 orders.akw-ltd.co.uk Technical Support: 01905 560 219...
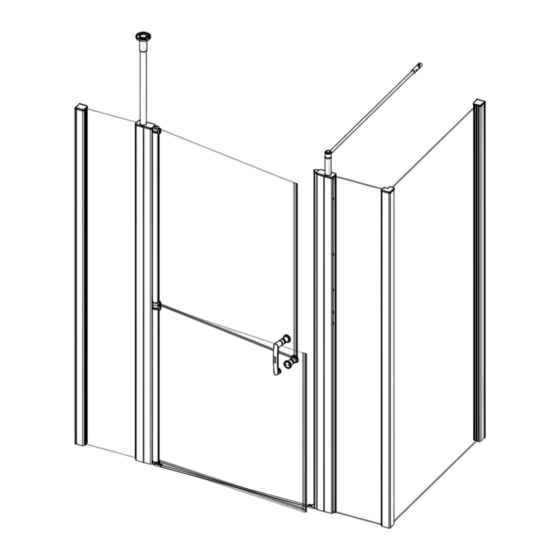
- Page 20 V. Fasten the wall bracket to the ceiling. M5 x 12 countersunk head 4.2 x 32 mm pan head 4.2 x 45 mm pan head 4.2 x 13 mm pan head 4.2 x 9.5 mm pan head Fig. 5.1 General: 01905 823 298 www.akw-ltd.co.uk...
- Page 21 Step 5: Attaching Support Means Fig. 5.2 4.2 x 38 mm pan head 4.2 x 32 mm pan head Fig. 5.3 Fig. 5.4 Order: 01905 823 299 orders.akw-ltd.co.uk Technical Support: 01905 560 219...
- Page 22 V. Put the door(s) into the wall comp(s) or whopper(s) and align the holes. VI. Fix the door(s) in place using 4.2 x 9.5 mm pan head screws. *Alternatively, run the deflector seal to the end and have the magnet strip a bit higher. Fig. 6.1 General: 01905 823 298 www.akw-ltd.co.uk...
- Page 23 Step 6: Installing Doors Fig. 6.2 Fig. 6.3 Order: 01905 823 299 orders.akw-ltd.co.uk Technical Support: 01905 560 219...
- Page 24 III. Draw the outside half of the handle onto the screw. Ensure that the plastic sheath that goes in the slotted hole remains on the handle. IV. Repeat for the remaining piece of the handle. V. Insert the rubber bungs into the holes. Fig. 7.1 General: 01905 823 298 www.akw-ltd.co.uk...
- Page 25 Step 7: Installing the Handle Fig. 7.2 Fig. 7.3 Order: 01905 823 299 orders.akw-ltd.co.uk Technical Support: 01905 560 219...
- Page 26 III. Bend the bump strip just enough to slide it under the seal holders, then press it down firmly. IV. Fully tighten the screws in the bump strip holders. Fig. 8.1 Fig. 8.2 Fig. 8.3 General: 01905 823 298 www.akw-ltd.co.uk...
- Page 27 II. Insert all screw caps into the extrusions. III. Place all top caps onto the extrusions. IV. Apply silicone sealant to the screen, horizontally on the outside and vertically on the inside. Fig. 9.1 Order: 01905 823 299 orders.akw-ltd.co.uk Technical Support: 01905 560 219...
- Page 28 Step 9: Finishing Up Fig. 9.2 Fig. 9.3 General: 01905 823 298 www.akw-ltd.co.uk...
- Page 29 Order: 01905 823 299 orders.akw-ltd.co.uk Technical Support: 01905 560 219...
- Page 30 General: 01905 823 298 www.akw-ltd.co.uk...
- Page 31 After cleaning, rinse with water and wipe thoroughly with a soft damp cloth to remove any cleaning material residues before drying. AKW does not approve or recommend autoclave cleaning of any of the components due to the damage that this can cause to the components’ material.
- Page 32 If the issue is still Follow us on Social: unresolved, contact AKW Technical Enquiries who will provide further advice and arrange for a maintenance engineer to visit if necessary. none of the foregoing affects your statutory rights.
Need help?
Do you have a question about the Larenco and is the answer not in the manual?
Questions and answers