Table of Contents
Advertisement
Advertisement
Table of Contents

Related Manuals for Honeywell RAEGuard 3


Summary of Contents for Honeywell RAEGuard 3
- Page 1 RAEGuard 3 Fixed Gas Detector FGM-6XXX(S) User Manual D06-4001-000 Rev A...
-
Page 2: About This Manual
RAEGuard 3 User Manual About this manual This manual explains how to install and use RAEGuard 3 fixed gas detector. All personnel responsible for installation, commissioning, operation or maintenance of these products should read this manual. Before installing the product, please read and fully understand the instruction given in this manual. -
Page 3: Table Of Contents
RAEGuard 3 User Manual Contents ABOUT THIS MANUAL ............... 2 CONTENTS ..................3 1 SAFETY ................... 6 2 INTRODUCTION ................9 2.1 TRANSMITTER ................11 2.2 FLAMMABLE, TOXIC AND OXYGEN GAS SENSORS ....12 2.3 ACCESSORIES ................12 ® 2.4 OPTIONAL HART FUNCTION ........... - Page 4 RAEGuard 3 User Manual 6.1 DISPLAY ..................24 6.2 SYSTEM STATUS ............... 25 6.3 MAGNETIC WAND ..............25 6.4 OPERATING MODE ..............26 7 FIRST TIME SWITCH ON (COMMISSIONING) ....... 27 8 CALIBRATION AND BUMP TEST ..........29 8.1 ZEROING AND SPAN CALIBRATION ......... 29 8.2 BUMP TEST ................
- Page 5 14.6 Mounting Plate Kit Drawing ............. 70 14.7 Gas Flow Adapter Drawing ............. 71 15 NAMEPLATES ................72 15.1 RAEGuard 3 LEL ..............72 15.2 RAEGuard 3 EC ..............73 15.3 RAEGuard 3 NDIR ..............74 15.4 7R i-sensor LEL ..............75 15.5 7R i-sensor NDIR ..............
-
Page 6: Safety
WARNINGS RAEGuard 3 is designed for installation and use in Zone 1, Zone 2 hazardous areas in many countries including Europe, China etc. Installation must be in accordance with the recognized standards of the appropriate authority in the country concerned. - Page 7 RAEGuard 3 User Manual Special condition for safe use: Compliance with the manual is required for safe use of RAEGuard 3. Once the instrument steps into the "safe state", must shut down and resume detector until it is ensured to be good.
- Page 8 This warranty covers instrument and parts sold to the Buyer only by authorized distributors, dealers and representatives as appointed by Honeywell Analytics. The warranties set out in this clause are not pro rata, i.e. the initial warranty period is not extended by virtue of any works carried out there under.
-
Page 9: Introduction
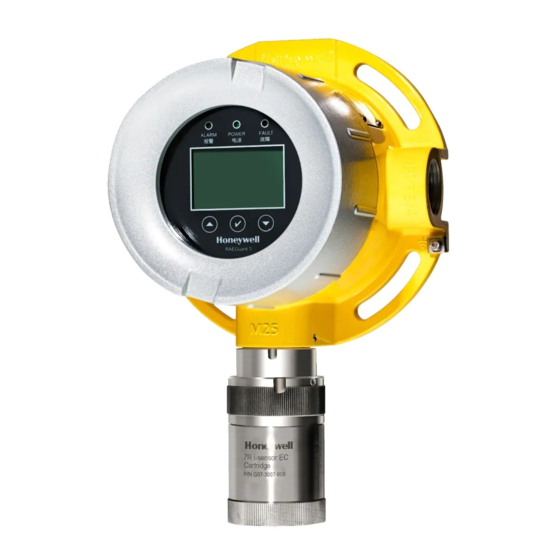
RAEGuard 3 User Manual 2 Introduction The RAEGuard 3 consists of a gas detector transmitters and a choice of sensors for detecting flammable gas, toxic gas and oxygen. It is designed for using in hazardous area locations and may also to be used in other area not classified as hazardous. - Page 10 RAEGuard 3 User Manual RAEGuard 3 comprises of the main parts as shown below. Cover Locking Grub Screw 3/4'’ Cable Module Entry/Conduit(x 2) M25 Sensor Entry Enclosure External Earth Integral Point(x 2) Mounting Plate Safety Sensor Cartridge Barrier/Socket Retainer Locking Grub...
-
Page 11: Transmitter
RAEGuard 3 User Manual 2.1 Transmitter The RAEGuard 3 is with a universal transmitter, which can be connected to toxic and oxygen, catalytic and infrared(IR) sensor modules, and supports the remoted installation between sensor and transmitter separately. RAEGuard 3 transmitter uses three magnetic wand switches to enable non- intrusive operation. -
Page 12: Flammable, Toxic And Oxygen Gas Sensors
Toxic and oxygen sensor Cartridge Flammable or NDIR sensor Cartridge 2.3 Accessories A wide range of accessories is available to allow RAEGuard 3 to be used in a wider range of environments and installations. Standard accessories (Note: ATEX/IECEx versions not including Stopping Plug):... -
Page 13: Function
Bluetooth communication and SD card. For more ® detailed information, please read Hart Communicator manual or consult manufacturer. The DD file of RAEGuard 3 can be downloaded from the website: ® https://data.hagascloud.com, or from the Hart Foundation website. Note: This feature is optional instead of standard... -
Page 14: Installation
RAEGuad 3 Toxic and Oxygen RAEGuard 3 Flammable and NDIR RAEGuard 3 offers two mounted spares, one as standard spares along with product is 2xU-type bolts; another as optional Mounting Plate Kit is for customer who can install quickly and conveniently, which includes 1-plate, 1-brackt and screws 2- M8*110, 4-M8*25 and 2-M8*6 separately. - Page 15 See the following procedure to fix the optional Mounting Plate Kit on the pipe/structure; At diagonal positions secure the two M8*6 screws to the four holes in the back of enclosure of the RAEGuard 3 transmitter; Refer to “Step 1”, align the transmitter to the 2 holes on the mounting plate;...
-
Page 16: Installing The Sensor
RAEGuard 3 User Manual 3.2 Installing the sensor Replacement or installation of toxic gas and oxygen sensor as well as flammable gas and NDIR sensor Toxic gas and oxygen sensor Flammable gas and NDIR sensor Warning Care should be taken when removing and refitting sensor module to the sensor socket so that damage to the connection pins can be avoided. -
Page 17: Remote Sensor Mounting
Connect the junction box to the transmitter using suitable cable and cable glands. For wiring, see "Electrical Connection" section. Note : The maximum cable length between the remotely mounted sensor and the RAEGuard 3 transmitter is 10 meters. Step1 Step 2 Step 3... -
Page 18: Electrical Connections
4 Electrical Connections WARNINGS RAEGuard 3 is designed for installation and use in Zone 1, Zone 2 hazardous areas in many countries including Europe, China etc. Installation must be in accordance with the recognized standards of the appropriate authority in the country concerned. -
Page 19: Transmitter Wiring
Note: All electrical connections should be made in accordance with any relevant local or national legislation, standards or codes of practice. RAEGuard 3 transmitter only supports source current output with 3 wires 4-20mA. Please refer to the wiring diagram as below. -
Page 20: Terminals
RAEGuard 3 User Manual 5.2 Terminals Note: Before wiring, ensure that the PCB stack will be out of the enclosure of transmitter due to terminals at back of PCB stack. Terminal Block for Relays Grounding SP-07J/07A Point for Local Alarm... -
Page 21: Power
The above data is based on the normal supply voltage of 24VDC. RAEGuard 3 supports RS485 Modbus RTU protocol. It is recommended to use shielded twisted-pair cable to communicate with the master system. The maximum communication distance is as follows:... - Page 22 RAEGuard 3 User Manual detector housing and another end is grounded reliably. The grounded wire should select a cable with a cross-section not less than 4mm , and the external grounded resistor should be guaranteed to be less than 4ohms.
-
Page 23: Default Settings
23.5%vol Rising 100ppm 10ppm Rising 20ppm Rising 500ppm 25ppm Rising 50ppm Rising 100%LEL 25%LEL Rising 50%LEL Rising -NDIR 100%LEL 25%LEL Rising 50%LEL Rising For details of how to change the configuration of the RAEGuard 3 please refer to section 12. -
Page 24: Normal Operation
RAEGuard 3 User Manual 6 Normal operation RAEGuard 3 is generally running by the above default configuration. If the user needs adjustment based on the actual field conditions, please set it in terms of the setting range given by the instrument. -
Page 25: System Status
RAEGuard 3 User Manual 6.2 System status RAEGuard 3 provides users with simple and clear system status indications, which is convenient for users to judge and know the danger level of the site and whether the instrument is running normally. -
Page 26: Operating Mode
RAEGuard 3 User Manual 6.4 Operating mode RAEGuard 3 detector offers three operating modes. Normal monitor mode: is the normal operating status while RAEGuard 3 measures, and displays gas concentration. While the instrument alarm, fault, warning, etc. occur, the LED light will indicate the corresponding status of the instrument, and the corresponding information will be displayed on the LCD. -
Page 27: First Time Switch On (Commissioning)
RAEGuard 3 User Manual 7 First Time Switch on (Commissioning) Warning The following procedure requires the Transmitter Cover to be removed while carrying out supply voltage checks. Therefore, the appropriate permits to work should be sought in preparation. Prior to carrying out any HOT WORK ensure local and site procedures are followed. - Page 28 RAEGuard 3 User Manual follows, which takes about 60s. * The connected sensor does not support TWA/STEL, the page will not be displayed. * Clock does not affect detection * This page will be displayed if the sensor is faulty, or not...
-
Page 29: Calibration And Bump Test
Teflon material should be used for the pipe. To calibrate the detector, use an appropriate span gas cylinder, constant flow regulator and the RAEGuard 3 Calibration Cap. The flow rates used for calibration gas are as follows:... - Page 30 0.5 to 1.0 Methane (NDIR) 0.5 to 1.0 The RAEGuard 3 detector adopts a 2-point calibration method, i.e. zeroing calibration and span calibration. The calibration of the detector should follow the sequence below. Note: The zero of the oxygen sensor does not need to be calibrated, nor does it require bump test.
- Page 31 RAEGuard 3 User Manual According to navigation, then select the switch” √” access to the calibration screen as shown below. At the same time, the detector enters the "Inhibit" mode. When zeroing gas is ready, please click the switch” √”, if it is oxygen sensor, and “No Zero Calibration”...
- Page 32 RAEGuard 3 User Manual Span Calibration After zero calibration, enter the "Span Concentration" setting menu as shown below. Click the button ”√” to set the calibration span gas concentration. The following is the allowable setting range; if the displayed “Span Concentration”...
-
Page 33: Bump Test
RAEGuard 3 User Manual 14. When the span calibration fails, the display is as shown below. Use the switch “√” to repeat the 12, 13 or 14 above for the span calibration till succeed. √ Note: When instrument calibration is unsuccessful, it is recommended to check transmitters or sensors, and you can choose to retry or contact Customer Service Center. - Page 34 RAEGuard 3 User Manual Select the “√” switch to enter the “Test” screen as shown below. Select the “Bump Test” and use the “√” switch, at the same time the detector enters “Inhibit” mode. If it is an oxygen sensor, the prompts are as follows: If it's not an oxygen sensor, the menu goes to "BumValue Set".
- Page 35 RAEGuard 3 User Manual Connect the gas cylinder to the Calibration Cap through Teflon pipe, select the “√” switch, and the detector starts countdown (different sensors have different countdown set, which has been set at the factory). Use the “▲” switch to undo the calibration and return to the “Calibration & Test”...
-
Page 36: General Maintenance
9 General Maintenance WARNINGS RAEGuard 3 is designed for installation and use in Zone 1, Zone 2 hazardous areas in many countries including Europe, China etc. Installation must be in accordance with the recognized standards of the appropriate authority in the country concerned. - Page 37 Typical life of a toxic gas sensor is dependent on the application, frequency and amount of gas exposure. Under normal conditions (3 monthly visual inspection and 6 monthly test/recalibration), the RAEGuard 3 Oxygen and other toxic sensors have an expected life equal to or greater than 24 months.
-
Page 38: Servicing
RAEGuard 3 Sensor Socket have no serviceable parts. When they have reached the end of their operational life, simply replace the cells. To replace the plug-in sensor of a RAEGuard 3 Sensor Socket for Flammable and NDIR use the following procedure: Important: Remove the Power from the RAEGuard 3 transmitter. - Page 39 Waterproof Flammable/NDIR Sensor Replacement To replace the plug-in intrinsically safety oxygen and toxic sensor of a RAEGuard 3 Safety Barrier use the following procedure: Important: Firstly, enter the menu of transmitter, working according to below diagram: Remove the Waterproof Cap or other accessories from the thread.
-
Page 40: Replacing Modules Within The Transmitter
10.2 Replacing Modules within the Transmitter The circuit module in the RAEGuard 3 transmitter housing contains 3 replaceable modules: Display PCB, Main PCB, and Terminal PCB (Relay output will not be provided if relay function is not ordered). - Page 41 RAEGuard 3 User Manual Finally, according to the reverse step, fit the circuit module, tighten the cover of transmitter, and lock Locking Grub Screw. Protective cover Display PCB Main PCB Terminal PCB 4-ST2.9x13 self-tapping screw Protective cover...
-
Page 42: Faults And Warnings
RAEGuard 3 User Manual 11 Faults and Warnings The table below provides details of possible error. Message Description Action F301 Sensor failure Check terminal plate, safety barrier F302 Sensor failure Check sensor modules, or change F321-325 Sensor failure Check sensor modules, or change... - Page 43 RAEGuard 3 User Manual F653 Mainboard failure Check the main board, or replace it Check the sensor module, or replace it, or F654 Sensor failure contact the factory Communication failure between Check the cable and safety barrier, or F655 sensor and replace them, or contact the factory.
-
Page 44: Menu's And Advanced Configuration
RAEGuard 3 User Manual 12 Menu’s and Advanced Configuration RAEGuard 3 offers users a variety of operating modes, providing different management permissions for operators in different functions. Put the magnet over the switch Select the “√” for more than switch “√” to... -
Page 45: View Mode
RAEGuard 3 User Manual 12.1 View mode Under the normal detection mode of the detector, select the “√” button with the magnetic wand to quickly browse the detector parameter settings, which can only be viewed, but cannot be modified. select “... -
Page 46: Configuration Mode
RAEGuard 3 User Manual 12.2 Configuration Mode RAEGuard 3 enters different settings menus depending on the passwords entered. "1111" enters the basic configuration mode; "8888" enters the advanced configuration mode. Comparative tables of different menus in 2 configuration modes Basic Advanced Calibration &... - Page 47 RAEGuard 3 User Manual above/below Low Alarm latch status: ● ● latch/non-latch Low Alarm relay: ● ● energized/de-energized High Alarm settings ● ● High Alarm threshold ● ● High Alarm trigger direction: ● ● above/below High Alarm latch status: latch/non- ●...
- Page 48 RAEGuard 3 User Manual ● Password settings Low-level password setting111 ● Advanced password settings: 888 ● Communication settings ● ● Address: 001 ● ● Baud rate: ● ● 4800;9600;19200;38400;57600 HART address:00 ● ● Output crrent lvel ●...
- Page 49 RAEGuard 3 User Manual Forced relay: It has 3 menus: fault relay, low alarm relay and high alarm relay. Entering any menu, the detector will enter the "Inhibit" indicator mode. Fault relay: Use the switch “▼” to activate the energized or de- energized state of the fault relay.
- Page 50 RAEGuard 3 User Manual required low alarm value according to the LCD screen display prompt. Low Alarm trigger direction: In addition to Oxygen, when other gases are detected, the Low Alarm trigger direction default is "higher", indicating that if the gas concentration value detected by the detector in real time is greater than the set Low Alarm threshold, the Low Alarm relay will be triggered.
- Page 51 External alarm device: It refers to the local sound and light alarm SP-07J and SP-07A provided by Honeywell, which cannot be connected to any other equipment. The default type is SP-07J. Select the switch “▼”,move up and down to select the desired option; Use the switch “▲”...
- Page 52 The default is disabled. This menu is only effective for toxic gas (excluding: oxygen, catalytic combustion flammable gas and NDIR infrared flammable gas). The operation process is as follows: Range settings: RAEGuard 3 is different from other products. Users can set...
- Page 53 RAEGuard 3 User Manual the detection range of the detector according to the actual needs or changes in the installation environment. Depending on the instrument, different sensors have different settings. √ Note: After the range is modified, in order to ensure the linearity and detection accuracy of the detector, please calibrate the zero point and standard gas according to the calibration requirements.
- Page 54 RAEGuard 3 User Manual CF value is set mainly for some detected gases without standard gas substances. "60% LEL standard methane gas" is equivalent to "60*0.83=49.8 (% LEL) hydrogen gas". Sensor Replacement: This menu is only effective for toxic and oxygen sensors.
- Page 55 RAEGuard 3 User Manual otherwise it will affect the cycle management function of detector, such as calibration reminder, etc. Date settings: Time settings: Location code: Users can define the location information of detector by himself to facilitate the management of the detector.
- Page 56 RAEGuard 3 User Manual Password settings: Low-level password setting: The default is: 1111. Enter the password setting menu, select the switch “▲” to cyclically increment and decrement number; use “▼” to move to the next character; use “√” to complete; then select “√”...
- Page 57 RAEGuard 3 User Manual Communication settings: Address: RS485 Modbus RTU address, the default is 001, and the range is set to 001-247 Baud rate: The default RS485 Modbus RTU communication rate is 19200, which can be set to: 4800, 9600, 19200, 38400, 57600.
- Page 58 RAEGuard 3 User Manual Output Current Level: This menu includes fault mode, inhibit mode, warning mode, and out of range, which is used to set the current output of the instrument in different modes. Fault mode defaults to 1.0 mA; inhibit mode defaults to 2.0 mA;...
- Page 59 RAEGuard 3 User Manual 4-20 mA output calibration: This menu is used to fine-tune the 4-20 mA circuit, mainly to adjust the current transmission error caused by wiring. 4 mA output calibration: The current value of 4 mA is adjusted while...
- Page 60 RAEGuard 3 User Manual 20 mA output calibration: The current value of 20 mA is adjusted while the instrument enters the inhibit mode. Restore factory settings: After the menu is executed, the instrument "restart" will restore all settings in the detector to the factory default value.
- Page 61 RAEGuard 3 User Manual...
-
Page 62: Technical Specifications
RAEGuard 3 User Manual 13 Technical specifications RAEGuard 3 Gas Detector Universal transmitter with standard configuration of 3- wire, 4-20mA and RS485 MODBUS output for use with a wide range of applications for the detection of flammable, toxic and Oxygen gas hazards. - Page 63 -20°C to +50°C, 45-75%RH(Non-condensing), in clean air conditions Remarks: * RAEGuard 3 will provide users more communication interfaces and gas types in the future, such as Bluetooth, wireless, etc. For availability, please contact Honeywell. ** Availability of ATEX, IECEx and other certificates, please contact Honeywell Analytics.
- Page 64 LEL model is FGM-6100/6100S. NDIR model is FGM-6200/6200S. Toxic and Oxygen models are: FGM-6300/6300S. No suffix that means aluminum alloy housing material, and "S” that means a stainless steel housing material. * For availability, please contact Honeywell Analytics. 1ppm is equivalent to 1μmol/mol.
-
Page 65: Installation Drawings
RAEGuard 3 User Manual 14 Installation Drawings 14.1 Mechanical installation Drawing... -
Page 66: Electronic Connection Drawing
RAEGuard 3 User Manual 14.2 Electronic Connection Drawing... -
Page 67: Duct Mounting Drawing
RAEGuard 3 User Manual 14.3 Duct Mounting Drawing... -
Page 68: Collecting Cone Drawing
RAEGuard 3 User Manual 14.4 Collecting Cone Drawing... -
Page 69: Sunshade/Deluge Protection Drawing
RAEGuard 3 User Manual 14.5 Sunshade/Deluge Protection Drawing... -
Page 70: Mounting Plate Kit Drawing
RAEGuard 3 User Manual 14.6 Mounting Plate Kit Drawing... -
Page 71: Gas Flow Adapter Drawing
RAEGuard 3 User Manual 14.7 Gas Flow Adapter Drawing... -
Page 72: Nameplates
RAEGuard 3 User Manual 15 Nameplates 15.1 RAEGuard 3 LEL... -
Page 73: Raeguard 3 Ec
RAEGuard 3 User Manual 15.2 RAEGuard 3 EC... -
Page 74: Raeguard 3 Ndir
RAEGuard 3 User Manual 15.3 RAEGuard 3 NDIR... -
Page 75: I-Sensor Lel
RAEGuard 3 User Manual 15.4 7R i-sensor LEL... -
Page 76: I-Sensor Ndir
RAEGuard 3 User Manual 15.5 7R i-sensor NDIR... -
Page 77: I-Sensor Ec
RAEGuard 3 User Manual 15.6 7R i-sensor EC... -
Page 78: Cross Interference And Cross Calibration
The below table shows the relative cross sensitivity of the RAEGuard 3 to other gases. “Gas Type” indicated the RAEGuard 3 sensor type fitted to the RAEGuard 3. “Gas Type Applied” indicates the gas that may be applied to that sensor and the resulting Reading. -
Page 79: Cross Calibration Flammable Gas Detector (Not Tested As Part Of The Performance Approval)
RAEGuard 3 User Manual 16.2 Cross Calibration Flammable Gas Detector (Not tested as part of the performance approval) For greatest accuracy, a catalytic gas detector should be calibrated using a certified gas/air mixture equal to 50%LEL of the actual target gas intended to be monitored. - Page 80 2.56 As for detector calibrated by Methane, for example, if you intend to monitor Propane, so long as set CF @1.64 in menu of RAEGuard 3, which appears detector just detects Propane. If RAEGuard 3 detector is calibrated by non-Methane compounds, when calibrating with Propane the new CF for Ethane is 1.43/1.64 =...
-
Page 81: Appendix A - Modbus ® Protocol
Communication settings Communication mode: RTU Baud rate: 4800,9600,19200,38400,57600 Information structure / communication steps RAEGuard 3 only supports the 0x03 (read-only register) function code, i.e. The detector only supports reading values. 0x03: Read-only register Request information: Register Register Quantity of... - Page 82 Nothing in this quick start guide shall be construed as a representation and/ or warranty by Honeywell.
Need help?
Do you have a question about the RAEGuard 3 and is the answer not in the manual?
Questions and answers