Advertisement
Quick Links
Dear Customer,
Thank you for purchasing the Milano+ travel system.
For the safety of you child, you must read and follow these instructions
carefully.
This product has been manufactured under quality surveillance and been
tested to EN1888-2:2018 and BS EN1466:2014.
IMPORTANT- READ CAREFULLY AND KEEP FOR FUTURE REFERENCE
Advertisement

Related Manuals for Mee-go Milano+


Summary of Contents for Mee-go Milano+
- Page 1 Dear Customer, Thank you for purchasing the Milano+ travel system. For the safety of you child, you must read and follow these instructions carefully. This product has been manufactured under quality surveillance and been tested to EN1888-2:2018 and BS EN1466:2014. IMPORTANT- READ CAREFULLY AND KEEP FOR FUTURE REFERENCE...
- Page 2 User manual Unfolding and folding the stroller frame To unfold the frame, first lie it flat (1), then, holding the handle, pull it upwards (2), until the locking mechanism engages (3). ATTENTION! Before using the stroller ensure the locking mechanism is secured. To fold the frame, press the buttons on both sides of the handle (4,5) and push downwards.
- Page 3 Fitting and removal of rear wheels To attach the rear wheels, press the metal button in the centre of the wheel (7), then slide the wheel onto the axle, as far as it can go then pull back slightly. To remove the rear wheels press the button to release, and pull wheel outwards. Fitting and removal of front wheels To install the front wheel, slide the wheel pin into the socket under the footrest of the stroller until you hear the click (8).
- Page 4 Swivel front wheels The stroller has swivelling front wheels. To lock the wheels rotate the knob (10), and then rotate the opposite direction to unlock the wheels. Applying the brake To apply the rear wheel brake, step down on the brake pedal (11), to release the brake lift up the brake pedal.
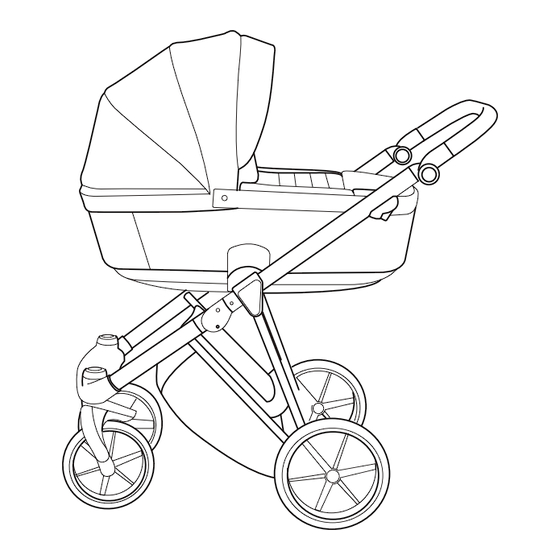
- Page 5 Assembling and disassembling the carrycot The carrycot can be mounted on the frame in a forward or rearward facing position. To mount the carrycot on the stroller frame, insert the connectors into the slots on each side of the frame and push downwards until you hear a“click”(13) To remove the carrycot, press the buttons on each side of the carrycot and lift the unit upwards (13).
- Page 6 Ventilation To increase ventilation in the carrycot unzip the zip on the back of the canopy and the back of the carrycot (16) Apron Open the press studs on the sides of the apron to allow you to remove your child from the carrycot without removing the whole cover (17) Assembling and disassembling the seat unit The seat unit can be mounted on the frame in a forward or rearward facing...
- Page 7 Seat unit canopy The seat is equipped with a removable canopy. To assemble, please slide onto the fittings situated on each side of the seat (22). To remove the canopy, press the red buttons located on each side of the seat and slide the canopy out of the fittings (23).
- Page 8 Footrest To change the angle of the footrest, press both buttons located on each side, while simultaneously adjusting the footrest to the desired position (28). To extend the footrest, pull it up and towards you and to shorten push it down (29). Bumper The seat is equipped with a safety bumper bar (30).
- Page 9 Rain cover and insect net The stroller is equipped with a raincover, that can be used both for the carrycot and seat unit (35). It is also has 2 insect nets: 1 for the carrycot, which is attached with zippers to the inside of the canopy and velcro to the edge the carrycot and 1 for the seat unit that is pulled over the seat and tucked under footrest (34).
- Page 10 Folding a frame with the seat unit To fold the frame with the seat unit, the seat must be in the forward facing position (36). First fold the footrest completely under the seat (37), then fold the handle down 90 degrees (38). Next, press the backrest adjustment so it is folded flat against the seat (38).
- Page 11 Foot cover and car seat canopy To use the canopy, first move the car seat handle into the upright position, then pull the canopy upwards over the handle, snap the press studs together around the handle to keep it in position (44). The foot cover can be fixed in position using the press studs located on the inside of the canopy (45).
-
Page 12: Maintenance Instructions
Do not use the stroller on rough ground, near fire and other dangerous areas. Avoid using or storing the travel system in wet, cold or high temperature • environments, keeping it away from fire or strong heat. Contact Mee-go: Mee-go Ltd Unit 5, Victoria Mills Mill Street, Dewsbury West Yorkshire United Kingdom WF12 9AQ www.mee-go.co.uk...
Need help?
Do you have a question about the Milano+ and is the answer not in the manual?
Questions and answers