
Related Manuals for Rockwell Automation 1794-AENTR, 1794-AENTRXT


Summary of Contents for Rockwell Automation 1794-AENTR, 1794-AENTRXT
- Page 1 FLEX I/O Dual-port EtherNet/IP Adapters Catalog Numbers 1794-AENTR, 1794-AENTRXT User Manual Original Instructions...
- Page 2 If this equipment is used in a manner not specified by the manufacturer, the protection provided by the equipment may be impaired. In no event will Rockwell Automation, Inc. be responsible or liable for indirect or consequential damages resulting from the use or application of this equipment.
-
Page 3: Table Of Contents
Overview ..............23 Rockwell Automation Publication 1794-UM066C-EN-E - April 2023... - Page 4 ..............53 Rockwell Automation Publication 1794-UM066C-EN-E - April 2023...
-
Page 5: Preface
Added section on Enable or Disable the Web Server 21, 45 Added section on Log in to the Web Server Additional Resources These resources link to additional information about related products from Rockwell Automation. To download publications, click the link or visit rok.auto/literature and search for the publication numbers. - Page 6 Preface Notes: Rockwell Automation Publication 1794-UM066C-EN-E - April 2023...
-
Page 7: Overview Of Flex I/O And Your
• Communication supported by RSLinx® software • IP address assigned via standard BOOTP/DHCP tools • I/O configuration via Studio 5000 Logix Designer application • No network scheduling required • No routing tables required Rockwell Automation Publication 1794-UM066C-EN-E - April 2023... -
Page 8: Types Of Adapters
Dual-port EtherNet/IP adapter with extended temperatures range Hardware and Software The adapters and the applications that are described in this manual are compatible with the following firmware revisions and software releases. Contact Rockwell Automation if you need Compatibility software or firmware updates to use this equipment. -
Page 9: Use Of The Control And Information Protocol (Cip)
I/O modules. If you use a rack- optimized connection to transfer the data, you only need a single connection – the connection to the adapter. Rockwell Automation Publication 1794-UM066C-EN-E - April 2023... -
Page 10: Mixing Rack-Optimized And Direct Connections
I/O modules set up to use rack optimization communicates at the rate of the requested packet interval (RPI) configured for the 1794-AENTR or 1794-AENTRXT adapter. I/O modules that are configured for direct communication communicate at their own set RPIs and ignore the adapter RPI. Rockwell Automation Publication 1794-UM066C-EN-E - April 2023... -
Page 11: Install Your Flex I/O Adapter
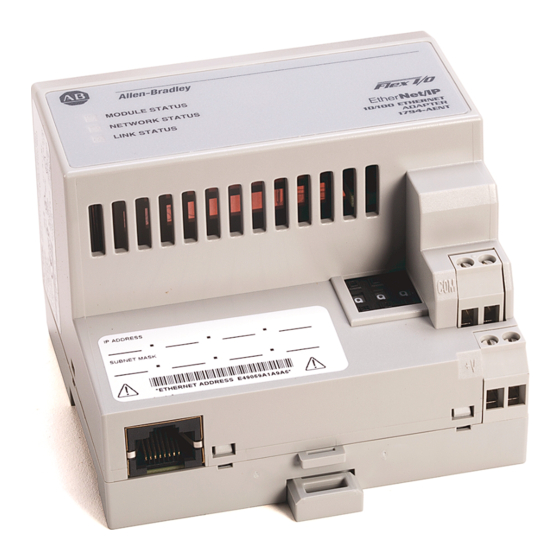
DIN rail and connect it to the EtherNet/IP network. Module Components Figure 2 to identify the external features of the FLEX I/O EtherNet/IP adapter. Figure 2 - Dual-port EtherNet/IP Adapter – 1794-AENTR, 1794-AENTRXT Component Identification Dual-port EtherNet/IP adapter Module locking tab... -
Page 12: Mount Your Adapter On A Din Rail
This could cause an explosion in hazardous location installations. Be sure that power is removed or the area is nonhazardous before proceeding. Rockwell Automation Publication 1794-UM066C-EN-E - April 2023... -
Page 13: Connect Wiring
When the adapter is locked onto the DIN rail, gently push the Flexbus connector into the adapter to complete the backplane. 8. Reinstall the module in the adjacent terminal base unit. Connect Wiring Rockwell Automation Publication 1794-UM066C-EN-E - April 2023... -
Page 14: Set The Network Address
Use the pen-push thumbwheel switches on the adapter. Press either the + or the - button with a pen tip to change the number. • Use a Dynamic Host Configuration Protocol (DHCP) server, such as Rockwell Automation® DHCP. • Retrieve the IP address (if previously set) from nonvolatile memory. -
Page 15: Mounting Dimensions
The module has the following mounting dimensions. 1794-AENTR shown (1.96) 80.4 (3.16) 87.4 (3.44) 30.4 (1.19) (3.70) Millimeters 1794-AENTR, 1794-AENTRXT (Inches) 87.4 H x 94 W x 92 D (344 H x 3.7 W x 3.6 D) Rockwell Automation Publication 1794-UM066C-EN-E - April 2023... - Page 16 Chapter 2 Install Your FLEX I/O Adapter Notes: Rockwell Automation Publication 1794-UM066C-EN-E - April 2023...
-
Page 17: Configure The Adapter For Your Ethernet/Ip Network
Before you can use your 1794-AENTR or 1794-AENTRXT adapter, you must configure its IP address, and optionally, its subnet mask and gateway address. You can use the Rockwell Automation BOOTP/DHCP utility to perform the configuration. You can also use generic BOOTP software or, within some limitations, a DHCP server. -
Page 18: Gateway Address
The gateway has two IP addresses (128.1.0.2 and 128.2.0.3). The first must be used by hosts on Network 1 and the second must be used by hosts on Network 2. To be usable, a host’s gateway must be addressed using a net ID matching its own. Rockwell Automation Publication 1794-UM066C-EN-E - April 2023... -
Page 19: Subnet Mask
The FLEX I/O adapters support the following additional methods to change the IP address: IP Address • BOOTP/DHCP tool • RSLinx Classic software For more information on how to use these methods, see EtherNet/IP Network Devices User Manual, publication ENET-UM006. Rockwell Automation Publication 1794-UM066C-EN-E - April 2023... -
Page 20: Implicit Protected Mode
Implicit Protected Mode. The following are example alerts that result from an attempt to set IP values on the adapter when the adapter is in Implicit Protected Mode: IMPORTANT Protected Mode is not configurable. Rockwell Automation Publication 1794-UM066C-EN-E - April 2023... -
Page 21: Enable Ordisable Web Server And Snmp Agent
Disabling the web server in conjunction with using the Implicit Protected Mode decreases the possibility of a security breach. For more information on how to enable or disable the web server, see Enable or Disable the Web Server on page Rockwell Automation Publication 1794-UM066C-EN-E - April 2023... - Page 22 Chapter 3 Configure the Adapter for Your EtherNet/IP Network Notes: Rockwell Automation Publication 1794-UM066C-EN-E - April 2023...
-
Page 23: Rack-Optimized Discrete I/O
Before You Begin You must complete the following tasks before you can configure the adapter and modules: 1. Create a Studio 5000 Logix Designer application project. 2. Add the ControlLogix 5580 controller to the project. Rockwell Automation Publication 1794-UM066C-EN-E - April 2023... -
Page 24: Add The Adapter To The Project
For some modules, the Select Major Revision dialog box can appear. If the dialog box appears, choose the major revision of the module and click OK. c. Click Create. The New Module dialog displays. 4. Complete the following tasks on the General category page: Rockwell Automation Publication 1794-UM066C-EN-E - April 2023... -
Page 25: Add The Flex I/O Modules To The I/O Configuration
This example application uses I/O module default configurations. For more information, see FLEX I/O Digital Input Modules Installation Instructions, publication 1794-IN093 and FLEX I/O Digital DC Output Modules Installation Instructions, publication 1794-IN094. Rockwell Automation Publication 1794-UM066C-EN-E - April 2023... - Page 26 Slot Comm Format Rack Optimization Electronic Keying Compatible Module 4. Click OK to save the configuration. The digital input module appears in the I/O configuration that is indented under the 1794- AENTR adapter. Rockwell Automation Publication 1794-UM066C-EN-E - April 2023...
- Page 27 1. From the I/O Configuration tree, right-click the remote 1794-AENTR adapter, and then select New Module. The Select Module Type dialog opens. 2. Select the 1794-OB16 module from the list, and then click Create. The New Module dialog opens. Rockwell Automation Publication 1794-UM066C-EN-E - April 2023...
- Page 28 Enter the new tag here 2. Make sure you select the Edit Tags tab at the bottom of the Controller Tags dialog, and then create the following tag: Type Parts_Count Counter 3. Close the Controller Tags dialog. Rockwell Automation Publication 1794-UM066C-EN-E - April 2023...
-
Page 29: Create The Ladder Program
The Who Active dialog opens. 2. Select your Ethernet driver (for example, AB_ETH-1) and expand the tree through the backplane of the local ControlLogix chassis. 3. Highlight the 1756-L85E ControlLogix 5580 controller and click Download. Rockwell Automation Publication 1794-UM066C-EN-E - April 2023... -
Page 30: Test The Example Application
1794-OB16 output module turn off. For more information, see FLEX I/O Digital Input Modules Installation Instructions, publication 1794-IN093 and FLEX I/O Digital DC Output Modules Installation Instructions, publication 1794-IN094. This completes the rack-optimized Discrete I/O example. Rockwell Automation Publication 1794-UM066C-EN-E - April 2023... -
Page 31: Analog I/O With Direct Connection
Perform the following steps to create the example application: Application 1. Start the Studio 5000 Logix Designer application. 2. From the main dialog File menu, select the project file from the previous chapter (for example, FLEX_IO_Controller). Rockwell Automation Publication 1794-UM066C-EN-E - April 2023... -
Page 32: Add The Analog Modules To The I/O Configuration
Add the Analog Input Module to the I/O Configuration 1. Right-click the 1794-AENTR adapter under the I/O Configuration folder, and then select New Module. The Select Module Type dialog opens. Rockwell Automation Publication 1794-UM066C-EN-E - April 2023... - Page 33 6. On the Configuration tab, use the drop-down list to set the Voltage/Current Range for Channel 0 to 0…10V – Binary. This range allows you to monitor the output with a voltmeter when you test the application. Leave the other channels at their default values. Rockwell Automation Publication 1794-UM066C-EN-E - April 2023...
-
Page 34: Add The Analog Output Module To The I/O Configuration
1794-AENTR adapter. Add the Analog Output Module to the I/O Configuration 1. Under the I/O Configuration folder, right-click the remote 1794-AENTR adapter, and then select New Module. The Select Module Type dialog opens. Rockwell Automation Publication 1794-UM066C-EN-E - April 2023... - Page 35 The two rack connected digital I/O modules continue to communicate at the RPI of the rack connection. 6. Click Apply to save the configuration. 7. Click the Fault/Idle Action tab. For this example, leave these parameters at the default setting. For an explanation of these parameters click Help. Rockwell Automation Publication 1794-UM066C-EN-E - April 2023...
-
Page 36: Edit The Controller Tags
Enter the new tag here Make sure you select the Edit Tags tab at the bottom of the Controller Tags dialog, and then create the following tag: Type Analog_Test_Signal Timer Rockwell Automation Publication 1794-UM066C-EN-E - April 2023... -
Page 37: Modify The Ladder Program
2. Save the program. Download the Program To download the program to the controller do the following: 1. Click the Communications menu, and then select Who Active. The Who Active dialog opens. Rockwell Automation Publication 1794-UM066C-EN-E - April 2023... -
Page 38: Test The Example Application
1. Connect analog output channel 0 on the 1794-OF4I/A module to analog input channel 0 on the 1794-IF4I/A input module. 1794-IF4I 1794-OF4I 2. Restore the Studio 5000 Logix Designer application window and place the controller in Run mode. Rockwell Automation Publication 1794-UM066C-EN-E - April 2023... - Page 39 For information on wiring and troubleshooting the I/O modules, see FLEX I/O Isolated Analog Output Module Installation Instructions, publication 1794-IN037 and FLEX I/O Isolated Analog Input Module Installation Instructions, publication 1794-IN038. This completes the direct connection analog I/O example. Rockwell Automation Publication 1794-UM066C-EN-E - April 2023...
- Page 40 Chapter 5 Analog I/O with Direct Connection Notes: Rockwell Automation Publication 1794-UM066C-EN-E - April 2023...
-
Page 41: Interpret Status Indicators
The faceplates of the 1794-AENT and 1794-AENTRXT adapters are provided with status indicators that display the Module Status, Network Status, and Link Status for both links. Status Indicators Figure 5 - 1794-AENTR, 1794-AENTRXT Module Network status Module status Link 1 status... - Page 42 Duplicate IP address. Adapter has detected that its IP address is already in use. Configure the adapter with a unique IP address. Flashing red/green Self-test. Adapter performing power-up self-test. Rockwell Automation Publication 1794-UM066C-EN-E - April 2023...
-
Page 43: Configure The Rslinx Ethernet Communication Driver
You can download and install RSLinx software from the Product Compatibility and Download Center at rok.auto/pcdc. Configure the AB_ETH Driver To configure the AB_ETH Ethernet communication driver perform the following steps: 1. Start RSLinx. 2. From the Communications menu, select Configure Drivers. Rockwell Automation Publication 1794-UM066C-EN-E - April 2023... - Page 44 7. When you are done entering the IP addresses, click Apply and then click OK to close the Configure driver dialog. The new driver appears in the list of Configured Drivers. Your list displays the drivers that you have configured on your workstation. 8. Close RSLinx. Rockwell Automation Publication 1794-UM066C-EN-E - April 2023...
-
Page 45: Adapter Web Dialogs
2. Set the switches to the desired IP address and cycle power to the module. 3. In your web browser, enter the IP address of the adapter. The web server home page does not display. Rockwell Automation Publication 1794-UM066C-EN-E - April 2023... -
Page 46: Log In To The Web Server
To display and work with the adapter diagnostics home page, follow these procedures. the Web Server IMPORTANT Make sure that your PC Internet LAN setting and your TCP/IP settings are configured to access the subnet on which your adapter communicates. Rockwell Automation Publication 1794-UM066C-EN-E - April 2023... -
Page 47: Access Diagnostic Information
Connection Statistics and Refresh Rate by clicking Diagnostic Overview on the navigational panel on Information the left. Click tabs to see the corresponding page. Click Diagnostics options to see corresponding pages. Type a refresh rate. Download EDS files for your adapter. Rockwell Automation Publication 1794-UM066C-EN-E - April 2023... -
Page 48: Use The Network Settings Page
To use the Ethernet Statistics page for information about the Ethernet link and interface and media counters, click Ethernet Statistics tab at the top of the page or from the panel on the left. Rockwell Automation Publication 1794-UM066C-EN-E - April 2023... -
Page 49: Use The I/O Connections Page
1. From the home page, click Configuration or Expand to see the Configuration options, if needed. 2. From the Configuration page, click one of the following: • Identity • Network • Services Rockwell Automation Publication 1794-UM066C-EN-E - April 2023... -
Page 50: Use The Device Identity Page
To use the Device Identity page to make entries for the device name, device description, and device location, click Device Identity from the tab at the top of the page or panel on the left. Rockwell Automation Publication 1794-UM066C-EN-E - April 2023... -
Page 51: Use The Network Configuration Page
To use the Services page to change the password for the Configuration webpage or disable the web server, click Device Services tab at the top of the page or panel on the left. Rockwell Automation Publication 1794-UM066C-EN-E - April 2023... - Page 52 Appendix C Adapter Web Dialogs Notes: Rockwell Automation Publication 1794-UM066C-EN-E - April 2023...
-
Page 53: Index
9 default address 18 BootP dimensions protocol 17 1794-AENTR 15 utility 17 1794-AENTRXT 15 BootP utility 17 mounting 15 bridging module 9 DIN rail 7 mounting 7 top-hat 12 Rockwell Automation Publication 1794-UM066C-EN-E - April 2023... - Page 54 I/O module 7 network cable 14 indicators network scheduling 7 status 11 networking input data 33 consumer 9 input module 9 node address 15 install set 15 physically 11 Internet Protocol IP 14 Rockwell Automation Publication 1794-UM066C-EN-E - April 2023...
- Page 55 19 IP address 17 unique IP address 17 web dialogs configuration 49 ethernet statistics 48 home page 46 I/O connections 49 network settings 48 password 50 user name 50 web server 45 Rockwell Automation Publication 1794-UM066C-EN-E - April 2023...
- Page 56 Index Notes: Rockwell Automation Publication 1794-UM066C-EN-E - April 2023...
- Page 57 FLEX I/O Dual-port EtherNet/IP Adapters User Manual Rockwell Automation Publication 1794-UM066C-EN-E - April 2023...
- Page 58 Rockwell Automation maintains current product environmental compliance information on its website at rok.auto/pec. Allen-Bradley, ControlLogix, expanding human possibility, FactoryTalk, FLEX, FLEX I/O-XT, Logix 5000, Rockwell Automation, RSLinx, RSLogix 5000, Studio 5000 Logix Designer, and TechConnect are trademarks of Rockwell Automation, Inc.
Need help?
Do you have a question about the 1794-AENTR, 1794-AENTRXT and is the answer not in the manual?
Questions and answers