Advertisement
Table of Contents
- 1 Table of Contents
- 2 General Requirements
- 3 Handicap Code Requirements
- 4 Operator Handing
- 5 Installation - Surface Applied Series 7100
- 6 Installing Adjustable Connecting Arm
- 7 Setting the Open Stop and Loading Operator Spring
- 8 Installing Parallel Arm and Track
- 9 Installing Actuation Switches
- 10 Operator Adjustments
- 11 Changing Operator Hand And/Or Closing Spring
- 12 Placement of Safety Decals
- 13 S7900 Fire Door Operator
- Download this manual
Advertisement
Table of Contents

Related Manuals for Horton Easy Access 7100 Series


Summary of Contents for Horton Easy Access 7100 Series
- Page 1 ™ Series 7100 Easy Access Surface Applied Swing Door Operator for C4190 Control Installation Instructions To be used in conjunction with H-SW C4190 Setup Instructions 7.069d3 G710, JAN 2001...
-
Page 2: Table Of Contents
• ANSI A156.19 American National Standard for Power Assist and Low Energy Power Operated Doors. • Horton Automatics recommendations for 7100 operators If there are any questions about these instructions call Horton Automatics Technical Assistance. INFORMATION TO BE PROVIDED BY THE DISTRIBUTOR TO THE OWNER •... -
Page 3: General Requirements
(shim) To electric strike & exit device (by others) Power supply is wired with 3/4" C L Output shaft power cord (by Horton) (19) & grounded outlet (by E.C.) Recommended power required overlap Or wired direct. input location atjamb Pivot 1 1/2"... -
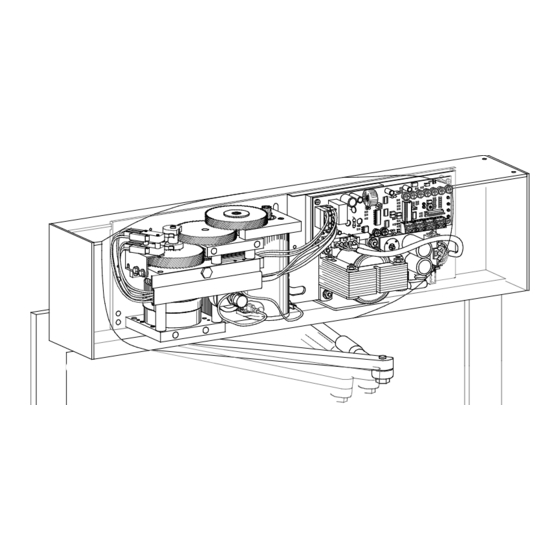
Page 4: Installation - Surface Applied Series 7100
G710.2 4. INSTALLATION - SURFACE APPLIED SERIES 7100 1st Step Check the mounting area for proper support. Wood Minimum length 28" (711) blocking in wallboard wall is recommended Shim if required. Actuation wiring 120VAC Drill #7 (.201) thru Power Supply back member &... -
Page 5: Installing Adjustable Connecting Arm
G710.3 5. INSTALLING ADJUSTABLE CONNECTING ARM NOTE: For inswing doors without arm clearance, see section 7 for parallel arm installation. 1st Step Locate and mount the foot (dim A) as per the arm chart C.L. below. 2 5/16" 1 5/8"(41) (58) Outswing Dim. -
Page 6: Setting The Open Stop And Loading Operator Spring
G710.4 6. SETTING THE OPEN STOP and LOADING OPERATOR SPRING CAUTION: When installing the power arm or when servicing any swing door operator, be sure to keep your face, hands and arms clear of the power arm's swing path. SERIOUS INJURY could result should the operator be accidentally activated to an open position or should the operator return to a relaxed position. -
Page 7: Installing Actuation Switches
G710.5 8. INSTALLING ACTUATION SWITCHES C1260 SWITCH ASSEMBLY 1st Step Pull the 24 VAC, 2 conductor C1316-2 SWITCH ASSEMBLY Note: Junction box not wire into the box and connect included in assembly. Surface applied 4" x 4" x 1 1/2" to the microswitch terminals. -
Page 8: Changing Operator Hand And/Or Closing Spring
G710.6 10. CHANGING OPERATOR HAND AND/OR CLOSING SPRING The following information is provided as a guide for: • Removing and replacing a broken spring. • Changing spring direction. • Changing both spring direction and operator hand. • Changing operator hand but not spring direction. NOTE: IN ALL CASES, SECURE THE BASE PLATE OF THE GEAR TRAIN ASSEMBLY (PREFERABLY IN A VISE) WITH THE OUTPUT SHAFT FACING UP. - Page 9 G710.7 IF CHANGING OPERATOR HAND BUT NOT SPRING DIRECTION ( FROM LH TO RHR OR RH TO LHR ): Follow the steps outlined in the previous page for removing the chassis stop and allowing the spring to unwind. The gear train and controls will then have to be moved to opposite sides of the operator base plate chassis.
-
Page 10: Placement Of Safety Decals
. AUTOMATIC AUTOMATIC CAUTION CAUTION C7280 DOOR ACTIVATE SWITCH Required to meet ANSI PUSH TO OPERATE HORTON AUTOMATICS DOOR standards. This decal is included with each door package. ACTIVATE SWITCH TO OPERATE 58"(1473) ± 5"(127) HORTON AUTOMATICS THE DECALS SHOWN BELOW ARE AVAILABLE OPTIONS. - Page 11 Form G710, Jan 2001 printed in U.S.A. Product equipment depicted in the various figure drawings are approximate and for illustration purposes only. Consult manufactu rerfordetail product specifications. Horton Automatics reserves the right to improve the product and change its specifications without notice.
Need help?
Do you have a question about the Easy Access 7100 Series and is the answer not in the manual?
Questions and answers