Advertisement
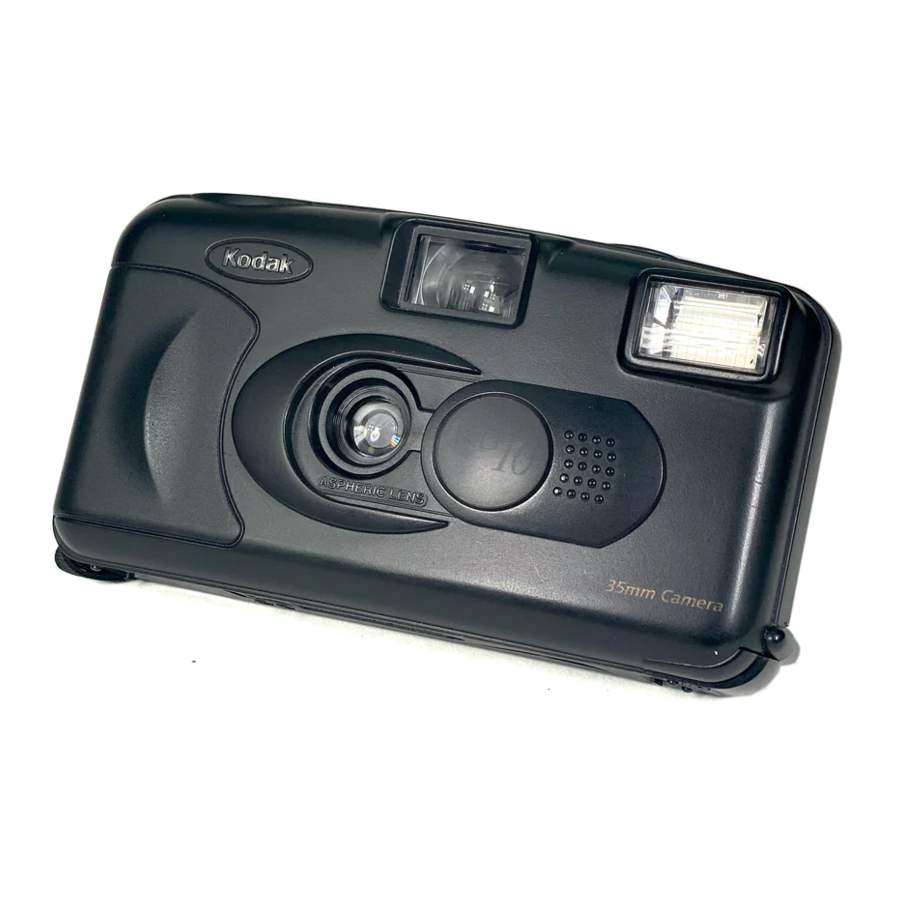
GETTING TO KNOW YOUR DEVICE

- PICTURE COUNTER
- SHUTTER BUTTON
- CAMERA STRAP
- LENS
- LENS-COVER SWITCH
- FLASH
- FILM-REWIND HANDLE
- VIEWFINDER
- FILM SPINDLE
- FILM-DOOR LATCH
- BATTERY-DOOR LATCH
- FILM CHAMBER
- FILM TAKE-UP SPOOL
- FILM-LOAD MARK
- FILM DOOR
- FILM WINDOW
- FILM-ADVANCE WHEEL
- FILM-REWIND LEVER
- FILM-SPROCKET TEETH
- VIEWFINDER EYEPIECE
- FLASH-READY LIGHT
LOADING THE BATTERIES
This camera uses 2 AA-size alkaline batteries.
- Load the batteries as shown.

- Replace both batteries with fresh alkaline batteries when the FLASH-READY LIGHT takes more than 30 seconds to come on.

Battery Tips
- Remember to keep spare batteries with you at all times.
- Read and follow all warnings and instructions supplied by thebattery manufacturer.
- Keep batteries away from children.
- Do not try to take apart, recharge or short circuit the batteries, orsubject them to high temperature or fire.
- Store batteries in their original packaging prior to use.
LOADING THE FILM
For excellent all-around results for indoor and outdoor picture-taking, use ISO 400-speed film. For use in bright daylight, you can use ISO 100- or ISO 200-speed film. If in sunlight, turn your back to the sun and load the film in the shade of your body.
- Push up on the FILM - DOOR LATCH (10) to open the FILM DOOR (15).
![]()
- Insert the flat end of the film cartridge over the FILM SPINDLE (9). Push the other end of the film cartridge down into the FILM CHAMBER (12) until it fits securely into place. Do not force it into the film chamber.

- Pull out the film leader until the tip reaches the film-load mark. Lay the film flat between the film-guide rails.


If the end of the film extends past the film-load mark, gently push the excess back into the cartridge.
- Close the film door and check the FILM WINDOW (16) (you should see the film information through the window). Do not open the film door after you start taking pictures or you will ruin the film.

- Slide the LENS - COVER SWITCH (5) completely open to uncover the LENS (4) and to turn the FLASH (6) on.

- Press the SHUTTER BUTTON (2) and turn the FILM - ADVANCE WHEEL (17) until it locks (the PICTURE COUNTER [1] will start at "S").
Continue doing this until the picture counter shows "1." (If the picture counter does not move, reload the film into the camera by following these instructions.)
![]()


NOTE: Because of limited space on the picture counter, each dot represents one picture.
TAKING PICTURES
This camera features a flash that fires every time you take a picture. The all-the-time flash feature acts as a fill flash in hazy outdoor pictures or in bright-light conditions where shadows may exist.
- Slide the LENS-COVER SWITCH (5) completely open to uncover the LENS (4) and to turn the FLASH (6) on.

- For a sharp picture, stand at least 4 ft (1.2 m) from your subject.

- Look through the VIEWFINDER EYEPIECE (20) to see your subject.
![]()
- Hold the camera steady and gently press the SHUTTER BUTTON (2) to take the picture. Be careful not to cover the flash and picture-taking lens with your fingers.
- Wind the FILM - ADVANCE WHEEL (17) until it stops. Your camera is ready to take the next picture.

- Close the lens-cover switch when you finish taking pictures.


TAKING FLASH PICTURES
In dim light, such as indoors or outdoors in heavy shade or on dark overcast days, you need flash. This camera features a flash that fires every time you take a picture.
- Slide the LENS-COVER SWITCH (5) completely open to uncover the LENS (4) and to turn the FLASH (6) on
- Take the picture when the FLASH - READY LIGHT (21) glows.

- Keep the subject within the distance range for the speed of film 1in your camera. Don't take pictures beyond the maximum distance or your pictures will be dark.

- Hold the camera steady and gently press the SHUTTER BUTTON (2) to take the picture. Be careful not to cover the flash and picture-taking lens with your fingers.


To prevent battery drain, turn off the flash by closing the lens cover when you are not using it.
UNLOADING THE FILM
The film will not advance when you reach the end of the roll. You must rewind the film before you open the film door or you will ruin the film.
- To rewind the film, slide the FILM - REWIND LEVER (18) in until it latches and remains in the locked position.

- Unfold the FILM - REWIND HANDLE (7) and slowly turn it in the direction of the arrow. There should be tension when turning the filmrewind handle and less tension when the film is fully rewound.
![]()
- Open the FILM DOOR (15) and remove the film.


NOTE: The film-rewind lever will unlock when you load another film into the camera.
TROUBLESHOOTING
| What happened | Probable cause | Solution |
Camera will not operate | Lens-cover switch closed | Open the lens-cover switch |
| Flash not ready | Wait for the flash-ready light to glow | |
| Film not advanced | Fully wind film-advance wheel until it stops | |
| Film not properly loaded | Reload the film. See LOADING THE FILM | |
| Film needs to be rewound/removed | See UNLOADING THE FILM | |
Flash-ready light fails to glow within 30 seconds | Flash not turned on | Open the lens-cover switch |
| Batteries weak or dead | Replace with 2 fresh AA-size alkaline batteries | |
| Batteries improperly loaded in camera | Insert batteries as shown on battery door | |
Excessive force required to rewind | Did not move the film-rewind lever until it locked in place | Fully move the film-rewind lever until it locks in place |
Picture counter doesn't return to S | Removed film without fully rewinding | With film out of the camera, press the rewind lever and move the film-sprocket teeth towards the left until counter is at "S" |
Shutter button cannot be released | No film in camera | Load film into the camera |
| Lens-cover switch closed | Open lens-cover switch | |
Film cartridge does not fit correctly in film chamber | Film-spindle not properly engaged inside film cartridge | Turn the film-rewind handle slowly to reposition the film spindle and to properly engage the film cartridge into the film chamber |
CARING FOR YOUR CAMERA
- Protect the camera from dust, moisture, sudden impact, and excessive heat.
![]()
Do not use solvents or harsh or abrasive cleaners on the camera body. - If the lens appears dirty, breathe on it to form a mist and wipe the surface gently with a soft, lintless cloth or lens-cleaning tissue. Do not apply pressure or you will scratch the lens. Never wipe a dry lens.
![]()
Do not use solvents or solutions not designed for cleaning camera lenses. Do not use chemically treated tissues intended for cleaning eyeglasses. - Remove the batteries when you store the camera for a long time.
![]()
To prevent possible damage and electrical shock, do not try to take apart or repair the camera or flash unit by yourself.


SPECIFICATIONS
Lens: 30 mm, 2-element aspheric lens
Shutter Speed: Fixed at 1/100 second
Aperture: f /8.0 for flash/daylight
Film Speed: DX (ISO) 100, 200 or 400 print film
Focus Range: Daylight: 4 ft (1.2 m) to infinity
Consumer Imaging
EASTMAN KODAK COMPANY
Rochester, NY 14650
Kodak is a trademark.
© Eastman Kodak Company, 1996

VideosHow to use Kodak KB-10 35mm Film Camera Video
Documents / ResourcesDownload manual
Here you can download full pdf version of manual, it may contain additional safety instructions, warranty information, FCC rules, etc.
Advertisement


Need help?
Do you have a question about the KB 10 and is the answer not in the manual?
Questions and answers