Advertisement
- 1 Safety Guide
- 2 Preliminaries
- 3 Your Breadmaker And Its Components
- 4 The Control Panel
- 5 Using the Breadmaker
-
6
Controls and Programs
- 6.1 The Control Panel
- 6.2 Sequence of Operations
-
6.3
Choosing a Program
- 6.3.1 BASIC
- 6.3.2 FRENCH
- 6.3.3 WHOLE WHEAT
- 6.3.4 QUICK
- 6.3.5 SWEET
- 6.3.6 ULTRA FAST
- 6.3.7 DOUGH
- 6.3.8 JAM
- 6.3.9 CAKE
- 6.3.10 SANDWICH
- 6.3.11 BAKE
- 6.3.12 KEEP WARM FUNCTION
- 6.3.13 CRUST CONTROL
- 6.3.14 Switching On
- 6.3.15 Delay Timer
- 6.3.16 Setting the Delay Timer
- 6.3.17 Start, Stop & Safety Cut-out
- 6.3.18 Stopping the Breadmaker in an Emergency
- 6.3.19 Adding Ingredients
- 6.3.20 Memory Recall
- 6.3.21 Error Displays
- 6.3.22 When The Bread Has Baked
- 6.3.23 Cold Weather
- 6.4 Breadmaker Operating Sequence
- 6.5 Weighing and Measuring Ingredients
- 7 Recipes - Getting Started
- 8 Help! My Bread's Gone Wrong - Some Easy Remedies
- 9 Troubleshooting Guide
- 10 The Basics of Breadmaking
- 11 Documents / Resources
Safety Guide
 |
| RISK OF ELECTRIC SHOCK DO NOT DISMANTLE |
|
|
 The lightning flash with arrowhead symbol, within an equilateral triangle, is intended to alert the user to the presence of uninsulated dangerous voltage within the product's enclosure that may be of sufficient magnitude to constitute a risk of electric shock.
 The exclamation point within an equilateral triangle is intended to alert the user to the presence of important operating and maintenance (servicing) instructions in the literature accompanying the appliance.
- Directly after bread making the appliance is HOT. Always use oven gloves when touching the Breadmaker or the bread pan after baking.
- Unplug the Breadmaker after use and allow it to cool before handling or cleaning any parts. Pull on the plug, not on the cable.
- This Breadmaker is for normal household use only. Do not use it for professional catering.
- Do not use the Breadmaker outdoors.
- Do not immerse the Breadmaker or the electrical cord or plug in water or liquids.
- Do not use the Breadmaker near a source of heat or on an unstable surface.
- Use the Breadmaker only on heat-resistant surfaces. If the work surface is excessively smooth the breadmaker should be placed on a non-slip mat.
- Make sure the Breadmaker is not exposed to direct sunlight.
- At least 100mm clearance must be provided on all sides of the Breadmaker.
- Close supervision is necessary when this appliance is used near children.
- When selecting the location for your machine, ensure that children do not have access to it.
- Make sure that the power cable does not touch any hot surface and that it does not overhang a table edge.
- Check the machine and the cable regularly for damage. If there is damage of any kind, the machine should not be used. Do not repair the machine yourself, but rather consult an authorized expert.
- Do not cover the Breadmaker when in use.
- Never leave the machine to operate unsupervised.
- This appliance is not intended for use by persons (including children) with reduced physical, sensory or mental capabilities, or lack of experience and knowledge, unless they have been given supervision or instruction concerning use of the appliances by a person responsible for their safety.
- Children should be supervised to ensure that they do not play with the appliance.
- Do not use attachments or accessories not recommended by the manufacturer.
- Do not operate the Breadmaker empty.
- Do not dent or damage the bread pan. The Breadmaker will not operate properly if damaged.
- When baking bread, never bake amounts greater than the maximum recommended in the recipes accompanying this manual. If you do, the bread may not be baked evenly and the dough could overflow.
- Do not use the Breadmaker for any purpose not expressly specified in this manual.
- There are no user serviceable parts in your Breadmaker. Unauthorised dismantling or servicing will void the product warranty.
Preliminaries
Please read all the instructions and familiarise yourself with the features and operation of your breadmaker before using the appliance. Make sure you read all the safety notes carefully.
Before using this appliance ensure that the voltage of your electricity supply is the same as that indicated on the rating plate of the appliance.
Unpacking the Breadmaker
In the box you should find:
- The breadmaker including the bread pan and kneading paddle.
- Measuring cup and spoon; paddle puller tool.
If any items are missing or damaged, contact your nearest Tesco store for assistance.
Retain the packaging in case you wish to transport the appliance safely at a later date. If you dispose of the packaging, do so in accordance with any recycling regulations in your area.
Note: In manufacture some parts of the Breadmaker are lightly greased. When the appliance is first used, there may be some vapour emission. This is harmless and will soon disappear.
Your Breadmaker And Its Components

The Control Panel

Using the Breadmaker
Preparation
Before using your Breadmaker for the first time, wash the inside of the bread pan, the kneading paddle, and the measuring utensils in hot soapy water. Rinse and dry well. Wipe the interior of the lid and the exterior of the bread pan and appliance with a damp cloth.
To open the lid: Lift the handle and hold it with both hands. Turn the bread pan anticlockwise (REMOVE). The pan may now be lifted out.

Make sure the drive shaft in the bread pan is clean and free from crumbs or pieces of dough.
Position the kneading paddle on the shaft (it will fit only one way round). Push it firmly into place. If the paddle is insecure it may come off when kneading and the ingredients will not be properly mixed.

Filling with Ingredients
Ensure you have all the ingredients to hand. Carefully fill the pan making sure you don't leave any ingredients out. When filling, it is essential that the ingredients are filled in the prescribed order, otherwise the bread will not be properly baked.

The ingredients should be at a warm room temperature (20º-25ºC). If the room is cold (below 18ºC), use warm water (40ºC) to make sure the yeast ferments fully. To gauge the temperature if you do not have a thermometer, heat some water and slowly add this to a jug of cold water until the resulting temperature is barely warm to the touch.
Measure and add the water to the pan. Next add the salt and the other dry ingredients. Finally add the yeast. It is essential to keep the yeast away from the salt and the water before mixing commences ore the bread will not rise properly.
Clean off any spills around the outside of the bread pan and lower it into the breadmaker, reversing the process described earlier.
Using the handle, lower the pan into the Bread maker. Turn clockwise (LOCK) to secure the pan firmly in place.

Lay the handle back on the pan. Close the lid.
The ingredients are now ready for baking.
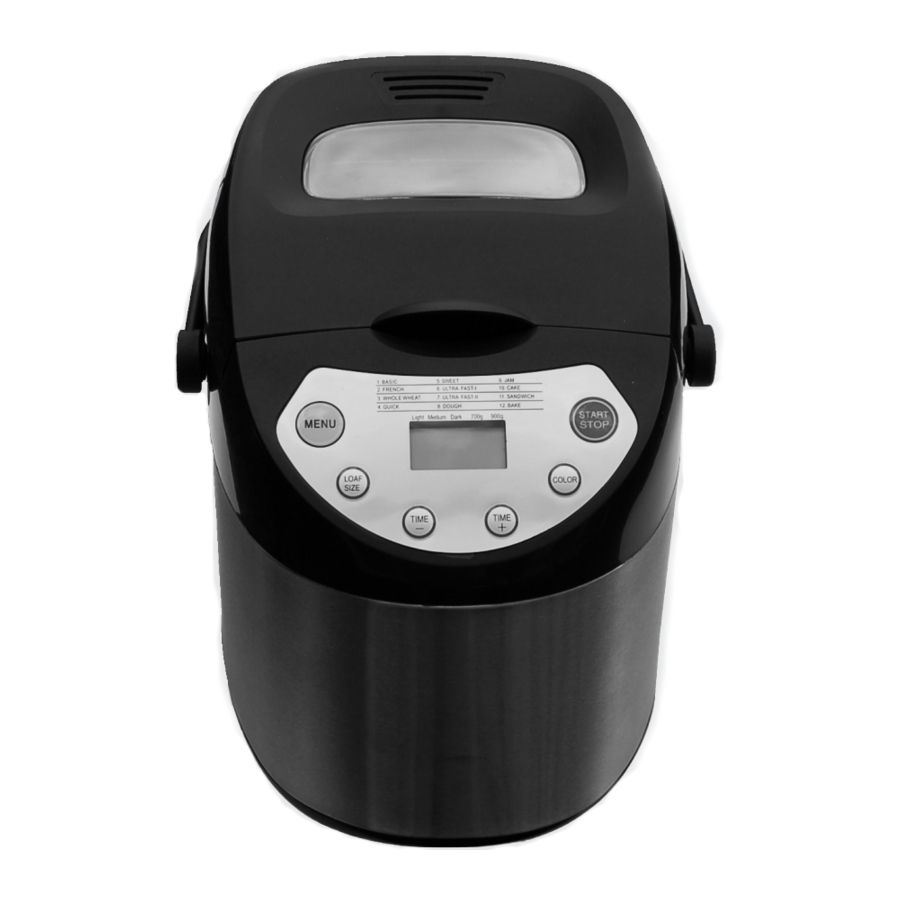
Controls and Programs
The Control Panel

Ensure that you understand the functions of your Breadmaker before use as an incorrect selection will affect the quality of the bread.
Plug the Breadmaker into the mains. The Control Panel display will light up and the unit is now operational.
When you power the Breadmaker, the display sets to Basic and Medium Crust. The display indicates 3:00, which means that the Breadmaker will take 3 hours to complete the program. This setting is illustrated above.
Sequence of Operations
- Choose a Program with the MENU button.
- Select the Loaf Size (as needed).
- Select the Crust Colour (as needed).
- Start the machine.
Choosing a Program
The Breadmaker has a choice of 12 programs. Press the MENU button repeatedly to cycle through the options. The options are explained below.
BASIC
Time: 3 hours 900g loaf; 2hrs 53 min 700g loaf
Used for the preparation of white bread and mixed grain bread. This program is the default setting.
The Breadmaker will knead the dough three times. After the second kneading the Breadmaker will beep. This beep indicates that additional ingredients may now be added.
FRENCH
Time: 3 hrs 50 min 900g loaf; 3hrs 40 min 700g loaf
For preparing French white bread. The Breadmaker kneads twice, but has longer rising and baking times, so the bread gets a thicker crust.
WHOLE WHEAT
Time: 3 hrs 40 min 900g loaf; 3hrs 32 min 700g loaf
For the preparation of wholemeal bread. The Breadmaker will knead twice. The dough rises and bakes longer. After 40 minutes the Breadmaker will beep, indicating that additional ingredients may be added. We recommend you choose the 'dark' crust with this option to get a crunchy crust.
QUICK
Total Program Time: 1 hour and 40 minutes
For recipes with baking powder. The Breadmaker stirs once and then bakes the dough. Place liquids in the bottom of the bread pan, dry ingredients on top. During the initial mixing, dry ingredients may collect in the corners of the pan- you may need to clear the corners with a rubber spatula to avoid flour lumps.
SWEET
Time: 2 hrs 55 min 900g loaf; 2hrs 50 min 700g loaf
For preparation of sweet yeast breads. The Breadmaker will knead the dough twice.
ULTRA FAST
ULTRA FAST 1: 700g loaf only-Time: 58 minutes
ULTRA FAST 2: 900g loaf only-Time: 58 minutes
The bread maker bakes the bread in 58 minutes. The bread is denser in texture with this setting. You should use water slightly hotter, around 48-50 deg C and use a cooking thermometer to gauge water temperature.
DOUGH
Total Program Time: 1 hour and 30 minutes
For preparation of different types of dough for shaping and baking elsewhere. The pan is not heated and the loaf size and crust selector are inoperative.
JAM
Total Program Time: 1 hour 20 minutes
Place the ingredients in the pan and the machine will stir and heat the jam. Monitor the jam to make sure it is not over cooked. Switch the machine off manually if there is time remaining on the program when the jam is cooked. Bake dough that has been previously raised.
CAKE
Total Program Time: 2 hours and 50 minutes
For kneading rise and baking cake mixtures and sweet breads where the raising agent is soda or baking powder.
Many cakes require less time than this program. Follow the recipe and switch the unit off manually if needed.
SANDWICH
Time: 3 hrs, 900g loaf: 2hours and 55 minutes, 700g loaf
For preparing large light breads with minimal crust for sandwiches There is no crust control on this setting.
BAKE
Total Program Time: 1 hour only
This function can be used to:
Bake dough that has been previously raised.
Re-bake or warm previously baked bread.
If you are reheating bread, check the loaf regularly and switch off manually if necessary.
KEEP WARM FUNCTION
When the baking cycle has ended the Breadmaker keeps the bread warm for one hour. After one hour the Breadmaker will automatically switch off.
CRUST CONTROL
Programs 1-7 offer 3 degrees of crust which you can select by repeatedly pressing the COLOR button. You can choose Medium, Dark or Light crust. Crust Control is not appropriate for the other programs.
Switching On
When the appropriate program and crust has been selected, press the START/STOP button to start. Do not switch the Breadmaker off until the cycle is complete.
Delay Timer
The time delay function allows you to delay the start time of baking by up to 12 hours, depending on the length of the baking cycle. All programs can be combined with the time delay function.
If the dough contains fresh milk, fruit or onions, do not select the time delay function, but bake the dough immediately. We also suggest that you do not use this function with the CAKE program.
Setting the Delay Timer
Example: It is 8.00 p.m. and you want to have fresh bread (using the Basic setting) at 7.00 a.m.
The difference between now (8:00 p.m) and 7:00 a.m. is 11 hours. Plug the breadmaker in. The preset cycle of 3:00 hours will be displayed.

If you keep the + or – buttons pressed, they will cycle to a maximum of 13:00 hours and reset to the preset program time (in this case 3:00 hours)
The timer display shows in hours and minutes the total time left until the bread is finished (including the delay added and the program time) It does not display the 1 hour "keep warm" time after the program is finished
Remember to press the START button to commence the timer countdown - otherwise nothing will happen. If you set the timer incorrectly after the start button has been pressed, you are able to switch off and reset the delay period again only if mixing has not started
Start, Stop & Safety Cut-out
The START STOP button serves to start or to stop the program. Only press this button after you have selected the Menu Program, Crust Colour (and the Delay Time if required). As the button is pressed you will hear a beep, the machine will start and the timer display will count down. The symbol will flash when the machine is running or the delay function has been activated.
Stopping the Breadmaker in an Emergency
Keep the START/STOP button depressed for 3 seconds. Only do this in an emergency, as the machine will reset to the beginning of its program: You must then begin again, the ingredients may be ruined and need replacement.
Adding Ingredients
If the bread maker program menu is set at Basic, French, Whole Wheat, Sweet, Sandwich, beeps are heard during the second kneading process. These inform you when extra ingredients may be added. During breadmaking, open the lid of the Breadmaker only at the times specified. If the lid is opened at any other time, the quality of the bread may be adversely affected.
Memory Recall
If the power supply is temporarily interrupted, the process of bread making will continue automatically when power is restored. If the power cut exceeds15 minutes the the bread maker must be restarted manually. If the process has gone no further than the kneading phase when the power supply is cut off, you may press the "START/STOP"button to resume the program from the beginning
Error Displays
If you try to use the Breadmaker when the internal temperature in is too high the display shows  . Switch the Breadmaker off, remove the pan, leave the lid open and wait until the Breadmaker has cooled down.
If the display shows  after you have pressed START, the temperature sensor is inoperative. Have the Breadmaker examined by a competent repair facility.
When The Bread Has Baked
When the program is completed the display shows 0:00 and the appliance beeps 10 times. The pan may now be removed from the Breadmaker.
Lift the lid. Using a pair of oven gloves, remove the pan from the Breadmaker. Place the bread pan on a heatproof surface and leave it for 10 minutes. Invert the bread pan over a breadboard or other heat resistant surface and tap the bread pan lightly to release the bread. The bread should now be allowed to cool on a heatproof rack before use. If the paddle has got stuck in the loaf, remove it with the paddle puller tool, a melamine fork or other suitable tool.
Note: Always use a rack. If you leave the bread to cool on a normal work surface, water vapour in the bread will not evaporate and the bottom of the loaf may be spoiled.
Cold Weather
Although the Breadmaker works perfectly well at low temperatures, if your kitchen is cold the bread may not be satisfactory. Ideally, bread should be baked in an ambient temperature around 20ºC (70ºF).
Breadmaker Operating Sequence
- Open the lid and remove the baking pan by raising the handle and twisting anticlockwise to the REMOVE position. Lift the pan out and place it on the work surface.
- Ensure that the paddle is attached to the spindle inside the baking pan (this simply pushes on) Make sure the paddle is fitted the right way round.
- Measure the ingredients as required and add them all into the pan. There Is no need to mix the ingredients before hand, the Breadmaker will do this.
- When adding the yeast to the baking pan, take care that the yeast does not come into contact with the water or any other liquid as It will start to activate immediately.
Note: All our recipes and those that are available elsewhere are based on yeast specially intended for breadmakers, available in sachet form.
This applies especially when using the delay timer. - Do not overfill the baking pan This will affect the bread and may damage the appliance. Using the pan handle, place the baking pan in the Breadmaker and twist clockwise to the LOCK position. Close the lid of the appliance.
- Plug the appliance into the power supply (you will hear one long beep). The appliance will automatically be set to the BASIC program with the crust setting at MEDIUM. The display will show
![]()
- Select the required program by pressing the MENU button until the number corresponding to the program appears. Remember to select the loaf size and the crust colour.
- Press the START/STOP button to start the machine. When the program is completed the display shows
![]() and the appliance will beep 10 times. The 1hour "Keep Warm" time is not displayed.
and the appliance will beep 10 times. The 1hour "Keep Warm" time is not displayed. - When the program is completed and the bread is baked the "keep warm" function will operate for a further hour. After a period of 1 hour the breadmaker will again beep 10 times and then switch off. For best results, stop the breadmaker with the START/STOP button and remove the baking pan within this period.
- Take care when removing the bread. The baking pan is very hot. To remove the baking pan open the Lid and, using oven gloves because the pan is still hot, remove the pan, Using the handle, twist the pan anticlockwise to the REMOVE position and lift out.
- Let the pan cool for about 10 minutes out of the machine in normal orientation. This is particularly important for the heavier breads.
- Turn the pan upside down and gently tap or shake the bread from the pan. Occasionally, the paddle will stay in the loaf; wait until the loaf is cool and then remove the paddle with a wooden utensil to avoid damage to the non-stick surface. If you need to aid removal of bread from the pan use only wooden or heatproof plastic utensils.
- Leave the bread on a rack to cool. Make sure the paddle has been removed before slicing the bread.
- Always unplug the appliance after use.


Note: When the Breadmaker is operating only open the lid at the prescribed places in the baking cycle. Failure to observe this will affect the quality of the bread, especially its ability to rise properly.
Weighing and Measuring Ingredients
The next few pages contain a series of recipes to help you get acquainted with the facilities available on your new Breadmaker. If you are to get the best results it is vital that your measurements are careful and accurate as small differences in key ingredients can have a huge effect on the final result.
Use a clear container for measuring liquids and measure at eye level. If you measure from above or below you will not get an accurate reading. The measuring cup provided has scales marked in cups, millilitres (ml) and fluid ounces (fl.oz.) to help you measure the ingredients correctly. Always fill the liquid exactly to the marked line.

If you are measuring dry ingredients by weight, use a good pair of kitchen scales calibrated in grammes (and Imperial if you prefer).
NOTE: Where the abbreviations tsp. (teaspoon) and tbsp. (tablespoon) appear in the recipes they refer to the supplied measuring spoon. Use this spoon as other utensils may not yield the correct amounts. Spoon measurements must be level. Rounded or heaped measures may not yield the proper results.


The capacity of the Breadmaker is sufficient to bake a 900g loaf, or to raise the equivalent amount of dough for baking elsewhere. Do not exceed this amount otherwise the mechanism may be damaged, or the dough may rise through the appliance lid.
Recipes - Getting Started
To get you started with your Bread maker, here is a selection of recipes. The recipes use fast action or easy bake dried yeast intended for bread makers.
When adding ingredients add the water first, followed by any other liquid and semi-liquid ingredients. Next add the flour followed by the other dry ingredients. Tap the pan lightly on all sides to settle the flour. This prevents the yeast from coming into contact with the liquids. Finally add the yeast in a small heap in the centre of the pan.
QUANTITIES AND CONVERSIONS
The recipe quantities are sufficient to bake a 700 gram loaf. Scale them up for larger loaves.
To avoid conflicts with different measuring systems the amounts are based on the supplied measuring cup and spoon. The cup is calibrated in cups, ounces and ml.
The spoon is calibrated in tablespoon (tbsp-15g) and teaspoon (tsp-5g) quantities.
Recipes
WHITE BREAD
(Use Basic or Quick Programme)
1 1⁄3 cups water at room temp. (around 20°C)
1 tbsp vegetable cooking oil
1 tsp salt
3 1⁄3 cups strong white bread flour
1 tsp white sugar
2 tsp dried yeast
WHITE BREAD VARIATIONS
The ingredients listed below are additional to the white bread mix unless otherwise stated.
Cheese
¾ cup grated cheese
Reduce water slightly if the cheese has a high moisture content.
Date
½ cup chopped dates
Add after the second kneading when the machine beeps
Cranberry
1½ tsp nutmeg
1 – 2 tbsp grated orange peel
2 – 4 tbsp dried cranberries
1 – 2 tbsp orange marmalade
Substitute cranberry juice for water
Potato
1⁄3 cup dried potato flakes
1 – 2 tsp dried parsley
Reduce flour by equivalent amount to potato
ONION BREAD
(Use Basic or Quick Programme)
Add all the ingredients at the beginning
1 1⁄3 cups water at room temp. (around 20°C)
1 tsp salt
1 tbsp powdered milk
3 1⁄3 cups strong white bread flour
1⁄3 cup dried onion flakes
12gm (½oz.) butter, chopped into pieces
1 tsp sugar
2 tsp dried yeast
CHEESE & ONION BREAD
(Basic or Quick Programme)
1 ⅛ cups milk
1 tbsp extra virgin olive oil
¾ cup 75 g (3oz) grated mature cheddar cheese
½ onion (finely grated / food processed)
1 tsp salt
1 tsp sugar
3 1⁄3 cups strong white bread flour
½ tsp mustard powder
2 tsp dried yeast
GARLIC BREAD
(Use Basic or Quick Programme)
1 ⅛ cups water at room temp. (around 20°C)
2 tbsp olive oil
1½ tsp salt
¾ tsp garlic (fresh pressed)
3 cups strong white bread flour
1 tbsp sugar
3 tbsp Parmesan cheese (grated)
¾ tsp basil (dried)
¾ tsp garlic powder
2 tbsp chives (dried)
¾ tsp black pepper
2 tsp dried yeast
PEANUT BUTTER BREAD
avoid if you have a nut allergy
(Use the Basic or Quick Programme)
1¼ cups water at room temp. (around 20°C)
3 cups strong white bread flour
½ cup peanut butter (smooth or crunchy)
¼ cup brown sugar
1½ tsp salt
1½ tsp dried yeast
RYE BREAD
(Use Basic or Quick Programme)
1 cup water at room temp. (around 20°C)
1¼ tsp salt
4 tsp vegetable oil or butter
2¼ cups strong white bread flour
¾ cup rye flour
2½ tbsp sugar
1 tbsp cornmeal
1 ½ tsp caraway seeds
2 tsp dried yeast
GRANARY BREAD
(Use Basic or Quick Programme)
1 1⁄3 cups water at room temp. (around 20°C)
1 tbsp vegetable cooking oil
1 tsp salt
3 1⁄3 cups granary bread flour
1 tsp white sugar
2 tsp dried yeast
FRENCH BREAD
(Use French Programme)
1¼ cups water at room temp. (around 20°C)
1½ tsp salt
3 cups strong white bread flour
1½ tsp sugar
2 tsp dried yeast
CARROT BREAD
(Use the Basic Programme)
¾ cup water at room temp. (around 20°C)
¼ cup plain yoghurt
1 cup carrots (grated)
2 tbsp honey
2 tbsp molasses (or dark brown muscovado sugar)
2¼ cups strong white bread flour
1 cup wholemeal bread flour
1 tbsp dried milk
1½ tsp salt
¼ cup walnuts (chopped)
1½ tsp dried yeast
BANANA BREAD
(Use the Whole Wheat Programme set to Light Crust)
⅔ cup water at room temp. (around 20°C)
1 tbsp vegetable cooking oil
1 tsp salt
3 tbsp honey
1 ⅛ cups wholemeal bread flour
¾ tsp vanilla essence
½ cup mashed banana
2 tbsp butter (chopped into pieces)
2 tbsp dried milk
2½ cups strong white bread flour
1 tsp white sugar
2 tsp dried yeast
FOCACCIA
(Use Basic or Quick Programme)
⅔ cup water at room temp. (around 20°C)
2 tbsp olive oil
1 tsp salt
2¼ cups strong white bread flour
2 tsp a mixture of freshly chopped thyme, marjoram and sage*
1 tsp white sugar
1 tsp dried yeast
This will make a small (approx. 500g) rounded loaf.
* If you use dried herbs, reduce the quantity by half as dried herbs have a stronger flavour.
TOMATO BREAD
(Use Basic or Quick Programme)
1 cup* water at room temp. (around 20°C)
2 tbsp olive oil
½ tsp salt
3 1⁄3 cups strong white bread flour
30 g (2¼oz) sundried tomatoes
½ tsp dried yeast
* made up from the water used to soak the tomatoes plus fresh water. (see below)
Firstly, soak the tomatoes in a little hot water for 15 min. Drain and chop into pieces, reserving the water.
You can add the tomatoes together with all the other ingredients at the beginning of the programme. This will give a blended character to the loaf.
Alternatively, you can add the tomatoes midway through the cycle. This will retain their individual character and give more flavour to the bread
BRIOCHE
(Use the Cake Programme)
2¼ tbsp water at room temp. (around 20°C)
¾ tsp salt
3 medium eggs, beaten
2½ cups strong white bread flour
75 g (3oz) butter (chopped into pieces)
1½ tbsp caster sugar
2½ tsp dried yeast
Note: If you prefer your brioche with a lighter crust, stop the programme 25 min. from the end and remove the loaf.
PIZZA DOUGH
(Use the Dough Programme)
1½ cups water at room temp. (around 20°C)
2½ tbsp olive oil
4½ cups strong white bread flour
2½ tbsp sugar
1½ tsp salt
2¼ tsp dried yeast
This should be sufficient for three 12" (300mm) Pizza bases. Roll into circles on a floured surface and pinch the edges up to form a rim. Place on a greased baking sheet, cover with the pizza toppings of your choice and bake at Gas Mk.6 / 200ºC / 400ºF for 15 mins.
If desired, you can re-prove the dough for 10 - 20 mins. by covering the formed base with a cloth and leaving it in a warm place on the greased baking sheet before adding the toppings.
BUN DOUGH
(Use the Dough Programme)
⅔ cup water at room temp. (around 20°C)
2 eggs, beaten
2 tbsp margarine
3 cups strong white bread flour
2 tbsp sugar
½ tsp salt
2 tsp dried yeast
SWISS BUNS
When the programme is completed, mould into 15 torpedo shapes on a greased baking sheet. Leave the dough to reprove for 10 -20 mins (method as for pizza dough, above)
DOUGHNUTS
When the programme is completed, mould into 15 balls and re-prove for 10 - 20 mins. Fry in hot oil until golden brown.
Using a wooden spoon, roll the doughnuts in caster sugar while they are still hot. Take care not to burn yourself.
Wholemeal (Whole Wheat) Bread Recipes
Here are some tried and tested recipes for making a variety of excellent wholemeal breads.
RECIPE 1
(Use the Whole Wheat Programme)
1 1⁄3 cups water at room temp. (around 20°C)
1 tbsp vegetable cooking oil
1 tsp salt
3 1⁄3 cups wholemeal bread flour
1 tsp white sugar
2 tsp dried yeast
RECIPE 2
(Use the Whole Wheat Programme)
1½ cups water at room temp. (around 20°C)
2 tbsp vegetable cooking oil
1½ tsp salt
4½ cups wholemeal bread flour
3 tbsp dried milk (optional)
2 tbsp white sugar
2¾ tsp dried yeast
RECIPE 3
(Use the Basic Programme)
1 1⁄3 cups water at room temp. (around 20°C)
1 tbsp vegetable oil or
12g (½oz) butter (chopped into pieces)
2 tsp salt
3 1⁄3 cups wholemeal bread flour
Pinch white sugar
2 tsp dried yeast
LIGHT WHOLEMEAL
(Use the Whole Wheat Programme)
1 1⁄3 cups water at room temp. (around 20°C)
1 tbsp vegetable oil
1 tsp salt
2¼ cups wholemeal bread flour
1 ⅛ cups strong white bread flour
1 tsp white sugar
2 tsp dried yeast
WHOLEMEAL SODA BREAD
(Use the Ultra Fast 1 Programme)
1 cup water at room temp. (around 20°C)
150ml (⅝ cup) natural Greek yoghurt
1 tsp salt
3 1⁄3 cups wholemeal bread flour
1 tsp bicarbonate of soda
1 tbsp baking powder
Help! My Bread's Gone Wrong - Some Easy Remedies
Have all the ingredients been added?
Have all the ingredients been accurately measured?
Was the yeast in contact with any liquid or salt before the programme started?
Has the correct programme been used?
Has the delay timer been properly set?
Has the mains been switched off during the cycle?
Was the lid opened at the wrong point in the cycle?
Was the water temperature correct?
Was the breadmaker in a very cold kitchen when the program started?
Was bread left in the machine after the "keep warm" time?
Troubleshooting Guide
| Symptom | Likely Cause | Remedy |
Bread rises too much | Too much yeast or flour Not enough salt Excessive water in the bread | Check ingredients carefully Ingredients old, out of date Reduce water content |
Bread does not rise enough | Too little yeast or wrong yeast Damp or out of date yeast Yeast in contact with salt Water too warm Wrong type of flour Damp, out of date flour | Check yeast condition carefully Only use sachet yeast Keep ingredients separated Use fresh water at room temp. Use fresh bread flour. Keep flour dry and in a dark, cool place. |
Bread has collapsed | Ingredients too warm | Use water at room temp. and fresh correctly stored ingredients. |
Bread rose well but flattened during baking | Too much water Ingredients not fresh Poor quality flour | Reduce water slightly Do not exceed "use by" dates Use fresh proper bread flour |
Bread deformed after baking | Gluten content of flour too low Too much water | Use fresh proper bread flour Reduce amount of water slightly |
Texture lumpy or uneven | Flour to water ratio is incorrect Flour is damp or out of date | Check quantity and quality of all ingredients |
Mushroom-like rough surface | Too much flour, especially with white bread Excessive salt or sugar | Check quantity and quality of all ingredients |
| Bread is difficult to slice | Bread too warm | Let bread cool on an open rack |
The Basics of Breadmaking
An understanding of ingredients and their interaction is essential to good breadmaking. This short guide will help you understand some of the processes and the materials used.
FLOUR
Flour is the essential ingredient. It should be fresh, and stored in cool, dry conditions, preferably in an airtight jar. Use only breadmaking flour. General-purpose flours do not contain enough gluten to produce well structured bread.
Wholemeal flour contains the whole wheat grain. This results in heaver denser loaves than bread made with white bread flour, and takes longer to rise - use the Wholemeal settings for best results.
Other flours such as rye are often added to bread flours to make specialty loaves. As these flours contain no gluten they cannot be used entirely on their own.
Flours vary - millers all have their own special methods, and age and storage play their part. Although you should always follow the recipe carefully there are occasions when you may have to adjust the dough. You may do this a few minutes into the kneading cycle. Open the Breadmaker lid and gently touch the dough. It should feel very slightly sticky. If it is sloppy, add a little flour (½ -1 tablespoon). Allow this to work in and re-check if necessary. If the dough is too dry, add the same amount of lukewarm water. Re-check if necessary.
As you gain experience, you will get to know the feel of good dough. It should be soft and smooth with the faintest sticky feel, but should leave no residue when turned out of the pan, as in our recipes for doughnuts and other recipes blended on the Dough programme.
The only time you can adjust the quality of the dough is during the kneading cycle. Once baking commences do not lift the lid or the bread may spoil.
MILK
Whole, semi-skimmed or skimmed milk can be used in breadmaking but it should always be added lukewarm. Refrigerated milk must be heated to around 27ºC (80ºF). Never heat milk above 37ºC (98ºF) as this can cause problems with yeast.
Milk can usually be substituted for water in most recipes, but the quantity may need to be adjusted - usually slightly higher. If dried milk features in the recipe, leave it out when substituting milk for water.
LIQUID QUANTITIES
Flour is absorbent, its texture will vary to some extent with the prevailing atmospheric conditions. The amount of liquid may have to be adjusted if the conditions in your kitchen are excessively dry or humid. If there is too much water in the bread it will not rise properly, even to the point of collapse. Insufficient liquid will result in a poorly structured, lumpy loaf.
If you are in any way unsure, it is good policy to monitor the dough while it is kneading, using the notes above.
BUTTER, MARGARINE, COOKING FAT AND OIL
These are interchangeable in bread making. Fats add flavour and help the keeping properties of bread. If you wish to use margarine based on vegetable oil, ensure that you use the regular kind. Avoid the "light" varieties as they contain quite large amounts of water which will adversely affect the bread. If you are in doubt, read the small print on the container; this will indicate whether the product is suitable for breadmaking.
When substituting oil for butter, margarine or solid cooking fat, reduce the amount of liquid by around ¾ tbs. to compensate for the extra liquid content of the oil.
As you will see from our recipes, it is good practice to cut butter and solid fats into small pieces before using them.
Low fat bread can be made by substituting natural low fat yoghurt for some or all the fat in the recipe, in equal amounts. Apple purée may also be used. Once again, monitor the dough and adjust accordingly.
SUGAR
Sugar provides food for the yeast, helps bread to rise and improves flavour, structure and colour. Almost any kind of natural sweetener can be used, - all the various sugars, corn and maple syrup, honey, etc. Once again, when using liquid sweeteners to replace sugar, reduce the amount of water slightly to compensate.
Artificial sweeteners are not suitable for breadmaking.
SALT
Salt in bread is NOT just a matter of taste! Salt restrains the growth of the yeast, and improves elasticity and structure. If you reduce or eliminate salt from the bread it will rise excessively - if you use too much salt the loaf will not rise enough. Use common table salt.
When adding salt to the bread pan, keep it away from the yeast by introducing it at one corner. If the yeast comes into premature contact with salt, the bread will not rise properly. This situation is obviously more important when using the delay timer.
YEAST
Yeast is a micro-organism which feeds on sugars and starches in the bread mix producing carbon dioxide gas which in turn causes the bread to rise.
We recommend the use of dried fast-acting yeast which is intended for breadmakers. The instructions on the sachet will tell you if the yeast is suitable for breadmakers. Easy-blend yeasts are readily available from branches of Tesco and other good grocers.
When adding yeast, be especially careful to get the quantity correct otherwise you could have a disaster on your hands, especially if you add too much!
Note: Some ingredients, especially garlic and cinnamon can spoil the quality of your bread if added in excess. Never be over generous with such additions, use the amounts recommended in the recipes.
When baking items containing milk and onions, it is advisable not to use extended timer settings
AND FINALLY
HAPPY BREADMAKING!

Documents / ResourcesDownload manual
Here you can download full pdf version of manual, it may contain additional safety instructions, warranty information, FCC rules, etc.
Advertisement


Need help?
Do you have a question about the BMS10 and is the answer not in the manual?
Questions and answers