Advertisement
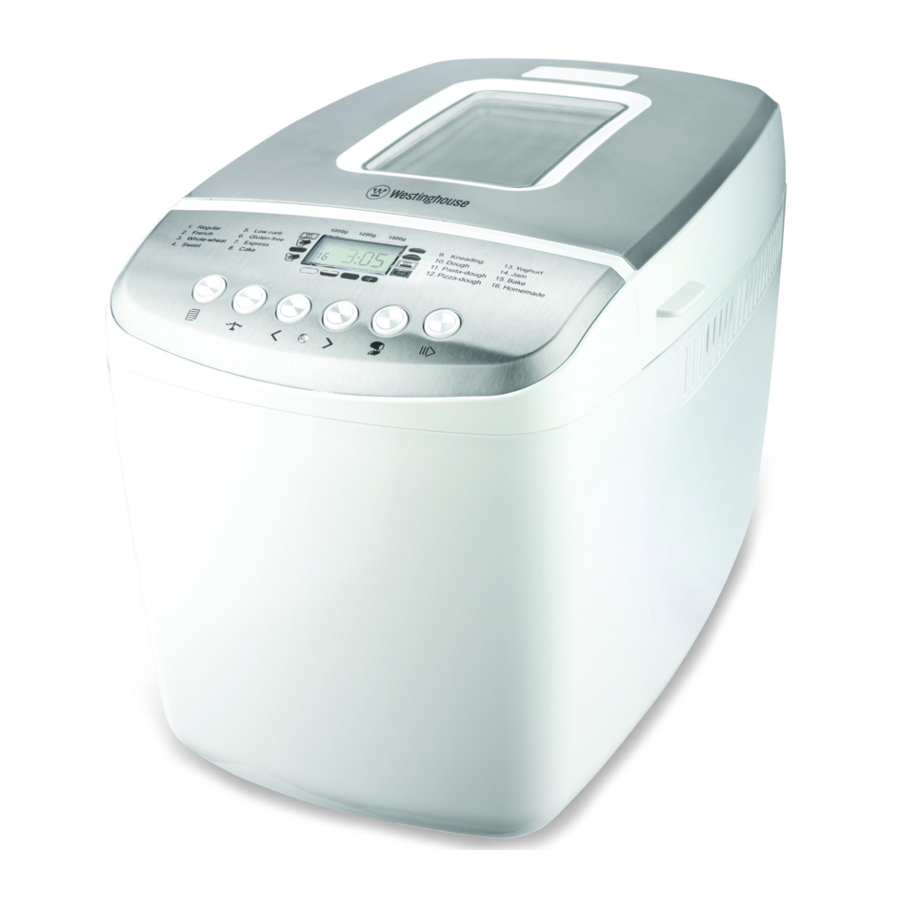
DESCRIPTION OF PARTS


- Lid
- Viewing window
- 2 kneading paddles
- Baking pan
- Control panel
- Housing
- Kneading paddle remover
- Measuring cup
- Measuring spoon
INTENDED USE
Use the device only for the purpose intended. Any other use may result in damage to the device or injuries.
IMPORTANT SAFEGUARDS
General
- Read this manual thoroughly before first use. It contains important information for your safety as well as for the use and maintenance of the equipment. Keep these instructions for future reference and pass it on with the device.
- Pay particular attention to the warnings on the device and in this instruction manual.
- Use the device only for its intended purpose. Improper use may lead to hazards.
- This device is designed for household use only, not for staff kitchen areas in shops, offices and other working environments, farm houses, by clients in hotels, motels and other residential type environments, bed and breakfast type environments use. It is not suitable for commercial use.
- In the event of improper use or wrong operation, we do not accept any liability for resulting damages.
- The use of accessories and components not expressly recommended by the manufacturer may result in injuries or damages and voids the warranty.
- This device is not intended to be used by persons (including children) with reduced physical, sensory or mental abilities or lack of experience and / or lack of knowledge unless they are supervised by a person responsible for their safety or have received instructions on how to use the device.
- Children should be supervised to ensure that they do not play with the device.
- Never leave the device unsupervised while it is switched on.
- Do not place heavy objects on top of the device.
- Never immerse electrical parts of the device in water during cleaning or operation. Never hold the device under running water.
- Do not under any circumstances attempt to repair the device yourself. For servicing and repairs, please consult an authorised dealer or qualified customer service centre.
- This device should not be operated with an external clock timer or separate remote control system.
Power supply
- The mains voltage must match the information on the rating label of the device.
- The power plug is used as the disconnect device. Please be sure that the power plug is in operable condition.
- Only removing the power plug can separate the device completely from the mains supply.
- Avoid damages to the power cord that may be caused by kinks or contact with sharp corners.
- Make sure the device, including power cord and power plug are not exposed to hot surfaces.
- Only unplug from the power outlet by the plug itself. Do not pull on the cord.
- Disconnect the power plug when the device is not in use, in case of malfunctions, prior to attaching accessories and prior to each cleaning.
- If the power cord or the casing of the device is damaged or if the device is dropped, the device may not be used before it is examined by a professional electrician.
- A damaged power cord may only be replaced by the manufacturer or a workshop commissioned by the manufacturer or by a similarly qualified person in order to avoid hazards.
Installation location
- Place the device on a at, sturdy and heat-resistant surface.
- Put the device in a place which is out of reach of children.
- Do not operate this device near flammable materials (e.g. curtains, textiles, walls) and never cover it. Ensure that there is always a sufficient safe distance from flammable materials.
- Use this device in dry indoor areas only and never outdoors.
![]()
Do not use this device near water or heavy moisture; e.g. in a damp basement or beside a swimming pool or bathtub.- In order to reduce the risk of re and electric shock, do not expose the device to re ( replace, grill, candles, cigarettes and so on) or water (water drops, water splashes, vases, tubs, ponds and so on).
- Keep this device away from all heat sources like for example, ovens, hot plates and other heat-producing devices/objects.
- Protect this device from extreme heat (over 35°C / 95°F) and cold (under 5°C / 41°F) as well as from direct sunlight and dust.
SPECIFIC SAFETY INSTRUCTIONS
Setup
- Make certain that the ventilation slits of the appliance are not covered.
- Do not draw the power cord over sharp edges or close to hot surfaces or objects. This may damage the insulation of the power cord.
- To prevent anyone from tripping over, the appliance is provided with a short power cord.
- If you plan to use an extension cable, make sure that the maximum permissible power rating of the cable corresponds with that of the bread maker.
- Place the extension cable in such a way as to prevent anyone from tripping over it or pulling it accidentally.
During operation
- Do not place any objects on the appliance and do not cover it during operation. Fire Hazard!
![]()
The bread maker becomes hot. Only touch the handles and touch buttons of the appliance. If necessary, use a kitchen cloth.- Before taking out the accessories or inserting them, allow the appliance to cool down and unplug the power cord.
- Do not re-locate the bread maker if the baking pan contains hot ingredients or liquids.
- Avoid contact with the rotating kneading paddles during operation. Injury hazard!
- Stop the appliance off by means of the On/Off button, then pull the power plug out of the wall socket to disconnect the appliance from the power supply.
- Do not use the bread maker for the storage of foods or utensils.

Cleaning
- Do not immerse the bread maker in water or other fluids. Hazard of lethal electrical shocks!
- Do not clean the appliance with abrasive scrubbers. Detached particles of the scrubber may come into contact with the electrical components and cause severe electric shocks.
BEFORE FIRST USE
- Carefully take the device and its accessories out of the packaging. Retain the packaging in case you would like to store the device away or transport it at a later date. If you choose to dispose of the packaging, then please do so according to the applicable legal regulations.
- Check the packaging contents for completeness and damages. Should the contents in the packaging not be complete or be damaged, do not use the device. Return it to your retail outlet immediately.
- Clean the device and all accessories before the first use. Refer to the chapter CARE AND MAINTENANCE.
USING THE BREAD MAKER
Proper use
- Only use your bread maker for baking bread in a household environment. Do not use the appliance for drying foodstuffs or other objects.
- Do not use the bread machine outdoors. Use accessories recommended by the manufacturer only. Accessories not recommended may cause damage to the appliance.
How to make bread
- Place the pan in position and turn it clockwise until it clicks in correct position. Insert the kneading blade onto the drive shaft. The ring of kneading blade should be face the bottom of bread pan.
It is recommended to ll holes with heat-resisting margarine prior to placing the kneaders, this avoids the dough to stick below the kneaders and the kneaders could be removed from bread easily. - Place ingredients into the bread pan. Please keep to the order mentioned in the recipe. Usually the water or liquid substance should be put firstly, then add sugar, salt and our, always add yeast or baking powder as the last ingredient.
NOTE: the maximum quantities of the our and yeast and other ingredients which may be used refer to the recipe.


Properties
You can use the automatic bread maker to bake according to your taste.
- You can choose from among 16 different baking programs.
- You can use ready-to-use baking mixtures.
- You can knead noodle dough or roll dough and make jam.
- With the "gluten-free" baking program, you can successfully make gluten-free baking mixtures and recipes with gluten-free ours, such as corn our, buckwheat our and potato our.
Control panel

- Display
- Display for selection of the weight (1000g, 1250g, 1500g)
- The remaining baking time in minutes and the programmed time
- The selected degree of browning (Medium Dark Rapid Lower)
- The selected program number
- The program processing sequence
- Menu
Load the desired baking program. The program number and the corresponding baking time appear on the display.
![]()
When pressing all touch buttons an acoustic signal must be audible, unless the appliance is in operation (namely all the program have been set, and the Start/Stop button has been pressed down, the others button without acoustic signal). - Loaf size
Select the gross weight (1000g, 1250g, 1500g). Press the button enough times until the marking appears beneath the desired weight.
NOTE: The program 9, 10, 11, 12, 13, 14 and 15 can not adjust the loaf size. - Delay Timer
Time-delayed baking. - Color
Select the degree of browning (Medium Dark Rapid Lower). Press the button of color until a marking appears above the desired degree of browning. The baking time changes depending on the selected level of browning. For baking programs 1 - 4 you can activate rapid mode by pressing the button until the triangle indicates the rapid program. The program 6, 7, and 11 can not select the color setting. - Start/Stop
To start and stop the operation or to delete a set timer. To interrupt operation, brie y press the Start/Stop button, until an acoustic signal is heard and the time ashes on the display. By pressing the Start/Stop button again operation can be resumed. If you do not pressing the Start/Stop manually, the machine will resume to process program automatically after 10 minutes. To finish operation and delete the settings, press the Start/Stop button for 3 seconds until one long acoustic signals are audible.
NOTE: Do not use the Start/Stop button to check the state of your bread.
Memory function
When being switched on again after a power failure of up to approx. 10 minutes, the program will continue from the same point. This does not apply, however, when you cancel/terminate the baking process by pressing the Start/Stop button for 3 seconds.
Viewing window
You can check the baking process through the window.
Baking programs
You select the desired program by pressing the button menu. The corresponding program number is showed on the display. The baking time depends on the selected Program combinations. See chapter "Program sequence".
- Baking program 1: Basic
This program is suitable for baking white or brown breads, which largely consist of wheat or rye flour. You obtain bread which has a compact consistency. - Baking program 2: French
This program is suitable for baking fluffy breads made from finely ground flours. You usually obtain fluffy breads with a crispy crust. - Baking program 3: Whole Wheat
This program is suitable for processing strong flours such as wholemeal wheat flour or wholemeal rye flour. This results in a heavy and compact bread. - Baking program 4: Sweet
This program is very suitable if you would like to add additional sugar or ingredients such as fruit juice, dried fruit, coconut flakes, raisins or chocolate to your bread. The program provides a fluffy, airier bread. - Baking program 5: Low carb
Use this program to bake low-carbohydrate breads. - Program 6: Gluten Free
Gluten-free flours and baking mixes have different rise properties and need more time to absorb fluids. Thus this program with its extended rise times and baking time is suitable for breads made of gluten-free our or gluten-free baking mixes. - Baking program 7: Express
The times for kneading and baking as well as the rise time are greatly reduced in the Super Rapid program. This program is thus suitable only for recipes that do not require any strong types of our or other heavy ingredients. The bread is less airy and also may not be as tasty as usual with this program. - Baking program 8: Cake
Use this program to bake your cake according to your own recipes or even cake mixes. - Baking program 9: Kneading
Use this program if you only want to knead dough. There are no rising phases and timer programming is no possible. - Baking Program 10: Dough
Yeast dough for bread rolls, pizza or other pastries can be kneaded this program. Timer programming is possible. This enables you to finish your dough within a precise time. The program includes kneading and rising phases. - Baking program 11: Pasta dough
You can prepare pasta dough with this program. The program lasts 15 minutes and consists of only a kneading phase. Timer programming is not possible. - Baking program 12: Pizza dough
For the preparation of pizza dough. This program takes 45 minutes and consists of two kneading and two rising phases. Timer program is possible. - Baking program 13: Yoghurt
This program lets you make yoghurt from cow's milk or soy milk. See the enclosed recipe booklet for detailed instructions. - Program 14: Jam
This program is used to produce jam, marmalade, jelly and other fruit-based spreads. - Program 15: Bake
For additional baking of breads that are too light or not baked through. You can also bake ready-made dough with this program. The bread will be kept warm for nearly an hour after the end of the baking operation. This prevents the bread from becoming too moist. - Baking program 16: Homemade
You can set this program according to your preferences and experience. You can set individual times for each phase of the baking process.- When MENU 16 homemade be selected, there are 8 custom menus can be saved in homemade menu. Press the COLOR button, you can choice (1-8) menus to diy (At this time when you press the MENU key it will return to the default first menu ).
- When one custom menus is selected, then press the LOAF button, you can choose the procedure process you want to set the time, the small arrow on the edge of the display indicates the current program step will be flashed, cycle will works as follow: PREHEAT--KNEAD1--RISE1--KNEAD2--RISE2--RISE3--BAKE--KEEP WARM.
- Press the "TIME+" key and the "TIME-" key, you can set the time of each program phase.
- When you change the time according to your needs, the time numbers will be flashing. When adjust the time to the maximum, press "TIME" key and return to the minimum time of program phase.
- Press the "LOAF" key again to finish setting and move to the next stage, the next program step flashes on the display. Until the program each stage set is completed, push the START again, confirm the Settings and exit setup, then press the START button and START to work. HOME MADE is mainly suitable for the user who is familiar with bread making process, and according to their own ideas, set bread production process, to achieve satisfactory results.
- The each phase's range of HOME MADE Menu's setting time as below:
There is memory function in each phase's time setting of HOME MADE Menu, and once it's set, it won't change until the next reset or restoring the factory default settings.Process Default time Adjustable time's range PREHEAT 0:15 0:00-0:20 KNEAD1 0:13 0:00-0:15 RISE1 0:25 0:20-0:40 KNEAD2 0:12 0:00-0:20 RISE2 0:30 0:00-1:00 RISE3 0:30 0:00-1:00 BAKE 1:00 0:00-1:20 KEEP WARM 1:00 0:00-1:00 - MENU 16 homemade be selected, then you choose one of 8 custom menus by pressing the "COLOR" key, if press the "MENU" and "LOAF" key at the same time for 1 second, the custom menu which you choose will restore the factory default settings.
- To prematurely terminate this function press the Start/Stop button for three seconds, until one long acoustic signals are heard. To switch off the appliance, disconnect the appliance from the power supply.
In programs 1, 2,3, 4, 5, 6, 10 and 16 hurried acoustic signal sounds during the program sequence. Soon thereafter, add the ingredients such as fruits or nuts. And the "ADD" letter will appear. The ingredients are not chopped by the kneading paddle.
If you have set the delayed timer, you can put all the ingredients into the baking pan at the beginning. In this case, however, fruits and nuts should be cut into smaller pieces.
Setting the Timer
The timer function enables delayed baking. Using the arrow keys [<] and [>], set the desired end time for the baking operation. Select a program. The display indicates the required baking time. Using the arrow keys you can change the end time of baking operation in steps of 10 minutes to a later point of time. Keep the arrow key pressed to carry out this function faster. The display shows the total duration of baking time and the delayed time. Confirm the timer setting by means of the Start/Stop button. The colon on the display flashes and the programmed time starts to run. When the baking process has been completed, ten acoustic signals are issued and the display indicates 0:00. The timer function is not available for program 9, 11, 13, 14 or 15.
Example:
It is 8 a.m. and you would like fresh bread in 7 hours 15 minutes at 3.15 p.m. First select program 1, then press the timer button until 7:15 appears on the display, as the time until the bread is finished is 7 hours 15 minutes. Note that the Timer function may not be available in jam program.
NOTE: Do not use the timer function when working with quickly spoiling ingredients such as eggs, milk, cream or cheese.
Baking bread
PREPARATION
Observe the safety instructions in this manual. Place the bread machine on an even and rm base.
- Pull the baking pan upward out of the appliance.
- Push the kneading paddles onto the drive shafts in the baking pan. Make sure they are firmly in place.
- Put the ingredients for your recipe in the stated order into the baking pan. First add the liquids, sugar and salt, then the flour, adding the yeast as the last ingredient.
NOTE: Make certain that yeast does not come into contact with salt or liquids. The maximum quantities of the flour and yeast which may be used refer to the recipe. - Place the baking pan back in the appliance. Make sure that it is positioned properly.
- Close the appliance lid.
- Plug the power plug into the socket. An acoustic signal sounds and the display indicates the program number and the duration of the normal program 1.
- Select your program with the menu button. Each input is confirmed by an acoustic signal.
- Select the color of your bread. The marking on the display shows whether you have chosen light, medium or dark. You can also select the setting "Rapid" to shorten the baking time.
NOTE: For programs 9, 10, 11, 12, 13 or 14, the functions "browning degree" is not available. And "Rapid" function is possible only for program 1, 2, 3 and 4. - You now have the possibility of setting the finish time of your program via the timer function. You can enter a maximum delay of up to 15 hours.
NOTE: This delayed function is not available for program 9, 11, 13, 14 or 15.
STARTING A PROGRAM
Now start the program using the Start/Stop button.
The program will automatically run various operations. You can watch the program sequence via the window of your bread baking machine. Occasionally, condensation may occur during baking in the window. The appliance lid can be opened during kneading.
Note: Do not open the appliance lid during baking. The bread can collapse.
Tip: After 5 minutes of kneading, check the consistency of the dough. It should be a soft, sticky lump. If it is too dry, add some liquid to it. If it is too moist, add some flour (1/2 to 1 teaspoon one or more times, as needed).
REMOVE FUNCTION
This function allows you to remove the dough kneading paddles before the baking phase. This is not mandatory, but has the advantage that the unaesthetic holes in the finished bread are slightly smaller because they are caused only by the thin shafts. The bread is no longer torn by the dough kneading paddles when removing it from the baking pan and is also easier to remove. During the 2nd rising phase, 10 beeps sound and "RMV" ashes on the display, then press the start/stop button to pause the program sequence for ten minutes. During this ten minutes pause, the remaining program time flashes on the display, remove the dough kneading paddles, press the start/stop button to continue the program, if no to press the the start/stop button, the program continues automatically after a 10-minute pause. This function does not apply to programs 7, 8, 9, 11, 12, 13, 14 or 15.
ENDING A PROGRAM
When the baking process has been completed, ten acoustic signals are issued and the display indicates 0:00. At the end of the program the appliance automatically changes to a warming mode for up to 60 minutes. In this mode, warm air circulates inside the appliance. You can prematurely terminate the warming function by keeping the Start/Stop button pressed until two acoustic signals are heard. The "keep warm" phase does not apply to program 9, 10, 11, 12, 13 or 14.

- Before opening the appliance lid, pull the power plug out of the wall socket. When not in use, the appliance should never be plugged in!
- Taking out the bread
- When taking out the baking pan, always use pot holders or oven gloves. Hold the baking pan tilted over a grid and shake lightly until the bread slides out of the baking pan. If the bread does not slip off the kneading paddles, carefully remove the kneading paddles using the enclosed kneading paddle remover.
NOTE: Do not use any metal objects that may lead to scratches on the non-stick coating. After removing the bread, immediately rinse the baking pan with warm water. This prevents the kneading paddles from sticking to the driving shaft.
Tip: If you remove the kneading paddles after the last kneading of the dough, the bread will remain intact when you remove it from the baking pan.
- Briefly press the Start/Stop button, to interrupt the baking process or pull the power plug out of the wall socket.
- Open the appliance lid and take out the baking pan. You can take the dough out with floured hands and remove the kneading paddles.
- Replace the dough and close the appliance lid.
- Push the plug back into the wall socket and press the Start/Stop button. The baking program is continued. Let the bread cool for 15-30 minutes before eating. Before cutting bread, make sure that no kneading paddle is still in the baking pan.
Do not attempt to start operating the bread maker, before it has either cooled down or warmed up. If the display shows "HHH" after the program has been started, it means that the temperature inside of bread pan is too high. You should stop the program and unplugged the power outlet immediately. Then open the lid and let the machine cool down completely before using again. If the display shows "LLL" after the program has been started, it means that the temperature inside of bread pan is too low, it may caused by frozen ingredient, if work, the bread maker will be damaged. You should stop the program and unplugged the power outlet immediately, remove it to the warmer environment until the temperature of the ingredient rise, then it can work. If the display shows "EE0" after you have pressed Start/Stop button, switch off the main switch and disconnect the mains plug, then insert the mains plug again and switch on the main switch, if the error message is still displayed, please contact Customer Service.
CARE AND MAINTENANCE
Pull the power plug out of the wall socket each time and allow the appliance to cool down. Protect the appliance against splashing water and moisture, as these could lead to an electric shock. Please also observe the safety instructions.

The parts and accessories of the appliance should not be washed in a dish washing machine.
Casing, lid, baking chamber
Remove all particles left behind inside the baking area using a wet cloth or a slightly wet soft sponge. Wipe the casing and the lid too with a wet cloth or sponge. Make sure that the inside area is fully dry. For easy cleaning, the appliance lid can be removed from the housing:
- Open the appliance lid to a suitable angle and lift up to remove it.
- Pull the appliance lid out of the hinge guides.
- To attach the appliance lid, pass the wedge-shaped hinge tappets through the opening in the hinge guides.
Baking pans and kneading paddles
The surfaces of the baking pans and kneading paddles have a nonstick coating. While cleaning, do not use any abrasive detergents, cleaning powders or objects that may cause scratches on the surface. Due to moisture and vapor the surface of various parts may undergo changes in their appearance over a period of time. This does not affect the quality or functional performance of the appliance. Before cleaning, take the baking pans and kneading paddles out of the baking area. Wipe the outside of the baking pans with a damp cloth.
Never immerse the baking pans in water or other liquids. Clean the interior of the baking pans with warm, soapy water. If the kneading paddles are incrusted and hard to release, ll the baking pan with hot water for approx. 30 minutes. If the retainer in the kneading paddle is clogged, you can clean it carefully with a wooden skewer. Do not use any chemical cleaning agents or thinners to clean the bread maker.
DISPOSAL
Proper disposal of this product.

This label indicates that, in the EU, electronic devices cannot be disposed of with regular household waste.
Please use the return or collections systems of your municipality or contact the seller where you purchased this product.
INFORMATION AND SERVICE
If you have question or concerns about your product, please visit our website: www.westinghousehomeware.com, or contact our overseas offices/agents.
In line with our policy of continuous product development, we reserve the right to change product, packaging and documentation specifications without notice.
¼, WESTINGHOUSE, and INNOVATION YOU CAN BE SURE OF are trademarks of Westinghouse Electric Corporation, a USA company. Used under license by Westinghouse Homeware (HK) Co. All Rights Reserved.

Documents / Resources
References
Download manual
Here you can download full pdf version of manual, it may contain additional safety instructions, warranty information, FCC rules, etc.
Advertisement

Need help?
Do you have a question about the WKBM 8000 and is the answer not in the manual?
Questions and answers