Advertisement
Quick Links
sauder.com
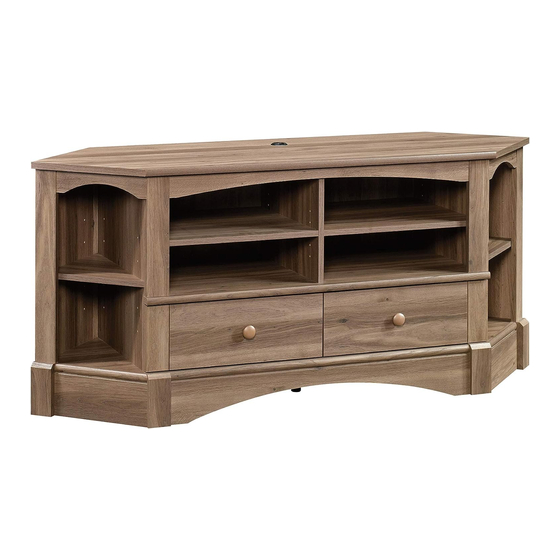
Corner Entertainment Credenza
Harbor View Collection | Model 420471
Need help? Visit Sauder.com to view video assembly tips or chat with a live rep.
Prefer the phone? Call 1-800-523-3987.
Share your journey!
Entertaining what
entertains you.
NOTE: THIS INSTRUCTION
BOOKLET CONTAINS IMPORTANT
SAFETY INFORMATION.
PLEASE READ AND KEEP FOR
FUTURE REFERENCE.
English pg 1-32
Français pg 33-36
Español pg 37-40
Lot # 392344
07/18/16
Purchased: __________________
Be sure to give us a ring before
making any returns. 1-800-523-3987
Advertisement

Related Manuals for Sauder Harbor View 420471


Summary of Contents for Sauder Harbor View 420471
- Page 1 Harbor View Collection | Model 420471 NOTE: THIS INSTRUCTION BOOKLET CONTAINS IMPORTANT SAFETY INFORMATION. Need help? Visit Sauder.com to view video assembly tips or chat with a live rep. PLEASE READ AND KEEP FOR FUTURE REFERENCE. Prefer the phone? Call 1-800-523-3987.
- Page 2 • Check the size and weight of your TV. Compare it to the diagram below – before you begin assembly! • This Sauder unit is designed for use with televisions weighing less than 135 pounds. Never use with a TV that weighs more.
- Page 3 FRONT VALANCE (1) VERTICAL MOLDING (2) D969 DRAWER BOTTOM (2) RIGHT VALANCE (1) END MOLDING (4) SHELF (2) LEFT VALANCE (1) LONG BRACE (1) BOTTOM (1) RIGHT DRAWER FRONT (1) D107 D969 D108 D107 D969 D108 www.sauder.com/services 420471 Page 3...
- Page 4 -Refer to instruction book for complete safety information. Note: This is a permanent label. Do not try to remove. Surface will be damaged. 02/ 02 2 6 9 2 3 2 269232 (Refer to step 25 for proper location and application) Page 4 420471 www.sauder.com/services...
- Page 5 BLACK 1-7/8" FLAT HEAD SCREW - 10 3S GOLD 5/16" FLAT HEAD SCREW - 16 BLACK 1-1/8" PAN HEAD SCREW - 2 30S BLACK 1-9/16" FLAT HEAD SCREW - 8 SILVER 5/8" FLAT HEAD SCREW - 4 www.sauder.com/services 420471 Page 5...
- Page 6 Look for this icon. It means a Step 1 video assembly tip is available at www.sauder.com/services/tips Push twenty-six HIDDEN CAMS (1F) into the ENDS (A2 å and B2), UPRIGHT (C2), SHELVES (E2), BACKS (I Some assembly and J), and BRACES (L). Then, insert the metal end of a (and snacks) required.
- Page 7 B2). Use four BLACK 9/16" LARGE HEAD SCREWS (1S). NOTE: There are no pre-drilled holes in the MOLDINGS. The å Groove SCREWS will tighten into the grooves. BLACK 9/16" LARGE HEAD SCREW (8 used in this step) These edges should be even. www.sauder.com/services 420471 Page 7...
- Page 8 å LEFT (35DB) to the ENDS (A2 and B2). Use four GOLD 5/16" FLAT HEAD SCREWS (3S) through holes #1 and #3. GOLD 5/16" FLAT HEAD SCREW (4 used in this step) Roller end Roller end Page 8 420471 www.sauder.com/services...
- Page 9 Fasten the CABINET RIGHT (35DA) and the CABINET å LEFT (35DB) to the UPRIGHT (C2). Use four GOLD 5/16" FLAT HEAD SCREWS (3S) through holes #1 and #3. GOLD 5/16" FLAT HEAD SCREW (4 used in this step) Finished edge Roller end www.sauder.com/services 420471 Page 9...
- Page 10 Use sixteen BLACK 9/16" LARGE HEAD SCREWS (1S). NOTE: Be sure the METAL BRACKETS are even with the å edges of the BRACES and VALANCES. (16 used) BLACK 9/16" LARGE HEAD SCREW (16 used in this step) Page 10 420471 www.sauder.com/services...
- Page 11 Tighten Risk of damage or Arrow injury. HIDDEN CAMS must be completely Arrow Maximum tightened. HIDDEN 210 degrees CAMS that are not completely tightened may loosen, and parts may separate. To Minimum completely tighten: 190 degrees www.sauder.com/services 420471 Page 11...
- Page 12 S u r f a c H I D D E N i t h S u r f a c H I D D E N i t h Maximum Arrow 210 degrees Minimum 190 degrees Page 12 420471 www.sauder.com/services...
- Page 13 SHELVES (E2). Tighten four HIDDEN CAMS. Finished edge i t h o Surface with f a c HIDDEN CAMS S u r D E N H I D Finished edge Maximum Arrow 210 degrees Minimum 190 degrees www.sauder.com/services 420471 Page 13...
- Page 14 BLACK 9/16" LARGE HEAD SCREWS (1S) through Don't worry. It isn't the BRACKETS on the VALANCE and into the TOP. Rome. This can be built in a day. BLACK 9/16" LARGE HEAD SCREW (3 used in this step) Page 14 420471 www.sauder.com/services...
- Page 15 UPRIGHT (C2). Use six BLACK 1-7/8" FLAT HEAD SCREWS (2S). These holes must be here. U n fi n i s h s u r f a c BLACK 1-7/8" FLAT HEAD SCREW (6 used in this step) www.sauder.com/services 420471 Page 15...
- Page 16 Fasten the BACKS (I and J) to the BOTTOM (G2). Use Minimum å four BLACK 1-7/8" FLAT HEAD SCREWS (2S). 190 degrees Notched edge Notched edge Surface with HIDDEN CAMS Surface with HIDDEN CAMS BLACK 1-7/8" FLAT HEAD SCREW (4 used in this step) Page 16 420471 www.sauder.com/services...
- Page 17 Slide the LONG END MOLDINGS* (AA) onto the notched å edges of the BACKS (I and J). * U.S. Patent No. 5,499,886 å Slide the LONG END MOLDINGS (AA) onto the notched edges. Notched Notched edge edge www.sauder.com/services 420471 Page 17...
- Page 18 Fasten the VALANCES (O2 and P2) to the TOP (D2). Use å four BLACK 9/16" LARGE HEAD SCREWS (1S) through the BRACKETS on the VALANCES and into the TOP. BLACK 9/16" LARGE HEAD SCREW (4 used in this step) Page 18 420471 www.sauder.com/services...
- Page 19 NOTE: Be sure the BRACKETS are even with the edges of the å BOTTOM and BACKS. Fasten the FRONT BASE MOLDING (X) to the BOTTOM (G2). BLACK 9/16" LARGE HEAD SCREW å (14 used in this step) Use three BLACK 9/16" LARGE HEAD SCREWS (1S). www.sauder.com/services 420471 Page 19...
- Page 20 BLACK 9/16" LARGE HEAD SCREWS (1S). NOTE: There are no pre-drilled holes in the END å MOLDINGS (CC). The SCREWS will tighten into the grooves. BLACK 9/16" LARGE HEAD SCREW (8 used in this step) Page 20 420471 www.sauder.com/services...
- Page 21 H I D D E N i t h BLACK 9/16" LARGE HEAD SCREW (4 used in this step) S u r f a c H I D D E N i t h o www.sauder.com/services 420471 Page 21...
- Page 22 Step 17 Fasten the LONG BRACE (EE) to the BOTTOM (G2) å and BRACES (L). Use fi ve BLACK 9/16" LARGE HEAD SCREWS (1S). BLACK 9/16" LARGE HEAD SCREW (5 used in this step) Page 22 420471 www.sauder.com/services...
- Page 23 Fasten the CONNECTOR PLATE (35G) to the SIDE BASE å MOLDINGS (Y and Z) and the OUTER END MOLDINGS (CC). Use four BLACK 9/16” LARGE HEAD SCREWS (1S). BLACK 9/16" LARGE HEAD SCREW (8 used for the CONNECTOR PLATES) www.sauder.com/services 420471 Page 23...
- Page 24 å Turn the adjustable end of the ADJUSTABLE FOOT completely å in. Final adjustments will be made after the unit is standing upright. SILVER 5/8" FLAT HEAD SCREW (4 used in this step) Turn completely in. Page 24 420471 www.sauder.com/services...
- Page 25 BACK. Carefully cut out the holes needed. NAIL (21 used in this step) These holes must line up over the SHELVES (E2). BLACK 9/16" LARGE HEAD SCREW These holes must line up (19 used in this step) over the UPRIGHT (C2). www.sauder.com/services 420471 Page 25...
- Page 26 Fasten the DRAWER BACK (D69) to the DRAWER SIDES (D107 and D108). Use four BLACK 1-9/16" å FLAT HEAD SCREWS (30S). NOTE: Be sure the DRAWER BOTTOM (D969) inserts into the groove of the DRAWER BACK (D69). å Repeat this step for the remaining drawer. å Page 26 420471 www.sauder.com/services...
- Page 27 Roller end Screw head - turn CAM to line up holes in the SLIDES with holes in DRAWER SIDES D108 Roller end D107 (4 screws per drawer) GOLD 5/16" FLAT HEAD SCREW (8 used in this step) www.sauder.com/services 420471 Page 27...
- Page 28 Fasten a KNOB (134K) to the RIGHT DRAWER FRONT (Q). å Use a BLACK 1-1/8" PAN HEAD SCREW (9S). Repeat this step for the other drawer. å BLACK 1-1/8" PAN HEAD SCREW (2 used in this step) 134K Page 28 420471 www.sauder.com/services...
- Page 29 ENDS (A2 and B2), UPRIGHT (C2), and BACKS (I and J). Set the ADJUSTABLE SHELVES (K and M2) onto the METAL PINS. (16 used) Floor Turn the ADJUSTABLE FOOT downward until it touches the fl oor. www.sauder.com/services 420471 Page 29...
- Page 30 - The TV must weigh less than 135 lbs. - The base of the TV must be able to sit Insert the GROMMET (10P) and GROMMET CAP (1P) into å completely on this shelf. the large hole in the TOP (D2). Page 30 420471 www.sauder.com/services...
- Page 31 Lift the front of the drawer up and slide it into the unit. 135 lbs. 5 lbs. 25 lbs. 25 lbs. 40 lbs. 5 lbs. 5 lbs. 40 lbs. 20 lbs. 20 lbs. 5 lbs. www.sauder.com/services 420471 Page 31...
- Page 32 #3. The higher the screw in the oblong hole, the higher your drawer front will be. The lower the screw, the lower the drawer front. Page 32 420471 www.sauder.com/services...
- Page 33 EXTRÉMITÉ DROITE ..........1 35DA ÉLÉMENT DROITE............2 pour future référence. EXTRÉMITÉ GAUCHE ..........1 35DB ÉLÉMENT GAUCHE ..........2 Pour contacter Sauder MONTANT................1 35DC TIROIR DROIT ..............2 en ce qui concerne cet élément, faire référence DESSUS ................1 35DD TIROIR GAUCHE ............2 au numéro de lot et...
- Page 34 Fixer seize CONSOLES EN MÉTAL (4G) aux ENTRETOISES (L et EE) et aux LAMBREQUINS (N2, O2 et P2). Utiliser seize VIS TÊTE • Cette unité Sauder est conçue pour les téléviseurs pesant moins LARGE 14 mm NOIRES (1S). de 61 kg. Ne jamais utiliser avec des téléviseurs plus lourds.
- Page 35 Fixer les MOULURES D'EXTRÉMITÉ (CC) sur les ENTRETOISES (L). Utiliser quatre VIS TÊTE LARGE 14 mm NOIRES (1S). REMARQUE : Les MOULURES D'EXTRÉMITÉ (CC) ne comportent pas de trous pré-percés. Serrer les VIS dans les rainures. www.sauder.com/services 420471 Page 35...
- Page 36 GOUPILLES EN MÉTAL (1R). Insérer les GOUPILLES EN MÉTAL dans les trous choisis dans les EXTRÉMITÉS (A2 et B2), le MONTANT (C2) et les ARRIÈRES (I et J). Poser les TABLETTES RÉGLABLES (K et M2) sur les GOUPILLES EN MÉTAL. Page 36 420471 www.sauder.com/services...
- Page 37 35DB GABINETE IZQUIERDO ..........2 EXTREMO IZQUIERDO ..........1 pour future référence. 35DC CAJÓN DERECHO .............2 PARAL ...................1 Pour contacter Sauder 35DD CAJÓN IZQUIERDO ..........2 en ce qui concerne cet PANEL SUPERIOR ............1 10A EXCÉNTRICO DE CORREDERA .......4 élément, faire référence D69 DORSO DE CAJÓN ...........2...
- Page 38 Fije dieciséis SOPORTES DE METAL (4G) a las RIOSTRAS (L y EE) y a las CORNISAS (N2, O2 y P2). Utilice dieciséis TORNILLOS NEGROS DE • Esta unidad Sauder está diseñada para ser usada con televisores cuyo CABEZA GRANDE de 14 mm (1S).
- Page 39 Fije las MOLDURAS DE EXTREMO (CC) a las RIOSTRAS (L). Utilice cuatro TORNILLOS NEGROS DE CABEZA GRANDE de 14 mm (1S). NOTA: No hay agujeros perforados en las MOLDURAS DE EXTREMO (CC). Los TORNILLOS apretarán dentro de las ranuras. www.sauder.com/services 420471 Page 39...
- Page 40 METAL (1R). Inserte las ESPIGAS DE METAL en los agujeros al nivel preferido de los EXTREMOS (A2 y B2), el PARAL (C2) y los DORSOS (I y J). Coloque los ESTANTES AJUSTABLES (K y M2) sobre las ESPIGAS DE METAL. Page 40 420471 www.sauder.com/services...
- Page 41 TOUJOURS décharger les tablettes et les tiroirs, en commençant par les surface supérieures, avant de déplacer le meuble. NE JAMAIS pousser ou tirer un meuble sur de la moquette. Demander à une autre personne de le soulever correctement pour le déplacer et/ou le repositionner. www.sauder.com/services 420471 Page 41...
- Page 42 SIEMPRE descargue los estantes y cajones, empezando con las superfi cies superiores, antes de moverlo. NUNCA empuje ni tire de los muebles sobre una alfombra. Obtenga que un amigo le ayude a levantarlo correctamente para moverlo y/o reposicionarlo. Page 42 420471 www.sauder.com/services...
- Page 43 à compter de la date d'achat la première fois et qui sont signalés à Sauder dans les limites de couverture de la contre tout défaut de matériaux ou de fabrication des composantes de mobilier Sauder.
- Page 44 Dear Valued Customer: So, how did it go? Thanks so much for choosing Sauder® furniture. I hope the Set a world record for speed? purchase and assembly process was a positive experience Feeling good about yourself? and you feel good about the furniture you just built. If you Nice.
Need help?
Do you have a question about the Harbor View 420471 and is the answer not in the manual?
Questions and answers