
Related Manuals for TOOLSTATION Hawksmoor GY219211

Summary of Contents for TOOLSTATION Hawksmoor GY219211
- Page 1 Original User’s Instructions 18V 25cm Brushless Cordless Chainsaw SKU: 88537 READ BEFORE USE PLEASE KEEP THESE INSTRUCTIONS FOR FURTHER REFERENCE...
-
Page 2: Table Of Contents
CONTENT ∫ WHAT’S IN THE BOX ---------------------------------------------------------- 3 ∫ SPECIFICATIONS -------------------------------------------------------------- 4 ∫ EXPLANATIONS AND SYMBOLS, CAUTIONS AND WARNINGS ---------- 6 ∫ IMPORTANT SAFETY WARNINGS -------------------------------------------- 8 ∫ PRODUCT DESCRIPTION AND IDENTIFICATIONS ------------------------ 25 ∫ ASSEMBLY AND OPERATING INSTRUCTIONS ----------------------------26 ∫... -
Page 3: What's In The Box
WHAT'S IN THE BOX Saw body Oregon guide bar Oregon saw chain Blade protection cover Battery pack Charger If you do not have all these items, please contact: www.coreservice.co.uk Hotline: +44 01904 947568 Email support@coreservice.co.uk www.coreservice.co.uk Hotline: +44 01904 947568 Email support@coreservice.co.uk... -
Page 4: Specifications
SPECIFICATION • Rubber overmould grip • Oil level indicator • Tool-free chain tensioning • Low kickback • Oregon bar & chain • Mechanical brake Technical Data Model GY219211 Nominal voltage of product with battery 18V d.c Cutting length 220mm Bar length 254mm Chain speed 10m/s... - Page 5 WARNING: The declared vibration emission level represents the main applications of the tool. However if the tool is used for different applications, with different accessories or poorly maintained, the vibration emission may differ. This may significantly increase the exposure level over the total working period. An estimation of the level of exposure to vibration should also take into account the times when the tool is switched off or when it is running but not actually doing the job.
-
Page 6: Explanations And Symbols, Cautions And Warnings
EXPLANATIONS AND SYMBOLS, CAUTIONS AND WARNINGS To reduce the risk of injury, user must read instruction manual Warning! Wear eye, ear, head protection Wear gloves Wear protective shoes Wear dust mask Beware of chain saw kickback and avoid contact with bar tip Do not expose to rain Always use chain saw two-handed Wear protective cloth... - Page 7 Do not throw into water. Do not throw on fire. Do not subject the battery to strong sunlight over long periods of time. Do not leave on a heater (max.45°C). Batteries contain Li-ion. Do not dispose of waste batteries in domestic waste. Contact local authority to find out how to dispose of batteries.
-
Page 8: Important Safety Warnings
IMPORTANT SAFETY WARNINGS General Power Tool Safety Warnings Warning: Please read the following instructions carefully, failure to do so could lead to serious personal injury. When using the electric chainsaw, basic safety precautions, including the following, should always be followed to reduce the risk of fire,electric shock and personal injury. - Page 9 Work Area Safety • Keep work area clean and well lit. Cluttered or dark areas invite accidents. • Do not operate power tools in explosive atmospheres, such as in the presence of flammable liquids, gases or dust. Power tools create sparks which may ignite the dust or fumes. •...
- Page 10 Personal Safety • Stay alert, watch what you are doing and use common sense when operating a power tool. Do not use a power tool while you are tired or under the influence of drugs, alcohol or medication. A moment of inattention while operating power tools may result in serious personal injury.
- Page 11 Power Tool Use and Care • Do not force the power tool. Use the correct power tool for your application. The correct power tool will do the job better and safer at the rate for which it was designed. • Do not use the power tool if the switch does not turn it on and off.
- Page 12 Service • Have your power tool serviced by a qualified repair person using only identical replacement parts. This will ensure that the safety of the power tool is maintained. Product Safety Warnings Chain Saw Safety Warnings: • Use the tool only with specifically designated battery packs. Use of any other battery packs will increase the risk of injury and fire.
- Page 13 • Do not operate a chain saw in a tree, on a ladder, from a rooftop, or any unstable support. Operation of a chain saw in this manner could result in serious personal injury. • Always keep proper footing and operate the chain saw only when standing on fixed, secure and level surface.
- Page 14 • Follow all instructions when clearing jammed material, storing or servicing the chain saw. Make sure the switch is off and the battery pack is removed. Unexpected actuation of the chain saw while clearing jammed material or servicing may result in serious personal injury.
- Page 15 • Do not overreach and do not cut above shoulder height. This helps prevent unintended tip contact and enables better control of the chain saw in unexpected situations. • Only use replacement bars and chains specified by the manufacturer. Incorrect replacement guide bars and saw chains may cause chain breakage and/or kickback.
- Page 16 Save These Instructions: Instructions concerning the proper techniques for basic felling, limbing, and cross-cutting. 1. Felling a tree When bucking and felling operations are being performed by two or more persons at the same time, the felling operations should be separated from the bucking operation by a distance of at least twice the height of the tree being felled.
- Page 17 3. Felling back cut Make the felling back cut (Y) at least 50 mm higher than the horizontal notching cut as illustrated in Figure 1. Keep the felling back cut parallel to the horizontal notching cut. Make the felling back cut so enough wood is left to act as a hinge. The hinge wood keeps the tree from twisting and falling in the wrong direction.
- Page 18 4. Limbing a tree Limbing is removing the branches from a fallen tree. When limbing leave larger lower limbs to support the log off the ground. Remove the small limbs in one cut as illustrated in Figure 2. Branches under tension should be cut from the bottom up to avoid binding the chain saw.
- Page 19 When the log is supported on one end, as illustrated in Figure 4, cut 1/3 the diameter from the underside (underbuck) (1). Then make the finished cut by overbucking (2) to meet the first cut. Figure 4 When the log is supported on both ends, as illustrated in Figure 5, cut 1/3 the diameter from the top (overbuck) (1).
- Page 20 When bucking on a slope always stand on the uphill side of the log, as illustrated in Figure 6. When “cutting through”, to maintain complete control release the cutting pressure near the end of the cut without relaxing your grip on the chain saw handles. Don’t let the chain contact the ground.
- Page 21 When battery pack is not in use, keep it away from other metal objects, like paper clips, coins, keys, nails, screws or other small metal objects, that can make a connection from one terminal to another. Shorting the battery terminals together may cause burns or a fire.
- Page 22 • Recharge only with the charger specified by manufacturer. Do not use any charger other than that specifically provided for use with the equipment. A charger that is suitable for one type of battery pack may create a risk of fire when used with another battery pack.
- Page 23 • Do not abuse the cord of charger. Never use the cord for carrying, pulling or unplugging the charger. Keep cord away from heat, oil, sharp edges or moving parts. Damaged or entangled cords increase the risk of electric shock. •...
- Page 24 • This charger can be used by children aged from 8 years and above and persons with reduced physical, sensory or mental capabilities or lack of experience and knowledge if they have been given supervision or instruction concerning use of the appliance in a safe way and understand the hazards involved.
-
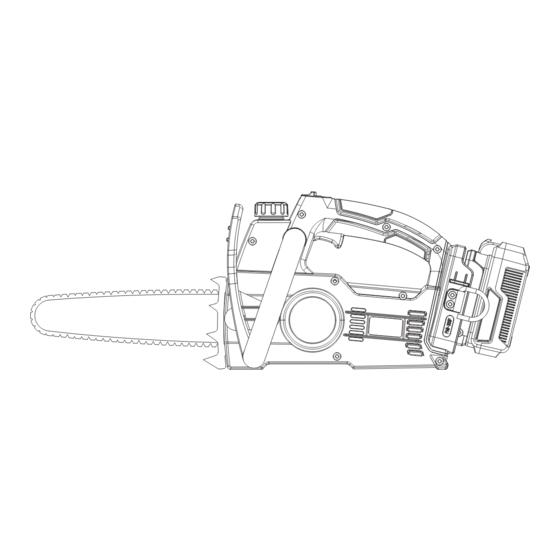
Page 25: Product Description And Identifications
PRODUCT DESCRIPTION AND IDENTIFICATIONS 1. Hand guard/chain brake 10. Saw chain 2. Lock off button 11. Blade protection cover 3. Front handle 12. Chain cover 4. On/off switch 13. Quick tensioning dial 5. Rear handle 14. Oil volume indicator 6. Battery pack release button 15. -
Page 26: Assembly And Operating Instructions
ASSEMBLY AND OPERATING INSTRUCTIONS To reduce the risk of injury, user must read instruction manual WARNING: Before assembly and adjusting to the chainsaw, ensure the chainsaw is turned off and the battery pack is removed. INTENDED USE The chainsaw is intended for sawing of trees, tree trunks, branches, wooden beams, planks, etc. Cuts can be sawed with or across the grain. - Page 27 3) Wearing protective gloves, slide and wrap the chain (10) in the groove around the guide bar (9). Ensure the saw chain teeth are facing in the correct running direction by comparing it to the chain icon (a) on the guide bar and machine. Ensure the bar tensioning plate (18) is facing outward. Long tensioning Short tensioning bolt assembly bolt...
- Page 28 5) Ensure all parts are seated properly. Make sure the drive links are fully seated in the drive sprocket (15), avoiding a kink. If kink occurs, pick up on the chain at the guide bar just ahead of the kink and then pull the kink out. NOTE: Chain should rotate freely and be free of kinks.
- Page 29 8) Rotate the chain quick tensioning dial (13) clockwise until it is firmly tightened. tighten 2. Tensioning chain and bar NOTE: New saw chains will stretch slightly. Check the chain tension frequently when first used and tighten when the chain becomes loose around the guide bar. The tension is correct when the chain snaps back after being pulled 3 mm away from the guide bar (9) with light force from the index finger and thumb as shown in Figure below.
- Page 30 3. Lubrication IMPORTANT: The chain saw is not filled with oil. It is essential to fill with oil before use. Never operate the chain saw without chain oil or at an empty oil tank level, as this will result in extensive damage to the product. NOTE: Chain life and cutting capacity depend on optimum lubrication.
- Page 31 4) Avoid dirt or debris entering oil tank, refit oil filler cap (8) and tighten by turning clockwise. IMPORTANT: To allow venting of the oil tank, small breather channels are provided between the oil filler cap and the strainer, to prevent leakage, and ensure machine is left in a horizontal position when not in use.
- Page 32 Charge the battery pack before operating when it is at medium or low battery charging level. Button Charging procedure 1) Slide the battery pack into the charger base to make connections. 2) Connect the battery charger to the power supply. The indicator light will be red to show that the charging has started.
- Page 33 2. To remove or install battery pack Depress the battery release button (c) to release battery pack from your tool. After recharging, insert the battery pack into tool’s battery port. A simple push and slight pressure will be sufficient. NOTE: When removing the battery pack, hold it firmly to avoid potential accidents. Operation 1.
- Page 34 Press the lock-off button (2), then fully press the on/off switch (4) and hold in this position. The lock- off button (2) can now be released (See Fig. below) For switching off, release the on/off switch (4), or push the hand guard into position 2 as shown in figure below.
- Page 35 3) Use both hands to grip saw. Always use left hand to grip front handle and right hand to grip rear handle. Use a firm grip. Thumbs and fingers must wrap around saw handles. 4) Make sure your footing is firm. Keep feet-shoulder width apart. Distribute your weight evenly on both feet.
- Page 36 5. How to use saw safely 1) Use the chain saw only with secure footing. 2) Hold the chain saw at the right-hand side of your body (See Fig. F1). 3) The chain must be running at full speed before it makes contact with the wood. 4) Do not operate the chain saw with arms fully extended, attempt to saw areas which are difficult to reach, or stand on a ladder while sawing (See Fig.
-
Page 37: Care And Cleaning
CARE AND CLEANING Follow maintenance instructions in this manual. Proper cleaning of saw and chain and guide bar maintenance can reduce chances of kickback. Inspect and maintain saw after each use. This will increase the service life of your saw. NOTE: Even with proper sharpening, risk of kickback can increase with each sharpening. - Page 38 Conditions which require chain and guide bar maintenance: • Saw cuts to one side or at an angle. • Saw has to be forced through the cut. • Inadequate supply of oil to the bar and chain. Check the condition of the guide bar each time the chain is sharpened. A worn guide bar will damage the chain and make cutting difficult.
- Page 39 6. Lubricate sprocket WARNING: Wear heavy duty gloves when performing any maintenance or service to this tool. Always remove the battery pack before performing any service or maintenance on this tool. NOTE: It is not necessary to remove the chain or bar when lubricating the guide bar sprocket. 1) Clean the bar and sprocket 2) Using a grease gun, insert the tip of the gun into the lubrication hole (t) and inject grease until it appears at the outside edge of the sprocket tip.
-
Page 40: Trouble Shooting
TROUBLE SHOOTING Use this section to help you to try and solve any problems you may have: PROBLEM POSSIBLE CAUSE CORRECTIVE ACTION Out of battery. Charge the battery pack. Chain saw fails to The chain brake is in “ON” position Push the chain brake to the “OFF”... -
Page 41: Declaration Of Conformity / Performance
Product Description: Hawksmoor 18V 25cm Cordless Chainsaw 1. Toolstation Limited, Express Park, Bristol Road, Bridgwater, Somerset TA6 4RN This declaration of conformity is issued under the sole responsibility of Toolstation 2. Object of the declaration The object of the declaration described above is in conformity with the relevant Community... -
Page 42: Environmental Information
ENVIRONMENTAL INFORMATION The symbol on the product or its packaging indicates that this product must not be disposed of with your other household waste. Instead, it is your responsibility to dispose of your waste equipment by handing it over to a designated collection point for the recycling of waste electrical and electronic equipment. -
Page 43: Guarantee
Toolstation products are individually tested before leaving the factory. If you are a consumer and you experience a problem with your Toolstation product, which is found to be defective due to faulty materials or workmanship within the Guarantee Period, this Toolstation Guarantee will cover repair or - at the discretion of Toolstation –...
Need help?
Do you have a question about the Hawksmoor GY219211 and is the answer not in the manual?
Questions and answers