
Related Manuals for Aquasana Rhino Chloramines Max Flow WH-1021


Summary of Contents for Aquasana Rhino Chloramines Max Flow WH-1021
- Page 1 Whole House Water Filter WH-1000 Rhino ® Rhino ® Chloramines Max Flow CITY WATER Owner’s Manual...
-
Page 2: Table Of Contents
Meet clean, healthy water. Your new Aquasana® whole house Rhino system ® was expertly engineered to reduce contaminants, including 83% of chloramines and 97% of chlorine, from the water throughout your entire home. Enjoy the peace of mind that comes from knowing our award-winning water filter technology is working for you. -
Page 3: Box Contents & System Configurations
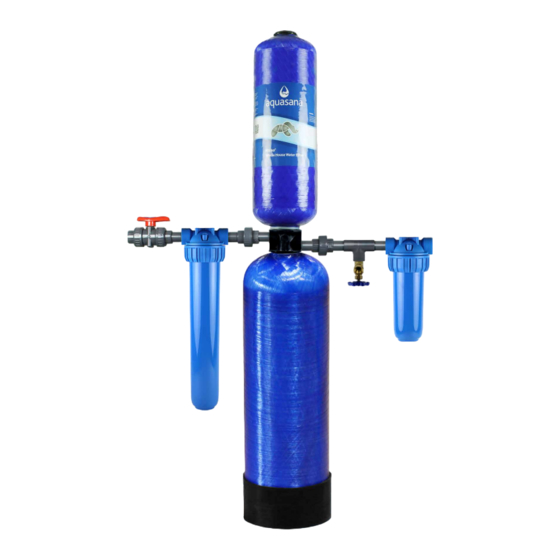
BOX CONTENTS & SYSTEM CONFIGURATION Rhino Chloramines Max Flow Tank Slip Unions (2) ® 20" Pre-Filter 2.5" TOE Nipples (5) 10" Post-Filter 3" Smooth Nipple Plastic Wrench Brass Drain Valve Fliter Support Brackets (2) PVC Tee 1" - " Reducer Bushings (2) Tall Salt-Free Water Conditioner (Optional) Shut-Off Valve Max Flow UV Filter (Optional) -
Page 4: Installation Steps
INSTALLATION STEPS Tools recommended for installation: Optional components: • Drill • Check valve • Wrench • Pro-Grade Bypass Kit • Channel locks • Water hammer arrestor • Pipe cutter • Copper wire & grounding clamps • NSF certified PVC primer and glue (if copper pipes are present) •... - Page 5 INSTALLATION STEPS Precautions (continued) • DO NOT install the tank on its side. It must be installed upright to maximize contact with media bed. • Pick an appropriate installation location where if the tank or any connection thereto should leak, the resulting flow of water will not cause damage to the surrounding area.
- Page 6 INSTALLATION STEPS Pro-Grade Bypass Kit Installation: IF YOUR SYSTEM does not include the Pro-Grade Bypass Kit, continue to step NOTE: Due to the variety of home design and spaces, anticipate the need for additional items to install bypass loop properly. Additional items would be available at a local home improvement store or through your plumbing contractor.
- Page 7 INSTALLATION STEPS Prepare Rhino Tank ® 1. Ensure the Rhino tank sits level. If it looks off-center or unlevel, reference troubleshooting section. 2. Pre-assemble all parts and dry-fit the entire system to ensure proper spacing and to confirm you have the necessary components for installation.
- Page 8 INSTALLATION STEPS COPPER PIPES ONLY (proceed to Step 4 for all other pipes) When installing on metallic plumbing, ensure you take the following precautions. Securely Ground install two (2) grounding clamps Wire and a #4 copper wire (not included) across the location Ground Ground where the system will be installed.
- Page 9 INSTALLATION STEPS NOTE: DO NOT cut more pipe than necessary. You can cut more pipe later if needed. If you're installing a bypass loop, plan accordingly for the space required. Ensure proper spacing to fit Pre and Post-Filters, and any optional add-ons Incoming Outgoing water supply...
- Page 10 INSTALLATION STEPS Configure System 1. Fit Rhino tank and additional optional add-ons into the system at this time. ® 2. Attach the shut-off valve to your incoming water line. 3. Connect the threaded nipple from the shut-off valve outlet to the 20"...
- Page 11 INSTALLATION STEPS Flush Your System NOTE: It’s imperative that this system is flushed properly prior to system water entering your house. The granular carbon used in the filtration tank contains fines that must be flushed out prior to use. 1. Connect a garden hose to the integrated drain valve and ensure the drain valve is in the open position.
- Page 12 INSTALLATION STEPS Flush Your System (continued) 5. After the initial 15-minute flushing, begin a period of "surge flushing" by turning the water supply on for 30 seconds and then off for 30 seconds, repeating the cycle for 15 minutes or until the initial surge of water is completely clear and free from discoloration and cloudiness.
-
Page 13: Troubleshooting Guide
Use rubber strap wrench to tighten tanks. If leak continues, contact customer service with a pre-recorded video of leak. Water leak from Aquasana • Ensure tight connection – do not overtighten as that could fittings cause cracks and further leaking. -
Page 14: Maintenance
MAINTENANCE Cleaning • The exterior of your filtration system can be cleaned with warm, soapy water. Do not use any abrasive solution. • Rinse well with clean water. NOTE: Never use chemical cleaning products on the system’s exterior surface as they may damage the housing. <... -
Page 15: Filter Replacements
FILTER REPLACEMENTS Pre/Post-Filter Replacements Whole House 20" Pre-Filter Cartridge Replacement Replace every 2 months. Replace sooner if there is a noticable decrease in water flow through the filter system. Whole House Low Maintenance Pre-Filter Cartridge Replacement Replace every 6 months. Replace sooner if there is a noticable decrease in water flow through the filter system. - Page 16 FILTER REPLACEMENTS Specifications This filter system is designed and tested for use with genuine Aquasana parts including replacement filters and all hardware. Use of parts from other manufacturers may result in loss of contaminant reduction performance, system damage, or failure. Use of parts from other manufacturers will also void your warranty.
- Page 17 FILTER REPLACEMENTS Rhino Tank Replacement ® Shut Off Water Supply 1. Turn off the main water source prior to tank replacement or turn off the shut-off valve. 2. Place a 5 gallon bucket under the system drain valve and open valve. This will relieve water pressure and drain excess water.
- Page 18 FILTER REPLACEMENTS Rhino Tank Replacement (continued) ® Reconnect Fittings 1. Clean the threads on the pipe nipples and re-apply new NSF certified plumbers tape. 2. Connect pipe nipples to your new Rhino tank. ® Plumb In New Rhino Tank ® Slide the new tank back into the system and re-attach the unions.
- Page 19 FILTER REPLACEMENTS Rhino Tank Replacement (continued) ® NOTE: It’s imperative that this system is flushed properly prior to system water entering your house. The granular carbon used in the filtration tank contains fines that must be flushed out prior to use. Flushing New Rhino Tank ®...
- Page 20 FILTER REPLACEMENTS Flushing Process (continued) 5. After the initial 15-minute flushing, begin a period of "surge flushing" by turning the water supply on for 30 seconds and then off for 30 seconds, repeating the cycle for 15 minutes or until the initial surge of water is completely clear and free from discoloration and cloudiness.
-
Page 21: Performance & Certifications
10.0 gpm 40-90°F 138-690 kPa 37.9 lpm 4.44-32.2°C Manufactured by: Aquasana, Inc. 6310 Midway Road · Haltom City, Texas 76117 866-662-6885 System independently tested to NSF/ANSI 42 for the claims specified on the Performance Data Sheet. For the full list of contaminants filtered, go to the... -
Page 22: Warranty
This Warranty covers defects in materials or workmanship dur- subject to misuse, alteration, neglect or accident. ing the limited warranty period of your of your Aquasana Rhino • The water filter has not been installed in accordance with Whole House Filtration System including sub-components... -
Page 23: Water For Life ® Program
– at no extra cost. commitment required. CONTACT US TO LEARN MORE 866-662-6885 waterforlife@aquasana.com * Exclusions apply. Limited Warranty details are available at aquasana.com. Benefits are for the term of Water for Life membership. < Back To Table of Contents >... - Page 24 LOVE IT? NEED HELP? Please let us know with Give us a call at 866-662-6885 and a review on Aquasana or your retailer’s website. tell us what’s going on. Aquasana, Inc. 6310 Midway Road Haltom City, Texas 76117 866.662.6885 USA 877.332.7873 Canada...
Need help?
Do you have a question about the Rhino Chloramines Max Flow WH-1021 and is the answer not in the manual?
Questions and answers