dji MAVIC 3 PRO User Manual
Hide thumbs
Also See for MAVIC 3 PRO:
- User manual (115 pages) ,
- Quick start manual (10 pages) ,
- Repair manual (6 pages)
Table of Contents
Advertisement
Advertisement
Table of Contents

Related Manuals for dji MAVIC 3 PRO


Summary of Contents for dji MAVIC 3 PRO
- Page 1 User Manual v1.0 2023.04...
- Page 2 This document is copyrighted by DJI with all rights reserved. Unless otherwise authorized by DJI, you are not eligible to use or allow others to use the document or any part of the document by reproducing, transferring or selling the document. Users should only refer to this document and the content thereof as instructions to operate DJI UAV.
-
Page 3: Using This Manual
* For increased safety, flight is restricted to a height of 98.4 ft (30 m) and a range of 164 ft (50 m) when not connected or logged into the app during flight. This applies to DJI Fly and all apps compatible with DJI aircraft. -
Page 4: Download Dji Assistant 2
DJI Mavic 3 Pro User Manual Download DJI Assistant 2 Download DJI ASSISTANT 2 (Consumer Drones Series) https://www.dji.com/mavic-3-pro/downloads • The operating temperature of this product is -10° to 40° C. It does not meet the standard operating temperature for military-grade application (-55° to 125° C), which is required to endure greater environmental variability. -
Page 5: Table Of Contents
Product Profile Introduction Feature Highlights Using for the First Time Preparing the Aircraft Preparing the Remote Controller Activating the DJI Mavic 3 Pro Aircraft Binding the Aircraft and Remote Controller Updating Firmware Overview Aircraft DJI RC Pro DJI RC Remote Controller... - Page 6 DJI Mavic 3 Pro User Manual QuickShots Hyperlapse Waypoint Flight Cruise Control Aircraft Flight Modes Aircraft Status Indicators Return to Home Smart RTH Low Battery RTH Failsafe RTH Landing Protection Precision Landing Vision Systems and Infrared Sensing System Detection Range Using the Vision System Advanced Pilot Assistance Systems (APAS 5.0)
- Page 7 DJI Mavic 3 Pro User Manual Remote Controller Alert Optimal Transmission Zone Linking the Remote Controller Operating the Touchscreen Advanced Features DJI RC Operation Remote Controller LEDs Remote Controller Alert Optimal Transmission Zone Linking the Remote Controller Operating the Touchscreen...
- Page 8 Product Profile This chapter introduces the major features of the product. © 2023 DJI All Rights Reserved.
-
Page 9: Product Profile
15 km and video quality at up to 1080p 60fps from the aircraft to the DJI Fly app. The remote controller works at both 2.4 and 5.8 GHz, and is capable of selecting the best transmission channel automatically. -
Page 10: Using For The First Time
DJI Mavic 3 Pro User Manual Using for the First Time DJI Mavic 3 Pro is folded before being packaged. Follow the steps below to unfold the aircraft and prepare the remote controller. Preparing the Aircraft 1. Remove the storage cover. -
Page 11: Preparing The Remote Controller
3. Unfold the front arms, followed by the rear arms, and then the propeller blades. • Charger is not included with Mavic 3 Pro (Drone Only). It is recommended to use a PD 65W (or above) charger to charge the Intelligent Flight Battery. -
Page 12: Activating The Dji Mavic 3 Pro Aircraft
Follow the on-screen prompts to activate the remote controller. Activating the DJI Mavic 3 Pro Aircraft DJI Mavic 3 Pro requires activation before first use. After powering on the aircraft and remote controller, follow the on-screen prompts to activate DJI Mavic 3 Pro using DJI Fly. An internet connection is required for activation. -
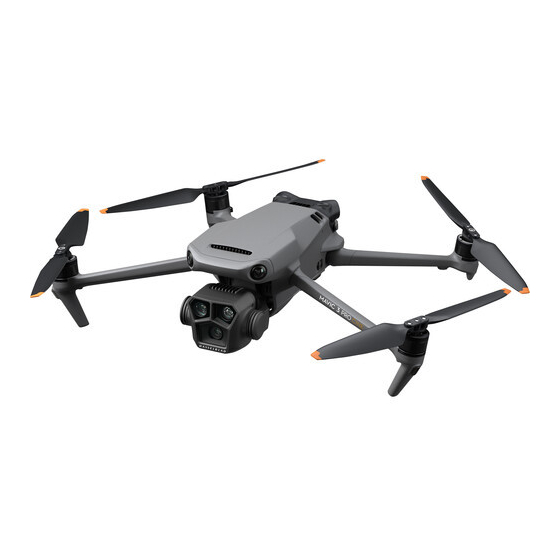
Page 13: Overview
DJI Mavic 3 Pro User Manual Overview Aircraft Gimbal and Camera Propellers A. Tele Camera Aircraft Status Indicators B. Medium Tele Camera 10. Landing Gear (Built-in antennas) C. Hasselblad Camera 11. Upward Vision System Horizontal Omnidirectional Vision 12. Intelligent Flight Battery System 13. -
Page 14: Dji Rc Pro
Flight Mode Switch For switching between three flight modes: Switch between Cine, Normal, and Sport mode. 5D Button View and set the 5D button features in DJI Fly by entering Camera View > Settings > Control > Button Customization. Power Button Press once to check the current battery level. - Page 15 Press halfway down on the button to autofocus and press all the way down to take a photo. Press once to switch to photo mode when in record mode. 19. Camera Control Dial Control zoom in/out by default. Set the function in DJI Fly by entering Camera View > Settings > Control > Button Customization. ©...
- Page 16 23. Speaker Outputs sound. 24. Customizable C2 Button Press once to turn the auxiliary light on or off. Set the function in DJI Fly by entering Camera View > Settings > Control > Button Customization. 25. Air Intake For heat dissipation. Do not block the air intake during usage.
-
Page 17: Dji Rc Remote Controller
DJI Mavic 3 Pro User Manual DJI RC Remote Controller Control Sticks Use the control sticks to control the aircraft movements. Set the stick mode in DJI Fly. The control sticks are removable and easy to store. Status LED Indicates the status of the remote controller. - Page 18 For storing the control sticks. 17. Customizable C2 Button Press once to turn the auxiliary light on or off. Set the function in DJI Fly by entering Camera View > Settings > Control > Button Customization. 18. Customizable C1 Button Switch between recentering the gimbal and pointing the gimbal downward.
- Page 19 Flight Safety This section describes safe flight practices and flight restrictions. © 2023 DJI All Rights Reserved. ...
-
Page 20: Flight Safety
DJI Mavic 3 Pro User Manual Flight Safety Once pre-flight preparation is complete, it is recommended to hone your flight skills and practice flying safely. Pick a suitable area to fly in according to the following flight requirements and restrictions. Make sure you understand and comply with the local laws and regulations before flying. -
Page 21: Flight Restrictions
GNSS is unavailable. Flight Altitude and Distance Limits Max altitude restricts an aircraft’s flight altitude, while max distance restricts an aircraft’s flight radius around the Home Point. These limits can be changed in the DJI Fly app for improved flight safety. ©... - Page 22 DJI Mavic 3 Pro User Manual Max Altitude Home Point Max Distance Height of aircraft when taking off Home Point not manually updated during flight Strong GNSS Signal Flight Restrictions Prompt in DJI Fly App Altitude of the aircraft cannot exceed the value Max Altitude Max flight altitude reached.
-
Page 23: Geo Zones
Warning Zones, Enhanced Warning Zones, and Altitude Zones. Users can view such information in real-time in the DJI Fly app. GEO Zones are specific flight areas, including but not limited to airports, large event venues, locations where public emergencies have occurred (such as forest fires), nuclear power plants, prisons, government properties, and military facilities. -
Page 24: Starting/Stopping The Motors
To stop the motors mid-flight, perform the same CSC that was used to start the motors for two seconds. The default setting can be changed in DJI Fly. ©... -
Page 25: Controlling The Aircraft
DJI Mavic 3 Pro User Manual Controlling the Aircraft The control sticks of the remote controller can be used to control the aircraft movements. The control sticks can be operated in Mode 1, Mode 2, or Mode 3, as shown below. The default control mode of the remote controller is Mode 2. -
Page 26: Takeoff/Landing Procedures
4. Tap Settings > Safety, and then set the Obstacle Avoidance Action to Bypass or Brake. Make sure to set an appropriate Max Altitude and RTH Altitude. 5. Wait for the aircraft self-diagnostics to complete. If DJI Fly does not show any irregular warning, the user can start the motors. -
Page 27: Intelligent Flight Modes
The aircraft will bypass obstacles regardless of the flight modes or obstacle Avoidance the aircraft will hover if an obstacle is detected, avoidance action settings in DJI Fly when the vision systems are working normally. regardless of whether the obstacle avoidance action is set to Bypass or Brake in DJI Fly. - Page 28 DJI Mavic 3 Pro User Manual ActiveTrack 5.0 Trace Parallel After setting the tracking direction (the The aircraft tracks the subject at a constant default direction is Back), the aircraft tracks angle and distance from the side as the the subject as its moving direction, and tracking starts.
- Page 29 2. Drag-select the subject in the camera view, or enable Subject Scanning under Control settings in DJI Fly and tap the recognized subject to enable FocusTrack. • FocusTrack must be used within the supported zoom ratio as follows, otherwise it will affect subject recognition: a.
- Page 30 DJI Mavic 3 Pro User Manual c. Tap on the bottom of the screen to switch to ActiveTrack. In Trace mode, the tracking direction can be changed using the direction wheel (Front, Back, Left, Right, Front Diagonal Left, Front Diagonal Right, Back Diagonal Left, and Back Diagonal Right). The direction wheel will be minimized if there is no operation for an extended period or any other area of the screen is tapped.
-
Page 31: Mastershots
1. Launch the aircraft and make it hover at least 2 m (6.6 ft) above ground. 2. In DJI Fly, tap the shooting mode icon to select MasterShots and read the instructions. Make sure you understand how to use the shooting mode and there are no obstacles in the surrounding area. -
Page 32: Quickshots
DJI Mavic 3 Pro User Manual Exiting MasterShots Press the flight pause button once or tap in DJI Fly to exit MasterShots. The aircraft will brake and hover. • Use MasterShots at locations that are clear of buildings and other obstacles. Make sure there are no humans, animals, or other obstacles in the flight path. - Page 33 1. Launch the aircraft and make it hover at least 2 m (6.6 ft) above ground. 2. In DJI Fly, tap the shooting mode icon to select QuickShots and follow the prompts. Make sure you understand how to use the shooting mode and there are no obstacles in the surrounding area.
-
Page 34: Hyperlapse
DJI Mavic 3 Pro User Manual c. When the subject is similar in color or pattern with the surroundings. d. When the subject is in the air. e. When the subject is moving fast. f. When the lighting is extremely low (<300 lux) or high (>10,000 lux). - Page 35 The aircraft will generate a timelapse video automatically, which is viewable in playback. Users can select Photo Type in Settings > Camera page in DJI Fly. • For optimal performance, it is recommended to use Hyperlapse at an altitude higher than 50 m and to set a difference of at least two seconds between the interval and shutter time.
-
Page 36: Waypoint Flight
The heading will point toward the POI during flight. A waypoint flight route can be saved and repeated. Using Waypoint Flight 1. Enable Waypoint Flight on the left of the camera view in DJI Fly to enable Waypoint Flight. 2. Waypoint Settings Pin Waypoint Waypoints can be pinned via the map before take off. - Page 37 DJI Mavic 3 Pro User Manual Settings Tap the waypoint number for settings, the waypoint parameters are described as follows: Camera The camera action at the waypoint. Choose between None, Take Photo, and Action Start or Stop Recording. Altitude The altitude at the waypoint from the take-off point. Ensure to take off at the same take-off altitude to obtain better performance when a Waypoint Flight is repeated.
- Page 38 5. Perform a Waypoint Flight • Check the Obstacle Avoidance Action settings in the Settings > Safety page of DJI Fly before performing the Waypoint Flight. When set to Bypass or Brake, the aircraft will brake and hover in place if an obstacle is detected during the Waypoint Flight.
- Page 39 DJI Mavic 3 Pro User Manual a. Tap GO to upload the waypoint flight task. Tap to cancel the uploading process and return to the waypoint flight parameter settings. b. The waypoint flight task will be performed after being uploaded, the flight duration, waypoints, and distance and will be displayed on the camera view.
-
Page 40: Cruise Control
Using Cruise Control 1. Set the Cruise Control Button Go to DJI Fly, select Settings > Control > Button Customization, and then set the C1, C2 or C3 button to Cruise Control. 2. Enter Cruise Control •... - Page 41 Aircraft DJI Mavic 3 Pr o c onta ins a flight controller, video downlink system, vision systems, infrared sensing system, propulsion system, and an Intelligent Flight Battery. © 2023 DJI All Rights Reserved. ...
-
Page 42: Aircraft
DJI Mavic 3 Pro contains a flight controller, video downlink system, vision systems, infrared sensing system, propulsion system, and an Intelligent Flight Battery. Flight Modes DJI Mavic 3 Pro supports the following flight modes. The flight modes can be switched via the Flight Mode switch on the remote controller. Normal Mode The aircraft utilizes GNSS, the Horizontal, Upward, and Downward Vision Systems, and the Infrared Sensing System to locate and stabilize itself. -
Page 43: Aircraft Status Indicators
Solid red Critical error Blinks red and yellow alternately Compass calibration required * If the aircraft cannot takeoff while the status indicators are blinking red slowly, launch DJI Fly on the remote controller to view the details. © 2023 DJI All Rights Reserved. ... -
Page 44: Return To Home
DJI Fly and will adjust according to the environment. RTH Settings RTH settings are available for Advanced RTH. Go to the camera view in DJI Fly, tap System > Safety, and then RTH. 1. Optimal: regardless of the RTH Altitude settings, the aircraft automatically plans the optimal RTH path and adjusts the altitude according to environmental factors such as obstacles ©... - Page 45 DJI Mavic 3 Pro User Manual and transmission signals. The optimal RTH path means the aircraft will travel the shortest distance possible, reducing the amount of battery power used and increasing flight time. 2. Preset: if the aircraft is further than 50 m from the Home Point when RTH begins, the aircraft will plan the RTH path, fly to an open area while avoiding obstacles, ascend to the RTH Altitude, and return to home using the best path.
- Page 46 Pay extra attention to the battery power and warning prompts in DJI Fly. • Advanced RTH will not be available if the lighting condition and environment are not suitable for vision systems during takeoff or RTH.
-
Page 47: Low Battery Rth
Home Point according to the current position, environment, and flight speed. A warning prompt will appear in DJI Fly when the battery level is low and only enough to complete an RTH flight. The aircraft will automatically fly to the Home Point if no action is taken after a 10-second countdown. -
Page 48: Failsafe Rth
The aircraft will enter or remain in Straight Line RTH if the remote controller signal is restored during RTH. • If the RTH is triggered through DJI Fly and the aircraft is farther than 5 m from the Home Point, a prompt will appear in the app to select a landing option. -
Page 49: Landing Protection
2. If the ground is determined unsuitable for landing, the aircraft will hover and wait for pilot confirmation. 3. If Landing Protection is not operational, DJI Fly will display a landing prompt when the aircraft descends to 0.5 m from the ground. Tap confirm or push the throttle stick all the way down and hold for one second, and the aircraft will land. -
Page 50: Vision Systems And Infrared Sensing System
It will automatically turn on by default in low-light environments when the flight altitude is under 5 m. Users can also turn it on or off manually in the DJI Fly app. Each time the aircraft is restarted, the auxiliary bottom light will revert back to the default setting Auto. -
Page 51: Using The Vision System
Normal or Cine mode and Obstacle Avoidance is set to Bypass or Brake in DJI Fly. The aircraft can actively brake when detecting obstacles when using the horizontal and upward vision systems. The horizontal and upward vision systems work best with adequate lighting and clearly marked or textured obstacles. - Page 52 DO NOT use any cleaning product that contains alcohol. c. Contact DJI Support if there is any damage to the lenses of the infrared sensing and vision systems. • DO NOT obstruct the infrared sensing system.
-
Page 53: Advanced Pilot Assistance Systems (Apas 5.0)
The aircraft brakes and hovers for three seconds and awaits further pilot commands. To enable APAS, open DJI Fly, enter Settings > Safety, and enable APAS by selecting Bypass. Select Normal or Nifty mode when using Bypass. In Nifty mode, the aircraft can fly faster, smoother, and closer to obstacles obtaining better footage while avoiding obstacles. -
Page 54: Flight Recorder
DJI Assistant 2 (Consumer Drones Series). Propellers There are two types of DJI Mavic 3 Pro Quick-Release Propellers designed to spin in different directions. Marks are used to indicate which propellers should be attached to which motors. Make sure to match the propeller and motor following the instructions. -
Page 55: Intelligent Flight Battery
DJI Mavic 3 Pro User Manual • To avoid damaging the propellers, place the aircraft in the direction shown in the carrying case during transportation or storage. DO NOT squeeze or bend the propellers. If propellers are damaged, the flight performance may be affected. -
Page 56: Using The Battery
DJI Mavic 3 Pro User Manual battery cell is detected. 10. Hibernation Mode: the battery switches off after 20 minutes of inactivity to save power. If the battery level is less than 5%, the battery will enter Hibernation mode after six hours to prevent over-discharge. -
Page 57: Charging The Battery
Charging the Battery Fully charge the battery before each use. It is recommended to use the charging devices provided by DJI, such as the DJI 100W USB-C Power Adapter, DJI 65W Portable Charger, or other USB Power Delivery chargers. Using A Charger 1. - Page 58 DJI Mavic 3 Series 100W Battery Charging Hub is designed for use with Mavic 3 Intelligent Flight Batteries. When used with the DJI 100W USB-C Power Adapter, it can charge up to three Intelligent Flight Batteries in sequence from high to low power level. The charging time for one battery is approximately 1 hour and 10 minutes.
- Page 59 Power supply or battery error (remove and reinsert the batteries or unplug and plug in the charger) • It is recommended to use a DJI 100W USB-C Power Adapter when using the charging hub to charge Mavic 3 Intelligent Flight Batteries.
-
Page 60: Inserting/Removing The Battery
DJI Mavic 3 Pro User Manual Inserting/Removing the Battery Insert the Intelligent Flight Battery into the battery compartment of the aircraft. Make sure it is mounted securely and that the battery buckles are clicked into place. Click Press and hold the textured part of the battery buckles on the sides of the battery to remove it from the compartment. -
Page 61: Gimbal And Camera
Use the gimbal dial on the remote controller to control the tilt of the camera. Alternatively, do so through the camera view in DJI Fly. Press and hold the screen until the camera adjustment bar appears. Drag the bar up or down to control the tilt and left or right to control the pan. -
Page 62: Camera Profile
• DO NOT block any ventilation holes on the camera as the heat generated may damage the device or injure the user. • Only the DJI Mavic 3 Pro Cine supports the recording and storing of Apple ProRes 422 HQ, Apple ProRes 422, and Apple ProRes 422 LT video. -
Page 63: Storing And Exporting Photos And Videos
Storing Photos and Videos DJI Mavic 3 Pro has 8GB of built-in storage and supports the use of a microSD card to store photos and videos. A SDXC, or UHS-I microSD card is required due to the fast read and write speeds necessary for high-resolution video data. - Page 64 QuickTransfer. • When using QuickTransfer, it is not necessary to enter the Wi-Fi password on the settings page of the mobile device in order to connect. Launch DJI Fly and a prompt will appear to connect the aircraft.
- Page 65 Remote Controller This section describes the features of the remote controller and includes instructions for controlling the aircraft and the camera. © 2023 DJI All Rights Reserved. ...
-
Page 66: Remote Controller
Remote Controller DJI RC Pro The DJI RC Pro remote controller features O3+, works at both 2.4 GHz and 5.8 GHz, is capable of selecting the best transmission channel automatically, and can transmit a live HD view from the camera of the aircraft at a distance of up to 15 km (compliant with FCC standards, measured in a wide open area without interference). - Page 67 DJI Mavic 3 Pro User Manual Controlling the Gimbal and Camera Focus/Shutter Button: press halfway down to auto-focus, and press all the way down to take a photo. Record Button: press once to start or stop recording. Camera Control Dial: use to adjust the zoom by default. The dial function can be set to adjust the focal length, EV, aperture, shutter speed, and ISO.
- Page 68 DJI Mavic 3 Pro User Manual Controlling the Aircraft Three preprogrammed modes (Mode 1, Mode 2, and Mode 3) are available and custom modes can be configured in the DJI Fly app. Mode 1 Left Stick Right Stick Forward Down...
- Page 69 DJI Mavic 3 Pro User Manual Remote Controller Aircraft Remarks (Mode 2) Throttle Stick: moving the left stick up or down changes the altitude of the aircraft. Push the stick up to ascend and push down to descend. The aircraft hovers in place if the stick is in the center.
- Page 70 Home Point. Press the button again to cancel RTH and regain control of the aircraft. Customizable Buttons Including C1, C2, C3, and the 5D button. Go to Settings > Control in DJI Fly to customize the function of the button. Customizable...
-
Page 71: Remote Controller Leds
The remote controller vibrates or beeps twice to indicate an error or warning. Pay attention when prompts appear on the touchscreen or in DJI Fly. Slide down from the top of the screen and select Do Not Disturb or Mute to disable alerts. -
Page 72: Linking The Remote Controller
• DO NOT operate other wireless devices at the same frequency as the remote controller to avoid signal interference. • A prompt will be displayed in DJI Fly if the transmission signal is weak during flight. Adjust the antennas to make sure that the aircraft is in the optimal transmission range. -
Page 73: Operating The Touchscreen
The top of the touchscreen displays the time, Wi-Fi signal, and battery level of the remote controller. Some apps are already installed by default such as DJI Fly, Gallery, Files, Firefox, Settings, and Tips. Settings includes network, display, voice, and Bluetooth configurations. Users can quickly learn about the features under Tips. - Page 74 DJI Mavic 3 Pro User Manual Quick Settings 1. Notifications Tap to check system notifications. 2. Recent Tap to check recently opened apps. 3. Home Tap to return to the home screen. 4. System Settings Tap to access system settings.
-
Page 75: Advanced Features
DJI Mavic 3 Pro User Manual Advanced Features Calibrating the Compass The compass may need to be calibrated after the remote controller is used in areas with electromagnetic interference. A warning prompt will appear if the compass of the remote controller requires calibration. -
Page 76: Dji Rc
15 km (compliant with FCC standards, and measured in a wide open area without interference). The DJI RC is also equipped with a 5.5-in touchscreen (1920×1080 pixel resolution) and a wide range of controls and customizable buttons, enabling users to easily control the aircraft and remotely change the aircraft settings. - Page 77 DJI Mavic 3 Pro User Manual Controlling the Gimbal and Camera Focus/Shutter Button: press halfway down to auto-focus and press all the way down to take a photo. Record Button: press once to start or stop recording. Camera Control Dial: Use to adjust the zoom by default. The dial function can be set to adjust the focal length, EV, aperture, shutter speed, and ISO.
- Page 78 DJI Mavic 3 Pro User Manual Controlling the Aircraft Three preprogrammed modes (Mode 1, Mode 2, and Mode 3) are available and custom modes can be configured in DJI Fly. Mode 1 Left Stick Right Stick Forward Down Backward Left...
- Page 79 DJI Mavic 3 Pro User Manual Remote Controller Aircraft Remarks (Mode 2) Throttle Stick: moving the left stick up or down changes the altitude of the aircraft. Push the stick up to ascend and down to descend. The more the stick is pushed away from the center position, the faster the aircraft will change altitude.
-
Page 80: Remote Controller Leds
RTH, the aircraft will return to the last recorded Home Point. Press this button again to cancel RTH and to regain control of the aircraft. Customizable Buttons Go to Settings > Control in DJI Fly to set the functions of the customizable C1 and C2 buttons. Customizable Customizable... -
Page 81: Remote Controller Alert
The remote controller beeps to indicate an error or warning. Pay attention when prompts appear on the touchscreen or in DJI Fly. Slide down from the top of the screen and select Mute to disable all alerts, or slide the volume bar to 0 to disable some alerts. -
Page 82: Linking The Remote Controller
DJI Mavic 3 Pro User Manual Linking the Remote Controller The remote controller is already linked to the aircraft when purchased together as a combo. Otherwise, follow the steps below to link the remote controller and the aircraft after activation. -
Page 83: Operating The Touchscreen
DJI Mavic 3 Pro User Manual Operating the Touchscreen Home Screen Gestures Slide from the left or right to Slide up from the bottom of the center of the screen to the screen to return to DJI Fly. return to the previous screen. - Page 84 DJI Mavic 3 Pro User Manual Quick Settings 1. Notifications Tap to check system notifications. 2. System Settings Tap to access system settings and configure settings such as Bluetooth, volume, and network. You can also view the Guide to learn more about the controls and status LEDs.
-
Page 85: Advanced Features
DJI Mavic 3 Pro User Manual Advanced Features Calibrating the Compass The compass may need to be calibrated after the remote controller is used in areas with electromagnetic interference. A warning prompt will appear if the compass of the remote controller requires calibration. - Page 86 DJI Fly App This section introduces the main functions of the DJI Fly app. © 2023 DJI All Rights Reserved.
-
Page 87: Dji Fly App
Enter SkyPixel to view videos and photos shared by other users. Profile View account information and flight records, visit the DJI forum and online store, access the Find My Drone feature, offline maps, and other settings such as firmware updates, camera view, cached data, account privacy, and language. -
Page 88: Camera View
DJI Mavic 3 Pro User Manual Camera View Buttons Description Flight Mode N Mode: displays the current flight mode. System Status Bar In Flight: displays aircraft flight status and various warning messages. Battery Information 31'59": displays the current battery level and remaining flight time. Tap to view more information about the battery. - Page 89 • Explore mode uses the tele and medium tele cameras of Mavic 3 Pro as a safer way to explore views from farther distances. In Explore mode, users can use the hybrid zoom in any of the following ways: a.
- Page 90 DJI Mavic 3 Pro User Manual 10. Shutter/Record Button : tap to take a photo or to start or stop recording a video. 11. Playback : tap to enter playback and preview photos and videos as soon as they are captured.
-
Page 91: Screen Shortcuts
DJI Mavic 3 Pro User Manual Screen Shortcuts Tap to Aim During flight double-tap the point of interest on the screen, the aircraft will automatically move the point of interest to the center of the frame. Gimbal Angle Adjustment Press and hold on the screen to bring up the gimbal adjustment bar to adjust the gimbal angle. -
Page 92: Settings
CSC. Stopping the motors mid-flight will cause the aircraft to crash. Airsense An alert will appear in DJI Fly when a manned aircraft is detected if AirSense is enabled. Read the disclaimer in the DJI Fly prompt before using AirSense. -
Page 93: Control
DJI Mavic 3 Pro User Manual Control • Aircraft Settings Units Can be set to metric or imperial. Subject Scanning When enabled, the aircraft automatically scans and displays subjects in the camera view (only available for single-shot and normal video modes). - Page 94 USB Mode: Mavic 3 Pro Cine supports USB mode, enabling users to copy footage when the battery level of the aircraft is low. Power on the aircraft, enable USB mode in DJI Fly, and connect the aircraft to a computer to use USB mode. During this time, the storage of the aircraft can be accessed.
-
Page 95: Transmission
• The app is designed to assist your operation. Use sound discretion and DO NOT rely on the app to control the aircraft. The use of the app is subject to DJI Fly Terms of Use and DJI Privacy Policy. Read them carefully in the app. - Page 96 Appendix © 2023 DJI All Rights Reserved.
-
Page 97: Appendix Specifications
Horizontal: ±0.3 m (with vision positioning), ±0.5 m (with high- precision positioning system) Internal Storage Mavic 3 Pro: 8 GB (approx. 7.9GB available space) Mavic 3 Pro Cine: 1 TB (approx. 934.8GB available space) Camera Image Sensor Hasselblad Camera: 4/3 CMOS, Effective Pixels: 20 MP Medium Tele Camera: 1/1.3-inch CMOS, Effective Pixels: 48 MP... - Page 98 DJI Mavic 3 Pro User Manual Tele Camera FOV: 15° Format Equivalent: 166 mm Aperture: f/3.4 Focus: 3 m to ∞ ISO Range Video Normal and Slow Motion: 100-6400 (Normal) 400-1600 (D-Log) 100-1600 (D-Log M) 100-1600 (HLG) Night: 800-12800 (Normal)
- Page 99 DJI Mavic 3 Pro User Manual Video Resolution Hasselblad Camera Apple ProRes 422 HQ Apple ProRes 422 Apple ProRes 422 LT 5.1K: 5120×2700@24/25/30/48/50fps DCI 4K: 4096×2160@24/25/30/48/50/60/120*fps 4K: 3840×2160@24/25/30/48/50/60/120*fps H.264/H.265 5.1K: 5120×2700@24/25/30/48/50fps DCI 4K: 4096×2160@24/25/30/48/50/60/120*fps 4K: 3840×2160@24/25/30/48/50/60/120*fps FHD: 1920×1080@24/25/30/48/50/60/120*/200*fps * Recording frame rates. The corresponding video plays as slow-motion video.
- Page 100 DJI Mavic 3 Pro User Manual Color Mode and Sampling Hasselblad Camera Method Normal: 10-bit 4:2:2 (Apple ProRes 422 HQ/422/422 LT) 8-bit 4:2:0 (H.264/H.265) D-Log: 10-bit 4:2:2 (Apple ProRes 422 HQ/422/422 LT) 10-bit 4:2:0 (H.264/H.265) HLG/D-Log M: 10-bit 4:2:2 (Apple ProRes 422 HQ/422/422 LT) 10-bit 4:2:0 (H.265)
- Page 101 DJI Mavic 3 Pro User Manual Backward Measurement Range: 0.5-16 m Effective Sensing Speed: Flight Speed ≤ 12 m/s FOV: Horizontal 90°, Vertical 103° Lateral Measurement Range: 0.5-25 m Effective Sensing Speed: Flight Speed ≤ 15 m/s FOV: Horizontal 90°, Vertical 85°...
- Page 102 5° to 40° C (41° to 104° F) Charging Time Use the included data cable of the DJI 65W Portable Charger: Approx. 96 minutes Use the DJI 100W USB-C Power Adapter and DJI Mavic 3 Series 100W Battery Charging Hub: Approx. 70 minutes Charger...
- Page 103 DJI Mavic 3 Pro User Manual DJI 100W USB-C Power Adapter: Max 100 W (total) When both ports are used, the max output power of one port is 82 W, and the charger will dynamically allocate the output power of the two ports according to the power load.
- Page 104 [4] Measured in an unobstructed outdoor environment free of interference. The above data shows the farthest communication range for one-way, non-return flights under each standard. During your flight, please pay attention to RTH reminders in the DJI Fly app. [5] Data tested under FCC standard in unobstructed environments with typical interference. Used for reference purposes only and provides no guarantee for actual transmission distance.
-
Page 105: Camera Function Matrix
DJI Mavic 3 Pro User Manual Camera Function Matrix Medium Tele Hasselblad Camera Tele Camera Camera Single Shot √ √ √ Burst Shooting √ √ √ √ √ √ Photo Timed √ √ √ √ √ √ Pano √ ×... -
Page 106: Firmware Update
Use DJI Fly or DJI Assistant 2 (Consumer Drones Series) to update the aircraft firmware. Using DJI Fly When connecting the aircraft or remote controller to DJI Fly, you will be notified if a new firmware update is available. To start updating, connect your remote controller or mobile device to the internet and follow the on-screen instructions. -
Page 107: Post-Flight Checklist
Post-Flight Checklist • Make sure to perform a visual inspection so that the aircraft, remote controller, gimbal camera, Intelligent Flight Batteries, and propellers are in good condition. Contact DJI support if any damage is noticed. • Make sure that the camera lens and vision system sensors are clean. -
Page 108: Troubleshooting Procedures
Contact DJI support. Risk and Warnings When the aircraft detects a risk after powering on, there will be a warning prompt on DJI Fly. Pay attention to the list of situations below. If the location is not suitable for takeoff. -
Page 109: Disposal
7500 RPM MTOM Statement The MTOM of Mavic 3 Pro (Model L2S)/Mavic 3 Pro Cine (Model L2E), including the SD card, is 895 g (Model L2S)/963 g (Model L2E) to comply with C2 requirements. Users must follow the instructions below to comply with the MTOM C2 requirements. - Page 110 GPS by using the data update feature and store the data in the aircraft. GEO Awareness Map Drawing: after the latest UGZ data is updated, a flight map with a restricted zone will be displayed in the DJI Fly app. Name, effective time, height limit, etc., can be viewed by tapping the area.
- Page 111 UGZ. Neither AMSL altitude nor the AGL height is supported by DJI Mavic 3 Pro. The height H appears in the DJI Fly app camera view, which is the height from the aircraft takeoff point to the aircraft. The height above the takeoff point may be used as an approximation but may differ more or less from the given altitude/height for a specific UGZ.
- Page 112 DJI Mavic 3 Pro User Manual Authorization Zones Appear blue in the DJI app. Users will be prompted with a warning, and flight is limited by default. UA cannot fly or takeoff in these zones unless authorized. Authorization Zones may be unlocked by authorized users using a DJI verified account.
- Page 113 Ground • When the aircraft and DJI Fly app cannot obtain a GPS signal, the GEO awareness function will be inoperative. Interference of the aircraft antenna or disabling the GPS authorization in DJI Fly will cause the GPS signal fails to be obtained.
-
Page 114: Far Remote Id Compliance Information
PFST . The results of the PFST of the Remote ID system can be viewed in either a DJI flight control app such as DJI Fly or DJI goggles. - Page 115 Administrator, Inc. in the United States and other countries This content is subject to change. https://www.dji.com/mavic-3-pro/downloads If you have any questions about this document, please contact DJI by sending a message to DocSupport@dji.com. DJI and MAVIC are trademarks of DJI. Copyright © 2023 DJI All Rights Reserved.
Need help?
Do you have a question about the MAVIC 3 PRO and is the answer not in the manual?
Questions and answers