Maxi-Cosi Pria All-in-One Manual
Convertible car seat
Hide thumbs
Also See for Pria All-in-One:
- Manual (72 pages) ,
- Instruction manual (68 pages) ,
- Quick start installation manual (6 pages)
Table of Contents
Advertisement
Advertisement
Table of Contents

Related Manuals for Maxi-Cosi Pria All-in-One


Summary of Contents for Maxi-Cosi Pria All-in-One
- Page 1 Pria All-in-One Pria Max Convertible Car Seat 4358-8340A 11.3.22 KEEP INSTRUCTIONS FOR FUTURE USE. Read all instructions before using this car seat. WARNING: Failure to follow the warnings on the labels and in the instruction manual can result in serious injury or death to your child.
- Page 2 Overview Quick Navigation Welcome to the Maxi-Cosi family and thank you for choosing this car seat, also known as a child restraint! REAR-FACING FORWARD-FACING BOOSTER SEAT To help you get started using your child’s new car seat, here are the 1.8-18 kg...
-
Page 3: Table Of Contents
Contents Getting Started Securing Child in Car Seat ........Parts of the Car Seat ............1 Booster Seat Accessory Use ...............3 Booster Seat Mode ............52 Choosing Car Seat Mode ..........6 Storing Harness System ..........53 Preparing Car Seat for Child Fit .........8 Booster Seat Child Fit ............57 Rear-Facing... -
Page 4: Parts Of The Car Seat
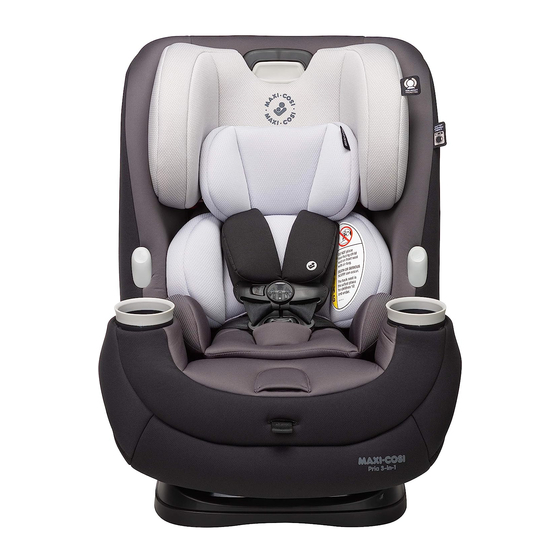
Parts of the Car Seat Headrest/Harness Adjustment Handle Anti-Rebound Bar Shell Adjustable Head (must use in Rear- (child restaint) Headrest Pillow Facing mode only) Rear-Facing Level Line Back EZ Out Pillow Harness Holders Forward- Facing Small Infant Rear-Facing Removable Belt Path Positioning Belt Path Cup Holders... -
Page 5: Accessory Use
Accessory Use For Use in Rear-Facing or Forward-Facing Mode For Use in All Modes Harness Covers Removable Cup Holders Harness covers help provide comfort to the The cup holders are top-rack neck. dishwasher safe. If the harness covers will not allow proper To remove cup holder, positioning of the chest clip or interfere with twist the cup holder... -
Page 6: Choosing Car Seat Mode
Choosing Car Seat Mode Measure your child’s weight and height For Use in Rear-Facing Mode Only (do not guess) before choosing the car seat’s mode. Your child’s height, weight, and age determine how the car seat Small Infant Positioning Pillow should be placed in the vehicle. -
Page 7: Preparing Car Seat For Child Fit
Preparing Car Seat for Child Fit REAR-FACING MODE Do not use this chest clip with 1.8-18 kg (4-40 lb) and 48-102 cm (19-40 in.) children who have an implanted IMPLANTED electronic medical device. Children under 1 year of age must ride Rear-Facing. ELECTRONIC In this car seat, your child can remain Rear-Facing... -
Page 8: Rear-Facing Child Fit
Rear-Facing Child Fit Head Position Release Chest Clip Hold the chest clip with both hands The top of your child’s head and press in on the top and bottom must be at least 2.5 cm buttons with your index finger and (1 in.) below the top of the thumb as shown. -
Page 9: Forward-Facing Child Fit
Changing Headrest/ Forward-Facing Child Fit Harness Height Head Position Fully Loosen Harness Straps The tops of your child’s ears must be below the top of the Push down on harness release car seat’s headrest. lever (through opening in pad) while pulling out on harness straps as shown. -
Page 10: Changing Buckle Position
Changing Buckle Position Unbuckle Harness Insert Buckle’s Metal Retainer into Slot Closest Press in on the red button and Buckle pull out buckle tongues. to Child Tongue Buckle must face out. Buckle cover only goes through slot in pad. It lays flat underneath the pad as shown. -
Page 11: Buckle Adjustment For Smaller Infants
Reclining the Car Seat Buckle Adjustment for Smaller Infants This car seat has 3 positions. If you cannot achieve a snug harness fit for your child, you may need to adjust the buckle strap length as shown in this section. With Buckle in the 1st Slot, Fully Recline the Car Seat If you need to move the buckle to... -
Page 12: Installing Anti-Rebound Bar
Installing Anti-Rebound Bar Removing Anti-Rebound Bar The anti-rebound bar used in Rear-Facing Mode. MUST be The anti-rebound bar MUST be removed when using Forward-Facing Booster Seat Mode. The anti-rebound bar must be removed when using Forward-Facing Booster Seat Mode. The anti-rebound bar must be used in Rear-Facing Mode. -
Page 13: Uas Use
UAS Use Release Anti-Rebound Bar For Use in Rear-Facing or Forward-Facing Mode With index finger, push down on both release tabs while gently pulling the bar towards you. UAS Anchor Bars Vehicle Seat Bight Your vehicle’s features may be considerably different than those pictured here. -
Page 14: Vehicle Belts
Vehicle Belts Adjuster Connectors Lap/Shoulder Belts UAS Belt Storage Location Belt Parts To Remove UAS Belt from Storage Location on Car Seat: Press the red release button on each connector, then pull the connectors off of storage attachments. Your vehicle’s features may be considerably different than those pictured here. - Page 15 Types of Retractors You MUST Review Your Vehicle Owner’s Manual Switchable Retractor Your vehicle owner’s manual will let (most vehicles have this type) you know which vehicle belts and seating positions child restraints This retractor can be switched to a locking mode. can be installed in.
-
Page 16: Tether Use
Tether Use Check the Latch Plates For Forward-Facing Mode Only Latch plates are the part of the seat belt that goes into the buckle. To see if the latch plate locks: Buckle the vehicle belt. Tether Anchors Then firmly tug the lap portion of the seat belt while pulling it up. -
Page 17: Rear-Facing Mode
Rear-Facing Mode Storing Tether Strap 1.8-18 kg (4-40 lb) and 48-102 cm (19-40 in.) When installing Rear-Facing, using the Booster Seat mode, Strap or when the car seat is not installed in a vehicle, attach the tether hook to its storage attachment on back of car seat as shown. -
Page 18: Rear-Facing Vehicle Belt Install
Rear-Facing Vehicle Belt Install Check Rear-Facing Level Before you begin installing the seat Line into your vehicle, did you check: The level line on shell must be Your child’s weight and height? parallel with the ground using See page 28. either position 3 or 2. - Page 19 Locate Rear-Facing Belt Tighten Belt Path Place hand in child restraint. Firmly push child restraint down and back towards the vehicle seat back while pulling the shoulder belt or the free end of lap belt parallel with the belt path through the belt path opening as shown.
-
Page 20: Rear-Facing Uas Install
Rear-Facing UAS Install Before you begin installing the seat into your vehicle, did you check: Recheck Rear-Facing Level Line Your child’s weight and height? Redo the installation if the See page 28. level line is not parallel with the ground. Your child’s fit? See page 10. - Page 21 Recline the Car Seat Pull UAS Belt Across the Seat Pull out on recline handle and push top of child restraint back. It must be under the seat pad, in front of the buckle, and go out The recline handle is at the front of through the other Rear-Facing the car seat and under the pad.
- Page 22 Tighten Belt Secure Child in Car Seat Place hand in child restraint. To properly secure your child in the car seat, see pages 49-51. Firmly push child restraint down and towards the vehicle seat Check your child’s fit often and back while pulling the free end of make any needed adjustments to the belt to tighten.
-
Page 23: Forward-Facing Mode
Forward-Facing Mode Forward-Facing Vehicle Belt + Tether Install 10-30 kg (22-65 lb) and Before you begin installing the seat 74-125 cm (29-49 in.) into your vehicle, did you check: and at least 1 year old Your child’s weight and height? See page 39. - Page 24 NOTE: If your vehicle seat has Route the Vehicle Belt a headrest that interferes with achieving a flush car seat fit, Thread the vehicle belt through check your vehicle owner’s Forward-Facing Belt Path manual to see if it can be opening.
-
Page 25: Forward-Facing Uas + Tether Install
Forward-Facing UAS + Tether Install Check Belt Tightness Do not use the UAS anchors of the child restraint anchorage Hold child restraint at the belt system (UAS) to attach this child restraint when restraining path with your weaker hand. a child weighing more than 18 kg (40 lbs). Push and pull from side to side. - Page 26 Locate Forward-Facing Belt Make Car Seat Flush Path Against Vehicle Seat Thread the connector with the Put the child restraint into adjuster closest to it though the Position 1. Forward-Facing Belt Path Only use the semi-reclined opening. position if necessary to install the Adjuster child restraint flush against the Pull it across the seat.
- Page 27 Check Belt Tightness Attach UAS Connectors to Vehicle’s UAS Anchors Hold child restraint at the belt path with your weaker hand. Review your vehicle owner’s manual for UAS anchor Push and pull from side to side. locations and UAS belt use. It should not move more than 2.5 cm (1 in.).
- Page 28 Securing Child in Car Seat Place Child in Car Seat Tighten Harness click The child’s bottom and back should Pull harness adjustment strap click be flat against the car seat. straight out to snugly tighten harness. Position harness straps over your child’s shoulders and upper thighs.
-
Page 29: Booster Seat Mode
Booster Seat Mode 18-45 kg (40-100 lb) and 110-132 cm (43-52 in.) Rear-Facing Forward-Facing Keep the booster seat Finished! Lap/Shoulder securely belted even Belt when unoccupied. The child is now secured in the car seat. Check your child’s fit often and make any needed adjustments to the car seat as they grow. -
Page 30: Storing Harness System
Storing Harness System You must store the harness system and remove accessories Storing Harness System (except the cup holders) when using the Booster Seat mode. To remove accessories, see pages 3-5. Adjust Headrest to Removing Buckle Highest Position Remove Anti-Rebound Bar You must remove the Anti-Rebound bar to use this seat in Booster Seat... - Page 31 Pull Harness Straps Thread Harness Straps into Slots Out of Shoulder on Sides of Headrest As Shown Harness Slots and Unthread Chest Clip Store the chest clip sewn in a safe place for future use. Place Harness Straps and Buckle Tongues Behind the Headrest and Rethread Harness Seat Pad As Shown...
-
Page 32: Booster Seat Child Fit
Lap/Shoulder Belt Use Booster Seat Child Fit You must store the harness system when using the Head Position Booster Seat mode. See pages 53-56. Tops of the child’s ears should never 12.7 cm (5 in.) be above the top of the headrest. Place Booster Seat Forward- Facing in Back Seat Put the booster seat into Position 1. - Page 33 Removing Seat Pad Set for Cleaning Buckle the Vehicle Belt You do not need to remove the harness system to remove Pull up on lap belt to tighten. the pad from the shell. To remove accessories, see pages 3-5. Unbuckle Harness Press in on red button and pull out buckle tongues.
- Page 34 At the Headrest/Harness Pull Down Seat Pad to Stretch Adjustment Handle, Pull the Fabric Elastic Strap Tab Out from Between the Headrest Release elastic strap from tab on each and Headrest Foam As Shown side of seat. At the Back of the Headrest, Pull the Fabric Tabs Out from Slots in Headrest As Shown Pull Pad Off Sides...
-
Page 35: Cleaning And Installing Seat Pad Set
Cleaning and Installing Seat Pad Set Cleaning Seat Pad, Buckle Cover, Harness Covers, At the Headrest/Harness Head & Back Pillows, and Infant Positioning Pillow Handle, Slide the Fabric Tab Machine wash separately with cold water on a gentle cycle. Make sure In Between the Headrest and harness covers are closed so fastening strips are not exposed. -
Page 36: Installing Harness System
Installing Harness System Installing Buckle Fully Recline the Car Seat Wrap Pad Around Bottom and Sides of Shell Pull harness The recline handle is at the front of the adjustment strap car seat and under the pad. and buckle through the slots in pad. - Page 37 Installing Harness Straps and Chest Clip From Back of Seat, Remove Harness Strap Adjust Headrest to Highest Position Loops From Splitter Plate Pull Harness Straps Out of Shoulder Harness Slots Undo Fasteners on Headrest Pad and Seat Pad Thread Buckle and Chest Clip If the buckle tongues have been unthreaded sewn from the harness straps, insert them into...
-
Page 38: Aircraft Information
Aircraft Information From Back of Seat, Thread This restraint is certified for aircraft use when used with the internal harness. Harness Straps Over Metal Bar This child restraint is not certified for aircraft use when used as a Do not twist harness straps. booster seat because aircraft seats do not have shoulder belts. -
Page 39: Replacement And Expiration Of Car Seat
Replacement and Expiration of Car Seat Transport Canada Regulations Do not risk your child’s safety. Transport Canada Road Safety Directorate regulates children’s restraint systems under the Motor Vehicle Restraint Systems Safety Regulations To keep your child as safe as possible, Dorel Juvenile Group (RSSR). -
Page 40: Vehicle Seating Position
Registration and Safety Notices Although child restraints are tested, evaluated, and certified by the manufacturer and tested by Transport Canada, it is possible Vehicle Seating Position that a safety-related problem may be found. If there is ever a safety issue with your child restraint, we use registration Never place a child rear-facing in a seating information to reach owners. -
Page 41: Warranty
Please note: Our product warranty only applies when purchased from an authorized Maxi-Cosi retailer. The origin of 2. If your harness twists: products not purchased through these authorized retailers is Straighten the harness each time you put your child in the child unknown and could be counterfeit. -
Page 42: Replacement Parts List
Replacement Parts List Dorel Juvenile Group Information Thank you for choosing this child restraint. The DJG family is Tether Anti-Rebound Bar committed to creating child restraints with the most comfort and convenience available today. Buckle Assembly UAS Belt Remember, parents are a child’s first teachers and examples. Instructions Seat Pad Set If you always buckle your seat belt, your child will think it is the...
Need help?
Do you have a question about the Pria All-in-One and is the answer not in the manual?
Questions and answers