Ooma HD2 Handset Quick Start Guide
- Quick start manual (2 pages) ,
- Quick start manual (2 pages)
Advertisement
Package Contents

Getting Started
You're just a few quick steps from making and receiving calls on your new Ooma HD2 Handset. This handset is the perfect companion to the Ooma Telo™—you'll be able to access all Ooma features and even unlock new functionality! Before you begin, please make sure that your Ooma Telo is installed and operating properly, as your new handset cannot be set up without a functioning Telo.
Step 1 Insert Batteries
Remove the battery cover located on the back of the handset by sliding it away from the center of the device. Insert the two rechargeable AA batteries, making sure that you align the flat end against the springs. Replace the battery cover by sliding it in the opposite direction.

 If you need to replace the batteries included with your handset, use only rechargeable Nickel Metal-Hydride (Ni-MH) batteries. Other types of batteries may damage the handset or create a risk of fire. |
Step 2 Charge the Handset
Plug the AC adapter into a power outlet and then connect the AC adapter cable to the charging cradle. Put the handset on the cradle.

When the handset is on its cradle, it will show a lightning bolt in the battery icon when it is charging.
| We recommend that you leave the handset on the cradle for 30 minutes before proceeding to the next step. The handset requires 10 hours to fully charge. |
Step 3 Register the Handset
Press the Page key on your Ooma Telo and hold it down for three seconds to activate registration mode. When the handset detects the Telo, press the YES soft key to proceed.

Once the handset is successfully registered, the home screen will be displayed.
Each Ooma Telo supports up to four Ooma HD2 Handsets.
|
Once the Telo is back in service, repeat Step 3. The Telo will now connect to your HD2 Handsets. Any older Telo Handsets will no longer work. |

 on a phone connected to your Ooma Telo. The Telo will reboot and download a new version of software. The upgrade will take about 5 minutes to complete.
Quick Reference


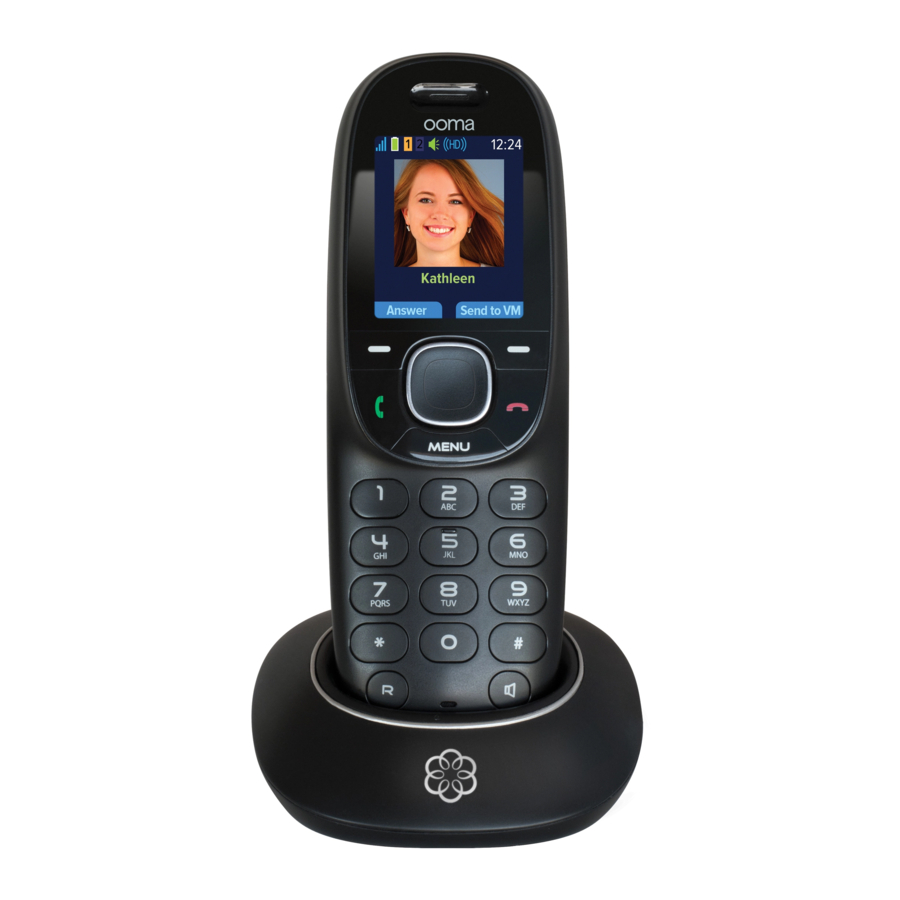
Home Screen

After the handset is registered to your Telo, it will display a home screen similar to the one pictured below.

 Signal Strength Indicator
Signal bars show the connection strength to the Ooma Telo
 Battery Indicator
Shows the battery charge level. A lightning bolt will flash when the batteries are charging
 Line Indicators
Shows which line or lines are currently in use
 Speakerphone Indicator
Shows whether the speakerphone functionality is engaged
 HD Indicator
Displays when you have established an HD-quality call
 Mute Indicator
Displays whether the microphone is muted
 Missed Call Indicator
Displays when you have missed calls to review
 Ringer Off Indicator
Displays when the ringer volume is turned off (this phone will not ring)
 Do Not Disturb Indicator
Displays when Do Not Disturb mode is enabled (no phones will ring)
Navigating the User Interface

Your Ooma HD2 Handset has an easy-to-use interface that puts the most common features at your fingertips while still letting you access all the advanced features the handset is capable of.
Accessing the main menu
Press the  key from the home screen.
To select an item
Use the navigation pad to scroll through a menu until you have highlighted the item you want, then press the center Select key.
Using the soft keys
There are two context-sensitive soft keys just under the display. Shortcuts to popular functions are assigned to these keys. The handset will update the label above the keys as you use the phone. Press the appropriate soft key to invoke the assigned function.
Accessing other options
To see a list of all available functions on a screen, press the Options soft key.
To exit a menu
Press the key or left on the navigation pad to go back one menu level. Press  to exit all menus.
Main Menu Options

The following options are available from the main menu:

 Voicemail — Listen to and manage your voicemail
 Intercom — Intercom to or monitor other handsets
 Services — Engage features like Do Not Disturb
 Phonebook — Browse and search your contacts
 Favorites — Speed dial your friends and family
 Call logs — Access a list of your recent phone calls
 About — Information about your Ooma system
 Settings — Configure your phone preferences
Basic Operation

Placing and Receiving Calls
There are two ways to place a call. You can dial the number first like a cell phone, and then press  . This gives you the added convenience of automatically searching your phonebook as you dial. Alternately, you can place a call in a traditional manner by pressing first before you dial.
To answer a call, press when the phone is ringing.
You may end a call by pressing .
To make a second call while you are already on the phone, press to switch lines and then dial the phone number.
Note: This requires the Instant Second Line feature of Ooma Premier.
Joining an Existing Call
You can join an existing call-in-progress by picking up an unused handset and pressing . Press the Join soft key and then select the line you wish to join.
Picture Caller-ID
When an incoming call comes in, you'll see the associated phone number on the display.
If the caller is in your Ooma phonebook, you'll also see their name and picture (if available) shown on the handset display.
Note: Ooma Premier users will see the caller-ID name even if the caller is not in your phonebook.
Call-waiting
Switch to a second incoming call by pressing or the Answer soft key. The current call will be automatically placed on hold. Switch back to the first call by pressing again.
Speakerphone
Press the ![]() key to start a call in speakerphone mode, or during a call to switch to speakerphone. Press
key to start a call in speakerphone mode, or during a call to switch to speakerphone. Press ![]() again to go back to using the earpiece (or headset if one is plugged in).
again to go back to using the earpiece (or headset if one is plugged in).
Muting the Microphone
While you are on a call, you can turn the microphone off by pressing the Mute soft key. Press the Unmute soft key to turn the microphone on again.
Volume Adjustment
To adjust the ringer volume, press up/down on the navigation pad while you're on the home screen.
To adjust the call volume, press up/down while you're on a call. This will adjust the volume setting for the earpiece, speakerphone, or headset depending on which one is active.
Handset Paging
To locate your handset, press the ![]() key on the Ooma Telo. All handsets that are powered on will chime for 30 seconds.
key on the Ooma Telo. All handsets that are powered on will chime for 30 seconds.
Press on the handset to stop the chime.
International Calls
To place an international call, dial  followed by the country code and phone number. Depending on your account settings, you may hear your prepaid balance announced before the call is connected.
Note: To make international calls and access other premium services such as 411, you must charge up your prepaid account at: my.ooma.com/prepaid
Calling Features

Phonebook
Set up your phonebook by going to: my.ooma.com/contacts
You can add new contacts manually or import existing contacts from many popular applications and sites.
To sync your phonebook down to your handsets, click the Sync button on the web page or select Services from the main menu on your handset and then Sync config.
To place a call using your phonebook, select Phonebook from the main menu to bring up a list of your contacts. Use the navigation pad to scroll and then press Select to view a list of phone numbers for a contact. Choose one and then press ![]() to place the call.
to place the call.
Voicemail Playback
To access your voicemail account, press the Voicemail soft key from the home screen and follow the audio prompts.
When listening to your voicemail, press  to play the previous message, press
  to replay the current message and
  to skip to the next message. Delete the current message by pressing
 ![]() , and save by pressing
, and save by pressing ![]() .
.
Press ![]() to end voicemail playback.
to end voicemail playback.
Call Logs
Select Call Logs from the main menu and use the navigation pad to scroll through a list of your recent calls. Press ![]() to return a call.
to return a call.
Redial
Press ![]() to bring up a list of previously dialed numbers. Scroll through the list and then press
to bring up a list of previously dialed numbers. Scroll through the list and then press ![]() to redial.
to redial.
Intercom
Use the intercom to connect with other members of your household. To use this feature, select Intercom from the main menu. Choose a handset you wish to call or select Call All to ring all handsets.
Baby Monitoring
Baby monitoring lets you listen in on another room when you're busy elsewhere in your home. Monitoring works in one direction, with one handset acting as a remote microphone and the other handset acting as a speaker.
The first time you use this feature, you must enable the function on the handset you will use as a remote microphone. Go to Settings from the main menu and turn on the Baby monitor option. The handset is now ready to be monitored.
Now pick up the handset you will use as the speaker. Select Intercom from the main menu. Choose the handset you wish to monitor and then press the Monitor softkey.
Favorites
Set up a list of your favorite callers for easy access. Add a phone number from your call logs, redial list, or phonebook by highlighting the number and then pressing the Options softkey and selecting Add to favorites. Select which speed dial slot you want the number to be assigned to.
Access your favorites by pressing ![]() from the home screen and then the speed dial slot number you wish to dial. You may also press and hold the speed dial slot number from the home screen to make the call directly.
from the home screen and then the speed dial slot number you wish to dial. You may also press and hold the speed dial slot number from the home screen to make the call directly.
Premier Features
![]()
Ooma Premier is a collection of advanced calling features that have been designed to enhance the capabilities of your home phone. With over 25 features to choose from, there's something for everyone!
In addition to the features described below which take advantage of your Ooma HD2 Handset, Premier subscribers can also access privacy protecting features to block telemarketers, call forwarding options to prevent missed calls, and many other convenient features that greatly enhance the capabilities of your home phone.
To learn more about all of the features available in Ooma Premier, visit: my.ooma.com/premier
Enhanced Voicemail
![]()
Send to Voicemail
When an incoming call comes in, press the Options softkey and then select Send to VM to send the call directly to voicemail. You can also send an active call to voicemail.
Do Not Disturb
You can engage Do Not Disturb and send all calls straight to voicemail. Toggle Do Not Disturb on and off by pressing the DND soft key from the home screen or selecting the Do Not Disturb option from the Services menu.
Voicemail Monitoring
When an incoming call goes to voicemail, you'll be able to hear the caller leaving their message through the handset speaker.
Press if you want to pick up the call, or press to shut off the speaker.
Enhanced Calling

Instant Second Line™
If someone else is already on a call, pick up any Ooma handset and press to get a fresh Ooma dialtone to make a second call. You'll see the line  indicator light up when you're on the second line.
Enhanced Call Waiting
If someone is already on the line and you receive a second incoming call, any Ooma handsets not in use will ring. Press ![]() to answer the call.
to answer the call.
Three-way Conferencing
With calls on both lines, press the Options softkey and then select the 3-way conference option to merge both lines together. To split the conference into individual calls, press the Options softkey and then select the Stop conference option.
Virtual Numbers
Select a second phone number for your in-laws, home business, or to make it easy for loved ones living in another area code to reach you. To configure this feature, go to: my.ooma.com/numbers
Personal Devices
Each Ooma HD2 Handset can be configured as a personal device, allowing you to set up a separate phone number and voicemail account for a home office or a member of your household.
Your personal device will have a separate My Ooma account, allowing you to customize your new phone line exactly the way you want it. To configure this feature, go to: my.ooma.com/numbers
Troubleshooting

My handset doesn't work
- If your phone cannot register to your Telo, you might have a first-generation Ooma Telo Handset and your Telo is running in a mode that does not support the new Ooma HD2 Handset. Dial
![]() from a phone connected directly to the Telo, wait for your Telo to reboot and then try again.
from a phone connected directly to the Telo, wait for your Telo to reboot and then try again. - Make sure your batteries are properly installed and sufficiently charged.
 from a phone connected directly to the Telo, wait for your Telo to reboot and then try again.
My phone doesn't ring
- Your ringer may be turned off. Increase the ringer volume by pressing up on the navigation pad from the home screen.
- Check the signal quality with the signal strength indicator. Bring the handset closer to the Telo and try to answer an incoming call.
- When DND is on, the status bar will display
![]() and all incoming calls will go directly to voicemail. To turn this feature off, press the DND soft key on the home screen.
and all incoming calls will go directly to voicemail. To turn this feature off, press the DND soft key on the home screen.
I don't hear a dialtone
- Verify that your Ooma Telo is powered on and working properly. The Ooma logo should be lit blue. If you have a regular phone, plug it into the PHONE port of the Telo to check for dialtone.
My handset won't charge
- Make sure the charging cradle is plugged in.
- Make sure that the handset is placed in the cradle securely.
- Remove the batteries from the handset and re-install them. Replace the batteries with new Ni-MH rechargeable batteries if your current set no longer works.
I hear noise or static
- Bring the handset closer to the Ooma Telo to see if quality improves.
- Try moving your Ooma Telo and handset away from devices that may generate interference (other phones, computers, wireless devices, electrical appliances like microwaves).
Call quality is not good
- Try adjusting the earpiece volume by pressing up/down on the navigation pad.
- Move closer to the Ooma Telo to see if the audio quality improves.
- Ensure that the handset batteries are fully charged.
- Problems with voice quality might be due to your Internet connection. Please visit www.ooma.com/support for tips on troubleshooting your Internet connection.
|
Check out these resources for troubleshooting guides or additional help: Online knowledgebase: www.ooma.com/support |
 Need Assistance?
Documents / Resources
References
![my.ooma.com]() My Ooma - Login
My Ooma - Login![my.ooma.com]() My Ooma - Login
My Ooma - Login![my.ooma.com]() My Ooma - Login
My Ooma - Login![my.ooma.com]() My Ooma - Login
My Ooma - Login![www.ooma.com]() Ooma Support | Home Phone | Support
Ooma Support | Home Phone | Support![www.ooma.com]() Redirecting…
Redirecting…![forums.ooma.com]() Ooma Forums -Index page
Ooma Forums -Index page
Download manual
Here you can download full pdf version of manual, it may contain additional safety instructions, warranty information, FCC rules, etc.
Advertisement


Need help?
Do you have a question about the HD2 and is the answer not in the manual?
Questions and answers