Table of Contents
Advertisement
Quick Links
Advertisement
Table of Contents

Related Manuals for Trakm8 RoadHawk DVR8000

Summary of Contents for Trakm8 RoadHawk DVR8000
- Page 1 RoadHawk DVR8000 User Manual JUN18023...
- Page 2 • This product is for internal vehicle use only, in order to prevent a short-circuit or the risk of electric shock, do not use the RoadHawk DVR8000 in the rain or a high humidity environment. • In the event of any solid or liquid coming into contact with the RoadHawk DVR8000, please disconnect the power immediately, and ask a qualified member of staff to check it, and only restart it if deemed safe to do so.
-
Page 3: Table Of Contents
Contents Product Overview 6.18 Recording and video file settings 6.19 Codec Basic functions 6.20 Channel Audio/Video Compression Format 6.21 Record plan Audio/video recording mode 6.22 Playback Image quality when monitoring, 6.23 Network settings, LAN, 3G, Wi-Fi, IPC recording, playback 6.24 Local Network Settings (LAN) Total Resource 6.25 3G Network settings Alarm pre-recording 6.26 Wi-Fi setting Full duplex 6.27 Wi-Fi encryption 2.7... -
Page 4: Product Overview
1 Product Overview The eight –channel embedded digital hard disk video recorder is designed for vehicle safety. It uses an embedded processor and embedded operating system, combined with video / audio compression / decompression, GPS, vehicle recorder, and the capacity hard disk storage technology. 2 Basic functions Audio/Video Compression Format The video adopts the latest IS014496-10 (H.264) video compression technology, and high compression rate to ensure a better image quality using less storage. The audio adopts the G711A compression method, outputting a better voice with low distortion. Audio/video recording mode • Compression format Audio and video data is stored in special files, encrypted to prevent data loss under frequent power failure circumstances. •... -
Page 5: Full Duplex
Full duplex • Under full loading status, users can index, playback the recorded data with no frame loss. Malfunction alarming function • When the DVR fails to work, and the alarm is On, the alarm information will be displayed for up to 6 minutes Self-test the status and self-recovery • When in working status, the “RUN” indicator will constantly flashes and check the device. Recovery will take no more than 3 minutes when device crashes. • 8 Channel 1080P : 8 channels real time, switchable to monitoring mode. -
Page 6: Features
3 Features Operating system • Embedded Linux operating system, high stable, free from virus. • English/Chinese/Russian/ Portuguese menu. • Graphical user interface. Compression format • H.264 format: excellent frame rate, quality image output. Monitoring and Recording • Monitor: 4/8 Channel 1080P : 1080P (1920*1080). • Record: 8 Channel 1080P : PAL 200fps, NTSC 240fps, real-time 8CH 1080P recording. • Record mode: by alarm, schedule, manual, motion detection. • Support: 8 Channel 1080P : 8CH video and 8CH audio meanwhile recording. • Record image quality: 8 levels adjustable. •... -
Page 7: Technical Parameters
Technical Parameters Device parameters DVR Performance index Model RoadHawk DVR8000 Product Name 8 Channel Mobile DVR (HDD Storage) Operation System Linux Operation Interface Graphical Interfaces English File System TES Proprietary Format System Privileges User Password Video Input 8 *1080P/720P/960H 1 Channel PAL/NTSC Output, 1.0Vp-p, 75Ω, Pin Aviation Connector Video Output 1 Channel VGA Support 1920*1080, 1280*720, 1024*768 Resolution Video Display 1 /4 /8 Screen Display Video Standard PAL:25frames/Sec;NTSC:30frames/Sec System Resources PAL:200 Frames; NTSC:240 Frames Audio Input 8 Channels Independent Input 600Ω Audio Output... -
Page 8: Instruction Of Installation
Optional functions: Basic Type (Pin Aviation Connector) +A: GPS Function +B: 3G/4G Function +E: Lan Port + J: Fireproof Box +K: Canbus +L:Wifi hot-Spot +P: POE +O: Power amplifier interface +F:SD Card slot +W: Wifi Function +M: Dispatch Interface +2: SIM2 module 5 Instruction of Installation... -
Page 9: Instruction Of External Interface Wiring
5.1 Instruction of External Interface Wiring Remarks: • If the power supply is 12V, then the current of 12V output can be just 5A. So if there are more than this power, we suggest customers to get power for other cameras from the 12V vehicle power directly or use Our special car power supply. • Ports: DEBUG: Testing port RS232/RS485: intercom connecting port SENSOR: Alarm port • WIFI hotspot, fire box interface, network port, CAN BUS, power amplifier, bus station- announcer are not standard interface, that will be add when you have request order. -
Page 10: Instruction Of Hdd Installation
5.2 Instruction of HDD Installation Please ensure that the DVR8000 is not powered on before removing the HDD tray. • Open the front panel of the hard drive box and remove the hard drive caddy. Unlock with security key and undo the 2 screws. •... -
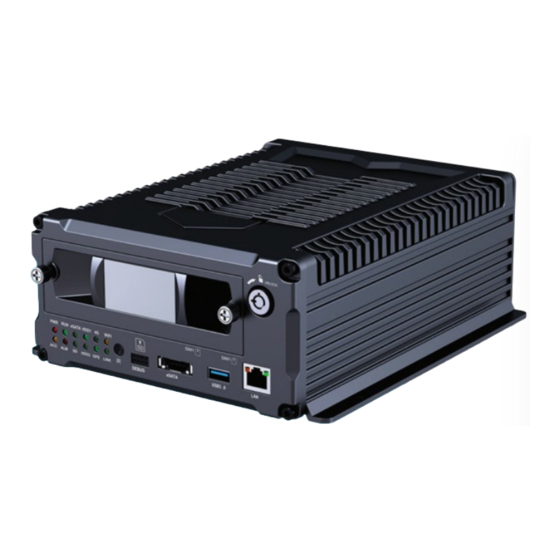
Page 11: Instruction Of Use
6 Instruction of use 6.1 Instruction of front panel • PWR LED: Power LED on. • Run LED: DVR working LED indicator. • ESATA LED: Backing up the data by esata LED indicator. • HDD 1 LED: When recording, playing, backup, LED is flashing. • 4G LED: 3G/4G, WIFI module, LINK working LED indicator. • Wi-Fi LED: When Wi-Fi module is running the LED is on. • ACC LED: ACC controller signal regularly,it would indicate. • ALM LED: When have alarm signal, it would be on, when alarm signal disappear it would be off. - Page 12 Key and other descriptions • DEBUG: Debug interface. • ESTAT: Backup interface. • SD: SD card interface. • LAN: Network RJ45 interface. • IR: Infrared receiving window. • LOCK: While removing the hard drive, use the key to unlock in order to remove the hard drive, unlock after machine’s auto-disconnects the power, the power auto- connect after being locked. • USB3.0: Backup the video data of hard drive via USB. • SIM1: Standard SIM card size: 15 x 25mm, default connection. • SIM2: Standard SIM card, size: 15 x 25mm, SIM1 card automatically switch SIM2 card when disconnected (SIM2 module matching). NOTE: Recommend to use the SanDisk brand of the USB disk, the minimum volume 256M, must support the FAT32 file system.
-
Page 13: Instruction Of Remote Control Operation
6.2 Instruction of remote control operation ① Go to menu ① Upward for MENU selection. ② Return ② ‘UP’ direction for PTZ control mode. Record ① Downward for MENU selection. ② ‘Down’ direction for PTZ control mode. Enter the sub-menu to set and confirm ① Towards left for MENU selection or MENU setup. ② ‘Left’ direction for PTZ control mode. Playback on the mobile DVR ① Towards right for MENU selection or MENU setup. ① Stop when recording or during playback ② ‘Right’ direction for PTZ control mode. ② Delete ① Screen zoom the first channel video when Pause/Play during playback surveillance, record ② Enter password or set system password. Fast-forward during video playback, Press again ③ Shortcut keys, press the first key shortcut to to speed up. switch the number 1, press the second key short- cut to switch the capital letter a, press the third Rewind uring video playback. -
Page 14: Menu Setting Instruction
6.3 Menu setting instruction First press and then press to enter the default password 6666. Then press to enter the main menu interface. To select ‘System’, ‘Disk’, ‘Record’, ‘Playback’, ‘Network’ and ‘Alarm’ options, please use the arrow navigation buttons on the remote control. Pressing the ‘OK’ button will select the desired option. 6.4 System settings To select ‘Setup’, ‘Vehicle’ , ‘Other’, ‘System info’, ‘Log’ and ‘Config’ options, please use the arrow navigation buttons on the remote control. Pressing the ‘OK’ button will select the desired option. -
Page 15: Setup Settings
6.5 Setup settings To select ‘Base’, ‘User’ , ‘Serial’, ‘PTZ’, ‘GPS’, ‘G-sensor’ and ‘NTP’ options, please use the arrow navigation buttons on the remote control. Pressing the ‘OK’ button will select the desired option. 6.6 Base setting Set the System time, TV system, Language, etc. Date format: Offer 3 display methods like ‘y/m/d, m/d/y, d/m/y’ for personal habit. Daylight saving time: On or off. Date: Adjust the date of HDD recorder Time: Adjust the time of HDD recorder Language: Set ‘Chinese’, ‘English’, ‘Portuguese’, ‘Russian’ and ‘French’, have Note: Select the ‘OK’ button to save any changed to restart the DVR after setting. parameters, select the ‘Cancel’ button to close the window without saving any changed parameters. -
Page 16: User Settings
6.7 User settings Set up the username and password for the administrator and common users. Admin user: Set up the user name of the administrator Password: Enter the default password before changing the new password. New password: Enter the new password. Common user: Set up the user name of common user. Password: Enter the default password before changing the new password. New password: Enter the new password. 6.8 Serial settings Set up the communication protocol with external equipment via the serial settings screen. -
Page 17: Gps Settings
6.9 GPS settings Set up the communication protocol with external equipment via the serial settings screen. ID Time zone: Different by countries, e.g: China for UTC+08. GPS Interval: GPS data upload interval, used with other system interface. 6.10 G-Sensor settings G Sensor-X: 2000mg (default value). This value will change accordingly if the X direction gravity accelerated speed value is changeable. G Sensor-Y: 2000mg (default value, customisable). G Sensor-Z: 2000mg (default value, this value will change accordingly if the Z direction gravity accelerated speed value is changeable). -
Page 18: Vehicle Information
6.12 Vehicle information Details of car number plate, route and driver code. Car ID: Can be showed by English, numbers or common symbols. A-person: Set up the driver for the vehicle. Line Num: The driving route and code. Driver ID: Set up the driver code information. 6.13 Other information VGA Output: 1920x1080, 1280x720, 1024x768, no output. Zoom in CH: Choosing which channel to see each time power is on. This is also useful when backing the car. E.g. when you choose CH 1 as the Zoom, CH1will be shown on... -
Page 19: System Information
6.14 System information Displays DVR hardware code number and software version information (this cannot be changed). Device encoding: Only for this DVR. The code is unique. Firmware version: The version No. of DVR software. IMIE: IMIE No. of 3G/4G network or module. Strength of 3G/4G signal: Strength value: 99, unknown: 0-31. Strength of GPS signal: AA-BB (AA: GPS No ;BB: GPS strength. Show signal strength of max3). Wi-Fi MAC: The MAC address 6.15 Log information Log type: User action log, alarm logging,... -
Page 20: Configuration Management
6.16 Configuration management Import: Import the configuration parameters. Export: Export the configuration parameters. Renew: Restore the factory parameter. 6.17 Disk check and format Disk Name: Display the system-recognised HDD name. Overwrite: Choose on and off. Total Size: Display the total size of HDD. Free Size: Display the remaining capacity of HDD. -
Page 21: Recording And Video File Settings
6.18 Recording and video file settings The video files setting includes ‘codec’, ‘channel’ and ‘record plan’. 6.19 Codec Channel: Select the channel setting. The information of each channel can be set independently. Resolution: CIF/ HD1/ D1/ 960H/ 720p/ 1080p: The left column shows local storage information. The right column shows network transmission information. Local ‘CIF, HD1 and D1’ is optional. Only ‘CIF’ can be chosen for network transmission. Frame: 1-25/30fps. The left column shows local storage information. The right column shows network transmission information. Stream mode: Contains Bit Rate and Variable Bit Rate. -
Page 22: Channel
6.20 Channel Channel: Select the channel setting (the information of each channel could be set independently). Channel name: The name of each channel. OSD: Choose to add the character information or not. Copy to all: Copy to all channels. 6.21 Record plan Channel: Select the channel setting. The information of each channel can be set independently. Record mode: Real time, event or no record. File length: The packaged video files length setting (5/10/15/25/30/60 minutes). -
Page 23: Playback
6.22 Playback The video is in date and time order in the menu, Select the tome range and press search ,then press ‘Play ‘button to replay the video. DVR player file attributed: File format suffix ‘_P’ is power off video file , suffix ‘_S’ indicates an alarm trigger video files, suffix ‘_T’ indicates an timing video files. Channel: 1CH/4CH/8CH/12CH video playback, video playback on each channel or full screen, or playback and record simultaneously. Play: Select the video files and channel to replay. Export: Select the HDD video files you wish to backup to a USB Disk. The operating method refers to ‘local video playback instruction’. -
Page 24: Local Network Settings (Lan)
6.24 Local Network Settings (LAN) Network Type: LAN and 3G/4G-Wi-Fi optional. DHCP: Automatically obtain the IP address. In order not conflict with the LAN, please enable ON, and also enable DHCP on the router. Note only one DHCP server can be enabled in one LAN. Static IP: Setup under LAN and Wi-Fi mode. Net mask: Subnet mask under LAN or Wi-Fi mode. Gateway: Gateway under LAN or Wi-Fi mode. DNS: Please input when the server IP is DNS. Not necessary when IP is static. Server IP: If the units login on our server, please use cvideoview.com, and if the units login on your own server, please use yours. -
Page 25: Wi-Fi Setting
6.26 Wi-Fi setting Net type: Select 3G-Wi-Fi when the type is under LAN. DHCP: ON. Access network setup →’Wi-Fi’. SSID: Wi-Fi router device name. Password: Using password for SSID. Certificate: Support ‘WPA-PSK’. Encryption: Support ‘TKIP’. 6.27 Wi-Fi encryption Access router, check its ‘Wi-Fi’ encryption. Note: Please make sure the router Wi-Fi encryption is the same with the setup in MDVR if the units use Wi-Fi. -
Page 26: Alarm Setting
6.28 Alarm setting Sensor alarm, motion detection settings. Sensor: An external sensor alarms. MD: Motion detecting alarm. Other: other alarm setting. 6.29 Sensor setting Channel: Main channel. Optional alarm inputs. Enable: Turn on/off means. Sensor name: Name the alarm. Trigger level: High or low level trigger of the alarm. Linkage: Set up ON/ OFF video linkage function. OSD: Choose whether to overlay alarm information. Lock: Never overwrite. Alarm: Choose whether to overlay alarm information. -
Page 27: Md: Motion Detecting Alarm
6.30 MD: Motion detecting alarm Channel: Choose between main channel or a different channel. Enable: Turn on the motion detection recording and adjust the sensitivity (Off, High, Medium Low). Opening the motion detection recording, you also need to select to the icon “S” (alarm record) and adjust the time range of the recording in the Record Settings. Area setup: : No detection : Low sensitivity : High Sensitivity 6.31 Other: Other alarm settings Alarm out time: Alarm output time (5secs-900secs). Low voltage: The low voltage alarm about car battery. -
Page 28: Dvr Video Playback Instructions
6.32 DVR Video playback instructions System supports 2 video playback options. Users can watch video playback with the IR remote control. The specific steps are as follows: Enter the main menu, move to ‘playback’ option and press to enter. Next press the key or key to select the playback date , move to ‘Search’, then press key to display the video files of the selected date (file named by the record time). Press again to select the time to play. If your required time is not available in the current page, press the keys to the next page until you find the required time, then press to move the ‘play channel’ option. Again press to select the playback channel. If you need to reselect the files, press keys to repeat the previous steps to select again, then press Press to select the replay channel, then press... - Page 29 You can also watch the video playback with the mouse. The specific steps are as follows: Enter the main menu, click on the ‘playback’ option to enter, then select the playback date, file type and time frame. Next press ‘search’ to display the video files of the selected date (file named by the record time). After selecting the time and channel , press ‘Play’. If your required time is not available in the current page, press ‘back’ or ‘next’ to the other page, until you find the required time. Press on the playback interface, and then use the mouse to click to implement different functions, such as: rewind, stop, play, pause, a frame play, fast-forward, next and audio (each channel).
-
Page 30: Video Backup
6.33 Video backup System supports 2 video backup ways. 1. Connect the USB disk to the DVR’s USB port for backup (Ports on Demand). Operating method as follows: a) Connect USB disk to the DVR’s USB port (FAT32 format, backup Max 30GB). b) On the video playback interface, select the backup video files first, then move to the ‘Export’ option, and press ‘OK’ to backup, ‘Export END’ display after backup finished, the USB disk could be taken away, then press to exit if no other operations. c) If you need to backup another file, press and repeat the previous steps. 2) Take the HDD box out from the MDVR, then connect the HDD reader to the PC. You can check the video playback on PC via the installed local playback analysis software (suitable for large amounts of data backup, simple and flexible). The proprietary data files also can be converted to the common format, suitable for different reading demands. Specifics refer to the local playback analysis software instructions. For the required volumes of video and video-related settings, please see the following table: 6.34 Video Data Volume 4CH 1080P-NVR 8CH 720P-NVR... - Page 31 Notes...
- Page 32 RoadHawk c/o Trakm8 4 Roman Park, Roman Way, Coleshill, Birmingham, West Midlands, B46 1HG Tel. +44 (0) 330 333 4120 Email. info@roadhawk.co.uk Web. www.roadhawk.co.uk JUL18023...
Need help?
Do you have a question about the RoadHawk DVR8000 and is the answer not in the manual?
Questions and answers