Advertisement
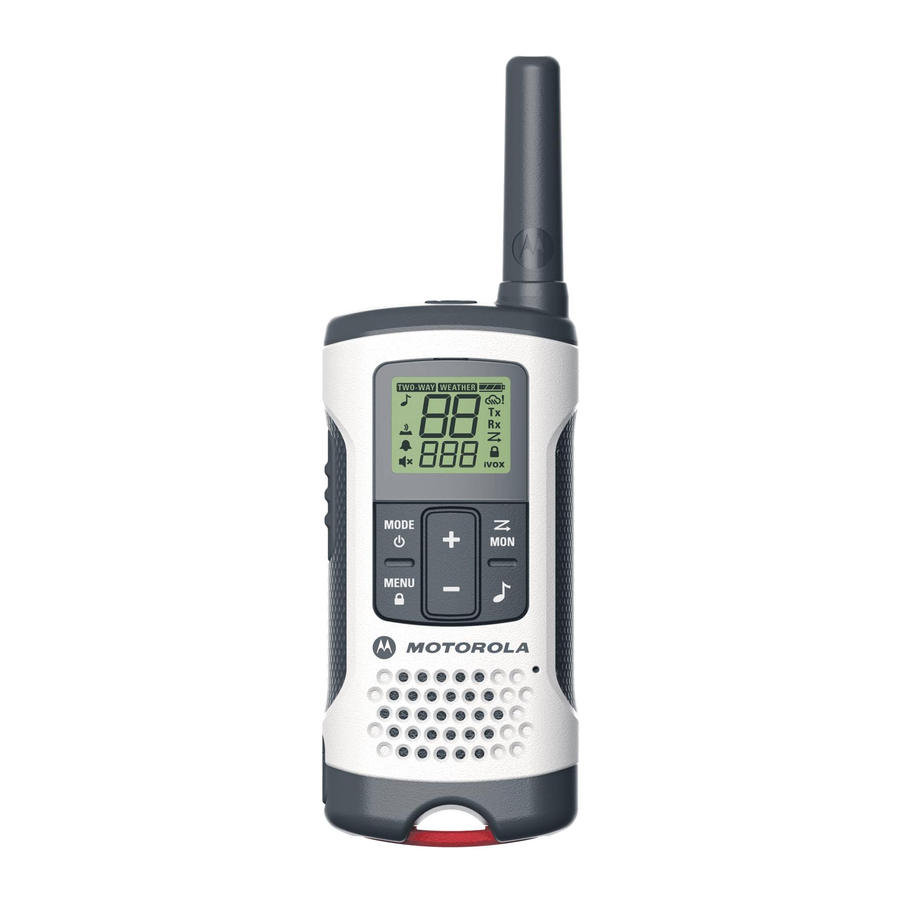
Control Buttons

Display Screen Guide

 | Call Tone |  | Battery Meter |
 | Keypad Tone |  | Weather Alert |
 | Roger Tone |  | Status (transmit/ receive) |
 | Mute |  | Scan |
 | iVOX / VOX |  | Lock |
Getting Started
Installing the Batteries
Discard the retailer tag (loose in one of the battery compartments), before installing batteries.
Each radio can use either 1 NiMH rechargeable battery pack or 3 AA alkaline batteries and beeps when the batteries are low.
Installing the NiMH Rechargeable Battery Pack (Optional Accessory)
- Take the belt clip off.
- With the back of the radio facing you, lift the battery cover latch up and remove the cover.
- Insert the NiMH battery pack by following the instruction on the battery pack. (The ribbon must be underneath the battery pack and must wrap around the right side of the pack for easy removal).
- Close the battery cover firmly.
Installing the Three AA Alkaline Batteries
- Take the belt clip off.
- With the back of the radio facing you, lift the battery cover latch up and remove the cover.
- Insert the three AA Alkaline batteries with + and – polarity as shown inside. (The ribbon must be underneath the AA alkaline batteries and must wrap around the right side of the batteries).
- Close the battery cover firmly.
Radio Battery Meter
The radio battery icon shows the battery charge level, from full  to empty
  . When the radio has one segment left, the radio chirps periodically or after releasing the PTT button (Low Battery Alert).
Removing the NiMH Battery Pack
- Turn the radio off.
- With the back of the radio facing you, lift the battery cover latch up and remove the cover.
- Remove the NiMH battery pack by pulling the ribbon attached to the radio.
- Close the battery cover firmly.
Removing the Three AA Alkaline Batteries
- Turn the radio off.
- With the back of the radio facing you, lift the battery cover latch up and remove the cover.
- Gently remove each alkaline battery by pulling the ribbon attached to the radio.
- Close the battery cover firmly.
Note:
- Exercise care when removing NiMH or AA batteries. Do not use sharp or conductive tools to remove either of these batteries.
- Remove the batteries before storing your radio for extended periods of time. Batteries corrode over time and may cause permanent damage to your radio.
Battery Capacity Maintenance
- Charge the NiMH batteries once every 3 months when not in use.
- Before placing the radio in storage, remove the battery.
- Store the NiMH batteries in temperature between -20°C to 35°C and in low humidity. Avoid damp conditions and corrosive materials.
Using the Micro-USB Charger
The micro-USB charger is a handy port that allows you to conveniently charge your NiMH battery pack.
- Make sure your radio is turned OFF.
- Plug the micro-USB cable into the micro-USB charging port on your radio.
- Connect the USB charger to a nearby and easily accessible wall power outlet.
- An empty battery will be fully charged in 12 hours.
- The battery meter on LCD will move to indicate the battery is charging.
Note:
- When moving between hot and cold temperatures, do not charge the NiMH battery pack until the battery temperature acclimates (usually about 20 minutes).
- For optimal battery life, remove the radio from the charger within 16 hours. Do not store the radio while connected to the charger.
Attaching and Removing the Belt Clip
- Attach the belt clip to the back of the radio until the clip clicks in place.
- Attach the belt clip to pocket or belt strap until the clip clicks in place.
To Remove
- Push the release tab on top of the belt clip to release the latch.
- Pull the belt clip away from the back of the radio.
Turning your Radio On and Off
- Press and hold on the
![]() button to turn your radio ON/ OFF. In the ON position, the radio chirps and briefly shows all feature icons available on the radio.
button to turn your radio ON/ OFF. In the ON position, the radio chirps and briefly shows all feature icons available on the radio. - The display screen then shows the current channel, code and all features that are enabled. The radio is in Two-Way mode.
 button to turn your radio ON/ OFF. In the ON position, the radio chirps and briefly shows all feature icons available on the radio.
Setting the Volume
Press and hold  for three seconds to listen to volume level.
- First press either
![]() or
or ![]() to trigger volume change. You will see current volume level on screen.
to trigger volume change. You will see current volume level on screen. - Press
![]() to increase the volume. Press
to increase the volume. Press ![]() to decrease the volume.
to decrease the volume. - When the volume reached level 0 the mute icon
![]() appears permanently on screen.
appears permanently on screen.
 to trigger volume change. You will see current volume level on screen.
 appears permanently on screen.
Do not hold the radio close to your ear. If the volume is set to an uncomfortable level, it could hurt your ear.
Talking and Listening
To communicate, all radios in your group must be set to the same channel and Interference Eliminator Code.
- To talk, press and hold the PTT button. When transmitting,
![]() icon blinks (only on radio with weather mode feature) and
icon blinks (only on radio with weather mode feature) and ![]() is shown.
is shown. - When you are finished talking, release the PTT button.
- When receiving,
![]() icon blinks (only on radio with weather mode feature) and
icon blinks (only on radio with weather mode feature) and ![]() is shown.
is shown.
 is shown.
 is shown.
For maximum clarity, hold the radio one inch away from your mouth and speak directly into the microphone. Do not cover the microphone while talking.
Talk Range
Your radio is designed to maximize performance and improve transmission range. Do not use the radios closer than five feet apart.
Monitor Button
Pressing and holding for three seconds allows you to listen to the volume level of the radio when you are not receiving. You can also press to check for activity on the current channel before you talk.
Push-to-Talk Timeout Timer
To prevent accidental transmissions and save battery life, the radio emits a continuous warning tone and stops transmitting if you press the PTT button for 60 continuous seconds.
Mode Button (Only on Radio with Weather Mode Feature)
By pressing "mode" button, the user will be seamlessly switching between two-way and weather mode. When radio is in two-way mode,  will be shown. When radio is in weather mode,
  will be shown. Corresponding setting and information will be shown on the LCD.
Menu Options
Selecting the Channel
Each country model has different number of channels and frequencies. See the "Channels and Frequencies" table on overleaf for details.
- With the radio on, press
![]() one time until the channel number starts to flash.
one time until the channel number starts to flash. - Press
![]() or
or![]() and select an unused or quiet channel. An extended press of
and select an unused or quiet channel. An extended press of ![]() or
or![]() allows you to scroll through the channels rapidly.
allows you to scroll through the channels rapidly. - Press the PTT button to save the channel setting and exit menu or
![]() to continue set up.
to continue set up.
 one time until the channel number starts to flash.
Selecting the Interference Eliminator Code
Interference Eliminator Codes help minimize interference by blocking transmissions from unknown sources. Your radio has 121 Interference Eliminator Codes. Codes 1 – 38 are standard analog codes that appear on other FRS/GMRS radios. Codes 39 – 121 are additional digital codes added for superior interference protection. 0 is the off position, no analog or digital codes are enabled.
To set the code for a channel:
- Press
![]() two times until the code starts to flash.
two times until the code starts to flash. - Press
![]() or
or![]() to select the code.
to select the code. - Press the PTT button to save the code setting and exit menu or to continue set up.
You can set a different code for each channel using this procedure. An extended press of  or
or allows you to scroll through the Interference Code rapidly so you can quickly reach the code you want.
Note: On a radio that uses Interference Eliminator Codes, the code must be set to 0 to communicate with radios that do not have Interference Eliminator Codes. Select 0 for "no tone, no code" on the display of your radio.
Setting and Transmitting Call Tones
Your radio can transmit different call tones to other radios in your group so you can alert them that you want to talk. Your radio has 20 call tones from which to choose.
To set a call tone:
- Press
![]() three times until
three times until![]() appears. The current call tone setting will flash.
appears. The current call tone setting will flash. - Press
![]() or
or![]() to change and hear the call tone.
to change and hear the call tone. - Press the PTT button to set the new call tone and exit menu or
![]() to continue set up.
to continue set up.
To transmit your call tone to other radios set up to the same channel and Interference Eliminator Code as your radio, press  .
.
Note: Setting the call to OFF disables the call tone feature.
Hands-Free Use Without Accessories ( )
)
Note: iVOX feature is not available on model T200.
You can use the feature to transmit hands-free without the need for any headset accessories. Once is turned on, the radio detects your voice and transmits when you speak into the internal microphone.
- Press
![]() four times until
four times until ![]() appears on the display. The current setting will flash.
appears on the display. The current setting will flash. - Press
![]() or
or![]() to select Off or set sensitivity L1, L2 or L3.
to select Off or set sensitivity L1, L2 or L3. - Press the PTT button to set and exit menu or
![]() to continue set up.
to continue set up.
Hands-Free Use with Accessories ( )
)
Note: VOX feature is not available on model T200.
You can transmit hands-free more reliable with the use of optional headset accessories. Once is turned on, the radio detects your voice and transmits when you speak. Many accessories (sold separately) are available for your radio. For more information, visit our website at www.motorolasolutions.com/TalkaboutAccessories or call customer service.
- Plug the
![]() accessory into the accessory port. Press
accessory into the accessory port. Press ![]() four times until
four times until ![]() appears on the display. The current setting will flash.
appears on the display. The current setting will flash. - Press
![]() or
or![]() to select Off or set sensitivity L1, L2 or L3.
to select Off or set sensitivity L1, L2 or L3. - Press the PTT button to set and exit menu or
![]() continue set up.
continue set up. - Lower the volume before placing the accessory on your head or in your ear.
- To turn off
![]() , simply remove accessory.
, simply remove accessory. - When
![]() accessory is connected, only accessory microphone is functional. Pressing PTT on radio will also allow user to transmit via accessory microphone.
accessory is connected, only accessory microphone is functional. Pressing PTT on radio will also allow user to transmit via accessory microphone.
Note: There is a short delay between the time you start talking and when the radio transmits. There is a short delay before the transmission is completed.
Setting the Sensitivity Level When in / Mode
Adjusting the sensitivity level of the radio helps minimize the possibility of unintended noises triggering a transmission and helps the radio pick up soft voices.
L3 = High Sensitivity for quiet environments
L2 = Medium Sensitivity for most environments
L1 = Low Sensitivity for noisy environments
Keypad Tones
You may enable or disable the speaker key tones. You will hear the key tone each time a button is pushed.
- Press
![]() five times (four times on model T200) until
five times (four times on model T200) until ![]() appears. The current setting On/Off will flash.
appears. The current setting On/Off will flash. - Press either
![]() or
or![]() to turn On or Off.
to turn On or Off. - Press the PTT button to confirm and exit menu or
![]() continue set up.
continue set up.
Note: When the key tone feature is off, the following are not disabled:
 appears. The current setting On/Off will flash.
- Transmit timeout alert tone
- Call tone
- Low battery alert tone or
- The transmitted talk confirmation tone
Transmitting a Talk Confirmation Tone
You can set your radio to transmit a unique tone when you finish transmitting. It is like saying "Roger" or "Over" to let others know you are finished talking.
- With the radio on, press
![]() six times (five times on model T200) until the
six times (five times on model T200) until the ![]() appears. The current setting On/ Off flashes.
appears. The current setting On/ Off flashes. - Press
![]() or
or![]() to turn On or Off.
to turn On or Off. - Press the PTT button to set and exit menu.
 appears. The current setting On/ Off flashes.
Special Features
Keypad Lock
To avoid accidentally changing your radio settings:
- Press and hold
![]() until
until ![]() displays.
displays. - When in lock mode, you can turn the radio on and off, adjust the volume, receive, transmit, send a call tone and monitor channels. All other functions are locked.
- To unlock the radio, press and hold
![]() until
until![]() is no longer displayed.
is no longer displayed.
 displays.
Scanning Channels
Use scan to search all channels for transmissions from unknown parties, to find someone in your group who has accidentally changed channels or to quickly find unused channels for your own use.
To start Scanning:
- Briefly press the
![]() key. The scan
key. The scan ![]() will appear in the display and the radio will begin to scroll through the channel and code combinations.
will appear in the display and the radio will begin to scroll through the channel and code combinations. - When the radio detects channel activity matching the channel and code combination, it stops scrolling and you can hear the transmission.
- To respond and talk to the person transmitting, press the PTT button within five seconds after the end of the transmission.
- The radio will resume scrolling through the channels five seconds after the end of any received activity.
- To stop scanning, briefly press the key
![]() .
.
 will appear in the display and the radio will begin to scroll through the channel and code combinations.
Scanning Notes:
- If you press the PTT button while the radio is scrolling through inactive channels, the transmission will be on the "home channel". Scanning will resume five seconds after the end of your transmission. You may press
![]() the key to stop scanning at any time.
the key to stop scanning at any time. - If the radio stops on an undesired transmission, you may immediately resume the scan by briefly pressing
![]() or
or![]() .
. - If the radio repeatedly stops on an undesired transmission, you may temporarily remove that channel from the scan list by pressing and holding
![]() or
or![]() for three seconds. You may remove more than one channel in this way.
for three seconds. You may remove more than one channel in this way. - To restore the removed channel(s) to the scan list, turn the radio off and then turn back on, or exit and re-enter the scanning mode by pressing
![]() .
. - You cannot remove the home channel from the scan list.
Weather Receiver
Note: Weather feature is not available on model T200. Weather feature is available on model T260 designed for use in USA and Canada.
Your radio can tune in to broadcasts by the United States National Oceanic and Atmospheric Administration (NOAA) Weather Radio and Environment Canada Weather Radio. You can listen to a weather channel (see "Weather Channels and Frequencies" table for details) or set your radio to alert you to emergency weather broadcasts that interrupt routine broadcasts. When you listen to a weather channel, you cannot use your radio in scan mode or for two-way communications. Both NOAA and Environment Canada have transmitters located throughout the United States and Canada, respectively. These transmitters broadcast watches, forecasts and other information 24 hours a day.
Note: NOAA weather radio stations are assigned to cover specific areas and service may be limited. Please check with your local weather office for frequency and details or visit www.weather.gov/nwr in the US to view the appropriate transmitter for your area. The use of the NOAA logo does not provide an endorsement or implied endorsement by the National Weather Service of NOAA, nor does the use of the Weatheradio logo provide an endorsement or implied endorsement by Environment Canada.
Entering Weather Mode
- From two-way mode, press
![]() to enter weather mode
to enter weather mode ![]() .
.
Setting the Weather Channel
Your radio receives weather frequencies:
- In weather mode, press
![]() one time until weather channel number flashes.
one time until weather channel number flashes. - Press
![]() or
or![]() to select the appropriate channel with good reception in your area.
to select the appropriate channel with good reception in your area. - Press the PTT button to set and exit menu or
![]() continue set up weather alert.
continue set up weather alert.
Setting the Weather Alert
Your radio can be set to respond to NOAA Weather Radio emergency messages. A special alarm tone sounds an alert and turns on the weather receiver to give you immediate weather and emergency information.
- In weather mode press
![]() twice until
twice until ![]() displays.
displays. - Press
![]() or
or![]() to select On/Off.
to select On/Off. - Press the PTT button or
![]() to exit the weather menu set up.
to exit the weather menu set up. - Press
![]() to return to two-way mode. If you activate Weather Alert and return to two-way mode
to return to two-way mode. If you activate Weather Alert and return to two-way mode ![]() will display.
will display.
 displays.
Note: When the weather channel is activated, either manually or after receiving an alert, and no buttons are pressedfor 5 minutes, the weather mode will automatically revert back to two-way mode.
As with two-way radio reception, weather channel reception depends on how close you are to a transmitter and whether you are indoors or outdoors. Because weather channels are transmitted without codes, they may contain static or noise. Weather Alert will not function while actively transmitting or receiving in two-way mode.
Weather Channels and Frequencies

Channels and Frequencies
USA, Canada, Mexico, Panama, Paraguay, Uruguay

Remark: Power refers to maximum allowable power as defined by FCC/ISED for each channel under FRS rules for USA and FRS/GMRS for Canada and is not a reflection of the power specification of the radio.
Argentina

Brazil

Chile

Columbia

Peru

Patent and Copyright Information
MOTOROLA, MOTO, MOTOROLA SOLUTIONS and the Stylized M logo are trademarks or registered trademarks of Motorola Trademark Holdings, LLC and are used under license. All other trademarks are the property of their respective owners.
© 2016 and 2021 Motorola Solutions, Inc. All rights reserved.

Documents / Resources
References
Download manual
Here you can download full pdf version of manual, it may contain additional safety instructions, warranty information, FCC rules, etc.
Download Motorola TALKABOUT T2xx Series - Two-Way Radio Instructions
Advertisement


Need help?
Do you have a question about the TALKABOUT T2XX Series and is the answer not in the manual?
Questions and answers