
Related Manuals for walser Walimex Pro LED 45W Softbox


Summary of Contents for walser Walimex Pro LED 45W Softbox
- Page 1 WALSER GmbH & Co. KG Senefelderstrasse 23 86368 Gersthofen Germany info@walser.de www.walser.de Made in China...
- Page 2 LED 45W / 60W Softbox 40x60cm Bi Color + Bi Color Kit 1&2 LED 45W / 60W Octagon Ø65cm Bi Color + Bi Color Kit 1&2 Gebrauchsanleitung Instruction Manual...
-
Page 3: Table Of Contents
Gebrauchsanleitung 1. Hinweise zum Verständnis dieser Gebrauchsanleitung ...... 4 1.1 Kennzeichen und Symbole am Gerät ...............4 1.2 Symbole zu Sicherheitshinweisen in dieser Gebrauchsanleitung .....5 2. Wichtige Sicherheitshinweise ..............5 3. Gerät auspacken und prüfen ..............7 4. Übersicht über Bestandteile und Bedienelemente ....... 8 4.1 Softbox rechteckig 45W/60W ................8 4.2 Softbox Octagon 45W/60W ................9 4.3 Übersicht der Ausstattung .................10... - Page 4 Instruction Manual 1. Notes on understanding these operating instructions ......24 1.1 Markings and symbols on the unit ..............24 1.2 Symbols for safety instructions in these operating instructions ......25 2. Important safety instructions ..............25 3. Unpack and check the unit ..............27 4.
-
Page 5: Hinweise Zum Verständnis Dieser Gebrauchsanleitung
• Einfache Steuerung über mitgelieferte Fernbedienung. Wir wünschen Ihnen viel Freude mit unserem Produkt. Ihr Team von WALSER ■ Bitte lesen Sie sich die vorliegende Gebrauchsanleitung sorgfältig durch, bevor Sie das Produkt zum ersten Mal benutzen. Sie beinhaltet alle Informationen, die Sie benötigen, um Verletzungen und Sachschäden vorzubeugen. -
Page 6: Symbole Zu Sicherheitshinweisen In Dieser Gebrauchsanleitung
1.2 Symbole zu Sicherheitshinweisen in dieser Gebrauchsanleitung Symbol Bedeutung Weist auf sicherheitsrelevante Informationen und eventuelle Folgen hin. Weist auf schwere oder gar tödliche Verletzungen hin, wenn ein WARNUNG bestimmtes Risiko nicht vermieden wird. Weist auf mögliche Sach- oder Gerätschäden oder sonstige wichtige HINWEIS Informationen in Zusammenhang mit dem Gerät hin. - Page 7 WARNUNG Stromschlaggefahr und Brandgefahr durch Kurzschluss Ein Kurzschluss kann u. a. durch defekte Kabel und durch Feuchtigkeit oder Nässe verur- sacht werden. Bei einem Kurzschluss können sich die Leitungsdrähte so stark erwärmen, dass deren Isolierung schmilzt oder sogar die Leitungsdrähte selbst durchschmelzen. Da- durch kann es zu einem Brand kommen.
-
Page 8: Gerät Auspacken Und Prüfen
HINWEIS Falls die Lieferung unvollständig ist oder Teile beschädigt sind, wenden Sie sich bitte per E-Mail an info@walser.de. Im Rahmen von Produktverbesserungen behalten wir uns das Recht auf technische und optische Änderungen vor. Abbildungen können geringfügig voneinander abweichen. Richtlinie 2009/125/ EG in Verbindung mit Verordnung 2019/2015 zur Energieverbrauchskennzeichnung findet hier keine Anwendung. -
Page 9: Übersicht Über Bestandteile Und Bedienelemente
Übersicht über Bestandteile und Bedienelemente 4.1 Softbox rechteckig 45W/60W Softbox 40 x 60 cm Lampenfassung Diffusor Fernbedienung Neigungswinkelverstellung LED-Leuchtmittel Spigot-Anschluss (5/8 Zoll, 16 mm Zapfen) Lampenstativ Zubehör:... -
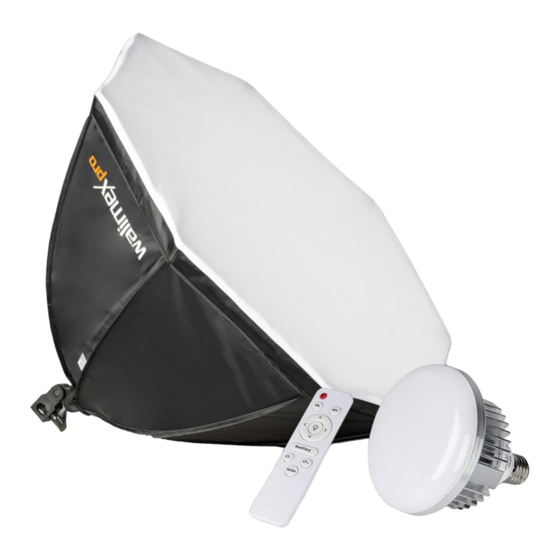
Page 10: Softbox Octagon 45W/60W
4.2 Softbox Octagon 45W/60W Softbox Octagon Ø65cm Lampenfassung Diffusor Fernbedienung Neigungswinkelverstellung LED-Leuchtmittel Spigot-Anschluss (5/8 Zoll, 16 mm Zapfen) Lampenstativ Zubehör:... -
Page 11: Übersicht Der Ausstattung
HINWEIS Die beiden Übersichten stellen die Maximalausstattung der rechteckigen, bzw octagonalen Softboxen da. In der nachfolgenden Tabelle können Sie die tatsächliche Ausstattung ihrer Softbox entnehmen. 4.3 Übersicht der Ausstattung 23102 23103 23104 23105 23106 23107 23108 23109 2x 60W 2x 60W Lampe Softbox 40x60... -
Page 12: Softbox Aufspannen
• Verbinden Sie das Netzteil (19) mit der Steckdose des örtlichen Stromnetzes (AC 220- 240 V/50-60 Hz). HINWEIS Örtliche Stromversorgung mit den Anschlusswerten des Geräts vergleichen. Wenn die Werte nicht übereinstimmen, wenden Sie sich bitte an info@walser.de. HINWEIS Schließen Sie das Netzteil nur an einer schutzgeerdeten Steckdose an. HINWEIS Nach Verwendung trennen Sie das Gerät von der örtlichen Stromversorgung, indem Sie den... -
Page 13: Gerät Und Leuchtmittel Einschalten, Ausschalten
7.2 Gerät und Leuchtmittel einschalten, ausschalten Sie können das Leuchtmittel über den Ein- /Aus-Kippschalter am Netzkabel bedienen. • Gerät und Leuchtmittel einschalten: Ein- /Aus-Kippschalter auf I stellen. • Das Leuchtmittel leuchtet. • Gerät und Leuchtmittel ausschalten: Ein- /Aus-Kippschalter auf O stellen. •... -
Page 14: Einstellen Der Leuchtstärke
• Die 3 Stufen der Nachtlichtfunktion entsprechen einer voreingestellten Farbtemperatur von 3000K, 5000K und 6000K. • Die Fernbedienung funktioniert per Infrarot (IR) und benötigt direkten Sichtkontakt. Die Reich- weite beträgt ca. 3-5 Meter. 7.3.2 Einstellen der Leuchtstärke • Drücken Sie den <ON> (2) Knopf der Fernbedienung, um die Leuchte einzuschalten. •... -
Page 15: Probleme Beheben
• Gerät und alle demontierten Elemente in die Artikelverpackung legen und entsprechend den Vorgaben in den Technischen Daten transportieren oder lagern (siehe Technische Daten) Probleme beheben Problem Mögliche Ursachen Abhilfe Netzkabel ist nicht oder Netzkabel und Netzteil Gerät ist eingeschaltet, nicht korrekt eingesteckt. -
Page 16: Gerät Instand Halten Und Reinigen
Keine Batterien eingelegt. Batterien oder Akkus einlegen. Ausreichend geladene Batterien Batterien leer. oder Akkus einlegen. Leuchte am Netzschalter Leuchte per Netzschalter ausgeschaltet. einschalten. Fernbedienung funktioniert nicht Falsche Kanalwahl. Korrekte Kanalwahl vornehmen. Wenden Sie sich an unseren Service. Reparaturen dürfen nur Gerät ist defekt. - Page 17 Stromschlaggefahr ■ Bringen Sie das Gerät niemals mit Feuchtigkeit oder Wasser in Berührung. ■ Ziehen Sie stets den Netzstecker, bevor Sie das Gerät reinigen. Gerät Reinigung Gehäuse Leichte und hartnäckige Verschmutzungen vorsichtig mit einem feuchten Tuch beseitigen. Leuchtmittel Mit Staubpinsel oder trockenem, weichem Tuch abtupfen. Softbox Leichte und hartnäckige Verschmutzungen mit trockenem oder angefeuchte- ten Tuch beseitigen.
-
Page 18: Zubehör
Sie kostenlos. 13. Verweis auf die Konformitätserklärung „Hiermit erklärt WALSER GmbH & Co. KG, dass sich die Fernbedienung und die LED-Leuchte mit integriertem Funkempfänger, in Übereinstimmung mit den grundlegenden Anforderungen und den übrigen einschlägigen Bestimmungen befinden. Die Konformitätserklärung kann unter folgender Adresse angefordert werden: info@walser.de. -
Page 19: Softboxen 60W
Flickerfrei Lebensdauer LED (Std.) 50.000 Halterung Stativhalterung 5/8 Zoll Spigot Diffusor Gewicht 0,76kg 0,86kg Länge Anschlusskabel + Netzteil Gewicht inkl. Verpackung 1,55 kg 1,61kg Maße 600 x 400 mm Ø650 mm Stromversorgung Stromversorgung AC 220-240V, 50/60Hz Betriebsdaten Zulässige -20 °C bis + 40 °C Betriebsbedingungen Trocken und staubfrei in der Originalverpackung oder Tasche, Lagerbedingungen... - Page 20 Modellvariante Bi Color Anzahl LED COB Foto-Video LED Variante High Performance LED Farbtemperatur 3.000 - 6.000 Kelvin Lichtstrom 6.200 lm Farbwiedergabeindex CRI 95 Ra Dimmbar 10-100 % Abstrahlwinkel 120° Synchrone Steuerung Ja, wenn beide in Reichweite der Fernbedienung sind mehrerer Leuchten (ca.
-
Page 21: Softboxen 60W Kit 1
Zulässige -20 °C bis + 40 °C Betriebsbedingungen Trocken und staubfrei in der Originalverpackung oder Tasche, Lagerbedingungen bei -20 °C bis +50 °C Fernbedienung Stromversorgung 3.0 V (2x AAA 1,5 V) Batterien oder Akkus (nicht enthalten) Reichweite max. 5 m (mit Sichtkontakt) Walimex pro LED 60W Bi Walimex pro LED 60W Bi Co- Color, Octagon Softbox Ø... -
Page 22: Softboxen 60W Kit 2
Lebensdauer LED (Std.) 50.000 Halterung Stativhalterung 5/8 Zoll Spigot Diffusor Gewicht 1,55kg 1,65kg Länge Anschlusskabel + Netzteil Gewicht inkl. Verpackung 2,38 kg 2,45kg Maße 600 x 400 mm Ø650 mm Stromversorgung Stromversorgung AC 220-240V, 50/60Hz Betriebsdaten Zulässige -20 °C bis + 40 °C Betriebsbedingungen Trocken und staubfrei in der Originalverpackung oder Tasche, Lagerbedingungen... - Page 23 Modellvariante Bi Color Anzahl LED COB Foto-Video LED Variante High Performance LED Farbtemperatur 3.000 - 6.000 Kelvin Lichtstrom 6.200 lm Farbwiedergabeindex CRI 95 Ra Dimmbar 10-100 % Abstrahlwinkel 120° Synchrone Steuerung Ja, wenn beide in Reichweite der Fernbedienung sind mehrerer Leuchten (ca.
- Page 24 2x Walimex pro LED 60W Bi 2x Walimex pro LED 60W Bi Color, 2x Octagon Softbox Ø Color, 2x Softbox 40x60 cm, 65 cm, 2x Diffusor, 2x Lampen- Lieferumfang 2x Diffusor, 2x Lampenstativ, Fernbedienung, Aufbewah- stativ, Fernbedienung, Aufbe- rungstasche. wahrungstasche. Niclas Walser Inhaber...
-
Page 25: Instruction Manual
• No matter if product, food or people shots: suitable for photo and video shoots alike. • Simple control via supplied remote control. We wish you lots of fun with our product Your WALSER team ■ Please read these instructions carefully before using the product for the first time. -
Page 26: Symbols For Safety Instructions In These Operating Instructions
1.2 Symbols for safety instructions in these operating instructions Symbol Meaning Indicates safety-related information and possible consequences. Indicates serious or even fatal injuries if a certain risk is not avoided. WARNING Indicates possible damage to property or equipment or other NOTICE important information related to the unit. - Page 27 WARNING Electric shock hazard and fire hazard, caused by a short circuit A short circuit can be caused, among other things, by defective cables and by moisture or wetness. In the event of a short circuit, the cable wires can heat up so much that their insulation melts or even the cable wires themselves melt through.
-
Page 28: Unpack And Check The Unit
3.4 Check that the items included in the delivery are undamaged. NOTICE If the delivery is incomplete or parts are damaged, please contact us by e-mail at info@walser.de. Within the scope of product improvements, we reserve the right to make technical and optical changes. -
Page 29: Overview Of Components And Controls
Overview of components and controls 4.1 Softbox rectangular 45W/60W Softbox 40 x 60 cm Lamp holder Diffuser Remote control Tilt angle adjustment LED illuminant Spigot connection (5/8 inch, 16 mm spigot) Lamp tripod Accessories:... -
Page 30: Softbox Octagon 45W/60W
4.2 Softbox Octagon 45W/60W Softbox Octagon Ø65cm Lamp holder Diffuser Remote control Tilt angle adjustment LED illuminant Spigot connection (5/8 inch, 16 mm spigot) Lamp tripod Accessories:... -
Page 31: Overview Of The Equipment
NOTICE The two overviews represent the maximum equipment of the rectangular and octagonal softboxes. In the following table you can see the actual equipment of your softbox. 4.3 Overview of the equipment 23102 23103 23104 23105 23106 23107 23108 23109 2x 60W 2x 60W Lamp... -
Page 32: Stretch Open The Softbox
• Connect the power supply unit (19) to the socket of the local mains supply (AC 220-240- 240V/50-60 Hz). NOTICE Compare local power supply with the connection values of the unit. If the values do not match, please contact info@walser.de. NOTICE Only connect the power supply unit to a protective earthed socket. NOTICE After use, disconnect the unit from the local power supply by pulling out the mains plug. -
Page 33: Switch On The Unit And The Lamp, Switch Off
7.2 Switch on the unit and the lamp, switch off You can operate the lamp via the on/off toggle switch on the mains cable. • Switch on the unit and the lamp: Set the on/off toggle switch to I • The lamp lights up. •... -
Page 34: Adjusting The Light Intensity
7.3.2 Adjusting the light intensity • Press the <ON> (2) button on the remote control to switch the light on. • Increase the luminosity value of the fixture by pressing the <up> arrow button (4) or the <right> arrow button (6) on the remote control. •... -
Page 35: Troubleshooting
Troubleshooting Problem Possible causes Remedy Mains cable is not plugged in Connect the mains cable and Unit is switched on, or not plugged in correctly. plugged in correctly. but shows no Luminaire is not function Switch on the lamp with the switched on. -
Page 36: Maintaining And Cleaning The Unit
10. Maintaining and cleaning the unit 10.1 Check and maintain the unit regularly Before each With every What do you have to do? change Check all cables and plugs for damage. Check the socket of the lamp for tightness. Check softbox for correct mounting. WARNING Electric shock hazard and fire hazard, caused by a short circuit In case of damage, have the unit repaired by a qualified electrician right away. -
Page 37: Accessories
This service is free of charge for you. 13. Reference to the declaration of conformity "WALSER GmbH & Co. KG hereby declares that the remote control and the LED luminaire with integrated radio receiver are , in conformity with the essential requirements and the other relevant provisions. -
Page 38: Technical Data
14. Technical Data 14.1 Softboxes 45W LED 45W Softbox 40x60cm LED 45W Octagon Ø65cm Bi Unit Bi Color Color Item number 23102 23103 Max. Power 45 watt Model variant Bi Color Number of LED COB Photo Video LED version High Performance LED Colour temperature 3,000 - 6,000 Kelvin Luminous flux... -
Page 39: Softboxes 60W
Power supply Power supply AC 220-240V, 50/60Hz Operating data Permissible -20 °C to + 40 °C Operating conditions Dry and dust-free in the original packaging or bag, Storage conditions at -20 °C to +50 °C Remote control 3.0 V (2x AAA 1,5 V) batteries or rechargeable batteries Power supply (not included) Range... - Page 40 Beam angle 120° Synchronous control Yes, if both are within range of the remote control. of several luminaires (approx. 3-5 m) Flicker-free LED service life (hrs.) 50,000 Bracket Tripod mount 5/8 inch spigot Diffuser Weight 0.86kg 0.95kg Length connection cable + power supply unit Weight, incl.
-
Page 41: Softboxes 60W Kit 1
14.3 Softboxes 60W Kit 1 LED 60W Softbox 40x60cm LED 60W Octagon Ø65cm Bi Unit Bi Color Kit 1 Color Kit 1 Item number 23106 23107 Max. Power 60 watt Model variant Bi Color Number of LED COB Photo Video LED version High Performance LED Colour temperature... -
Page 42: Softboxes 60W Kit 2
Power supply Power supply AC 220-240V, 50/60Hz Operating data Permissible -20 °C to + 40 °C Operating conditions Dry and dust-free in the original packaging or bag, Storage conditions at -20 °C to +50 °C Remote control 3.0 V (2x AAA 1,5 V) batteries or rechargeable batteries Power supply (not included) Range... - Page 43 Beam angle 120° Synchronous control Yes, if both are within range of the remote control. of several luminaires (approx. 3-5 m) Flicker-free LED service life (hrs.) 50,000 Bracket Tripod mount 5/8 inch spigot Diffuser Weight 3.01kg 3.29kg Length connection cable + power supply unit Weight, incl.
- Page 44 This guarantee is only valid in conjunction with your proof of purchase. If you wish to make use of our guarantee, please contact us by e-mail at info@foto-walser.de. You can find our comprehensive guarantee promise and the scope of the guarantee under www.foto-walser.de/garantie...
Need help?
Do you have a question about the Walimex Pro LED 45W Softbox and is the answer not in the manual?
Questions and answers