Breville Bit More BTA720XL, BTA730XL Toaster Manual
- Instruction book (16 pages) ,
- Instruction book (40 pages)
Advertisement
KNOW YOUR BREVILLE PRODUCT

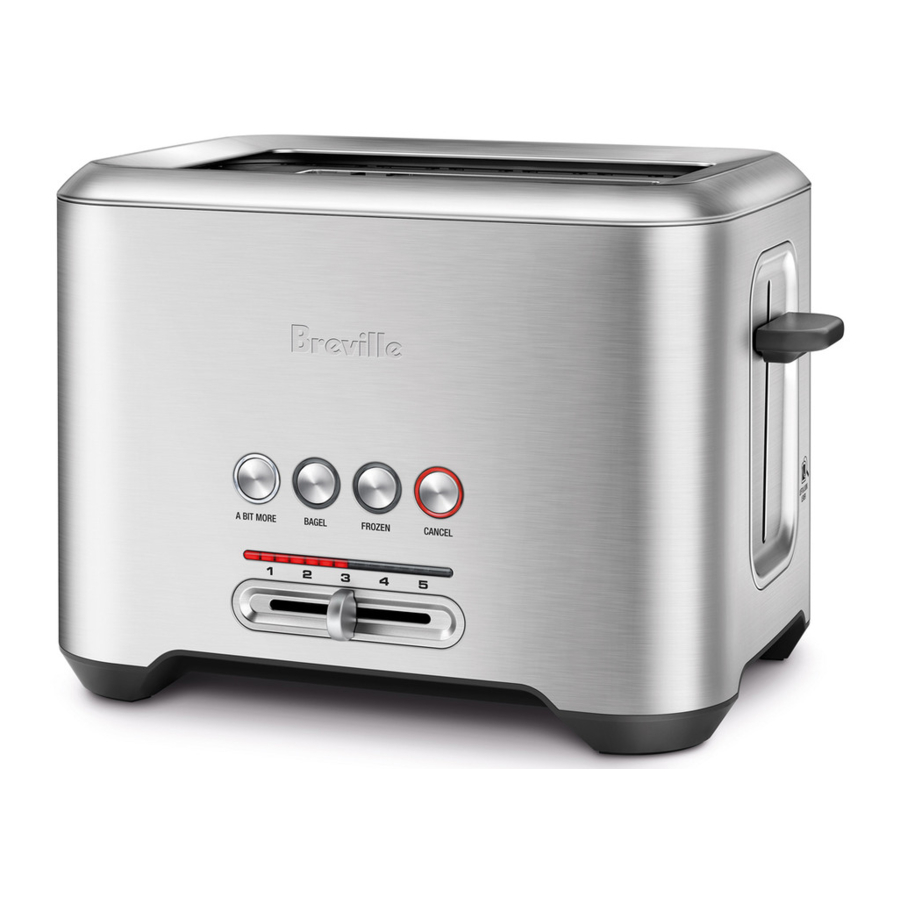
- A BIT MORE™ button
If your toast comes up too light, one press adds a little extra toasting time. - BAGEL button
Activates additional heat to the middle heating elements to perfectly toast the insides of your cut bagel without burning the outside. - FROZEN button
Activates additional toasting time required to defrost then toast frozen bread. - CANCEL button
Cancels the toasting cycle. Also use this button to adjust the volume of the toast ready alert. - Toasting slots
- LED toasting progress indicator
- Variable browning control slide
- Full stainless steel body
- Slide out crumb tray
- Concealed cord storage
- LIFT & LOOK™ / high lift lever
Use the lever during the toasting cycle to raise and lower the carriage so you can check the toasting progress without interrupting the toasting cycle. High lift feature makes it easier to remove small items such as English muffins.
NOT SHOWN
Breville Assist™ Plug
OPERATING
 NOTE NOTEThis toaster is electronically controlled and will not operate until the toaster is plugged into a 110/120 volt power outlet. |
Before first use, remove any packaging material or promotional labels attached to your toaster.
- Insert the power plug into a 110/120V power outlet. The LED toasting progress indicator will illuminate from left to right, then align to the selected browning setting (indicated by the position of the browning control slide). The toaster will revert to stand-by mode after a few minutes if a button is not pressed or the browning control slide is not adjusted.
| NOTE When using the toaster for the first time, we suggest toasting on the maximum setting without bread. The toaster may emit a thin smoke or distinct odor on initial use. This is normal and not detrimental to the performance of the toaster. |
- Place bread, bagels, English muffins etc into each of the toasting slots. Ensure items for toasting are not too large or too thick to fit in the toasting slots.
- There are 12 browning settings ranging from '1' (lightest) to '5' (darkest). Select the desired browning setting by adjusting the browning control slide on the front of the toaster. The LED toasting progress indicator will illuminate and align to the selected browning setting (as indicated by the position of the browning control slide).
| NOTE When toasting bread for the first time, it is suggested to toast on browning setting '3' (7 LED's illuminated). Various types of bread and personal preference may require a different browning setting. For example, raisin toast and white lighttextured breads may require a lighter setting, while heavier textured rye breads may require a darker setting. |
- To start the toasting process, press down the lever until it locks into place. The LED toasting progress indicator (above the selected browning setting) will flash and start to gradually count down.
| NOTE Toasting can be stopped at any time by pressing the CANCEL button. This will cancel the operation and the carriage will move to the raised position. |
- Once the toasting cycle is complete the toast ready alert will sound (refer to TOAST READY ALERT to adjust the volume). Remove the toast. The LED toasting progress indicator will re-illuminate to the previously selected browning setting for a few minutes before entering stand-by mode.
| NOTE To re-activate the toaster from stand-by mode, press any button or move the browning control slide. The LED toasting progress indicator will re-illuminate. |

Do not leave the toaster unattended when in use as toast may jam.
In the unlikely event that bread, bagels, English muffins or toaster pastries become jammed in the toasting slots, all the buttons and the LED toasting progress indicator will flash and the elements will turn off. Remove the power plug from the power outlet and allow the toaster to cool completely before carefully easing the bread out of the slots. Take care not to damage the heating elements. Do not use metal utensils.
A BIT MORE™ BUTTON
If your toast comes up too light, one press of this button adds a little extra toasting time. This feature can be selected before, during or after the toasting cycle and can be used with the BAGEL and FROZEN functions.
To use this feature during the toasting cycle:
Press the A BIT MORE™ button. The button surround will illuminate white when selected. The toasting time will automatically increase but will not illuminate more of the LED toasting progress indicator. The A BIT MORE™ function can be cancelled by pressing the A BIT MORE™ button again and the original toasting cycle will continue.
To use this feature before or after the toasting cycle:
Press the A BIT MORE™ button. The button surround will illuminate white when selected. Press down the lever until it locks into place. The LED toasting progress indicator will automatically align with the lowest browning setting then flash and count down for the additional browning time.
BAGEL BUTTON
This feature activates additional heat to the middle heating elements to perfectly toast the insides of your cut bagel without burning the outside.
To toast bagels:
- Place the cut bagel into the toasting slots with the inside of the bagel facing inwards as per the bagel markings above the middle heating elements of the toaster.
- Select the desired browning setting by adjusting the browning control slide on the front of the toaster. There are 12 browning settings ranging from '1' (lightest) to '5' (darkest).
- To select the BAGEL setting, press the BAGEL button and the button surround will illuminate white. To start the toasting process, press down the lever until it locks into place.
| NOTE It is normal for the outside heating elements to appear off or on a lower power during the bagel setting. This ensures the inside of your cut bagel toasts without burning the outside. |
- After the cycle has finished, press the BAGEL button to deselect the setting.
FROZEN BUTTON
This feature activates additional toasting time required to defrost then toast frozen bread.
To toast frozen bread:
- Place the bread into the toasting slots.
- Select the desired browning setting by adjusting the browning control slide on the front of the toaster. There are 12 browning settings ranging from '1' (lightest) to '5' (darkest).
- To select the FROZEN setting, press the FROZEN button and the button surround will illuminate white. To start the toasting process, press down the lever until it locks into place. The toasting time will automatically increase.
- After the cycle has finished, press the FROZEN button to deselect the setting.
LIFT & LOOK™ LEVER
This feature raises and lowers the carriage so you can check the toasting progress without interrupting and/or cancelling the toasting cycle. During the toasting cycle, simply lift the lever to view the toasting progress. Lower the lever to continue the cycle or press the CANCEL button to stop the cycle at any time.
HIGH LIFT LEVER
The lever can be lifted approximately ½ inch above the starting position. This raises the carriage approximately ½ inch making it easier to remove smaller items such as English muffins.
TOAST READY ALERT
A toast ready alert will sound when the toasting cycle has finished and the carriage has risen and locked into the raised position. The default volume setting for the toast ready alert is 'High' but can be adjusted to 'Low' or 'Mute'.
Adjusting the volume of the Toast Ready Alert
Press and hold down the CANCEL button for 2 seconds until the A BIT MORE™, BAGEL and FROZEN buttons illuminate. While these buttons are illuminated, adjust the volume as follows:
Mute:
Press the FROZEN button. The button surround light will flash three times.
Low:
Press the BAGEL button. The toaster will beep three times with low volume.
High:
Press the A BIT MORE™ button. The toaster will beep three times with high volume.
CARE & CLEANING
- Remove the power plug from the power outlet and allow the toaster to cool completely before cleaning.
- To clean any crumbs from the toaster, remove the crumb tray, located on the left side of the toaster, opposite to the lever. Empty and replace the crumb tray before using the toaster again. Replace the crumb tray by sliding it inwards until it locks into position.
- To remove any additional crumbs, turn the toaster upside down over a trash bin and shake crumbs free.
- Wipe the outside of the toaster with a slightly dampened soft cloth then polish with a soft dry cloth to dry completely.
| NOTE Do not clean with metal scouring pads. Pieces can break off the pad and touch electrical parts creating an electric shock hazard. |
STORAGE
Remove the power plug from the power outlet and allow the toaster to cool completely before storing. Follow the directions for cleaning and store in an upright position on a flat surface on a bench top or in an accessible cupboard.
Do not store anything on top of the toaster.
Do not use the toaster without the crumb tray in position. Do not allow crumbs to build up in the crumb tray. Failure to clean the crumb tray regularly may result in a fire hazard and damage to the toaster.

Documents / ResourcesDownload manual
Here you can download full pdf version of manual, it may contain additional safety instructions, warranty information, FCC rules, etc.
Download Breville Bit More BTA720XL, BTA730XL Toaster Manual
Advertisement


Need help?
Do you have a question about the Bit More BTA720XL and is the answer not in the manual?
Questions and answers