Advertisement
- 1 KNOW YOUR BREVILLE PRODUCT
- 2 BEFORE FIRST USE
- 3 INITIAL SET UP
- 4 USING THE YOUBREW - CARAFE MODE
- 5 USING THE YOUBREW - SINGLE CUP MODE
- 6 PROGRAMMING THE CLOCK (OPTIONAL)
- 7 PROGRAMMING AUTO-START (OPTIONAL)
- 8 CHANGING THE 'READY' SIGNAL VOLUME
- 9 HELPFUL TIPS
- 10 CARE & CLEANING
- 11 TROUBLESHOOTING
- 12 Documents / Resources
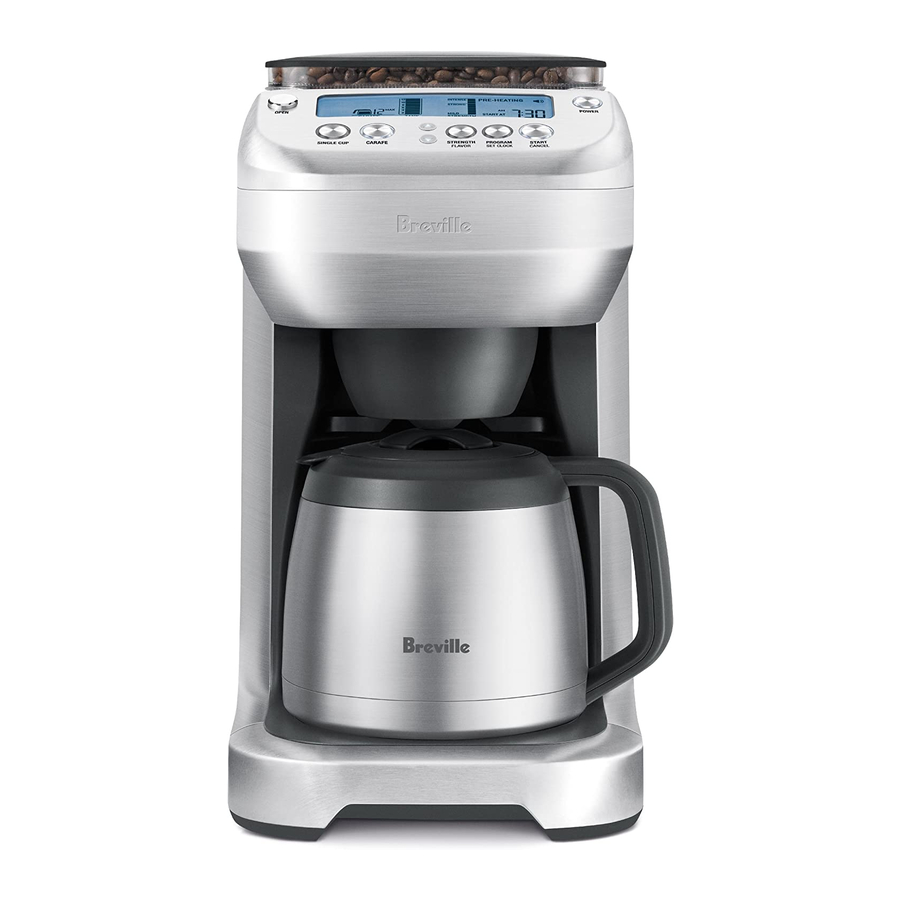
KNOW YOUR BREVILLE PRODUCT

All parts of the YouBrew ® that come into contact with coffee and water are BPA Free.
- Bean Hopper Lid
- 0.5lb Bean Hopper
- Bean Hopper Locking System
seals the base of the bean hopper for easy removal, storage and transfer of coffee beans. - Cleaning Brush
for convenient cleaning of the grinding burrs and coffee grinds chute. - Integrated Burr Grinder
grinds whole beans just prior to brewing for maximum freshness, fl avor and aroma. Grinder can be turned off when using pre-ground coffee. - 12-Cup (60oz) Water Tank
with fl ip-top lid for convenient, front-access fi lling. Grille prevents large debris from entering the tank while the 'MAX' level fl oat rises when the tank is full. - Contoured Control Panel
with angled design for easy viewing of the backlit LCD screen. - Coffee Grinds Chute
delivers ground coffee from the bean hopper to the coffee basket. - Removable Grinds Catcher
catches loose grinds from the coffee grinds chute. - Carafe Lid.
- 12-Cup Double-Wall, Stainless Steel Thermal Carafe
- Removable Gold Tone Filter
- Soft Opening, Swing-Out Door
with safety interlock system prevents operation if the coffee basket is not correctly assembled or the door is not properly closed. - Removable Coffee Basket
lifts out for easy fi lling and cleaning. Holds the included gold tone fi lter or paper fi lters. - Steam Baffle
assists with water overfl ow if the coffee basket becomes blocked. - Brew Pause Drip Stop
temporarily ceases the fl ow of coffee when the carafe is removed so a cup can be poured mid-brew. - Drip Tray
can be removed for direct brewing into tall cups & travel mugs.

- OPEN button
- Press to open the swing-out door.
- SINGLE CUP button
- Press to brew a single cup of coffee.
- Continue pressing to select between 9 brew sizes.
- CARAFE button
- Press to brew a carafe of coffee.
- Continue pressing to select a specifi c carafe size between 2 cups (minimum) and 12 cups (maximum).
![]() button
button - Use in conjunction with the STRENGTH | FLAVOR button to increase the volume of the 'Ready' signal.
- Use in conjunction with the STRENGTH | FLAVOR button to increase the brew strength and fl avor.
- Use in conjunction with the PROGRAM button to program the clock and Auto-Start.
![]() button
button - Use in conjunction with the STRENGTH | FLAVOR button to decrease the volume of the 'Ready' signal.
- Use in conjunction with the STRENGTH | FLAVOR button to decrease the brew strength and fl avor.
- Use in conjunction with the PROGRAM button to program the clock and Auto-Start.
- STRENGTH | FLAVOR button
- Press to adjust the brew strength. 7 settings plus 'PRE-GROUND' coffee setting vary the amount of freshly ground coffee for a mild, strong or intense brew.
- Press to adjust the fl avor. 5 settings vary the steeping time of the coffee and water to produce a light-fl avored cup or a bolder, more full-fl avored coffee.
- PROGRAM | SET CLOCK button
- Press to program the clock ('TIME NOW' time).
- Press to program the Auto-Start ('START AT' time).
- START | CANCEL button
- Press to start or cancel the brew cycle.
- POWER button
- Press to turn the power on or off, or to exit out of POWER SAVE mode.


BEFORE FIRST USE
- Before using the YouBrew® for the first time, ensure you have unpacked all parts and accessories before removing and safely discarding all packaging material and promotional labels. Ensure the power cord is unplugged from the power outlet.
- Wipe the exterior stainless steel housing with a soft, damp cloth. Wash the bean hopper and lid, coffee basket, gold tone filter and carafe in warm, soapy water and a soft cloth. Do not use abrasive cleansers, pads or cloths which can scratch the surface. Rinse and dry thoroughly.
INITIAL SET UP
Install the Bean Hopper
- Position the hopper onto the machine. Turn the locking knob clockwise in the direction of the LOCK arrow until it clicks. Fill the hopper with fresh beans. We recommend always keeping the hopper full (0.5lb maximum) to ensure there are sufficient beans. However, never over-pack the hopper as this may result in the grinder jamming. Replace the hopper lid.
 NOTE NOTEFor easy removal, storage and transfer of beans, the hopper can be removed by turning the locking knob counter-clockwise in the direction of the UNLOCK arrow. If you have removed the hopper, ensure it is securely reassembled back onto the machine. The safety interlock system will prevent operation if the hopper is incorrectly assembled. The LCD screen will flash 'LOCK BEANHOPPER' until the issue is resolved. |
- Plug in the Power Cord
Unwind the power cord completely and insert the power plug into a grounded 110-120V power outlet. Press the POWER button. The LCD screen will illuminate.
| NOTE The coffee machine will enter POWER SAVE mode after remaining idle for 10 minutes. Press the POWER button to exit POWER SAVE mode and re-start the machine. |
- Install the Coffee Basket
For best results, we recommend pre-heating the coffee basket by running it under hot tap water. Ensure to dry the coffee basket thoroughly, taking particular care to completely dry the chute area. Line the coffee basket with either the provided gold tone filter or a paper filter. Never use both at the same time.- Provided gold tone filter. When using the gold tone filter, be sure that the handle is positioned towards the hinge area of the coffee basket. If you do not, the handle may interfere with the flow of ground coffee into the gold tone filter.

- Provided gold tone filter. When using the gold tone filter, be sure that the handle is positioned towards the hinge area of the coffee basket. If you do not, the handle may interfere with the flow of ground coffee into the gold tone filter.

| NOTE The gold tone filter will allow some fine coffee grounds to fall into the coffee. This will appear as sediment in the cup or carafe. This is normal. Only use the gold tone filter provided as others may cause the machine to overflow. |
- Paper filter (8-12 cup, flat base basket style with ~ 3¼"/8.25cm base). Ensure that the paper filter is completely open and touching the side walls and bottom of the coffee basket.
Close the coffee basket lid. Press the OPEN button to open the swing-out door. Attach the coffee basket to the swing-out door by ensuring the hinge area of the coffee basket is fi rmly seated in its most downward position on the two door hooks. Close the door until it clicks shut.

| NOTE The safety interlock system will prevent operation if the coffee basket is not in place, if it is not fi rmly seated on the two door hooks, or if the swing-out door is not closed. The LCD screen will flash 'EMPTY COFFEE FILTER' until the issues are resolved. |
USING THE YOUBREW® - CARAFE MODE
First Time Use Only
We recommend flushing the machine to remove any dust particles or residues from the manufacturing process. Follow the proceeding instructions, ensuring to completely fill the water tank (Step 1), select '12 CUPS' (Step 3) and the 'PRE-GROUND' coffee setting (Step 4). However do not add any coffee to the coffee basket. Once the cycle is complete, discard the water from the carafe and repeat the cycle again for best results. The machine is now ready to use.

We recommend using cold, filtered water. We do not recommend the use of de-mineralized or distilled water as this may affect the taste of brewed coffee and how the coffee machine is designed to function.
Fill the Water Tank
Press open the flip-top lid. Pour the desired amount of cold, preferably filtered water into the tank using a jug or the provided carafe. If using the carafe, ensure the carafe lid is securely locked in place. The LCD screen will indicate the amount of water in the tank as it is filled. The machine will beep when full and the water level float will rise to indicate the maximum level. Do not exceed the 12 cup maximum. Doing so may cause the carafe to overflow or water spillage at the back of the machine. Close the flip-top lid.
| NOTE Check the water level on the LCD screen before use. We recommend always keeping the water tank full. The water tank should be refilled with cold, preferably filtered water. Do not fill with any other liquid. | |
| NOTE Never pour water into the bean hopper or grinding chamber area. Doing so can cause the grinder to clog. Only re-commence use when the grinding chamber and grinding burrs are completely dry. Refer to Troubleshooting, 'Moisture clogging grinder'. | |
| NOTE Never fill the water tank once the coffee machine has started a brewing cycle. This will affect the volume dispensed into the carafe. | |
Pre-Warm the Carafe
A warm carafe will help maintain the coffee's optimal temperature and keep coffee hotter for longer. Remove the carafe lid by turning counter-clockwise then lifting upwards. Fill the carafe with hot water for about 30 seconds then discard the water. To lock the carafe lid back into position, align the arrow on the carafe lid with the ALIGN arrow on the carafe. Turn clockwise until the arrow on the carafe lid aligns with the LOCK arrow on the carafe. This ensures that the lid is closed and in the proper position for brewing and pouring. Place the carafe into position under the drip stop outlet.

| NOTE Ensure the carafe is completely empty and the lid is securely locked in place before placing under the drip stop outlet. Starting a brew cycle with water or coffee in the carafe will cause the carafe to over flow. |
Select 'Carafe' Mode
Press the CARAFE button. The LCD screen will display a carafe symbol and the current number of cups selected. Continue pressing the CARAFE button to select the desired number of cups. You can choose less than the current tank level (2 cup minimum), while the maximum is the amount of water in the tank, up to 12 cups. Each cup is approximately 5 fl.oz.
Select the Brew Strength or 'PRE-GROUND' Coffee Setting
Press the STRENGTH button. The LCD screen will flash the current strength setting and the ![]() and
and ![]() buttons will illuminate and flash. Use these buttons to cycle through 7 strength settings from 'MILD', 'STRONG' to 'INTENSE' or for the 'PRE-GROUND' coffee setting. When the 'INTENSE' strength setting is selected, the maximum number of cups that can be brewed is 9 cups. This ensures the maximum coffee to water ratio.
buttons will illuminate and flash. Use these buttons to cycle through 7 strength settings from 'MILD', 'STRONG' to 'INTENSE' or for the 'PRE-GROUND' coffee setting. When the 'INTENSE' strength setting is selected, the maximum number of cups that can be brewed is 9 cups. This ensures the maximum coffee to water ratio.
Press the STRENGTH button to select. The LCD screen will cease to flash once selected.
| NOTE If using pre-ground coffee, select the 'PRE-GROUND' coffee setting. This will disable the burr grinder. Add preground coffee to the gold tone filter or a paper filter (8-12 cup, fl at base basket style with ~ 3¼"/8.25cm base). We recommend 1 level tablespoon of pre-ground coffee per 5oz/150ml cup of water. Adjust the amount according to your individual taste. The maximum capacity for pre-ground coffee is 16 level tablespoons. Exceeding this amount may cause overflow. When using the machine for the first time, we recommend selecting the 'PRE-GROUND' coffee setting, however omitting the addition of pre-ground coffee. This will flush the machine and remove any dust particles or residues from the manufacturing process. |
Start the Brew Cycle
Press the START | CANCEL button. The grinder will commence grinding the correct amount of coffee for the selected brew size and strength. If the 'PRE-GROUND' coffee setting has been selected, the grinder will be disabled.
| NOTE Steam may emit from the rear steam vent during grinding and brewing. This is normal. |
The count-down timer will then begin. The time displayed is an estimate only and will depend on the amount and strength settings you have selected. The LCD screen will display:
- 'PRE-HEATING' as the water is heated to the optimal temperature. The pre-heating time will depend on the starting temperature of the water in the water tank.
- 'BREWING' as the coffee is dispensed into the carafe.
To stop the cycle at any time, press the START | CANCEL button. You will hear a winding noise. This is normal.
Never open the swing-out door and remove the coffee basket while brewing. Hot water and coffee can cause injury.
Using the Brew Pause Feature
The Brew Pause feature temporarily ceases the flow of coffee when the carafe is removed so a cup can be poured mid-brew. Do not remove the carafe for longer than 20 seconds or the coffee may overflow the coffee basket.
Empty the Coffee Basket
Once the brewing cycle is complete, the ready signal will sound and a winding noise will be heard. This is normal. The coffee machine will automatically shut-off, however the LCD screen will flash 'EMPTY COFFEE FILTER' as a reminder to remove the coffee basket and discard the used grinds. Wash the coffee basket, taking particular care to rinse the chute area. Then dry the coffee basket and chute area thoroughly.
We also recommend checking the coffee grinds chute disc for any build-up of coffee grinds. This is the stainless steel disc that is visible when the swing-out door is opened. A build-up of grinds on this disc can affect the performance of the machine. Wipe the disc clean then dry thoroughly.
The coffee basket and gold tone or paper filter may still be very hot after brewing. Use caution and allow to cool before removing.
Pour and Enjoy
Ensure the carafe lid is securely locked in position. There is no need to turn or adjust the lid before pouring. The lid automatically opens when pouring and closes when not to keep coffee hot.
Hot steam may rise when pouring. The bottom of the carafe is hot to touch for several minutes after brewing. Use caution and ensure not to set the carafe on a heat sensitive surface.
USING THE YOUBREW® - SINGLE CUP MODE
First Time Use Only
We recommend flushing the machine to remove any dust particles or residues from the manufacturing process. Follow the instructions, 'Using the YouBrew® - Carafe Mode', ensuring to completely fill the water tank (Step 1), select '12 CUPS' (Step 3) and the 'PRE-GROUND' coffee setting (Step 4). However do not add any coffee to the coffee basket. Once the cycle is complete, discard the water from the carafe and repeat the cycle again for best results. The machine is now ready to use.
We recommend using cold, filtered water. We do not recommend the use of de-mineralized or distilled water as this may affect the taste of brewed coffee and how the coffee machine is designed to function.
Fill the Water Tank
Press open the flip-top lid. Pour the desired amount of cold, preferably filtered water into the tank using a jug or the provided carafe. If using the carafe, ensure the carafe lid is securely locked in place. The LCD screen will indicate the amount of water in the tank as it is filled. The machine will beep when full and the water level float will rise to indicate the maximum level. Do not exceed the 12 cup maximum. Doing so may cause water spillage at the back of the machine.
Close the flip-top lid.
| NOTE Check the water level on the LCD screen before use. We recommend always keeping the water tank full. The water tank should be refilled with cold, preferably filtered water. Do not fill with any other liquid. |
| NOTE Never pour water into the bean hopper or grinding chamber area. Doing so can cause the grinder to clog. Only re-commence use when the grinding chamber and grinding burrs are completely dry. Refer to Troubleshooting, 'Moisture clogging grinder'. |
| NOTE Never fill the water tank once the coffee machine has started a brewing cycle. This will affect the volume dispensed into the cup. |
Pre-Warm the Cup or Travel Mug
A warm cup will help maintain the coffee's optimal temperature and keep coffee hotter for longer. Fill the cup with hot water for about 30 seconds then discard the water. Place the cup into position under the drip stop outlet.
| TIP: For taller cups and travel mugs, remove the drip tray at the base of the machine. Press the OPEN button to open the swing-out door. Insert the cup/mug into the drip tray cavity before closing the swing-out door. The maximum cup/mug dimensions are 7.5" height, 2¾" diameter. |

REMOVE DRIP TRAY, OPEN DOOR, INSERT CUP, CLOSE DOOR.
Select 'Single Cup' Mode
Press the SINGLE CUP button. The LCD screen will display a cup symbol and the current cup size selected. Continue pressing the SINGLE CUP button to select the desired size.
There are 9 size options to accommodate for different amounts or milk, half-and-half and creamer. Below is a guide to the amount brewed at each setting. Always ensure your cup is an adequate size for the setting selected.
| SETTING | AMOUNT BREWED |
| 1 | ~ 7.5oz |
| 2 | ~ 9.5oz |
| 3 | ~ 11oz |
| 4 | ~ 12.5oz |
| 5 | ~ 14.5oz |
| 6 | ~ 16oz |
| 7 | ~ 17.5oz |
| 8 | ~ 19.5oz |
| 9 | ~ 21oz |
The amounts above are approximate only. Actual amounts may vary due to the type of filter used, the coffee bean size, roast, blend and freshness, or amount and type of pre-ground coffee used.
Select the Brew Strength or 'PRE-GROUND' Coffee Setting
Press the STRENGTH | FLAVOR button. The LCD screen will flash the current strength setting and the ![]() and
and ![]() buttons will illuminate and flash. Use these buttons to cycle through 7 strength settings from 'MILD', 'STRONG' to 'INTENSE' or for the 'PRE-GROUND' coffee setting.
buttons will illuminate and flash. Use these buttons to cycle through 7 strength settings from 'MILD', 'STRONG' to 'INTENSE' or for the 'PRE-GROUND' coffee setting.
Press the STRENGTH | FLAVOR button to select. The LCD screen will flash the current flavor setting.
| NOTE If using pre-ground coffee, select the 'PRE-GROUND' coffee setting. This will disable the burr grinder. Add pre-ground coffee to the gold tone filter or a paper filter (8-12 cup, fl at base basket style with ~ 3¼"/8.25cm base). We recommend 1 level tablespoon of pre-ground coffee per 5oz/150ml cup of water. Adjust the amount according to your individual taste. The maximum capacity for pre-ground coffee is 16 level tablespoons. Exceeding this amount may cause overflow. |
Select the Flavor Setting
Press the STRENGTH | FLAVOR button until the LCD screen flashes the current flavor setting and the ![]() and
and ![]() buttons illuminate and flash. Use these buttons to cycle through 5 flavor settings from 'LITE' to 'BOLD'. These settings vary the steeping time of the coffee and water. The 'LITE' setting steeps for less time to produce a light-flavored cup. The 'BOLD' setting steeps for more time for a bolder, more full-flavored coffee.
buttons illuminate and flash. Use these buttons to cycle through 5 flavor settings from 'LITE' to 'BOLD'. These settings vary the steeping time of the coffee and water. The 'LITE' setting steeps for less time to produce a light-flavored cup. The 'BOLD' setting steeps for more time for a bolder, more full-flavored coffee.
Press the STRENGTH | FLAVOR button to select. The LCD screen will cease to flash once selected.
Start the Brew Cycle
Press the START | CANCEL button. The grinder will commence grinding the correct amount of coffee for the selected brew size and strength. If the 'PRE-GROUND' coffee setting has been selected, the grinder will be disabled.
| NOTE Steam may emit from the rear steam vent during grinding and brewing. This is normal. |
The count-down timer will then begin. The time displayed is an estimate only and will depend on the amount, strength and flavor settings you have selected. The LCD screen will display:
- 'PRE-HEATING' as the water is heated to the optimal temperature. The pre-heating time will depend on the starting temperature of the water in the water tank.
- 'STEEPING' as coffee and water are steeped together.
- 'BREWING' as the coffee is dispensed into the cup.
To stop the cycle at any time, press the START | CANCEL button. You will hear a winding noise. This is normal.
Never open the swing-out door and remove the coffee basket while brewing. Hot water and coffee can cause injury.
Empty the Coffee Basket
Once the brewing cycle is complete, the ready signal will sound and a winding noise will be heard. This is normal. The coffee machine will automatically shut-off, however the LCD screen will flash 'EMPTY COFFEE FILTER' as a reminder to remove the coffee basket and discard the used grinds. Wash the coffee basket, taking particular care to rinse the chute area. Then dry the coffee basket and chute area thoroughly.
We also recommend checking the coffee grinds chute disc for any build-up of coffee grinds. This is the stainless steel disc that is visible when the swing-out door is opened. A build-up of grinds on this disc can affect the performance of the machine. Wipe the disc clean then dry thoroughly.
The coffee basket, gold tone or paper filter may still be very hot after brewing. Use caution and allow to cool before removing.
| NOTE If using the gold tone filter, you may notice the brewing cycle finish before the ready signal sounds. This is normal. The total brewing time displayed on the LCD screen is calculated using paper filters as coffee passes through paper filters slower. |
PROGRAMMING THE CLOCK (OPTIONAL)
You must set the clock to use the Auto-Start feature. Always remember to reset the clock for time changes, power outages and when you unplug the machine.
- Press the PROGRAM button until the LCD screen displays 'TIME NOW'.
Once this appears, press and hold the PROGRAM button until the PROGRAM button illuminates red and the LCD screen displays a flashing 'AM'. - Use the
![]() and
and ![]() buttons to select either AM or PM.
buttons to select either AM or PM. - Press the PROGRAM button. The LCD screen will display a flashing hour.
- Use the
![]() and
and ![]() buttons to select the desired hour.
buttons to select the desired hour. - Press the PROGRAM button. The LCD screen will display a flashing minute.
- Use the
![]() and
and ![]() buttons to select the desired minute.
buttons to select the desired minute.
| TIP: For faster scrolling, press and hold the  and and  buttons. buttons. |
- Press the PROGRAM button to finish. The LCD screen will display 'TIME NOW' and the programmed time.


PROGRAMMING AUTO-START (OPTIONAL)
The Auto-Start feature allows you to program the specific time when the coffee machine will automatically turn on and start the preheating and grinding cycle.
- Ensure the clock is set.
- Press the PROGRAM button until the LCD screen displays 'START AT'. Once this appears, press and hold the PROGRAM button until the LCD screen displays a flashing 'AM' or 'PM'.
- Use the
![]() and
and ![]() buttons to select either AM or PM.
buttons to select either AM or PM. - Press the PROGRAM button. The LCD screen will display a flashing hour.
- Use the
![]() and
and ![]() buttons to select the desired hour.
buttons to select the desired hour. - Press the PROGRAM button. The LCD screen will display a flashing minute.
- Use the
![]() and
and ![]() buttons to select the desired minute.
buttons to select the desired minute.
| TIP: For faster scrolling, press and hold the and buttons. |
- Press the PROGRAM button. It will illuminate red and the LCD screen will display the programmed 'START AT' time for 5 seconds. During this time, press the START | CANCEL button. The LCD screen will dim and display 'PROGRAM ON' to indicate that the Auto-Start feature has been successfully turned on. If 'PROGRAM ON' does not appear, then the Auto-Start feature has not been activated.
![warning]() NOTE
NOTE
During Step 8, the programmed 'START AT' time will appear on the LCD screen for 5 seconds. If the START | CANCEL button is not pressed within 5 seconds, 'TIME NOW' will appear on the LCD screen and pressing the START | CANCEL button will cause the coffee machine to start grinding and brewing.
- Ensure that the coffee machine is correctly assembled and prepared with:
- Sufficient water in the water tank and coffee beans in the bean hopper.
- The coffee basket assembled with an empty gold tone filter or paper filter (8-12 cup, fl at base basket style with ~ 3¼"/8.25cm base).
- Either a cup, travel mug or carafe positioned under the drip stop outlet.

| NOTE To cancel a programmed Auto-Start, press the START | CANCEL button until the LCD screen no longer displays 'PROGRAM ON'. |
| NOTE The Auto-Start feature must be selected each time you want to pre-schedule a brew. Press the PROGRAM button until the LCD screen displays 'START AT'. The coffee machine will remember the last programmed Auto-Start time, so simply press the START | CANCEL button to re-select. Ensure 'PROGRAM ON' is displayed on the LCD screen. |
| NOTE Always remember to reset the clock and Auto-Start time when there is a time change, power outage or after you unplug the machine. |
CHANGING THE 'READY' SIGNAL VOLUME
The volume of the 'Ready' signal can be changed to suit your preference. There are 3 options:

Press and hold the STRENGTH | FLAVOR button until the LCD screen flashes one of the sound icons pictured above. While the icon flashes, use the ![]() or
or ![]() button to select the desired volume. The volume is selected once the icon stops flashing.
button to select the desired volume. The volume is selected once the icon stops flashing.
The selected volume will remain displayed on the LCD screen.
HELPFUL TIPS
WHOLE BEANS
- Coffee flavor and strength is a personal preference. Vary the type of coffee beans and the strength and flavor settings to achieve the taste of your preference.
- Freshly ground beans are the key to making coffee with more flavor and body. Use freshly roasted coffee beans, preferably with a 'roasted on' date and use within 2 weeks of the 'roasted on' date.
- Store coffee beans in a dark, cool and dry place. Vacuum seal if possible.
- Buy coffee beans in small batches to reduce the storage time and store no more than one week's supply at any time.
- Do not store beans in the bean hopper for a prolonged period.
- Clean the bean hopper and grinding burrs regularly.
PRE-GROUND COFFEE
- We recommend 1 level tablespoon of pre-ground coffee per 5oz/150ml cup of water. Adjust the amount according to your individual taste. The maximum capacity for pre-ground coffee is 16 level tablespoons. Exceeding this amount may cause the coffee basket to overflow.
- The grind will affect the rate at which the water flows through the coffee in the coffee basket and therefore the taste of the coffee. If the grind is too fine the water will not flow through the coffee and may clog or overflow the coffee basket. Alternatively, it may pass through the gold tone filter leaving sediment in the cup or carafe. The resulting coffee will be over extracted, too dark and bitter. If the grind is too coarse the water will flow through the coffee too quickly. This will result in an under-extracted coffee lacking in flavor.
- Always use "drip coffee grind" suitable for use with a drip coffee machine Never use "Espresso grind" as the finer grind size may cause the coffee basket to overflow.
GENERAL TIPS
- Pre-heat the carafe or cup for best results. A pre-heated carafe or cup will help maintain the coffee's optimal temperature and keep coffee hotter for longer. Fill with hot water for about 30 seconds then discard the water.
- Fresh, good-tasting water is essential for a perfect cup. If your water contains excessive sediment, or has an 'off' taste or odor, we recommend using filtered water.
ICED COFFEE
- Iced coffee is at its best when the coffee is brewed strong because the coffee is diluted by the melting ice cubes. We recommend selecting '9 CUPS' and the 'INTENSE' strength setting. This makes approximately 1.5 quarts (1.5L) of brewed coffee, enough for 4-6 servings. Once the brewing cycle is complete, transfer the coffee to a heatproof pitcher and let cool to room temperature. Refrigerate until cold, at least 2 hours or up to overnight. Fill glasses with ice cubes. Pour the coffee into the glasses, filling them to within 1.5" (4cm) of the rim. Top each glass with cream, milk, syrups or sweeteners as desired.
- If using granulated sugar as a sweetener, add while the coffee is hot to encourage the sugar crystals to completely dissolve.
- To avoid a diluted taste, you can also use regular strength coffee and serve it over coffee ice cubes. Prepare coffee ice cubes by pouring cool coffee into ice-cube trays and freezing.
CARE & CLEANING
Always turn the coffee machine off and remove the plug from the power outlet before cleaning.
CLEANING THE COFFEE BASKET AND GOLD TONE FILTER
After every use, press the OPEN button to open the swing-out door. Remove the coffee basket. Discard the ground coffee and paper filter. The coffee basket and gold tone filter can be rinsed under running water. Make sure to thoroughly rinse the chute area of the coffee basket and ensure the fine holes of the gold tone filter are clear. For a deeper clean, wash the coffee basket and gold tone filter in warm, soapy water with a soft bristled brush.
| NOTE The flap on the side of the coffee basket is the steam baffle which assists with water overflow if the coffee basket becomes blocked. The flap is hinged from the bottom for easy cleaning. Pull the flap downwards to clean, however always click it back into the upright position before use. |
The coffee basket, gold tone or paper filter may still be very hot after brewing. Use caution and allow to cool before removing.
CLEANING THE CARAFE
After each use, empty the carafe. Do not let brewed coffee stand overnight as this can cause the carafe to stain. Rinse the carafe and carafe lid under running water. For a deeper clean, we recommend regularly washing the carafe in warm, soapy water with a soft bristled brush (one can be purchased from Breville if you do not have a suitable one). Do not use abrasive cleansers, pads or cloths which can scratch the surface.
Rinse and dry thoroughly.
CLEANING THE BEAN HOPPER
Remove the hopper lid and turn the locking knob counter-clockwise in the direction of the UNLOCK arrow. The bean hopper and lid can be washed in warm, soapy water. Do not use abrasive cleansers, pads or cloths which can scratch the surface. Rinse and dry thoroughly.
| NOTE Do not clean any of the parts or accessories in the dishwasher. |
CLEANING THE GRINDING BURRS AND COFFEE GRINDS CHUTE
The LCD screen will display 'CLEAN COFFEE CHUTE' when the grinding burrs and coffee grinds chute need to be cleaned. We recommend doing this immediately to avoid clogging and overflowing of the coffee basket. Depending on frequency of use, you may choose to do this every 2-3 weeks.
- Press the POWER button to turn the machine on.
- Unlock and remove the bean hopper.
- Open the swing-out door. The coffee grinds chute will rotate to the open position.
You may hear a winding noise, this is normal.
![]()
- Press the POWER button to turn the machine off and remove the plug from the power outlet.
- Remove any beans that remain in the grinding chamber and around the upper burr.
- Remove the upper burr by turning the handle clockwise.
![]()
- Using the provided cleaning brush, thoroughly remove any build-up of coffee grinds that have formed around the grinding burrs and coffee grinds chute. Ensure the grinds catcher is in place to catch the loose grinds, then remove and empty the catcher.

- Wipe the coffee grinds chute disc (the entire stainless steel part) to remove any build-up of coffee grinds that have accumulated on the surface. Dry thoroughly.
- Replace the upper burr by aligning the three notches around the upper burr with the three notches in the grinding chamber. The upper burr should sit flush. Turn the handle counter-clockwise until it clicks into position.
- Replace the bean hopper and lock into position.
- Replace the coffee basket onto the swing-out door and close. The coffee grinds chute will rotate back to the closed position. You may hear a winding noise, this is normal.
- The LCD screen will no longer display 'CLEAN COFFEE CHUTE'. The machine is now ready to use.


CLEANING THE GRINDS CATCHER AND DRIP TRAY
Press the OPEN button to open the swing-out door. Remove the grinds catcher located under the coffee grinds chute and the 2-part drip tray at the base of the machine. Wash in warm, soapy water. Do not use abrasive cleansers, pads or cloths which can scratch the surface. Rinse and dry thoroughly.
CLEANING THE OUTER HOUSING
The outer housing and LCD screen can be cleaned with a soft, damp cloth. Apply cleanser to the cloth and not the LCD surface. Polish with a soft, dry cloth. Cleaning and drying with dry paper towels or abrasive cloths and cleaners may scratch the surface.
REMOVING CALCIUM BUILD-UP
Your coffee machine may experience build-up from calcium and minerals contained in your water. This 'scale' or mineral build-up will affect the machine's performance and coffee quality. It is critical that scale build-up be removed. How often you de-scale will depend on the hardness of your water and the frequency of use. For best results, Breville recommends de-scaling once per month in soft water environments and more frequently in hard water environments.
If there is an excessive mineral build-up, the LCD screen will display 'DE-SCALE'.

Remove the 'DE-SCALE' icon by pressing the SINGLE CUP and CARAFE button together, then follow these steps:
- Empty the Water Tank
- Press the CARAFE button to select the number of cups of water that remain in the water tank.
- Press the STRENGTH button and the
![]() and
and ![]() buttons to select the 'PRE-GROUND' coffee setting. However do not add any coffee to the coffee basket.
buttons to select the 'PRE-GROUND' coffee setting. However do not add any coffee to the coffee basket. - Ensure the carafe is empty and the lid is securely locked. Place the carafe into position under the drip stop outlet.
- Press the START | CANCEL button.
- Once the cycle is complete, discard the water from the carafe. The water tank is now empty.
-
De-Scale the Machine
- Pour white vinegar into the water tank until the LCD screen displays '4 CUPS'. Then pour cold, preferably filtered water into the water tank until the LCD screen displays '12 CUPS'. There are now 4 cups of white vinegar and 8 cups of cold water in the water tank.
- Press the CARAFE button to select '12 CUPS'.
- Press the STRENGTH button and the
![]() and
and ![]() buttons to select the 'PRE-GROUND' coffee setting. However do not add any coffee to the coffee basket.
buttons to select the 'PRE-GROUND' coffee setting. However do not add any coffee to the coffee basket. - Ensure the carafe is empty and the lid is securely locked. Place the carafe into position under the drip stop outlet.
- Press the START | CANCEL button.
- Once the cycle is complete, discard the water from the carafe. For best results, repeat this process.
-
Rinse the Machine
Follow the de-scaling process (Step 2) with two full tanks of water or until the vinegar is gone. The machine is now ready to use.
| TIP: You may choose to use a domestic de-scaling agent instead of vinegar and water. Look for one that is designed for use with drip coffee machines. Follow the de-scaler to water proportions on the de-scaler packaging, however follow the above procedure. |
TROUBLESHOOTING
| PROBLEM | POSSIBLE CAUSES | WHAT TO DO |
| 'LOCK BEAN HOPPER' on LCD screen | Hopper not locked in place. | Turn the locking knob clockwise in the direction of the LOCK arrow until it clicks. |
| Unable to lock bean hopper | Coffee beans obstructing bean hopper locking device. | Remove bean hopper. Clear coffee beans from the grinding chamber and around the upper burr. Try re-locking the bean hopper. |
| 'FILL TANK' on LCD screen | Water tank is empty. | Press open the flip-top water tank lid. Pour the desired amount of cold, preferably filter water. |
| 'EMPTY COFFEE FILTER' on LCD screen | Coffee basket not in place or not correctly assembled. | Check that the coffee basket lid is closed and the coffee basket is fi rmly seated on the two door hooks. |
| Swing-out door not closed properly. | Close the door until it clicks shut. | |
| Coffee basket not emptied of used grinds. | Remove the coffee basket and discard used grinds. Wash the coffee basket, taking particular care to rinse the chute area. Dry thoroughly (especially the chute area). Attach to the swing-out door. Close the door until it clicks shut. | |
| Grinder starts but operates with a loud noise. No coffee in the coffee basket. | Grinder is blocked with a foreign item. | Check the bean hopper for any foreign body. If there is none, refer to 'Cleaning the Grinding Burrs and Coffee Grinds Chute'. |
| Moisture clogging grinder. | Clean and thoroughly dry the grinding burrs and coffee grinds chute. Refer to'Cleaning the Grinding Burrs and Coffee Grinds Chute'. It is possible to use a hair dryer to blow air into the grinding chamber and dry the lower burr. Only re-commence use when the grinding chamber and grinding burrs are completely dry. | |
| Coffee grinds in coffee | Using the gold tone filter. | The gold tone filter will allow some fine coffee grinds to fall into the coffee. This is normal. Switch to using a paper filter (8-12 cup, fl at base basket style with ~ 3¼"/8.25cm base) if you wish to eliminate all grinds. |
| Coffee basket has not been properly cleaned. Residual grinds from previous use. | After each use, wash the coffee basket, taking particular care to rinse the chute area. Dry thoroughly (especially the chute area). Ensure there are no grinds in the coffee basket before lining the coffee basket with the gold tone or paper filter. | |
| Coffee basket overflows | The coffee basket is clogged. | This can occur for a number of reasons:
|
| Coffee basket drips | Residual grinds in the drip stop outlet. | With the coffee basket lid open, push up the drip stop outlet (the hemisphere on the underside of the coffee basket). A valve will rise inside the coffee basket. Ensure there are no grinds underneath this valve. Thoroughly dry the coffee basket (especially the chute area) before lining the coffee basket with the gold tone or paper filter. |
| Carafe overflows | Carafe was not completely empty before brewing. | Always ensure the carafe is completely empty before brewing. |
| No coffee comes out | The coffee basket is clogged. | Never open the swing-out door and remove the coffee basket while brewing. Hot water and coffee can cause injury. Turn the POWER button off and remove the plug from the power outlet. Wait 10 minutes before opening the swing-out door and removing the coffee basket. Follow the solutions for 'Coffee basket overflows'. |
| Coffee is watery | Insufficient beans in the bean hopper. | Fill the hopper with fresh beans. We recommend always keeping the hopper full (0.5lb maximum) to ensure there are sufficient beans. |
| Bean hopper and/or burr grinder is blocked. | Refer to 'Cleaning the Grinding Burrs and Coffee Grinds Chute'. | |
| Beans are in the hopper but not feeding into the grinding burrs | Dark, oily beans can stick to the sides of the hopper. | Stir the beans to loosen. |
| The hopper is over-packed and the grinder is jamming. | Remove some of the beans. Stir the remaining beans to loosen. | |
| Coffee not strong enough / too strong | Strength setting is incorrect. | Check the selected strength setting displayed on the LCD screen. To change the strength setting, refer to 'Select the Brew Strength or 'PRE-GROUND' Coffee Setting'. |
| Coffee not hot enough | A pre-heated coffee basket, carafe or cup will help maintain the coffee's optimal temperature and keep coffee hotter for longer. Fill with hot water for about 30 seconds then discard the water. | |
| I cannot select the 'FLAVOR' setting | The 'FLAVOR' setting is only selectable in SINGLE CUP mode. | |
| Steam when grinding and brewing | This is normal. It is the rear steam vent releasing steam. | |
| Total brewing time on LCD screen changes mid-cycle or is different each time | The total brewing time displayed at the start of the cycle is an estimate only and may change mid-cycle or vary each time depending on the starting temperature of the water in the water tank. | |
| Brewing cycle finishes before the ready signal | If using the gold tone filter, this is normal. The total brewing time displayed on the LCD screen is calculated using paper filters as coffee passes through paper filters slower. | |
| 'CLEAN COFFEE CHUTE' on LCD screen | Grinding burrs and coffee grinds chute need to be cleaned. We recommend doing this immediately to avoid clogging and overflowing of the coffee basket. |
|
| Machine beeps and displays '1' on the LCD screen | There is an issue with the coffee grinds chute disc. | Remove the plug from the power outlet. Wait 10 seconds then reinsert. Check the coffee grinds chute disc for any build-up of coffee grinds. This is the stainless steel disc that is visible when the swingout door is opened. A build-up of grinds on this disc can affect the performance of the machine. Wipe the disc clean then dry thoroughly. If the problem persists, call Breville Consumer Service. |
| Machine beeps 20 times in fast succession and '2' is displayed on the LCD screen | Call Breville Consumer Service. | |
| Water level on LCD screen is not moving or indicating correctly | Using de-mineralized or distilled water which is affecting how the coffee machine is designed to function. | We recommend using cold, filtered water. We do not recommend using water with no/low mineral content such as de-mineralized or distilled water. If the problem persists, contact Breville Consumer Service. |

Documents / ResourcesDownload manual
Here you can download full pdf version of manual, it may contain additional safety instructions, warranty information, FCC rules, etc.
Advertisement


Need help?
Do you have a question about the YouBrew and is the answer not in the manual?
Questions and answers