
Subscribe to Our Youtube Channel
Related Manuals for Komatsu 95-2 Series


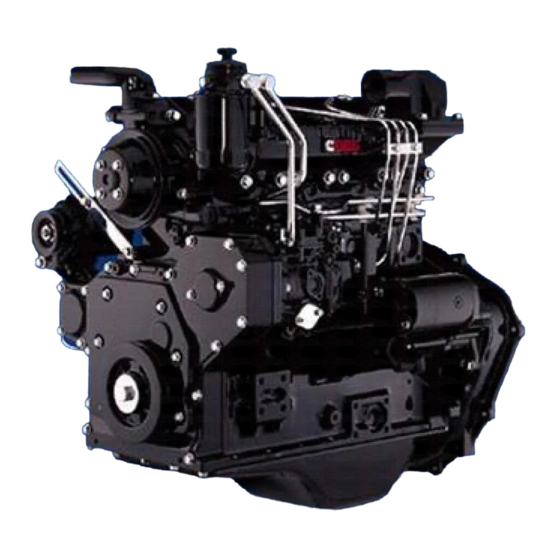
Summary of Contents for Komatsu 95-2 Series
- Page 1 SEBM018803 2 SERIES DIESEL ENGINE 00-1 © 2002 1 All Rights Reserved Printed in Japan 11-02(01)
-
Page 2: Table Of Contents
CONTENTS No. of page GENERAL ................ 01-1 STRUCTURE AND FUNCTION ........11-1 TESTING AND ADJUSTING .......... 12-1 DISASSEMBLY AND ASSEMBLY ......... 13-1 MAINTENANCE STANDARD ......... 14-1 REPAIR AND REPLACEMENT OF PARTS ....15-1 00-2 95-2 SERIES... - Page 3 11-12 12-109 13- 8 ‡ 00-22 11-13 12- 1 12-110 13- 9 11-14 12- 2 12-111 13-10 11-15 12- 3 12-112 13-11 01- 1 11-16 12- 4 12-113 13-12 ‡ 01- 2 11-17 12- 5 12-114 13-13 00-2-1 95-2 SERIES...
- Page 4 13-26 13-27 13-28 13-29 13-30 14- 1 14- 2 14- 3 14- 4 14- 5 14- 6 14- 7 14- 8 14- 9 14-10 14-11 14-12 14-13 14-14 14-15 15- 1 15- 2 15- 3 15- 4 00-2-2 95-2 SERIES...
- Page 5 Proper service and repair is extremely important for safe machine operation. The service and repair techniques recommended by Komatsu and described in this manual are both effective and safe. Some of these techniques require the use of tools specially designed by Komatsu for the specific purpose.
- Page 6 SAFETY SAFETY NOTICE PRECAUTIONS DURING WORK 19.Be sure to assemble all parts again in their origi- nal places. 11. When removing the oil filler cap, drain plug or Replace any damaged parts with new parts. hydraulic pressure measuring plugs, loosen •...
-
Page 7: General
FOREWORD GENERAL FOREWORD GENERAL This shop manual has been prepared as an aid to improve the quality of repairs by giving the serviceman an accurate understanding of the product and by showing him the correct way to perform repairs and make judge- ments. - Page 8 DISTRIBUTION AND UPDATING Any additions, amendments or other changes will be Symbol Item Remarks sent to KOMATSU distributors. Get the most up-to- date information before you start any work. Special safety precautions ¤ Safety are necessary when per- forming the work.
- Page 9 FOREWORD HOISTING INSTRUCTIONS HOISTING INSTRUCTIONS HOISTING Slinging near the edge of the hook may cause ¤ the rope to slip off the hook during hoisting, and H eavy parts (25 kg or more) must be lifted a serious accident can result. Hooks have max- with a hoist, etc.
- Page 10 FOREWORD METHOD OF DISASSEMBLING, CONNECTING PUSH-PULL TYPE COUPLER METHOD OF DISASSEMBLING, CONNECTING PUSH-PULL TYPE COUPLER ¤ B efore carrying out the following work, release Type 1 the residual pressure from the hydraulic tank. For details, see TESTING AND ADJUSTING, Releasing residual pressure from hydraulic tank.
- Page 11 FOREWORD METHOD OF DISASSEMBLING, CONNECTING PUSH-PULL TYPE COUPLER Type 2 Type 3 1) Hold the mouthpiece of the tightening portion 1) Hold the mouthpiece of the tightening portion and push body (2) in straight until sliding pre- and push body (2) in straight until sliding pre- vention ring (1) contacts contact surface a of vention ring (1) contacts contact surface a of the hexagonal portion at the male end.
- Page 12 # The recommended coating materials such as adhesives, gasket sealants and greases used for disassembly and assembly are listed below. # For coating materials not listed below, use the equivalent of products shown in this list. Category Komatsu code Part No. Q'ty Container Main applications, featuresr •...
- Page 13 FOREWORD COATING MATERIALS Category Komatsu code Part No. Q'ty Container Main applications, featuresr • Ftures: Silicon based, quick hard- ening type LG-7 790-129-9070 Tube • Used as sealant for flywheel housing, intake manifold, oil an, Adhesives thermostat housing, etc. •...
- Page 14 FOREWORD STANDARD TIGHTENING TORQUE STANDARD TIGHTENING TORQUE STANDARD TIGHTENING TORQUE TABLE (WHEN USING TORQUE WRENCH) # In the case of metric nuts and bolts for which there is no special instruction, tighten to the torque given in the table below. Thread diameter Width across of bolt...
- Page 15 FOREWORD STANDARD TIGHTENING TORQUE TABLE OF TIGHTENING TORQUES FOR SPLIT FLANGE BOLTS # In the case of split flange bolts for which there is no special instruction, tighten to the torque given in the table below. Thread diameter Width across flat Tightening torque 65.7 11.5...
- Page 16 FOREWORD STANDARD TIGHTENING TORQUE TIGHTENING TORQUE FOR 102 ENGINE SERIES 1) BOLT AND NUTS Use these torques for bolts and nuts (unit: mm) of Cummins Engine. Thread diameter Tightening torque 1.02 0.20 2.45 0.41 4.38 0.61 7.85 1.22 2) EYE JOINTS Use these torques for eye joints (unit: mm) of Cummins Engine.
- Page 17 FOREWORD ELECTRIC WIRE CODE ELECTRIC WIRE CODE In the wiring diagrams, various colors and symbols are employed to indicate the thickness of wires. This wire code table will help you understand WIRING DIAGRAMS. Example: 5WB indicates a cable having a nominal number 5 and white coating with black stripe. CLASSIFICATION BY THICKNESS Copper wire Current...
- Page 18 FOREWORD CONVERSION TABLE CONVERSION TABLE METHOD OF USING THE CONVERSION TABLE The Conversion Table in this section is provided to enable simple conversion of figures. For details of the method of using the Conversion Table, see the example given below. EXAMPLE •...
- Page 19 FOREWORD CONVERSION TABLE Millimeters to Inches 1 mm = 0.03937 in 0.039 0.079 0.118 0.157 0.197 0.236 0.276 0.315 0.354 0.394 0.433 0.472 0.512 0.551 0.591 0.630 0.669 0.709 0.748 0.787 0.827 0.866 0.906 0.945 0.984 1.024 1.063 1.102 1.142 1.181 1.220 1.260...
- Page 20 FOREWORD CONVERSION TABLE Liter to U.S. Gallon 1 l = 0.2642 U.S. Gal 0.264 0.528 0.793 1.057 1.321 1.585 1.849 2.113 2.378 2.642 2.906 3.170 3.434 3.698 3.963 4.227 4.491 4.755 5.019 5.283 5.548 5.812 6.076 6.340 6.604 6.869 7.133 7.397 7.661 7.925...
- Page 21 FOREWORD CONVERSION TABLE kgm to ft. lb 1 kgm = 7.233 ft. lb 14.5 21.7 28.9 36.2 43.4 50.6 57.9 65.1 72.3 79.6 86.8 94.0 101.3 108.5 115.7 123.0 130.2 137.4 144.7 151.9 159.1 166.4 173.6 180.8 188.1 195.3 202.5 209.8 217.0 224.2...
- Page 22 FOREWORD CONVERSION TABLE kg/cm to lb/in 1kg/cm = 14.2233 lb/in 14.2 28.4 42.7 56.9 71.1 85.3 99.6 113.8 128.0 142.2 156.5 170.7 184.9 199.1 213.4 227.6 241.8 256.0 270.2 384.0 398.3 412.5 284.5 298.7 312.9 327.1 341.4 355.6 369.8 426.7 440.9 455.1 469.4...
- Page 23 FOREWORD CONVERSION TABLE Temperature Fahrenheit-Centigrade Conversion ; a simple way to convert a Fahrenheit temperature reading into a Cen- tigrade temperature reading or vice versa is to enter the accompanying table in the center or boldface col- umn of figures. These figures refer to the temperature in either Fahrenheit or Centigrade degrees.
- Page 24 FOREWORD UNITS UNITS In this manual, the measuring units are indicated with Internatinal System of units (SI). As for reference, conventionally used Gravitational System of units are indicated in parentheses { Example: N {kg} Nm {kgm} MPa {kg/cm kPa {mmH kPa {mmHg} kW/rpm {HP/rpm} g/kWh {g/HPh}...
- Page 26 GENERAL APPLICABLE MACHINE APPLICABLE MACHINE Engine Serial No. Applicable machine PC60-7 Hydraulic excavator PC75UU-3 Hydraulic excavator PC78US-6 Hydraulic excavator 4D95LE-2 PC78UU-6 Hydraulic excavator BR100JG-2 Mobile crusher fl Serial No. shows for engine serial No. 01-2 01-2 95-2 SERIES...
- Page 27 Lubricating oil amount ¬ (refill capacity) (7.0) Coolant amount ¬ 10 (Engine side: 4.5) Alternator 24V, 25A Starting motor 24V, 3.0kW 12V 60Ah × 2 Battery Turbocharger — Air compressor — Others — 01-3 01-3 95-2 SERIES...
- Page 28 Governor all-speed control type Lubricating oil amount ¬ (refill capacity) (7.0) Coolant amount ¬ (Engine side: 4.5) Alternator 24V, 25A Starting motor 24V, 3.0kW 12V 60Ah × 2 Battery Turbocharger — Air compressor — Others — 01-4 01-4 95-2 SERIES...
- Page 29 Piston and connecting Piston, piston ring, piston pin, rod assembly connecting rod Oil pump Fuel injection pump 10.5 Water pump Alternator The weight is different depending on the type Starting motor of machine. Air compressor — Aftercooler assembly — 01-21 95-2 SERIES...
- Page 30 GENERAL OVERALL DRAWING OVERALL DRAWING fl The diagram shows the equipment for the PC78US-6. 4D95LE-2 LEFT SIDE DRAWING fl The shape may differ according to the ma- chine model. a. Crankshaft center b. Flywheel housing rear surface 01-22 95-2 SERIES...
- Page 31 GENERAL OVERALL DRAWING fl The diagram shows the equipment for the PC78US-6. 4D95LE-2 FRONT DRAWING fl The shape may differ according to the ma- chine model. a. Crankshaft center b. Cylinder liner center 01-23 95-2 SERIES...
- Page 32 GENERAL OVERALL DRAWING DIMENSION TABLE fl These dimensions are reference values for use when installing to a test bench. Dimensions for each part (mm) Engine Machine model PC78US-6 4D95LE-2 1,082 PC78UU-6 01-24 95-2 SERIES...
- Page 33 GENERAL ENGINE PERFORMANCE CURVE ENGINE PERFORMANCE CURVE Engine Engine Serial. No. Machine model Page PC60-7, PC75UU-3, BR100JG-2 01-26 4D95LE-2 PC78US-6, PC78UU-6 01-27 01-25 95-2 SERIES...
- Page 34 GENERAL ENGINE PERFORMANCE CURVE 4D95LE-2 [For PC60-7, PC75UU-3, BR100JG-2] Rated output: 40 kW {54 HP}/2,100 rpm (Net) Max. torque: 235 Nm {24 kgm}/1,500 rpm (Net) 01-26 01-26 95-2 SERIES...
- Page 35 GENERAL ENGINE PERFORMANCE CURVE 4D95LE-2 [For PC78US-6, PC78UU-6] Rated output: Min. 40.1 kW {53.7 HP}/1,850 rpm (Net) Max. torque: Min. 226 Nm {23 kgm}/1,500 rpm (Net) 01-27 95-2 SERIES...
-
Page 36: Structure And Function
....11-36 LUBRICATION SYSTEM Alternator ..........11-37 Lubrication system chart ...... 11-20 Starting motor ........11-38 Oil pump ..........11-21 Engine starting device ......11-39 Oil filter ........... 11-22 Oil filter mount ........11-23 11-1 95-2 SERIES... - Page 37 16. Water pump 27. Cylinder block 7. Camshaft gear 17. Intake valve 8. Front cover 18. Exhaust valve 28. Push rod 29. Flywheel housing 9. Connecting rod bushing 19. Thermostat 30. Flywheel 10. Piston pin 20. Fan 11-2 95-2 SERIES...
- Page 38 4-cycle 35. Thrust bearing 44. Fuel injection nozzle diesel engine 36. Oil pan 45. Intake manifold 37. Camshaft 46. Fuel injection pump 38. Connecting rod cap 47. Starting motor 39. Oil filter 48. Oil strainer 11-3 95-2 SERIES...
- Page 39 fl There may be differences according to the machine model. 1. Intake manifold A. Air intake (Air cleaner is mounted on 2. Air connector chassis end.) 3. Muffler B. Exhaust outlet 4. Exhaust connector 5. Exhaust manifold 11-4 95-2 SERIES...
- Page 40 STRUCTURE AND FUNCTION INTAKE AND EXHAUST SYSTEM 11-5 95-2 SERIES...
- Page 41 (5) and outlet (2), and is sent to the structure is simple. engine. • The dust and water separated by guide vane (3) circulates around the inside wall of body (9), flies into vacuator valve (6), and is auto- matically discharged. 11-6 95-2 SERIES...
- Page 42 (5) and outlet (2), and is sent to the structure is simple. engine. • The dust and water separated by guide vane (3) circulates around the inside wall of body (8), flies into vacuator valve (6), and is auto- matically discharged. 11-7 95-2 SERIES...
- Page 43 8. Bracket 2. Head cover 9. Nozzle holder 3. Oil filler cap 10. Seat gasket 4. Valve guide 11. Glow plug 5. Intake air return tube 6. Head bolt a. Blow-by suction port (to intake) 7. Breather pipe 11-8 95-2 SERIES...
- Page 44 Cylinder head Head cover • Float mount type • Direct fuel injection type • Unitized type • 2 valves (1 cylinder) • Injection nozzle: Assembled outside head cover Mount: Dry type (without sleeve) • Glow plug installed 11-9 95-2 SERIES...
- Page 45 5. Camshaft bushing (No. 2 journal) 2. Main bearing cap bolt 6. Camshaft bushing (No. 3 journal) 3. Camshaft bushing (No. 1 journal) 7. Oil pump drive shaft bushing 4. Cylinder block 8. Oil pump driven shaft 11-10 95-2 SERIES...
- Page 46 STRUCTURE AND FUNCTION ENGINE BODY Specifications Cylinder block • Crankshaft: 5 bearings • Camshaft: 3 bearings Cylinder • Linerless • Inside surface finishing: Honing 11-11 95-2 SERIES...
- Page 47 15. Connecting rod cap bolt 16. Main cap 5. Connecting rod 17. Main cap bolt 6. Cylinder block 18. Cam bushing 7. Piston 8. Connecting rod bushing a. Offset 9. Piston pin b. Re-entrant 10. Top ring 11. Second ring 11-12 95-2 SERIES...
- Page 48 (When the piston is assembled at the manufacturing plant, an L or S size pis- ton is selected to match the inside di- ameter of the cylinder, but parts sup- plied for piston replacement are all as- sembled with S size pistons.) 11-13 95-2 SERIES...
- Page 49 3. Crankshaft gear (No. of teeth: 24) 8. Idler gear bushing 4. Idler gear (No. of teeth: 48) 9. Front seal 5. Fuel Injection pump drive gear (No. of teeth: 48) A, B, C: Match marks for timing gears 11-14 95-2 SERIES...
- Page 50 STRUCTURE AND FUNCTION ENGINE BODY Specification Front oil seal • Single lip with dust seal 11-15 95-2 SERIES...
- Page 51 13. Rocker arm spring 5. Push rod 14. Rocker arm bracket 6. Exhaust valve 15. Rocker arm shaft 7. Intake valve 16. Adjustment screw 8. Valve spring 17. Locknut 9. Valve seal (intake and exhaust side) 18. Rocker arm 11-16 95-2 SERIES...
- Page 52 STRUCTURE AND FUNCTION ENGINE BODY VALVE TIMING 4D95LE-2 Specifications Valve lift • Intake valve: 9.6 mm • Exhaust valve: 10.6 mm 11-17 95-2 SERIES...
- Page 53 1. Starting motor 2. Flywheel housing 3. Crankshaft 4. Rear oil seal (Wet type: Double lip) 5. Flywheel 6. Ring gear (No. of teeth: 119) 7. Engine speed sensor 11-18 95-2 SERIES...
- Page 54 STRUCTURE AND FUNCTION ENGINE BODY 11-19 95-2 SERIES...
- Page 55 9. Piston 2. Oil pan 10. Intake, exhaust valve 3. Oil cooler 11. Rocker arm 4. Regulator valve 12. Timing gears 5. Oil filter 13. Fuel injection pump 6. Safety valve 7. Crankshaft W: Cooling water 8. Camshaft 11-20 95-2 SERIES...
- Page 56 4. Oil pump drive gear (No. of teeth: 21) 5. Drive shaft Regulator valve 6. Driven shaft • Set pressure: 588 ± 49 kPa {6.0 ± 0.5 kg/cm 7. Driven gear (No. of teeth: 7) 8. Regulator valve 9. Valve spring 11-21 95-2 SERIES...
- Page 57 STRUCTURE AND FUNCTION LUBRICATION SYSTEM OIL FILTER 1. Relief valve Specifications Relief valve 2. Cartridge • Cracking pressure: 3. Bracket 100 ± 20 kPa {1 ± 0.2 kg/cm A. Oil inlet B. Oil outlet 11-22 95-2 SERIES...
- Page 58 STRUCTURE AND FUNCTION LUBRICATION SYSTEM OIL FILTER MOUNT 1. Cartridge 2. Bracket 11-23 95-2 SERIES...
- Page 60 FUEL SYSTEM FUEL SYSTEM CHART 4D95LE-2 (WITH AUTOMATIC AIR BLEED MECHANISM) 1. Fuel tank 2. Gauze filter 3. Priming pump 4. Feed pump 5. Fuel filter 6. Overflow valve 7. Fuel injection pump 8. Fuel injection nozzle 11-25 95-2 SERIES...
- Page 61 4. Fuel injection pump drive gear 11. Fuel injection pipe (No. 3) (No. of teeth 48) 12. Fuel injection pipe (No. 4) 5. Pump holder 13. Governor 6. Fuel injection pump 14. Spill tube 7. Fuel filter 11-26 95-2 SERIES...
- Page 62 Type: Bosch type PES-A D. To fuel injection nozzle • Lubrication method: E. To fuel tank Forced lubrication with engine oil F. From oil pump (Lubrication oil) G. To fuel tank Governor • Type: Bosch RSV, Centrifugal, all-speed type 11-27 95-2 SERIES...
- Page 63 5. Spring seat (there are two types) • Cracking pressure adjustment: 6. Retaining cap shim adjustment 7. Nozzle body 8. Needle valve A. Fuel inlet port (from injection pump) B. Fuel spray (inside cylinder) C. Fuel return port (to fuel tank) 11-28 95-2 SERIES...
- Page 64 STRUCTURE AND FUNCTION FUEL SYSTEM FUEL FILTER 1. Overflow Specification 2. Filter bracket • Filtration area: 0.15 m 3. Cartridge A. Fuel inlet B. Fuel outlet 11-29 95-2 SERIES...
- Page 65 • The fuel injection amount is controlled by fuel control lever (4) when the engine is run- ning. • Adjust length of rod when installing the fuel solenoid valve (see TESTING AND ADJUST- ING). 11-30 95-2 SERIES...
- Page 66 STRUCTURE AND FUNCTION COOLING SYSTEM COOLING SYSTEM CHART 1. Radiator 2. Thermostat 3. Water temperature sensor 4. Water pump 5. Water manifold 6. Cylinder head 7. Piston 8. Cylinder block 11-31 95-2 SERIES...
- Page 67 Type: Centrifugal type (V-belt drive) 3. Water seal 4. Pump body 5. Boss 6. Drive shaft A. Water inlet port (from radiator) B. Water inlet port (from thermostat) C. Water outlet port (from engine) D. Water outlet port (from radiator) 11-32 95-2 SERIES...
- Page 68 Outside diameter of pulley 5. Fan pulley d. Heater pickup port 6. Crankshaft pulley e. Thermo sensor (installed on some models) 7. Crankshaft Water temperature gauge pickup port 8. Thermostat case cover 9. Thermostat 10. Thermostat case 11. Alternator 11-33 95-2 SERIES...
- Page 69 STRUCTURE AND FUNCTION COOLING SYSTEM FAN DRIVE fl The diagram shows the PC78US-6. Outer diameter of pulley (mm) Engine Applicable machine a (Fan) b (Alternator) c (Crankshaft) PC60-7 4D95LE-2 PC75UU-3, BR100JG-2 PC78US-6, PC78UU-6 11-34 95-2 SERIES...
- Page 70 2. Case It allows the engine water temperature to 3. Pellet rise in a short time. 4. Seat 5. Valve 6. Case 7. Spring 8. Bypass spring 9. Bypass valve 10. Bypass seat 11. E-ring 12. Jiggle valve 11-35 95-2 SERIES...
- Page 71 STARTING AND CHARGING SYSTEM ELECTRICAL CIRCUIT DIAGRAM 4D95LE-2 1. Battery 6. Glow plug 2. Starting motor 7. Oil pressure caution lamp 3. Alternator 8. Oil pressure switch 4. Starting switch 9. Water temperature gauge (electrical type) 5. Glow signal 10. Thermo sensor 11-36 95-2 SERIES...
- Page 72 Nikko Denki, open type 24 V, 25 A PC75UU-3 Nikko Denki, open type 24 V, 25 A 4D95LE-2 PC78US-6, PC78UU-6 Nikko Denki, open type 24 V, 25 A BR100JG-2 Nikko Denki, open type 24 V, 25 A 11-37 95-2 SERIES...
- Page 73 (sealed type, 2 pins connector, x type) No. of Weight Engine Machine model Type Specification pinion teeth (kg) PC60-7 PC75UU-3 Hitachi sealed type 24 V, 3 kW 4D95LE-2 PC78US-6, PC78UU-6 BR100JG-2 Nikko Denki, sealed type 24 V, 3 kW 11-38 95-2 SERIES...
- Page 74 GLOW PLUG (METAL 2-WIRE TYPE GLOW PLUG) 1. Heat generation coil (Fe-Cr) 2. Control coil (Fe) 3. Body 4. Rated voltage color marking Specification Rated voltage (color marking) Type Name 24 V (Red) Standard type Self-control type ceramic glow plug 11-39 95-2 SERIES...
- Page 75 Use these values for reference together with the repair and operation history of the machine when judging failures. 3. Do not use this standard values table as a standard for judging claims. 12-1 12-1 95-2 SERIES...
- Page 76 (5), and adjust the clearance with the adjust- ment screw until the thickness gauge can slide lightly. 5. After the clearance is properly adjusted, tighten the lock nut to secure the adjustment screw. 3 Lock nut: 44 ± 5.0 Nm {4.5 ± 0.5 kgm} 12-2 95-2 SERIES...
- Page 84 4. Check that solenoid (1) is attracted, then con- nect rod end (5) to stop lever (6), and adjust the length of rod (4) so that the stop lever contacts the end of the lever at the constant end. 12-10 95-2 SERIES...
- Page 85 5. Tighten nut (7) at the connection of stop lever (6) and rod end (5), then install a split pin. fl Install the rod end so that greasing port (8) is at the top. 2 Rod end: Grease (G2-LI) 12-11 12-11 95-2 SERIES...
- Page 87 TESTING AND ADJUSTING FUEL INJECTION PUMP CALIBRATION DATA FUEL INJECTION PUMP CALIBRATION DATA Engine model Pump assembly No. Engine serial No. Applicable machine Page 6204-73-1340 PC60-7, PC75UU-3, BR100JG-2 12-14 6204-73-1350 PC78US-6, PC78UU-6 12-15 4D95LE-2 12-13 95-2 SERIES...
- Page 88 B to E are the reference volume 10.2 1,050 fl56.0±1 ±2.5 fl48.4 when adjusting (Basic point) the injection 10.95 fl57.0±2 – fl62.0 volume. approx. 6.6 fl8.0±1 ±15 fl8.0 ‡ Marks fl are average volumes. fl60±5 – fl80 Governor Performance Curve 12-14 12-14 95-2 SERIES...
- Page 89 B to E are the reference volume fl42.4±1 ±2.5 fl52 when adjusting (Basic point) the injection 10.15 fl44.3 – fl62.5 volume. approx. 7.3 fl18±1 ±15 fl18 ‡ Marks fl are average volumes. – fl60±5 – fl80 Governor Performance Curve 12-15 95-2 SERIES...
- Page 90 {9.8} {17.7} {39.4} Running time min. Engine speed rpm Load {kg} Flywheel horsepower {HP} Running time min. Engine speed rpm Load {kg} Flywheel horsepower {HP} Running time min. Engine speed rpm Load {kg} Flywheel horsepower {HP} 12-41 12-41 95-2 SERIES...
- Page 91 High idling speed Low idling speed Flywheel horsepower Maximum torque High idling speed Low idling speed Flywheel horsepower Maximum torque High idling speed Low idling speed Flywheel horsepower Maximum torque High idling speed Low idling speed 12-70 12-70 95-2 SERIES...
- Page 92 Max. 650 {23.4 – 25.1}(Gross) {3.5 – 5.0} — — — 80 – 95 90 – 110 0.34 – 0.54 — {3.5 – 5.0} — — — 80 – 95 80 – 110 Min. 0.18 {1.8} — 12-71 95-2 SERIES...
-
Page 99: Starting Performance Is Poor (Starting Always Takes Time)
When control rack is pushed, it is found to be heavy or does not return (when blind cover at rear of pump is removed, it can be seen that plunger control sleeve does not move) When fuel cap is inspected directly, it is found to be clogged Remedy 12-107 12-107 95-2 SERIES... -
Page 100: Engine Does Not Start
When ring gear is inspected directly, tooth surface is found to be chipped Does not move even when fuel cut solenoid linkage is disconnected Does not move even when engine stop motor linkage is disconnected Remedy — 12-108 12-108 95-2 SERIES... -
Page 101: Engine Turns But No Exhaust Smoke Comes Out (Fuel Is Not Being Injected)
When feed pump strainer is inspected directly, it is found to be clogged When fuel cap is inspected directly, it is found to be clogged Does not move even when fuel cut solenoid linkage is disconnected Does not move even when engine stop motor linkage is disconnected Remedy 12-109 12-109 95-2 SERIES... -
Page 102: Exhaust Smoke Comes Out But Engine Does Not Start (Fuel Is Being Injected)
When feed pump is operated, operation is too light or too heavy Speed does not change when operation of certain cylinders is stopped When fuel cap is inspected directly, it is found to be clogged Remedy 12-110 12-110 95-2 SERIES... -
Page 103: Engine Does Not Pick Up Smoothly
When valve clearance is checked directly, it is found to be outside standard value When fuel cap is inspected directly, it is found to be clogged When feed pump is operated, operation is too light or too heavy Remedy 12-111 12-111 95-2 SERIES... -
Page 104: Engine Stops During Operations
When feed pump strainer is inspected directly, it is found to be clogged Check feed pump directly When control rack is pushed, it is found to be heavy or does not return — Remedy 12-112 12-112 95-2 SERIES... -
Page 105: Engine Does Not Rotate Smoothly (Hunting)
When fuel cap is inspected directly, it is found to be clogged When feed pump strainer is inspected directly, it is found to be clogged When fuel filter, strainer are inspected directly, they are found to be clogged Remedy 12-113 12-113 95-2 SERIES... -
Page 109: Oil Becomes Contaminated Quickly
When oil cooler is inspected directly, it is found to be clogged Turbocharger drain tube is clogged Excessive play of turbocharger shaft When safety valve is directly inspected, spring is found to be catching or broken Remedy — 12-117 12-117 95-2 SERIES... - Page 111 Pressure-tightness test of oil cooler shows there is leakage Pressure-tightness test of cylinder head shows there is leakage Remove cylinder head and inspect directly Remove oil pan and inspect directly Remedy 12-119 12-119 95-2 SERIES...
-
Page 112: S-I 2 Oil Pressure Caution Lamp Lights Up (Drop In Oil Pressure)
There is catching of relief valve or regulator valve, spring or valve guide is broken When oil level sensor is replaced, oil pressure sensor lamp goes out When oil pressure is measured, it is found to be within standard value — Remedy 12-120 12-120 95-2 SERIES... -
Page 113: S-I 3 Oil Level Rises (Water, Fuel In Oil)
When main pump is removed, seal is found to be damaged Remove head cover and inspect directly Remove fuel injection pump and inspect directly Defective contact of thermostat seal valve Remove oil pan and check directly Remedy 12-121 12-121 95-2 SERIES... -
Page 116: S-I 6 Vibration Is Excessive
When radial runout, face runout are measured, they are found to be outside standard value Remove front cover and inspect directly Remove head cover and inspect directly Fuel injection pump test shows that fuel injection amount is incorrect Remedy 12-124 12-124 95-2 SERIES... -
Page 118: Testing And Adjusting Data
60N{6kg} fl This STANDARD VALUE TABLE does not give the standard value for adjusting the engine output. Do not use the values in this table to change the setting for fuel injection pump. 12-126 12-126 95-2 SERIES... - Page 119 1,850 ± 55 7 – 10 fl This STANDARD VALUE TABLE does not give the standard value for adjusting the engine output. Do not use the values in this table to change the setting for fuel injection pump. 12-127 12-127 95-2 SERIES...
- Page 122 23. Main cap ..........13-13 25. Engine assembly ........13-29 24. Crankshaft ..........13-14 26. Fan, exhaust pipe, muffler, 25. Tappet ............. 13-14 engine oil tubes, block, cover ....13-30 26. Cylinder block assembly ....... 13-14 13-3 13-3 95-2 SERIES...
- Page 124 3) Remove 3 nuts of glow plug, then remove 3 each of wiring connector (4), lead (5), and plug (6). 5. Injection nozzle 1) Remove spill hoses (1). 2) Remove 4 nozzle holders (2), then remove 4 injection nozzles (3) from cylinder head. 13-5 13-5 95-2 SERIES...
- Page 137 The bolt can be used a maximum of five times. Always re- place any bolt that already has five punch marks. fl After assembling the connecting rods, check that the crankshaft ro- tates smoothly. 13-18 13-18 95-2 SERIES...
- Page 144 fl The push rods use the same part for both the intake and exhaust sides. fl If there is no abnormality in the push rod, assemble it to the same position as it was at disassembly. 13-25 13-25 95-2 SERIES...
- Page 146 40.0 ± 4.9 Nm {4.1 ± 0.6 kgm} fl Coat the gasket sealant in a line with a width of approximately ø1 mm. 20. Injection nozzle 1) Install dust seal (4) to nozzle holder. 2) Install copper gasket (5) to nozzle holder. 13-27 13-27 95-2 SERIES...
- Page 147 1) Install engine oil filter (7) to engine block together with tube. 2) Fit fuel filter assembly (6) to intake mani- fold, and install fuel hoses (5) to fuel injec- tion pump. 13-28 13-28 95-2 SERIES...
- Page 151 15 – 20 {1.5 – 2.0} plug Retighten Tightening torque of 2.2 {0.225} 2.0 – 2.5 {0.2 – 0.25} terminal nut Tightening torque of head 8.8 {0.9} 7.8 – 9.8 {0.8 – 1.0} cover mounting bolt 14-2 14-2 95-2 SERIES...
- Page 152 153 ± 14.7 40.5 (Red) {15.6 ± 1.5} {13.0} Out-of-square of valve Repair limit: 18.5° spring Standard size Tolerance Driving-in height of valve Correct guide 14.5 ± 0.2 fl 4D95LE-2 engine: No valve seat insert (EX, IN) 14-3 14-3 95-2 SERIES...
- Page 160 37.2 – 41.2 1st step 39.2 (4) connecting rod cap {3.8 – 4.2) mounting bolts Retighter (Coat bolt threads and +30° 2nd step Retighten with 90° washers with engine oil) Tightening bolt for plastic region rotation angle 14-11 14-11 95-2 SERIES...
- Page 164 95°C and 77°C for 4 – 5 minutes Fully open temperature: 95°C Thermostat (when immersed in hot water bath Fully open lift: Min. 8 at 95°C for 4 – 5 minutes)) 14-15 14-15 95-2 SERIES...
- Page 172 3 Bolt: 98 – 123.5 Nm {10 – 12.5 kgm} After press fitting, tighten the bolts fully within 2 minutes, and be sure that the cam gear temperature has not gone down. 15-8 15-8 95-2 SERIES...
- Page 173 Max. 200°C Heating time: Min. 45 minutes 3) Set the chamfered face of the ring gear fac- ing the flywheel, and press fit until the side face of the gear is in tight contact with the flywheel. 15-9 15-9 95-2 SERIES...
- Page 174 fl If the above test shows any cracks in the nozzle holder or around the plate plugs, replace the cylinder head. fl If cracks are found in any other places, weld to repair. 15-10 15-10 95-2 SERIES...
- Page 175 (SPECIAL RESTORATION PART) Cylinder liner • The 95-2 Series engine has a liner-less cylinder, so if the cylinder bore exceeds 95.40 mm be- cause of wear, the cylinder is bored, and this cylinder liner is used to restore the cylinder.
- Page 176 REPAIR AND REPLACEMENT OF PARTS MACHINING DRAWING FOR CYLINDER BLOCK BORE MACHINING DRAWING FOR CYLINDER BLOCK BORE • Honing 15-12 15-12 95-2 SERIES...
- Page 177 7. Remove the cam shaft, then install the taper plug for the oil hole, the µ-plug (replace with a new part), and the oil pressure caution switch to the cylinder block. 15-13 15-13 95-2 SERIES...
- Page 178 2) The part number does not change when there is change in the surface treatment of the crankshaft, but as shown above, the crankshaft pin bearing is changed at the same time. 15-14 15-14 95-2 SERIES...
- Page 179 After press fitting the bushing, machine the in- side diameter of the bushing with a reamer or honing machine in accordance with the mainte- nance standard. fl After machining, clean all the metal parti- cles from the oil hole and oil groove. 15-15 15-15 95-2 SERIES...
Need help?
Do you have a question about the 95-2 Series and is the answer not in the manual?
Questions and answers