Table of Contents
Advertisement
Quick Links
Advertisement
Table of Contents

Related Manuals for Husqvarna 525iRXT


Summary of Contents for Husqvarna 525iRXT
- Page 1 525iRXT Operator's manual 2-27...
-
Page 2: Table Of Contents
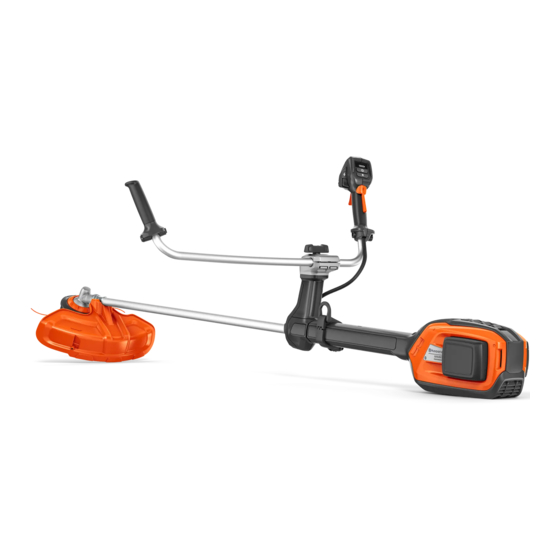
Contents Introduction..............2 Transportation, storage and disposal......23 Safety................4 Technical data.............. 24 Assembly..............12 Accessories..............25 Operation..............17 Registered trademarks..........25 Maintenance..............21 Declaration of Conformity..........26 Troubleshooting............23 Appendix ..............28 Introduction Product description Note: National or local regulations can set limit to the operation of the product. - Page 3 1. Grass blade 2. Trimmer head E35B 3. Shaft Maximum speed or no-load speed. 4. Balance XB Harness 5. Knob XXXX /min Revolutions or reciprocations per mi- 6. Handlebar or min nute. 7. Handle 8. Power trigger 9. Power trigger lockout 10.
-
Page 4: Safety
Symbols on the product or its packaging Manufacturer indicate that this product cannot be handled as domestic waste. This product Husqvarna AB must be deposited at an appropriate recycling facility. Drottninggatan 2, SE-561 82 Huskvarna, Sweden, tel: +46-36-146500... - Page 5 • Do not expose power tools to rain or wet conditions. • Do not use the power tool if the switch does not Water entering a power tool will increase the risk of turn it on and off. Any power tool that cannot be electric shock.
- Page 6 • Do not expose a battery pack or tool to fire • While operating the machine, always wear long or excessive temperature. Exposure to fire or trousers. Exposed skin increases the likelihood of temperature above 130 °C may cause explosion. injury from thrown objects.
- Page 7 • When transporting or storing the machine, always • Do a check of the product before use. Refer to, fit the cover on metal blades. Proper handling of Safety on page 4 and Maintenance on page 21 . Do the machine will reduce the likelihood of accidental not use a defective product.
- Page 8 or the cutting equipment rotates, as this can result in you are able to call for help in the event of an serious injury. accident. • Keep in mind that it is you, the operator that is • Make sure that you can move and stand safely. responsible for not exposing people or their property Check the area around you for possible obstacles to accidents or hazards.
- Page 9 EU countries.Use visor for face protection. Visor is CAUTION: All servicing and repair work not enough to protect the eyes. on the machine requires special training. This is especially true of the machine′s safety equipment. If your machine fails any of the checks described below you must contact your service agent.
- Page 10 3. Make sure that the power trigger and the lock moves decreases the vibration from the cutting attachment to freely and that the return spring operates correctly. the handlebar and handles. To start the product on 4. Start the product, refer to page 18 .
- Page 11 4. If the harness has a hip pad and a hip strap, make sure that the quick release function operates correctly. • To attach, tighten the locknut in the opposite To do a check of the cutting attachment guard direction to the direction of rotation of the cutting WARNING: attachment.
-
Page 12: Assembly
• Remove the battery from the product before you assemble the product. • Use approved protective gloves. • A defective or incorrect guard can cause injury. Do not use a cutting attachment that does not have an approved guard attached. •... - Page 13 2. Attach the handle onto the handlebar. 4. Tighten the knob fully. To put the handlebar in transport position 1. Loosen the knob. 2. Turn the handlebar until it is parallel to the shaft. 3. Align the screw hole in the handle with the screw hole in the handlebar.
- Page 14 To remove the cutting attachment WARNING: Always use the cutting guard attachment guard that is recommended for Accessories on the cutting attachment. See • Loosen the bolt and remove the cutting attachment page 25 . guard (A) from the shaft. WARNING: An incorrectly attached cutting attachment can result in injury or...
- Page 15 7. Tighten the nut with the socket wrench. Hold the 5. Install the nut (G). shaft of the socket wrench near the blade guard. Tighten in the opposite direction to how the cutting attachment rotates. Tighten it to a torque of 35-50 To remove the grass blade 6.
- Page 16 3. Remove the nut that holds the trimmer head and the 5. Adjust the shoulder strap until the weight is equal on drive disc. the 2 shoulders. 6. Adjust the height of the suspension point. Refer to To balance the product on page 17 . 4.
-
Page 17: Operation
To connect the battery to the product WARNING: Only use Husqvarna original batteries with the product. 1. Make sure that the battery is fully charged. 2. Push the battery into the battery holder of the product. - Page 18 • Examine the support flange for cracks. Replace the 1. Push and hold the start button until the green battery support flange if it is damaged. LED and the white mode LED comes on. • Make sure that the locknut can not be removed 2.
- Page 19 when you hit objects, for example, stones and/or hard 4. If the blade is angled to the left when clearing grass, the grass will collect in a line, which makes it easier surfaces. to collect, e.g. by raking. • Push the ErgoFeed button to start the automatic 5.
- Page 20 Husqvarna Fleet Services is a cloud solution that gives the commercial fleet manager an overview of all ™ products. Husqvarna Fleet Services can be added to 525iRXT. For more information about Husqvarna Fleet ™ Services , refer to www.husqvarna.com. ® Bluetooth wireless technology ®...
-
Page 21: Maintenance
To lubricate the Make sure that the bevel gear is filled correctly with grease, see bevel gear on page 22 . If not, use Husqvarna bevel gear grease. Lubricate the drive shaft end in the lower shaft coupling. 1796 - 002 - 06.12.2022... - Page 22 • Use a single-cut flat file. 5. If the grease level is too low fill the bevel gear with Husqvarna bevel gear grease. Fill slowly and turn the drive shaft as you apply the bevel gear grease, WARNING: Always discard a blade stop at the correct level (B).
-
Page 23: Troubleshooting
Troubleshooting User interface LED display Possible faults Possible action Battery LED indicator flashes or- Low battery voltage. Charge the battery. ange Red error LED flashes Overload. The cutting attachment is jammed. deacti- vate the product. Remove the battery. Clean the cutting attachment from unwanted mate- rials. -
Page 24: Technical Data
Technical data Technical data 525iRXT Motor Motor type Husqvarna e-torq BLDC Speed of output shaft. Trimmer head/blade, n 5500/7200 Cutting width, mm/in 450/18.1 Weight Weight without battery, kg/lb 4.2/9.1 Noise emissions Sound power level, measured dB (A) Sound power level, guaranteed L... -
Page 25: Accessories
590 11 42-01 Balance XB 597 46 93-01 Registered trademarks ® Bluetooth word mark and logos are registered Bluetooth SIG, inc. and any use trademarks owned by of such marks by Husqvarna is under license. 1796 - 002 - 06.12.2022... -
Page 26: Declaration Of Conformity
Declaration of Conformity EU Declaration of Conformity We, Husqvarna AB, SE-561 82 Huskvarna, Sweden, tel: +46-36-146500, declare on our sole responsibility that the product: Description Battery-operated brushcutter / grass trimmer Brand Husqvarna Type / Model 525iRXT Identification Serial numbers dating from 2023 and onwards... - Page 27 UK Declaration of Conformity We, Husqvarna AB, SE-561 82 Huskvarna, Sweden, tel: +46-36-146500, declare on our sole responsibility that the product: Description Battery-operated brushcutter / grass trimmer Brand Husqvarna Type / Model 525iRXT Identification Serial numbers dating from 2023 and onwards...
-
Page 28: Appendix
T35, T35x 8,5 m 10 cm 4" 4,3 m "Click" 15 cm 6" 1796 - 002 - 06.12.2022... - Page 29 E35B Li-ion A 2,4 mm / .095 B 8,5 m / 28' C 15 cm / 6" "Clic" 15 cm 6" 1796 - 002 - 06.12.2022...
- Page 30 1796 - 002 - 06.12.2022...
- Page 31 1796 - 002 - 06.12.2022...
- Page 32 Original instructions 1143026-26 2022-12-13...