Table of Contents
Advertisement
Available languages
Available languages
Quick Links
Advertisement
Chapters
Table of Contents

Summary of Contents for Proline PIH6600
- Page 1 PLAQUE DE CUISSON À INDUCTION INDUCTIEKOOKPLAAT PI H660 0...
-
Page 3: Table Of Contents
TABLE DES MATIÈRES CONSIGNES DE SÉCURITÉ IMPORTANTES........p.02 DESCRIPTION..................p.07 PRINCIPE DE FONCTIONNEMENT DE L’INDUCTION......p.08 INSTALLATION..................p.09 CONNEXION ÉLECTRIQUE..............p.12 FONCTIONNEMENT................p.15 NETTOYAGE ET ENTRETIEN.............p.20 GUIDE DE DÉPANNAGE..............p.21 FICHE DE DONNÉES TECHNIQUES...........p.23 MISE AU REBUT..................p.25... - Page 4 MISES EN GARDE IMPORTANTES MERCI DE BIEN VOULOIR LIRE LES CONSIGNES DE SÉCURITÉ ATTENTIVEMENT AVANT D’UTILISER L’APPAREIL ET CONSERVER POUR RÉFÉRENCE ULTÉRIEURE. Avertissements • Cet appareil est destiné à être utilisé dans des applications domestiques et analogues telles que: - les coins cuisines réservés au personnel des magasins, bureaux et autres environnements professionnels;...
- Page 5 • MISE EN GARDE: Les parties accessibles peuvent devenir chaudes au cours de l’utilisation. • Il est recommandé d’éloigner les jeunes enfants. • Ces surfaces sont susceptibles de devenir chaudes. • Ne pas utiliser un nettoyeur à vapeur pour les opérations de nettoyage.
- Page 6 • Un moyen de déconnexion du réseau d’alimentation ayant une distance d’ouverture des contacts de tous les pôles doit être prévu dans la canalisation fixe conformément aux règles d’installation. • L’appareil doit être installé en respectant les règles nationales d’installation électrique NF C 15-100. •...
- Page 7 • Ne touchez pas ses surfaces chaudes. • N’utilisez jamais la plaque de cuisson comme surface de rangement ou comme un plan de travail. • Ne laissez jamais un objet ou un ustensile autre qu’un ustensile de cuisson approprié sur l’appareil. •...
- Page 8 les orifices de ventilation. • N’utilisez pas la plaque à induction sur une moquette, un tapis, une nappe ou du papier fin pour éviter de boucher les orifices d’entrée et de sortie d’air, ce qui pourrait gêner l’émission de chaleur. •...
-
Page 9: Description
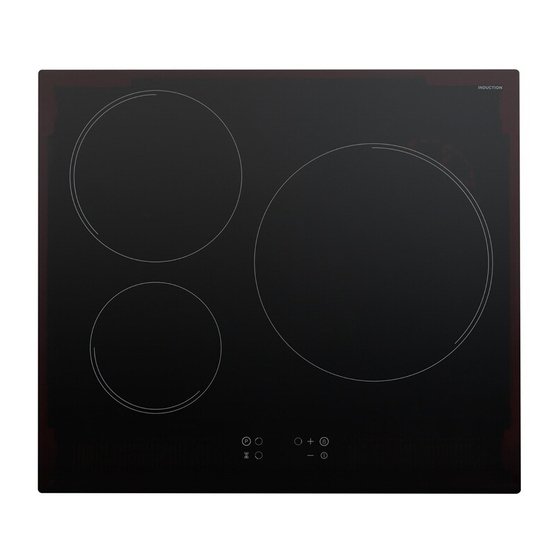
DESCRIPTION Vue supérieure 1. Zone de cuisson à induction 1300 W, avec Fonction d’ampli cation de puissance 1500 W 2. Zone de cuisson à induction 2300 W, avec Fonction d’ampli cation de puissance 2600 W 3. Zones de cuisson à induction 2600 W, avec Fonction d’ampli cation de puissance 3000 W 4. -
Page 10: Principe De Fonctionnement De L'induction
PRINCIPE DE FONCTIONNEMENT DE L’ INDUCTION Une bobine d’induction se trouve sous chaque zone de cuisson. Lorsqu’une zone de cuisson est allumée, cette bobine créé un champ magnétique qui impacte directement le fond de l’ustensile de cuisson approprié, ce qui provoque instantanément une accumulation de chaleur permettant de cuire les aliments. -
Page 11: Installation
INSTALLATION Découpez un trou dans le plan de travail aux dimensions indiquées sur le schéma ci-dessous. Un espace minimal de 50 mm doit être laissé tout autour du trou. Le plan de travail doit avoir une épaisseur d’au moins 30 mm et être constitué... - Page 12 A (mm) B (mm) C (mm) Min. 50 Min. 20 Entre d’air Sortie d’air 5 mm AVERTISSEMENT : Assurez une ventilation appropriée. Veillez à ce que la plaque à induction soit bien ventilée et à ce que ses entrées et sorties d’air ne soient pas bouchées. Si des tiroirs sont installés sous la plaque de cuisson, le dessous de la plaque de cuisson peut parfois devenir chaud.
- Page 13 Mises en garde : • La plaque de cuisson doit être installée par une personne agréée et qualifiée. N’essayez jamais d’installer l’appareil vous-même. • Une installation incorrecte peut provoquer des dommages matériels et des blessures corporelles pour lesquels le fabricant rejette toute responsabilité.
-
Page 14: Connexion Électrique
CONNEXION ÉLECTRIQUE Attention ! • La plaque de cuisson doit être installée par un électricien qualifié en respectant les normes et réglementations locales concernant les câbles électriques. • Avant tout travail sur une partie électrique de l’appareil, celui-ci doit être débranché du secteur. •... - Page 15 Jaune/Vert Noir Marron Bleu AVERTISSEMENTS : • Avant de brancher l’appareil au secteur, assurez-vous que : L’appareil est relié à la terre et la prise est conforme à la loi. La prise peut supporter la tension et la puissance maximale de l’appareil, indiquées sur la plaque signalétique située au bas de l’appareil.
- Page 16 • Test des ustensiles de cuisson Pour tester si un ustensile est compatible avec l’induction : Mettez un peu d’eau dans l’ustensile de cuisson et placez-le sur une zone à induction. L’eau bout très rapidement sur la zone de cuisson réglée à...
-
Page 17: Fonctionnement
FONCTIONNEMENT Utilisation du panneau de contrôle • Les boutons sont tactiles, il n’est donc pas nécessaire d’exercer une pression. • Utilisez la pulpe du doigt et non le bout du doigt. • Vous entendez un bip sonore à chaque fois que la pression sur un bouton est détectée par l’appareil. - Page 18 Cuisson 1. Placez l’ustensile sur la zone de cuisson que vous souhaitez utiliser. 2. Appuyez sur l’écran de la zone de cuisson. 3. Appuyez plusieurs fois sur pour régler le niveau de puissance souhaité de 1 à 9. Guide des niveaux de puissance Les réglages de niveau ci-dessous ne sont fournis qu’à...
- Page 19 Indicateur de chaleur résiduelle Si la zone de cuisson est encore chaude, l’indicateur de chaleur résiduelle s’allumera une fois la plaque éteinte. Amplification de puissance Les zones de cuisson sont équipées d’un amplificateur de puissance. Pour activer cette fonction, appuyez et maintenez enfoncé durant environ 3 secondes.
- Page 20 4. Lorsque le compte à rebours est terminé, la plaque de cuisson émet un bip. Verrouillage de sécurité Lorsque les zones de cuisson fonctionnent, vous pouvez verrouiller le panneau de contrôle, sauf . Il empêche une modification accidentelle des réglages. •...
- Page 21 2. Faites chauffer une poêle à fond épais. 3. Brossez les deux côtés du steak avec de l’huile. Versez un peu d’huile dans la poêle chaude, puis placez la viande sur la poêle chaude. 4. Retournez le steak une seule fois pendant la cuisson. La durée de cuisson exacte dépend de l’épaisseur du steak et du degré...
-
Page 22: Nettoyage Et Entretien
NETTOYAGE ET ENTRETIEN Nettoyez la plaque après chaque utilisation. Risque de brûlure dû aux zones de cuisson chaudes. Les zones de cuisson restent chaudes après l’utilisation. Éteignez la plaque de cuisson. Laissez les zones de cuisson refroidir avant de nettoyer la plaque. Pour enlever la saleté... -
Page 23: Guide De Dépannage
GUIDE DE DÉPANNAGE Problème Causes possibles Solution possible Assurez-vous que la plaque est connectée à l’alimentation et que la prise secteur est activée. Vérifiez La plaque de cuisson Pas d’alimentation. qu’il n’y a pas de coupure de courant dans votre zone ne s’allume pas. - Page 24 Codes d’erreu Ces codes d’erreur sont uniquement indicatifs et tous les dysfonctionnements doivent être diagnostiqués et réparés par un technicien qualifié. Affichage Causes possibles Solution possible Panne du capteur de température de la plaque de verre - circuit ouvert Vérifiez la connexion ou remplacez le capteur de Défaillance du capteur de température de la plaque de verre.
-
Page 25: Fiche De Données Techniques
Voici la fiche technique de la plaque à induction domestique conformément à la réglementation n° 66 / 2014 de l’Union Européenne. Informations sur les plaques de cuisson domestiques Symbole Valeur Appareil PIH6600 Identification du modèle Encastré Type de plaque de cuisson Nombre de foyers et/ou de zones de cuisson Technologie de chauffe (foyers de cuisson et zones de cuisson à... - Page 26 Marque Proline Référence PIH6600 Catégorie Plaque à induction 3 zones Tension/Fréquence V/Hz 220-240V~ 50Hz or 60Hz Puissance totale nominale (W) 6600W Dimensions du produit (mm) (L x l x H) 590X520X62mm Poids net du produit (kg) 8.7 kg Fabriqué en...
-
Page 27: Mise Au Rebut
MISE AU REBUT DISPOSA En tant que distributeur responsable, nous accordons une grande importance à la protection de l’environnement. Nous vous encourageons à respecter les procédures correctes de mise au rebut de votre appareil, des piles et des éléments d’emballage. Cela aidera à... - Page 28 Etablissements Darty & fils ©, 9 Rue des Bateaux-Lavoirs, 94200 Ivry-sur-Seine, France 09/03/2022...
- Page 29 INHOUDSOPGAVE BELANGRIJKE VEILIGHEIDSINSTRUCTIES........p.28 OVERZICHT..................p.32 PRINCIPE VAN INDUCTIE..............p.33 INSTALLATIE..................p.34 ELEKTRISCHE AANSLUITING............p.37 WERKING....................p.40 REINIGING EN ONDERHOUD............p.45 PROBLEEMOPLOSSING..............p.46 TECHNISCH GEGEVENSBLAD............p.48 VERWIJDERING...................p.50...
-
Page 30: Belangrijke Veiligheidsinstructies
BELANGRIJKE VEILIGHEIDSINSTRUCTIES LEES DE VOLGENDE VEILIGHEIDSINSTRUCTIES AANDACHTIG DOOR VOORDAT U HET APPARAAT IN GEBRUIK NEEMT EN BEWAAR ZE VOOR TOEKOMSTIG GEBRUIK. Waarschuwingen • Dit apparaat is bestemd voor huishoudelijk gebruik of gelijksoortige toepassingen zoals: - personeelskeukens winkels, kantoren andere werkomgevingen; - boerderijen;... - Page 31 • Deze oppervlakken kunnen heet worden. • Gebruik geen stoomreiniger. • Plaats geen metalen voorwerpen zoals messen, vorken, lepels of deksels op de kookplaat, deze kunnen warm worden. • Na gebruik, schakel de kookveld uit via de bedieningsknop en vertrouw niet enkel op de pandetector. •...
- Page 32 “INSTALLATIE” raadplegen. • Voor de bevestigingsmethode en het aansluiten van de kabels, raadpleeg de sectie “ELEKTRISCHE AANSLUITING”. • Voor gedetailleerde instructies en waarschuwingen om het apparaat op een juiste manier te gebruiken en te onderhouden en het vervangen van de lamp, raadpleeg de secties “Werking”...
- Page 33 samengeperste artikelen, blikken of koffiepotten, om explosie door het uitzetten van de warmte te vermijden. • Om elk gevaar te vermijden, stop geen vreemde voorwerpen, zoals een ijzeren draad, in de luchtventilatieopeningen of de luchtinlaat en dek ze niet af. •...
-
Page 34: Overzicht
OVERZICHT Bovenaanzicht 1. Inductiekookveld 1300W, met Power-boostfunctie 1500W 2. Inductiekookveld 2300W, met Power-boostfunctie 2600W 3. Inductiekookveld 2600W, met Power-boostfunctie 3000W 4. Glasplaat 5. Bedieningspaneel Bedieningspaneel Vermogenniveau / Bedieningspaneel Tijd instellen knoppen Ver-/ontgrendelen knop Power-boost knop Weergave van timer Timer regelknop Aan/uit-schakelaar Kookveld-keuzetoetsen en scherm Vermogenniveau... -
Page 35: Principe Van Inductie
PRINCIPE VAN INDUCTIE Er bevindt zich een inductiespoel onder elk kookveld. Wanneer een kookveld wordt ingeschakeld, creëert deze spoel een magnetisch veld, wat voor een directe impact op de bodem van het gepaste kookgerei en een onmiddellijke warmteontwikkeling zorgt om de levensmiddelen te bereiden. Magnetisch circuit Plaat Inductiespoel... -
Page 36: Installatie
INSTALLATIE Maak een gat in het aanrecht volgens de afmetingen die in onderstaande afbeelding zijn weergegeven. Zorg voor een ruimte van minstens 50 mm rondom het gat. Het werkblad moet minstens 30 mm dik zijn en van een warmtebestendig materiaal zijn gemaakt. Opmerking: g i l j i z... - Page 37 A (mm) B (mm) C (mm) Min. 50 Min. 20 Luchtinlaat Luchtuitlaat 5mm WAARSCHUWING Zorg voor voldoende ventilatie Zorg dat de inductiekookplaat goed wordt geventileerd en dat de luchtinlaat en -uitlaat niet worden belemmerd. Als er zich laden onder de kookplaat bevinden, kan de onderkant van de kookplaat warm worden.
- Page 38 De beugels installeren Maak de kookplaat aan het aanrecht vast met behulp van de 4 beugels die zich aan de onderkant van de kookplaat bevinden. Waarschuwingen: • Laat de inductiekookplaat door een erkende en vakbekwame persoon installeren. Probeer nooit om het apparaat zelf te installeren. •...
-
Page 39: Elektrische Aansluiting
ELEKTRISCHE AANSLUITING Opgelet! • Laat de installatie van de kookplaat uitvoeren door een vakbekwame elektricien en overeenkomstig alle lokale richtlijnen en voorschriften inzake elektrische bedrading. • Voordat u elektrische werkzaamheden aan het apparaat uitvoert, moet u het ontkoppelen van de netvoeding. •... - Page 40 Geel/ groen Zwart Bruin Blauw WAARSCHUWINGEN: • Zorg er voordat u het apparaat op het stroomnet aansluit voor dat: Het apparaat is geaard en de stekker in overeenstemming met de wetten is. De aansluiting kan de spanning en het maximale vermogen van het apparaat, die staan vermeld op het typeplaatje aan de onderkant van het apparaat, weerstaan.
- Page 41 PANNEN • Geschikte pannen rvs-pannen met een magnetische bodem geëmailleerde stalen pannen gietijzeren pannen • Ongeschikte pannen rvs-pannen zonder een magnetische bodem aluminium of koperen pannen potten en pannen van glas, keramiek of aardewerk • De pannen testen. Om te testen of een pan voor inductie geschikt is: Giet een beetje water in een pan en plaats deze op een inductiekookveld.
-
Page 42: Werking
WERKING Het bedieningspaneel gebruiken • De toetsen reageren op aanrakingen. Het is dus niet nodig om enige druk uit te oefenen. • Gebruik de bal van uw vinger en niet de top. • U hoort een pieptoon telkens een aanraking wordt geregistreerd. •... - Page 43 3. Tik herhaaldelijk op of om het gewenste vermogenniveau 1 tot 9 in te stellen. Gids voor vermogenniveau Onderstaande niveau-instellingen dienen slechts ter referentie. De exacte instelling is afhankelijk van verschillende factoren, zoals uw gebruikte kookgerei en de hoeveelheid te koken levensmiddelen. Experimenteer met de inductiekookplaat om de meest gepaste instellingen te vinden.
- Page 44 Om deze functie te activeren, houd gedurende ongeveer 3 seconden. Wanneer deze functie is ingeschakeld, neemt het vermogen toe zodat het kookveld sneller wordt opgewarmd, bijv. voor het koken van water voor het bereiden van pasta. De power-boostfunctie is gedurende maximaal 5 minuten actief. Om deze functie uit te schakelen, tik opnieuw op .
- Page 45 • Om deze functie te activeren, tik op en het scherm geeft “Lo” weer. • Om deze functie te deactiveren, tik en houd uw vinger erop totdat het symbool „Lo“ verdwijnt. KOOKTIPS • Wanneer de levensmiddelen koken, verlaag de temperatuurinstelling. •...
- Page 46 Roerbakken 1. Kies een pan met een vlakke bodem die voor inductie geschikt is. 2. Zorg dat u alle ingrediënten en kookgerei bij de hand hebt. Roerbakken dient snel te gebeuren. Als u grote hoeveelheden wilt bakken, bak de levensmiddelen in verschillende bakbeurten. 3.
-
Page 47: Reiniging En Onderhoud
REINIGING EN ONDERHOUD Maak de kookplaat schoon na elk gebruik. Risico op brandwonden door de hete kookvelden. De kookvelden zijn heet na gebruik. Schakel de kookplaat uit. Laat de kookvelden afkoelen alvorens de kookplaat schoon te maken. Vuil van het glasoppervlak verwijderen Verwijder onmiddellijk : plastic of aluminiumfolie of voedsel met suiker. -
Page 48: Probleemoplossing
PROBLEEMOPLOSSING Problem Mogelijke oorzaak Mogelijke oplossing Zorg dat de kookplaat op de voeding is = a angesloten en onder stroom staat. Controleer of er geen stroomuitval is De kookplaat in uw woning of gemeente is. Als u Staat niet onder stroom. alles hebt gecontroleerd en het probleem is kan niet worden nog aanwezig, neem contact op met een... - Page 49 Foutcodes Deze foutcodes zijn louter indicatief. Alle fouten moeten door een vakbe-Kwame technicus gecontroleerd en gerepareerd worden. Scherm Mogelijke oorzaak Mogelijke oplossing Temperatuursensor van de glasplaat is defect - open circuit Controleer de aansluiting of vervang de Temperatuursensor van de temperatuursensor van de glasplaat.
-
Page 50: Technisch Gegevensblad
TECHNISCH GEGEVENSBLAD Hieronder vindt u de technische gegevens van de huishoudelijke inductiekookplaat volgens de EU-verordening nr. 66/2014. Informatie voor elektrische kookplaten voor huishoudelijk gebruik Symbool Waarde Toestel PIH6600 Modelidentificatie Inbouwkookplaat Type kookplaat Aantal kookzones en/of velden Verwarmingstechniek (inductie- Inductiekookvelden kookplaat, stralende kookvelden,... - Page 51 Proline Merk PIH6600 Referentie Inductiekookplaat met 3 kookvelden Categorie Spanning / frequentie V / Hz 220-240V~ 50Hz or 60Hz Nominaal - Totaal vermogen (W) 6600W Productafmetingen (mm) (L*B*H) 590X520X62mm Nettogewicht product (kg) 8.7 kg VOLKSREPUBLIEK CHINA Gemaakt in...
-
Page 52: Verwijdering
VERWIJDERING DISPOSA Als verantwoordelijke handelaar dragen we zorg voor het milieu. We moedigen u aan om de juiste verwijderingsprocedure voor uw apparaat en verpakkingsmateriaal te volgen. Dit draagt bij tot het behoud van de natuurlijke rijkdommen door deze te recyclen zodat zowel de menselijke gezondheid en het milieu worden beschermd. - Page 53 TABLE OF CONTENTS IMPORTANT SAFETY INSTRUCTIONS........p.52 OVERVIEW..................p.56 THE INDUCTION PRINCIPLE............p.57 INSTALLATION..................p.58 ELECTRICAL CONNECTION.............p.61 OPERATION..................p.64 CLEANING AND MAINTENANCE............p.69 TROUBLESHOOTING...............p.70 TECHNICAL DATA SHEET..............p.72 DISPOSAL..................p.74...
-
Page 54: Important Safety Instructions
IMPORTANT SAFETY INSTRUCTIONS PLEASE READ THE FOLLOWING SAFETY WARNINGS AND THE INSTRUCTIONS CAREFULLY BEFORE USING THE APPLIANCE AND KEEP FOR FUTURE REFERENCE. Warnings • This appliance is intended to be used in household and similar applications such as: - staff kitchen areas in shops, offices and other working environments;... - Page 55 • A steam cleaner is not to be used. • Metallic objects such as knives, forks, spoons and lids should not be placed on the hob surface since they can get hot. • After use, switch off the hob element by its control and do not rely on the pan detector.
- Page 56 “CLEANING and Maintenance”. • CAUTION: The cooking process has to be supervised. A short term cooking process has to be supervised continuously. • The plug must be remained easily accessible after installation of the appliance. Precautions • Do not place combustible material or products on the hob at any time.
- Page 57 • To avoid danger, do not place paper, aluminium foil, cloth or other unsuitable articles onto the induction hob heating plate for indirect heating. • When using the induction hob, place it horizontally and allow at least 10cm of free space between the sides and back of the induction hob and the wall.
-
Page 58: Overview
OVERVIEW Top View 1. Induction cooking zone 1300W, with Power Boost function 1500W 2. Induction cooking zone 2300W, with Power Boost function 2600W 3. Induction cooking zone 2600W, with Power Boost function 3000W 4. Glass plate 5. Control panel Control Panel Power level / Time Control panel lock / unlock button... -
Page 59: The Induction Principle
THE INDUCTION PRINCIPLE An induction coil is located under each cooking zone. When a cooking zone is switched on, this coil creates a magnetic field which impacts directly on the base of the suitable cookware, which causes an instant build-up of heat to cook the food. -
Page 60: Installation
INSTALLATION Cut a hole in the worktop of the dimension shown in the diagram below. A minimum of 50 mm space should be left around the hole. The worktop should be at least 30 mm thick and made of heat-resistant material. Note: The safety distance between the sides of the hob and the inner surfaces of the worktop should be at least 3 mm. - Page 61 A (mm) C (mm) B(mm) Min. 50 Min. 20 Air intake Air exit 5mm WARNING: Ensuring Adequate Ventilation Make sure the induction hob is well ventilated and the air inlet and outlet are not blocked. If drawers are fitted below the hob sometimes the underneath of the hob may get hot.
- Page 62 Cautions: • The induction hob must be installed by a qualified authorised person. Never try to install the appliance by yourself. • Incorrect installation may cause harm and damage to people or property, for which the manufacturer accepts no responsibility. •...
-
Page 63: Electrical Connection
ELECTRICAL CONNECTION Attention! • The hob must be installed by a qualified electrician in line with all local standards and regulations for electrical wiring. • Before any work on the electrical section of the appliance, it must be disconnected from the mains. •... - Page 64 WARNINGS: • Before connecting the appliance to the power supply, make sure that: The appliance is earthed and the plug is compliant with the law. The socket can withstand the voltage and maximum power of the appliance, which are indicated on the data plate located on the bottom of the appliance.
- Page 65 • Testing pans To test whether a pan is induction compatible: Put some water in a pan placed on an induction cooking zone. Water boils very quickly on the cooking zone set at the maximum power level. Hold a magnet to the base of the pan. If the magnet sticks, the pan is generally suitable.
-
Page 66: Operation
OPERATION Using the Control Panel • The buttons are touch-sensitive, so you do not need to apply any pressure. • Use the ball of your finger, not its tip. • You will hear a beep each time a touch is registered. •... - Page 67 Power level guideline The level settings below are for reference only. The exact setting will depend on several factors, including your cookware and the amount of food you are cooking. Experiment with the induction hob to find the settings that best suit you.
- Page 68 up quickly, e.g. when boiling water for cooking pasta. The boost in power is active for a maximum of 5 minutes. To deactivate this function, touch again. The cooking zone will automatically revert to the original set power level. Count down timer You can use the count down timer to set how long the cooking zone operates for one cooking session.
- Page 69 COOKING TIPS • When food comes to the boil, reduce the temperature setting. • Using a lid will reduce cooking times and save energy by retaining the heat. • Minimize the amount of liquid or fat to reduce cooking times. •...
- Page 70 3. Preheat the pan briefly and add two tablespoons of oil. 4. Cook any meat first and then put it aside and keep warm. 5. Stir-fry the vegetables. When they are hot but still crisp, turn the cooking zone to a lower power level, return the meat to the pan and add your sauce.
-
Page 71: Cleaning And Maintenance
CLEANING AND MAINTENANCE Clean the hob after each use. Risk of burning due to hot cooking zones. The cooking zones will be hot after use. Switch the hob off. Allow the cooking zones to cool down before cleaning the hob. To remove the dirt from the glass surface Remove immediately: plastic or aluminium foil, and food with sugar. -
Page 72: Troubleshooting
TROUBLESHOOTING Problem Possible Cause Possible Solution Make sure the hob is connected to the power supply and that it is switched on at the mains socket. Check whether there is a power outage The hob cannot No power. in your home or area. If you have checked be turned on. - Page 73 Error codes These error codes are for guidance only and all faults should be diagnosed and repaired by aqualified technician. Display Possible Cause Possible Solution Glass plate temperature sensor failure – open circuit Check the connection or replace the glass plate temperature sensor.
-
Page 74: Technical Data Sheet
Below is the sheet of household induction hob according to EU regulation No. 66 / 2014. Information for domestic electric hobs Symbol Value Unit PIH6600 Model identification Built-in hob Type of hob Number of cooking zones and/or areas Heating technology (induction cook-... - Page 75 Proline Brand PIH6600 Reference 3-zone induction hob Category Voltage/frequency V / Hz 220-240V~ 50Hz or 60Hz Rated – Total power (W) 6600W Product Size (mm)(L*W*H) 590X520X62mm Product Net weight (kg) 8.7 kg Made in...
-
Page 76: Disposal
DISPOSAL DISPOSA As a responsible company we care about the environment.As such we urge you to follow the correct disposal procedure for the appliance and packaging materials. This will help conserve natural resources and ensure that it is recycled in a manner that protects health and the environment. You must dispose of this appliance and its packaging according to local laws and regulations. - Page 77 Etablissements Darty & fils ©, 9 Rue des Bateaux-Lavoirs, 94200 Ivry-sur-Seine, France Déclaration UE de Conformité N°86202203 EU Declaration of Conformity EU- Conformiteitsverklaring Declaración UE de Conformidad Declaração UE de Conformidade Description du produit – Product Description: Productbeschrijving: Descripcion del producto: Descriçào do produto: Marque –...
- Page 78 Reference number Title 2014/30/EU EMC Directive (EMC) 2014/35/EU Low Voltage Directive (LVD) 2009/125/EC Eco design requirements for energy-related products (ErP) 2011/65/EU & (EU) 2015/863 RoHS EMC: LVD : EN 62233:2008 ErP : La présente déclaration de conformité est établie sous la seule responsabilité du fabricant. This declaration of conformity is drawn up under the sole responsibility of the manufacturer.
- Page 80 PRDLiNe Etablissements Darty & fils ©, 9 Rue des Bateaux-Lavoirs, 94200 Ivry-sur-Seine, France...
Need help?
Do you have a question about the PIH6600 and is the answer not in the manual?
Questions and answers