Table of Contents
Advertisement
Advertisement
Table of Contents

Related Manuals for Karl Storz AIDA WD 300


Summary of Contents for Karl Storz AIDA WD 300
- Page 1 KARL STORZ AIDA ® Rel. 1.4...
- Page 2 Register / Index / Registro System description KARL STORZ AIDA ® Release 1.4 Software description KARL STORZ AIDA ® Release 1.4 Instructrion manual KARL STORZ AIDA WD300 / WD3504 ® 96296084 D...
- Page 3 System description KARL STORZ AIDA Release 1.4 ®...
- Page 4 KARL STORZ. Copyright © KARL STORZ, 02-2018 It is not permitted to forward or reproduce this document nor to use or disclose the contents thereof unless express consent is given. Violators will be liable for compensation for damages. All rights reserved if patents or utility models are granted.
- Page 5 2. 1. 1 System-compatible hardware ................2-1 2. 2 System versions ....................2-2 2. 2. 1 KARL STORZ AIDA WD 300 Full-HD with external Touchscreen ..... 2-2 2. 2. 2 KARL STORZ AIDA WD350 Full HD with external Smartscreen and Surgical Screen ....................2-3 2.
- Page 6 Contents 4. 2. 1 Information bar ....................4-2 4. 2. 2 Main menu ...................... 4-4 4. 2. 3 Application areas and modules ............... 4-4 4. 2. 4 Navigation bar ....................4-5 4. 3 ‘Current procedure’ application area ............... 4-6 4. 3. 1 Introduction ..................... 4-6 4.
- Page 7 1. 2 General safety instructions WARNING: Installation and commissioning of the device must only be performed by authorized qualified technicians from KARL STORZ GmbH & Co. KG who have been trained in electrical or electronic engineering or by an authorized contractual partner.
- Page 8 WARNING: Do not connect equipment to the system which has not been specified by KARL STORZ GmbH & Co. KG. WARNING: The display of image signals which do not originate from a KARL STORZ device may only be used for information purposes.
- Page 9 This means, for example, that when using easily combustible and explosive inhalation anesthetics or mixtures thereof, the device must not be operated inside the demarcated hazard zone shown below. This also applies for easily combustible and explosive chemicals, e.g., skin disinfectants and fast-acting surface disinfectants. 60° KARL STORZ AIDA ®...
- Page 10 Safety instructions 96296083EN / BA...
- Page 11 ® is supplied as a unit comprising complementary hardware and software. Any changes to the hardware or software which are not authorized by KARL STORZ void the approval for medical use, the warranty, and the manufacturer’s warranty. KARL STORZ AIDA...
- Page 12 KARL STORZ AIDA . Only connect permitted signal types ® and perform device tests before use. 2. 2. 1 KARL STORZ AIDA WD 300 Full-HD with external Touchscreen USB-Keyboard + Touchpad USB-Printer* Footswitch* Barcodescanner*...
- Page 13 System description 2. 2. 2 KARL STORZ AIDA WD350 Full HD with external Smartscreen and Surgical Screen USB-Keyboard + Touchpad USB-Printer* Footswitch* Barcodescanner* 20014430 AIDA WD350 12 VDC/2 A AIDA Control Screen AIDA Control Screen WM200 DC 12V Displayport 1.2a...
- Page 14 System description 2. 2. 3 KARL STORZ AIDA WD300 Full HD and Dual IMAGE1-S with Sugical Screens USB-Keyboard + Touchpad USB-Printer* Barcodescanner* Footswitch* 20014430 USB 2.0 Active DVI-D to DP-Adapter DVI-D AIDA WD300 Displayport HDMI Serial 1 LAN 2 LAN 1...
- Page 15 System description 2. 2. 4 KARL STORZ AIDA WD350 Full-HD with external Smartscreen and Dual IMAGE1-S withSurgical Screens USB-Keyboard + Touchpad USB-Printer* Footswitch* 20014430 Full HD Camera Signal (Loop- USB 2.0 Through) FG-card HDMI-Out Active DVI-D to DP Adapter DVI-D...
- Page 16 System description 2. 2. 5 KARL STORZ AIDA WD350 Full-HD with external Smartscreen and SCB-Devices 96296083EN / BB...
- Page 17 System description 2. 2. 6 KARL STORZ AIDA WD350 with external Smartscreen und Dual IMAGE1-S with Multiswitch USB-Keyboard + Touchpad USB-Printer* Footswitch* 20014430 AIDA WD350 ACC1 12 VDC/2 A ACC2 DC 12V Displayport 1.2a AIDA Control Screen WM200 Ultra HD/4K Camera Signal...
- Page 18 System description 2. 2. 7 KARL STORZ AIDA WD300 Ultra-HD/4K with external Touchscreen USB-Keyboard + Touchpad USB-Printer* Footswitch* Barcodescanner* 20014430 AIDA WD 300 HDMI Serial 1 LAN 2 LAN 1 Mouse DP 1 RS232 Touch Control K bd Line In...
- Page 19 System description 2. 2. 8 KARL STORZ AIDA WD350 Ultra-HD/4K with external Smartscreen and 4K-Screen USB-Keyboard + Touchpad Barcodescanner* USB-Printer* Footswitch* 20014430 AIDA WD350 12 VDC/2 A DC 12V Displayport 1.2a AIDA Control Screen WM200 ACC2 ACC1 Ultra HD/4K Camera Signal (Loop-...
- Page 20 System description 2. 2. 9 KARL STORZ AIDA WD 350 Full-HD with external Smartscreen and 4K-Screen USB-Keyboard + Touchpad USB-Printer* Footswitch* Barcodescanner* 20014430 AIDA WD350 12 VDC/2 A AIDA Control Screen DC 12V Displayport 1.2a AIDA Control Screen WM200 Full HD Camera Signal (Loop-Through)
- Page 21 System description 2. 2. 10 KARL STORZ AIDA WD350 Ultra HD/4K with external Smartscreen and SCB-Devices 2-11 KARL STORZ AIDA ®...
- Page 22 System description 2-12 96296083EN / BB...
- Page 23 ® by authorized, electrotechnically qualified specialists from KARL STORZ GmbH & Co. KG or by an authorized contractual partner. WARNING: Combinations of medical devices are only assured to be safe if they are identified as such in the respective instruction manuals or if the intended use and interface specifications of the products used in combination permit this.
- Page 24 Installation 3. 3 Installing printer 1. Log on to the PC as an administrator. 2. Click on Start\Nexus\SE46\Agent Local Whitelist Manager. $ The following window opens: 3. Click on Next. $ The following input window opens: 96296083EN / BA...
- Page 25 NOTE: Please do not close the window above as additional input is required at a later point. NOTE: You can now install a printer driver. It is important to specify the following under IPv4 for setting up a printer in the network: - IP address - Network mask - Gateway address KARL STORZ AIDA ®...
- Page 26 Installation Example installation of a printer driver for a Xerox printer NOTE: The steps are not explained here as they depend on the driver and printer. Once the printer driver has been successfully installed, either the system switches to the following screen automatically or it can be reached under Start\Device and Printers.
- Page 27 Next. NOTE: The address in the Port name field is automatically copied from the Hostname or IP address field. If necessary, you can also enter another address manually simply by overwriting the address. KARL STORZ AIDA ®...
- Page 28 Installation 6. Please wait until the printer is found. $ The following window opens: 7. Select the printer driver and click on Next. $ The following window opens: $ The Printer name field shows the printer driver with which the selected printer should be installed. The printer is automatically named after the printer driver selected in window 12.
- Page 29 8. Click on Next. $ The following window opens: 9. Select Do not share this printer. Click on Next. $ The following window opens: $ This window shows that the printer has been successfully installed. Click on Finish. KARL STORZ AIDA ®...
- Page 30 Installation Now restart the system by clicking Restart. Following the restart, log on as an administrator. $ The following window opens: Select I’ve finished updating the system and click on Next. $ The following window opens: 96296083EN / BA...
- Page 31 Click on Next. $ The following window opens: Enter additional information on the modifications and then click on Next. $ The following window opens: $ neXus SE46 now generates a new system certificate. $ The following window opens: KARL STORZ AIDA ®...
- Page 32 Installation Click on Finish and restart the system. Log on as an administrator. 3-10 96296083EN / BA...
- Page 33 You can access it at any time by clicking on the tool symbol in the header. 1. Tap on the tool symbol. $ The login window opens. 2. Enter the user details and password and tap OK or Enter on your keyboard to confirm. 3-11 KARL STORZ AIDA ®...
- Page 34 Installation NOTE: If you have entered the password via the on-screen keyboard, confirm this entry by pressing the Enter button. $ The configuration area opens. 3. In the configuration window, click in the left-hand column on Finish. $ The Finish selection menu opens. 3-12 96296083EN / BA...
- Page 35 4. Click on the Reporting tab. $ The Reporting selection menu opens. 5. Click in the bar next to Printer. $ A list opens listing all the available printers. $ Check whether the installed printer is included in the list. 3-13 KARL STORZ AIDA ®...
- Page 36 Installation 3. 4 Configuration Complete configuration of KARL STORZ AIDA is described in the separate software description for ® the device (96296082EN). 3-14 96296083EN / BA...
- Page 37 Only switch off the device using the ON/OFF switch. 1. Tap on the switch off symbol in the top right corner. $ The system is shut down and switched off. 2. Switch the connected peripheral devices off. KARL STORZ AIDA ®...
- Page 38 Operation 4. 1. 4 Monitoring memory usage The memory usage on the hard disk is continuously monitored. As soon as a certain limit is reached, the user is notified via the information bar that a restart should be performed when possible. System maintenance: A restart is required in order to ensure optimal performance The message persists until a restart is performed.
- Page 39 The output volume of the optional loudspeaker (or headphones) can be set and, if necessary, switched to mute using the loudspeaker symbol. Configuration The tool symbol takes you to the password-protected area for configuration of the system (see software description). KARL STORZ AIDA ®...
- Page 40 Tapping the question mark takes you to the product information and licenses window, where you can save this information to a USB stick. System shutdown NOTE: Depending on the setting, tapping on this pictogram either shuts KARL STORZ AIDA down or ®...
- Page 41 ‘Control’ application area In the ‘Control’ application area, you will find additional modules for the monitoring and control of other KARL STORZ control units. These devices do not have any influence on previous or ongoing procedures. ‘Previous procedure’ application area The ‘Previous procedure’...
- Page 42 NOTE: The scope of documentation can be restricted of extended by admin and must be configured in collaboration with the KARL STORZ technicians during the installation and commissioning. 96296083EN / BA...
- Page 43 • Expanded entry when at least one of the three data areas (team-, procedure- or instrument-related data) has been enabled. NOTE: By double-clicking in the header a, the menu with the patient data for the current patient will open. KARL STORZ AIDA ®...
- Page 44 Operation Reduced entry 1. Tap on Patient in the main menu. $ The Patient module is displayed. 2. Enter the requested data completely or check and complete the data. NOTE: If necessary, also add the preceding zeros when entering the date so that the entry always comprises 8 digits (e.g., 05.05.2012).
- Page 45 2. Enter all the members of the surgical team completely. 3. To enter a team member from a list, tap on the symbol to the right of the input field. 4. Tap on Procedure. $ The Procedure submenu is displayed. KARL STORZ AIDA ®...
- Page 46 Operation 5. Enter all the procedure data completely. 6. Tap on the arrow on the right edge of the input field to select data from a list. 7. Tap on Instruments. $ The Instruments submenu is displayed. 8. Enter the identification number of the instrument tray and the serial number of the endoscope used.
- Page 47 1. Tap on Patient in the main menu. $ The Patient module is displayed. Tap on the Import DICOM Worklist button at the bottom left. 4-11 KARL STORZ AIDA ®...
- Page 48 Operation 2. Tap on the Import DICOM Worklist button at the bottom left. $ The submenu opens for searching in the DICOM worklist. 3. Select a parameter for searching and enter your search term. 4. Tap on the magnifying glass symbol. $ The list of results is displayed.
- Page 49 $ The Patient module is displayed. Tap on the Import DICOM Worklist button at the bottom left. 2. Enter the patient ID and click the HIS button. $ The selected data set is loaded and displayed in the Patient module. 4-13 KARL STORZ AIDA ®...
- Page 50 Operation Enter patient data manually WARNING: If you have already created recordings before switching back to manual data compilation, they will be assigned to the new patient. 1. Tap on Patient in the main menu. $ The Patient module is displayed. 2.
- Page 51 2. Select the checklist you require and press OK to confirm. $ The selected checklist starts. $ Any patient and procedure information which has already been entered is displayed. $ The progress indicator for the editing of the checklist is shown. 4-15 KARL STORZ AIDA ®...
- Page 52 Operation Editing and finishing the checklist The orange triangle above the progress bar indicates the editing status of the checklist. The progress bar indicates a subdivision of the checklist into editing phases: the steps. You can browse backward and forward within a step using the arrow keys. The transitions between the steps are signaled with gates.
- Page 53 Remote capturing does not work when the SAVE button has just been pressed. WARNING: Compressed image and video files can contain artifacts and should therefore not be used for diagnostics and treatment purposes. Documenting the recordings a. Number b. Duration c. Start time 4-17 KARL STORZ AIDA ®...
- Page 54 Operation Assigning Comments For documentation purposes, the start time can be overwritten with your own term. 1. Open the patient screen. 2. In the list of Procedure names, select the entry for which you have created the keyword. 3. Then go to the Capture module. 4.
- Page 55 NOTE: The last recording is shown at the top of the list alongside the preview window. 1. Tap on the Still image button h for Input 1 a or Input 2 b. $ The recording is confirmed to the right of the preview window in area d. 4-19 KARL STORZ AIDA ®...
- Page 56 Operation Recording a video sequence NOTE: Video sequences can only be recorded and saved if this function was set up accordingly during the configuration. NOTE: Audio sequences can only be recorded from one source. The simultaneous capture of two sources is not possible. NOTE: With video recordings, the audio is also recorded as standard.
- Page 57 2. Place a check mark next to Mute. $ The microphone icon turns orange. 3. Tap on the operation field again to close it. $ The microphone icon will appear with a strike-through line across it. 4-21 KARL STORZ AIDA ®...
- Page 58 Operation Recording two sources synchronized 1. Place a checkmark next to Sync.. 2. Capture synchronous images. a. To capture synchronous still images from both sources, tap on Still image. b. To start recording synchronous videos from both sources, tap on Video. To end the synchronous capturing, tap on Video again.
- Page 59 NOTE: Unintentionally incorrect routing can result in the live image no longer being available to the physician. $ The image ID is displayed on the target screen. 4-23 KARL STORZ AIDA ®...
- Page 60 Operation Use the arrow keys a and b to scroll through the captured image and video recordings. NOTE: The recordings appear in chronological order. 4-24 96296083EN / BA...
- Page 61 If you select recordings with and without flags and then tap on Flag, all the selected recordings will be flagged. Comments Select the recordings you wish to annotate, and then tap on Comments. You can enter a name in the input mask. 4-25 KARL STORZ AIDA ®...
- Page 62 Operation Select Use Select together with flags to quickly and simply select recordings which you wish to display, print or delete. Example of how to proceed: • Flag all recordings which you wish to continue using. • Then tap on Select and select Select all unflagged in the context menu. •...
- Page 63 Enable Deinterlace if you see artifacts from interlacing in the still image (analog sources). Your changes are displayed in the preview window. Saving or rejecting Save your changes with Save or reject them with Reset. 4-27 KARL STORZ AIDA ®...
- Page 64 Operation 4. 3. 6 Finishing In the Finish module, you can initiate data storage for the created documentation. Depending on the configuration, the data is saved either automatically or, if necessary, must also be saved manually. Initiating data storage 1. Tap on Finish. NOTE: If necessary, you are requested to complete all data entries.
- Page 65 If you tap on Open tasks in this dialog window, you will be taken to the list of tasks which have not yet been exported. If the list is empty, the data storage has been successfully concluded. 4-29 KARL STORZ AIDA ®...
- Page 66 Operation 4. 3. 7 Forced restart NOTE: A notification will appear before you reach the maximum storage space usage. If you do not respond to these notifications, the system will carry out a forced restart. Please regularly make sure that there are no old images or videos still in the system that are impacting upon the system.
- Page 67 NOTE: More detailed information on the use of the Medical Device Control can be found in the separate instruction manual for the KARL STORZ SCB control NEO system. Operating medical devices 1. Tap on Home in the navigation bar.
- Page 68 Operation 4. 5 ‘Previous procedures’ application area 4. 5. 1 Filing cabinet NOTE: Depending on the configuration of your system, this module may not be available. In the Filing cabinet module, you can display documentation which has already been created. This documentation can be saved on a local drive, a network drive, a self-made optical data carrier or a USB stick.
- Page 69 $ A window with the still images and videos created in this treatment opens. NOTE: You can view the data again before copying to a target medium. To do so, select the corresponding still image or video and click on View. 4-33 KARL STORZ AIDA ®...
- Page 70 Operation Copying data sets NOTE: The Copy function is available for completed procedures. 1. Tap on Copy. $ A window opens in which you can select the target medium. 2. Select the target medium and tap OK. $ Data transfer begins. $ During the copying process, the message Preparing procedure data to copy to USB appears.
- Page 71 NOTE: A progress bar shows that copying is still running and how much time is remaining. The user can choose between Shutdown and Cancel. By tapping on Shutdown, copying is stopped and the system is shut down. By tapping on Cancel, copying is resumed. 4-35 KARL STORZ AIDA ®...
- Page 72 ® NOTE: Further information on the use of the StreamConnect server can be found in the separate ® ® instruction manual ‘KARL STORZ OR1 StreamConnect II’. ® 4-36 96296083EN / BA...
- Page 73 If you have burnt a CD or DVD, label the data carrier immediately afterwards as per the label suggestion. This prevents mix-ups when assigning labels to data carriers. NOTE: Destinations which cannot be accessed can be reassigned. 4-37 KARL STORZ AIDA ®...
- Page 74 Operation If you do not wish to save the data set, tap on Remove. $ The data set is permanently deleted. NOTE: If a task is completed, the number of unfinished open tasks in the information bar will decrease, or the message will disappear altogether. 4-38 96296083EN / BA...
- Page 75 Incorrect concentration may result in damage. Bear in mind the microbiological range of action of the chemicals used. NOTE: The manual ‘Cleaning, Disinfection, Care and Sterilization of KARL STORZ Instruments’ can be downloaded or requested by visiting www.karlstorz.com.
- Page 76 Maintenance 5. 2. 5 Manual wipe-down disinfection NOTE: To prevent liquid entering the device, it should not be sprayed with the reprocessing agent. NOTE: In order to preserve the conductivity of the contacts, you should never allow reprocessing agents to come into contact with the connections on the front and back of the device. When the cleaning agent dries, residues can form which impair conductivity.
- Page 77 (see software description 96296016, chap. 3.3 and 3.4). In Germany, you can refer repairs direct to: KARL STORZ SE & Co.KG Abt. Reparaturservice Take-off Gewerbepark 83 78579 NEUHAUSEN, Germany Service hotline: +49 7461/708 980 E-mail: technicalsupport@karlstorz.com...
- Page 78 Maintenance 96296083EN / BA...
- Page 79 Phone: +386 1 620 5880, Fax: + 386 1 620 5882 Phone: +52 (55) 1101 1520 E-Mail: pisarna@karlstorz.si E-Mail: mx-info@karlstorz.com KARL STORZ Endoskop Polska Marketing Sp. z o.o. KARL STORZ Marketing América Do Sul Ltda. ul. Bojkowska 47 Rua Joaquim Floriano, nº. 413, 20º andar – Itaim Bibi, 44-100 Gliwice, Poland CEP-04534-011 São Paulo, Brasil...
- Page 80 E-Mail: taley.bashirov@karlstorz.com Phone: +86 20 8732-1281, Fax: +86 20 8732-1286 E-Mail: info@karlstorz.com.cn KARL STORZ ENDOSKOPE East Mediterranean and Gulf S.A.L. KARL STORZ Endoscopy Asia Marketing Pte Ltd. Block M, 3 Floor No. 8 Commonwealth Lane #03-02 Beirut Souks, Weygand Street...
- Page 82 KARL STORZ SE & Co. KG Dr.-Karl-Storz-Straße 34 78532 Tuttlingen Postfach 230 78503 Tuttlingen Germany Telefon: +49 (0)7461 708-0 Telefax: +49 (0)7461 708-105 E-Mail: info@karlstorz.com www.karlstorz.com...
- Page 83 Software description KARL STORZ AIDA Release 1.4 ®...
- Page 84 KARL STORZ. Copyright © KARL STORZ, 02-2018 It is not permitted to forward or reproduce this document nor to use or disclose the contents thereof unless express consent is given. Violators will be liable for compensation for damages. All rights reserved if patents or utility models are granted.
- Page 85 List of supplied documentation ............... 1-1 1. 2 Technical description characteristics of the program ........1-1 1. 3 Installation procedure ..................1-1 1. 3. 1 KARL STORZ AIDA ® Secure ................1-1 1. 4 User-specific modifications ................1-6 Description of the program functions............... 2-1 2.
- Page 86 Contents Support from the program supplier/manufacturer ..........5-1 5. 1 Contact address for the user ................5-1 5. 2 Service hotline ....................5-1 5. 3 Education, training, internet etc............... 5-1 96296082EN / BA...
- Page 87 This means that only approved (certified) software can be run on the system. NOTE: KARL STORZ recommends combination with an Intrusion Prevention System (IPS) in order to guarantee maximum protection of your network.
- Page 88 Installation 6. Click on Next; the following window then appears: 7. Enter the following service key: Service-MLAACDET-ACAA-HHTPZATZ Please pay attention to the use of uppercase and lowercase. Now enter the reason for your changes and click on Next; the following window then appears: 96296082EN / BA...
- Page 89 9. Once the installation is completed, mark I’ve finished updating the system and then click on Next; the following window then appears: 10. KARL STORZ AIDA Secure now checks the changes; the following window then appears: ® KARL STORZ AIDA ®...
- Page 90 Installation 11. Select Automatically approve all changes and then click on Next; the following window then appears: 12. Now enter additional information on your changes and click on Next; the following window then appears: 96296082EN / BA...
- Page 91 (including loss of data). Consequently, it is essential that a system test after adding new software or hardware be performed, which verifies the perfect functioning. KARL STORZ cannot accept any liability for malfunctions or loss of data on modified systems. KARL STORZ AIDA...
- Page 92 Installation 1. 4 User-specific modifications Within the scope of available configuration options („2. 7 Configuration for Application Administrator“ on page 2-9 and „2. 8 Configuration for System-Administrator“ on page 2-48), a wide range of application-oriented system modifications can be peformed. 96296082EN / BA...
- Page 93 2. 2 Program structure The program principally offers two different modes. • Operation mode: See systemdescription • Configuration mode: In this mode, you can select the functional scope and application-specific settings. The configuration mode is described below. KARL STORZ AIDA ®...
- Page 94 Description of the program functions 2. 3 Roles and access rights in configuration mode The following user roles with various rights are predefined for configuration mode. Role Group Field of activitiy Authorization Confuguration Settings Users Attending Physician Creating personal user User profile Application...
- Page 95 Enter facility name Operating room name Activate audio feedback Activate start screen Content Enable modules Display Touchscreen Calibration Scaling factor Select screen type Select COM connection Set playback options on the operation monitor Activate display switchover Test settings KARL STORZ AIDA ®...
- Page 96 Description of the program functions Settings Access rights Level 1 Level 2 Level 3 Role 1 Role 2 Role 3 General DICOM Client AET Modality Character set Port Encryption Local cert. file Server cert. file Timeout Log level Enable Worklist Server AET Server IP Port...
- Page 97 Select watermark fields Capture Still image feedback Capture feedback position Video Remote Assign functions to camera head control buttons Checklist Checklist sto- rage path Checklist re- port logo path Horizontal alignment of logo Vertical align- ment of logo KARL STORZ AIDA ®...
- Page 98 Description of the program functions Settings Access rights Level 1 Level 2 Level 3 Role 1 Role 2 Role 3 Finishing Automatic Adding and removing storage media Manual Adding and removing storage media Reports Specify headers Select logo Auto print Enable auto print Name Number of copies...
- Page 99 Role 3 User Role System Administrator administration administration Application Administrator Settings User Super User User Auditor Activate group profiles Authentication Auto login Application Windows Auto logout Timeout Remote HTTP proxy Host service settings Port User name Password KARL STORZ AIDA ®...
- Page 100 Description of the program functions 2. 5 Opening the configuration area The configuration area can be accessed at any time by tapping on the tool symbol in the header. 1. Tap on the tool symbol. $ The login window opens. 2.
- Page 101 7. If you would like the start screen to be available after the program has started up, then place a check mark next to Enable Home Screen. 8. Enter the name of the facility in the field Facility name field, e.g., ... hospital. 9. Enter the operation room in the Operation room name field. KARL STORZ AIDA ®...
- Page 102 Description of the program functions ‘ ‘ Content menu Set up the scope of operation of the system in this menu. Activate or deactivate modules depending on whether they should be available to the user or not. ‘ ‘ Display menu In this menu, select the screen type.
- Page 103 Browser function. These server certificates are managed by the hospital’s IT department. 8. Leave the LogLevel as the factory setting. NOTE: The LogLevel can be adjusted for service purposes, but should normally remain in factory settings. 2-11 KARL STORZ AIDA ®...
- Page 104 Description of the program functions Setting up the interface to the DICOM Worklist provider or MPPS 1. If you want to allow access to a DICOM Worklist or MPPS, place a check mark next to Enable Worklist or Enable MPPS. NOTE: If you remove the check mark, the Import DICOM Worklist or MPPS button will no longer be displayed on the user interface.
- Page 105 Commitment server (for at least one object). The first request was made at least as long ago as the configured timeout. If there are both failed and timed out objects, ‘Timeout’ will be displayed. 2-13 KARL STORZ AIDA ®...
- Page 106 Description of the program functions Status Description Actions CommitPending Commit requests were sent, Normal status. Request being but no answer has yet been processed. received from the Commitment server. The first request was made within the configured timeout period. CommitIncomplete No Commit request was sent Normal status.
- Page 107 3. Under Port, enter the port for the HL7 server. 4. Set the Max. time for answer. Time for Answer: 60 seconds 5. Under Value QRD-9, select the patient search type. DEM: Search according to patient ID APN: Search according to case number 2-15 KARL STORZ AIDA ®...
- Page 108 Description of the program functions 6. Under COM port for barcode scanner, select the channel to which you want to connect a barcode scanner. Setting up an interface for storing data on the HL7 server 1. Under Server IP, enter the IP address of the HL7 server. 2.
- Page 109 Description of the program functions ‘ ‘ System menu The system information can be found in the System menu. 2-17 KARL STORZ AIDA ®...
- Page 110 Description of the program functions 2. 7. 2 ‘Capture’ module ‘ ‘ menu General In the General tab, you can receive signals from different types of source via 2 channels: • Display Port sources at Input 1 • HDMI sources at input 2 Each signal from these sources can be assigned a profile, which is generated from the following settings: •...
- Page 111 NOTE: All the available video formats produce compressed files which may contain artifacts. NOTE: The settings MPEG4, normal quality and a resolution in HD (720p) quality offer the best combination in terms of storage space and quality. 2-19 KARL STORZ AIDA ®...
- Page 112 Description of the program functions Video quality 1. Select the capture quality. Take note of the expected file size per minute of capturing depending on the format, resolution and capture quality as per the table below. Format Quality Resolution Transfer rate Storage space high 6 Mbit/sec...
- Page 113 NOTE: When saving via the network, a section size of 950 MB should not be exceeded. Select OFF if you do not wish the recording to be divided into sections. 2-21 KARL STORZ AIDA ®...
- Page 114 Description of the program functions ‘ ‘ menu Watermarks Specify whether the captured still images and video recordings are to be saved with a watermark in the Watermark menu. You can also specify the data for labeling the recordings. Setting up the watermark 1.
- Page 115 2. Select the desired metadata in Available fields. 3. Using the arrow buttons on the right-hand side, place the entries in the order in which they are to appear on the images. 4. Tap Close. 2-23 KARL STORZ AIDA ®...
- Page 116 Description of the program functions ‘ ‘ menu Capture feedback Still image In this section, you can configure whether there should be any feedback about a captured image, or whether to activate the surgical overlay on the surgical screen where the still images are shown. Capture feedback position In this section, you can set the corner of the screen where the still image is to be displayed.
- Page 117 Left pressed all the way down/image capture channel 1 ACC2: Left pressed half the way down/image capture channel 2 ACC3: Right pressed half the way down/start/stop video channel 2 ACC4: Right pressed all the way down/start/stop video channel 1 2-25 KARL STORZ AIDA ®...
- Page 118 Description of the program functions 2. 7. 3 ‘Checklist’ module ‘General‘ menu Storage locations of the checklist templates Entering the path The checklist templates can be located locally on the hard disk or on the facility server. The paths are preset to match the storage location on the computer’s hard disk.
- Page 119 Description of the program functions 2. Under Vertical alignment of logo, specify the vertical alignment of the logo. 2-27 KARL STORZ AIDA ®...
- Page 120 Description of the program functions 2. 7. 4 ‘Finish’ module ‘Automatic’ and ‘Manual’ menu Specify the targets for automatic data saving in the Automatic menu. In the Manual menu, specify the targets for manual, optionally selectable data saving. 1. Under [Select ...], select a target which you wish to include in data saving. 2.
- Page 121 NOTE: If the DICOM server does not accept this video format, then AIDA will automatically send the video in MPEG2 MP@ML format. • MPEG2 MP@ML MPEG2 MP@ML is a video-streaming format with the profile MP and the level ML. 2-29 KARL STORZ AIDA ®...
- Page 122 Description of the program functions Saving data on a USB stick Under Name, enter a designation for the target. Under Template, select the nature of the report which is to be added to data saving. • For each template type, select how many columns the report is to be divided into. •...
- Page 123 Under Path, enter the path or tap on Browse in order to select the target directory for saving data. Place or remove the check mark next to Remove old exports as necessary if you wish to allow new storage space to be created as necessary by deleting older files. 2-31 KARL STORZ AIDA ®...
- Page 124 Description of the program functions Data saving on an FTP, StreamConnect server or network share ® NOTE: There is no option for using FTP, DICOM or StreamConnect as references. If Reference ® is activated, then it will still be possible to view data on the medium (e.g., USB, hard disk) after the export.
- Page 125 2. Specify which data you wish to print automatically. For this, if necessary, place or remove the checkmarks next to Stills, Checklist and Removable 3. Configure the printer. 4. Under Name, enter a designation for this printing procedure. 2-33 KARL STORZ AIDA ®...
- Page 126 Description of the program functions Under Template, select the type of report which you wish to use for automatic printing. For each template type, select how many columns the report is to be divided into. Select Procedure if in the configuration for the user interface several input masks are set up for the procedure data.
- Page 127 Set up the surgical report in the Reports menu. 1. Under Header 1, select a standard title for the surgical report. 2. If desired, specify further standard titles for the surgical report under Header 2 and Header 3. 2-35 KARL STORZ AIDA ®...
- Page 128 Description of the program functions 3. To select the watermark logo for the report, tap on the button next to the Logo input field. Navigate to the storage location of the logo, highlight the file and tap on Open. ‘Autoprint‘ menu Automatic printing during the Auto print procedure Set up automatic printing for regular printing during the ongoing procedure once the specified number of images for printing has been reached in the Auto print menu.
- Page 129 • Remove the check marks if you wish to restrict the documentation to - patient data, including the anatomical region and body side - medical specialization - nature of the surgical procedure - responsible surgeon 2-37 KARL STORZ AIDA ®...
- Page 130 Description of the program functions Intervention identifier shown in the minimal and standard patient input mask Specify which of the following numbers are to be used for primary identification of the patient here. • Case number • Order number Mandatory fields Specify which mandatory fields are to be included for data entry here.
- Page 131 1. Enter the data. Example: Instrument trays Example: Endoscopes NOTE: If you wish to delete an entry from the list, highlight it and tap on Remove. 2-39 KARL STORZ AIDA ®...
- Page 132 Description of the program functions ‘Procedures‘ menu Creating, changing and removing procedures in the procedure list In this input mask, you can add new procedures or change and remove existing ones. Creating a new entry NOTE: The procedure list is pre-set as per the DICOM standard. Consult with the PACS archive management before making any changes.
- Page 133 Creating keywords 1. Mark an entry in the Procedure name column 2. Then click on Add a in the Keywords column. 3. Enter a keyword in the orange field. 4. Press OK to confirm the entry. 2-41 KARL STORZ AIDA ®...
- Page 134 Description of the program functions Profile management The application allows you to save different configuration screen settings in relation to personnel and personnel groups, and to use these in the form of profiles. Profile management is split into 3 categories. Default profile (preset) This profile is pre-defined and contains all settings for administering the application.
- Page 135 Editing a group profile 1. In the Manage profile dialog window, select the group name and click on Edit. Deleting a group profile 1. In the Manage profile dialog window, select the group name and click on Delete. 2-43 KARL STORZ AIDA ®...
- Page 136 Description of the program functions Assigning a group profile 1. Log in as an Application Administrator and open the default profile. 2. Go to the Team 1 screen in the Data entry section. NOTE: The default profile will be assigned to a newly created or imported physician as standard. 3.
- Page 137 NOTE: If no Attending Physician is selected, the default profile will be active. Procedures that have not been assigned to a physician can only be imported by a Super User. 2-45 KARL STORZ AIDA ®...
- Page 138 Description of the program functions ‘‘Stuff groups‘ menu 1. Place a check mark next to Active Directory Import. 2. In the Physician text field, enter the group name that was assigned for the required group in the Active Directory by the IT Department. 3.
- Page 139 Browser One or more connections to, for example, streaming servers, cloud services or Internet services can be established in the Browser menu. NOTE: Up to 5 web-based third-party products can be integrated into the KARL STORZ AIDA ® NOTE: Web-based KARL STORZ/third-party products may only be used if they have been verified and approved by KARL STORZ.
- Page 140 Description of the program functions 2. 8 Configuration for System-Administrator 2. 8. 1 ’General’ module‘ ‘ ‘ System menu In the System menu, you can manage various system settings such as network or WLAN settings. ‘ ‘ Security menu In the Security menu, you can increase the system security: Activate access control You can make access to the listed modules subject to an access control by placing a check mark next to the corresponding module.
- Page 141 This message is stored in the Microsoft Active Directory as standard. If this message is not pre-stored, you can create the title and message text yourself. In the Title field, enter the title of the information window. In the Text field, enter the information text. 2-49 KARL STORZ AIDA ®...
- Page 142 Description of the program functions 2. 8. 2 ’User administration’ module ‘ ‘ menu Role administration As part of IT security, the application allows users to assign access rights to definable groups of people. The following roles with the assigned groups are preset, and can be used for independent operation without the need for any further configuration.
- Page 143 Authentication Auto login/application (only accessible for Admin) 1. Place a check mark next to Application. $ The Auto login screen opens. 2-51 KARL STORZ AIDA ®...
- Page 144 Description of the program functions 2. Enter the user to be notified automatically after start-up. NOTE: If Application is not activated, no user will be notified after start-up. Auto login/Windows (only accessible for System Admin) 1. Place a check mark next to Windows. $ The Auto login screen opens.
- Page 145 Auto logout after completion of the procedure 1. Place a check mark next to Automatic log off after intervention has been completed. 2. At the end of the procedure, click on Finish. $ The current user will be logged out. 2-53 KARL STORZ AIDA ®...
- Page 146 Description of the program functions Auto logout after timeout 1. Place a check mark next to Automatic switch off after timeout. $ If no action is performed within the specified time, the current user will be logged out. 2-54 96296082EN / BA...
- Page 147 Depending on the configuration, it may also be necessary to enter the user and password. Deactivating Remote Service You must log on as the Administrator to deactivate the Remote Service. Start AIDA. 2. Click on Windows Desktop. 3. Log in again. 2-55 KARL STORZ AIDA ®...
- Page 148 Description of the program functions Deactivating Remote Service Windows services 1. If possible, start the services by tapping on Service or entering Service in the search field. Deactivating Axeda Desktop Server service 1. Right-click on Axeda Desktop Server and select Properties. $ The Server Properties window opens.
- Page 149 3. Stop the service by clicking on Stop. 4. Click on Apply. 5. Close the window by clicking on OK. Deactivating the RDM Connector 1. Right-click on RDMConnector and select Properties. $ The RDMConnector Properties window opens. 2-57 KARL STORZ AIDA ®...
- Page 150 Description of the program functions 2. Set startup type to Disable. 3. Stop the service by clicking on Stop. 4. Click on Apply. 5. Close the window by clicking on OK. 2-58 96296082EN / BA...
- Page 151 1. Log on to the system as the Administrator. 2. Restart the Computer Management console. 3. Open Computer Management (local)/Service and Applications/Services. 4. Select the Axeda Desktop Server. 5. Open Properties. $ The Axeda Desktop Server Properties window opens. 2-59 KARL STORZ AIDA ®...
- Page 152 Description of the program functions 6. Set start type to Automatic. 7. Activate the RDM Connector service. 8. Open Properties. $ The RDM Connector Properties window opens. 9. Set start type to Automatic. 10. Restart the system. 2-60 96296082EN / BA...
- Page 153 1. Start the WD300. 2. To access the drive selection window, press the F12 key as soon as the KARL STORZ window opens. $ The password input window opens. 3. Enter the password. The standard password is 123456. KARL STORZ AIDA ®...
- Page 154 Data backup and reorganization $ The following window opens. 4. Select the USB drive as the boot device. Note: The name is that of the physical USB drive. In the above window, this is SanDisk. This is normally the third entry in the list. 5.
- Page 155 Data backup and reorganization 6. Click on Troubleshoot in the next window. 7. Select System Image Recovery in the Advanced options window. KARL STORZ AIDA ®...
- Page 156 Data backup and reorganization 8. The following window appears when the C drive is open. 9. Click on Windows 10. NOTE: If you have installed a new SSD drive, this window may not appear. $ The following window opens. 10. Select the operating system. a.
- Page 157 If no backup is found or if you wish to select a particular backup, click on Select a system image followed by Next. $ The following window opens. 11. Select a backup and click on Next KARL STORZ AIDA ®...
- Page 158 Data backup and reorganization 12. Select a backup in the following window and click on Next. $ The following window opens in both cases. 13. Click on Next. 96296082EN / BA...
- Page 159 Data backup and reorganization 14. Confirm the settings for the backup by clicking on Finish. 15. Confirm the warning by clicking on Yes. 16. Wait until re-imaging is complete. KARL STORZ AIDA ®...
- Page 160 Data backup and reorganization $ Once re-imaging is complete, the WD300 starts automatically after 60 seconds. 17. You can skip the waiting time by clicking on Restart now. $ The WD300 normally starts up in Windows 10. $ Drive C now has the same status as it had prior to the system image backup 96296082EN / BA...
- Page 161 4. Click on the right mouse button. $ The selection menu opens. 5. Click on Copy. 6. Select the removable media, e.g., USB DISK. 7. Click on the right mouse button. $ The selection menu opens. KARL STORZ AIDA ®...
- Page 162 Data backup and reorganization 8. Click on Paste. $ The data are saved on the removable media, e.g., USB DISK. $ Copying progress is displayed. 3-10 96296082EN / BA...
- Page 163 3. 4 Deleting data on the (D:) hard disk drive 1. Select the DATA (D:) drive. 2. Click on the right mouse button. $ The selection menu opens. 3. Click on Format... 4. The Format DATA (D:) window opens. 3-11 KARL STORZ AIDA ®...
- Page 164 Data backup and reorganization 5. Click on Start. $ The data are deleted from the drive. 3-12 96296082EN / BA...
- Page 165 If you want to perform a hard shutdown, proceed as follows: 1. Press the power button for 5 seconds. $ The system is switched off. 4. 2 Reboot (cold, warm start) NOTE: When the Windows start menu appears, always start in Normal mode. KARL STORZ AIDA ®...
- Page 166 Behavior in exceptional situations 96296082EN /BA...
- Page 167 Support from the program supplier/manufacturer Support from the program supplier/manufacturer 5. 1 Contact address for the user KARL STORZ SE & Co.KG Abt. Reparaturservice Take-off Gewerbepark 83 78579 NEUHAUSEN, Germany 5. 2 Service hotline Tel.: +49 (0)7461/708 980 E-mail: technicalsupport@karlstorz.com 5.
- Page 168 Support from the program supplier/manufacturer 96296082EN / BA...
- Page 170 KARL STORZ SE & Co. KG Dr.-Karl-Storz-Straße 34 78532 Tuttlingen Postfach 230 78503 Tuttlingen Germany Telefon: +49 (0)7461 708-0 Telefax: +49 (0)7461 708-105 E-Mail: info@karlstorz.com www.karlstorz.com...
- Page 171 Instruction manual KARL STORZ AIDA WD 300 ®...
- Page 172 It is not permitted to forward or reproduce this document nor to use or disclose the contents thereof unless express consent is given. Violators will be sued for damages. All rights reserved in the event of patent issuance or utility model registration. Published by KARL STORZ SE & Co. KG Dr.-Karl-Storz-Straße 34 PO Box 230 78503 Tuttlingen...
- Page 173 Contents Contents Important information for safe use ..............1-1 1. 1 Details for the identification of the device ............1-1 1. 2 Details for the identification of the instruction manual ........1-1 1. 3 Designation of groups of people ..............1-1 1.
-
Page 174: Table Of Contents
Contents 3. 2. 3 Back of device ....................3-3 3. 2. 4 Manufacturer’s identification plate ..............3-3 3. 3 Technical data ....................3-5 3. 4 Connections ....................3-6 3. 4. 1 Front ....................... 3-6 3. 4. 2 Rear ........................ 3-6 Installation ....................... - Page 175 1. 1 Details for the identification of the device This instruction manual is exclusively intended for the device which is available in two versions. The information on the manufacturer's identification plate clearly identifies the relevant version. • Device designation: KARL STORZ AIDA ® WD 300 • Type designation: 1.
- Page 176 Important information for safe use 1. 4 Notes for operators • This device is produced in accordance with state-of-the-art technology and is safe to operate. Nonetheless, the device may still be a source of risk, especially if it is operated by personnel who are not adequately trained or if it is used incorrectly and for a purpose other than its intended use.
- Page 177 The device complies with the safety requirements of the following standards an directives: • Electrical safety according to IEC 60601-1 - Protection against electric shock: Class I ME Equipment - IP Classification: IPX0 • Electromagnetic Compatibility according to IEC 60601-1-2 nOTE: Observe the information on electromagnetic compatibility in chapter 7. • 2014/53/EU – Radio equipment Dirctive (RED) - Frequency band: 5 GHz - Maximum radio-frequency power transmitted in the frequency band: 250 mW • 2012/19/EU – Waste electrical and electronic equipment directive (WEEE) • 2011/65/EU –Restriction of the use of certain hazardous substances in electrical and electronic equipment (RoHS2) WD 300 KARL STORZ AIDA ®...
- Page 178 1. 6. 3 Intended use WD 300 is intended for use by qualified personnel in the The KARL STORZ AIDA ® Doctor’s Office or Operating Room. The KARL STORZ AIDA WD 300 is a dedicated ® appliance (consisting of hard- and software) intended for documentation of audio-visual and patient data during a diagnostic or therapeutic procedure. It allows the capture and the annotation of the surgical procedure for documentation purposes.
- Page 179 1. 7. 1 Ambient conditions for storage and transport • Ambient temperature: -10 °C to 60 °C • Relative humidity: 5 % to 95 % • Atmospheric pressure: 500 hPa – 1080 hPa 1. 7. 2 Ambient conditions for operation • Ambient temperature: 5 °C to 35 °C • Relative humidity: 10 % to 90 % • Atmospheric pressure: 700 hPa – 1080 hPa • Max. hight above sea level: 3000 m WD 300 KARL STORZ AIDA ®...
- Page 180 • Within the scope of application of this Directive, KARL STORZ SE & Co. KG is responsible for the proper disposal of this device. 1. 8. 1 Conventions in this instruction manual WD 300 is referred to as the device. In this instruction manual the KARL STORZ AIDA ® 96296081EN / BA...
- Page 181 Warning: Installation and commissioning of the device must only be performed by authorized qualified technicians from KARL STORZ SE & Co. KG who have been trained in electrical or electronic engineering or by an authorized contractual partner.
- Page 182 CaUTiOn: Only the software and hardware components which have been tested and approved by KARL STORZ and listed in chapter 2.1.1 of the system description 96296083 may be used. The maximum permitted values at the inputs and outputs of the device must be observed. If components are connected which exceed these values, this will void the warranty.
- Page 183 Safety instructions Warning: The device is not suitable for operation in potentially explosive atmospheres and oxygenated areas. This means, for example, that when using easily combustible and explosive inhalation anesthetics or mixtures thereof, the device must not be operated in demarcated hazard zone. This also applies for easily combustible and explosive chemicals, e.g., skin disinfectants and fast-acting surface disinfectants.
- Page 184 Safety instructions 96296081EN / BA...
- Page 185 KARL STORZ AIDA ® interventions aimed at examining and treating patients. WD 300 can be used to carry out the When performing medical interventions, KARL STORZ AIDA ® following from the central touch screen: • Controlling non-medical devices • Transferring and displaying video and audio signals from the integrated signal sources to the integrated peripheral devices • Recording, saving, editing, forwarding and printing medical examinations and interventions in the...
- Page 186 Product description Protect from moisture Fragile, handle with care Do not use if package is damaged Consult instructions for use Atmospheric pressure limitation 1080 Stack limitation CE-Konformitätskennzeichnung With this marking, the manufacturer declares the compliance of the product with the appli- cable standards and directives.
-
Page 187: Back Of Device
Serial 3 / of electric shock. Do not touch during operation and only connect Smart Screen cable when the device is switched off. 12 VDC/2 A 3. 2. 4 Manufacturer’s identification plate Manufacturer Catalogue number Serial number WD 300 KARL STORZ AIDA ®... - Page 188 Product description Non-ionizing radiation Electronic information product pollution control (China RoHS) Separate collection of electrical and electronic equipment. Do not dispose of as municipal waste. CSA certification mark for the USA and Canada With this marking, the manufacturer declares compliance with the certification requirements Alternating voltage Date of manufacture CE conformity marking With this marking, the manufacturer declares the compliance of the product with the...
-
Page 189: Technical Data
100 VAC – 240 VAC Input frequency: 50 Hz – 60 Hz Power consumption max: 5 - 2 A Dimensions (mm): 305 x 74,5 x 355 (W x H x D) Max. weight: 6.0 kg Degree of protection against elektric shock: Degree of protection against humidity: IPX0 Hard disk capacity: 2 TB RAM: 16 GB CPU: Intel Core i7-6700@3.4 GHz ® Operating system: Windows 10 IoT Enterprise Operating mode: Continuous operation WD 300 KARL STORZ AIDA ®... -
Page 190: Connections
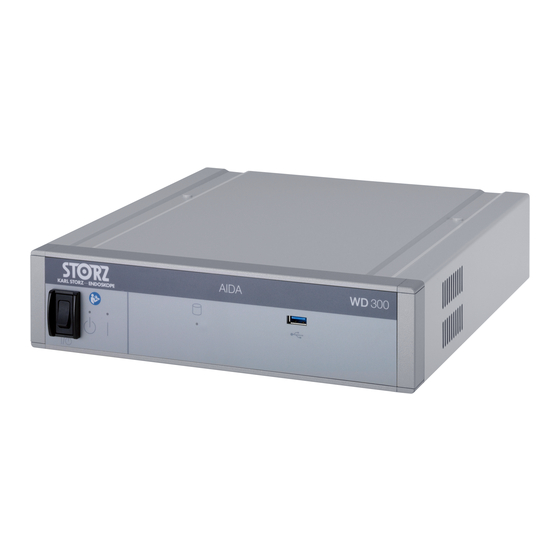
Product description 3. 4 Connections 3. 4. 1 Front a. Switch between standby and operating mode d. Red LED for hard disk access b. Yellow standby LED e. USB c. “Green” operating LED f. WLAN-antenna (at the inner side of the front panel) 3. 4. 2 Rear HDMI Serial 1 LAN 2 LAN 1 Mouse DP 1 Line In Serial 2 DP 2... -
Page 191: Installation
4. 1 Safety instructions Warning: Installation and commissioning of the device must only be performed by authorized qualified technicians from KARL STORZ SE & Co. KG who have been trained in electrical or electronic engineering or by an authorized contractual partner. -
Page 192: Installation And Comissioning
Installation 4. 3 Installation and Comissioning The device can be operated free-standing, in a rack or as a wall-mounted solution in eit- her a vertical or horizontal position. 4.3.1 Minimum requirements • Ambient conditions for operation as described in section 1.7. • Consideration of the technical data as described in section 3.3. • Consideration of the free area dimensions based on the graphic below to guarantee that the device is properly ventilated. 85,9 85,9 inlet... -
Page 193: Maintenance
Incorrect concentration may result in damage. Bear in mind the microbiological range of action of the chemicals used. nOTE: The manual ‘Cleaning, Disinfection, Care and Sterilization of KARL STORZ Instruments’ can be downloaded or requested by visiting www.karlstorz.com. -
Page 194: Required Reprocessing Materials
Maintenance 5. 2. 4 Required reprocessing materials • Disposable cloth or ready-to-use disinfectant cloth • Dry, low lint cloth 5. 2. 5 Wipe-down disinfection nOTE: To prevent liquid entering the device, it should not be sprayed with the disinfectant. nOTE: In order to preserve the conductivity of the contacts, you should never allow disinfectants to come into contact with the connections on the front and back of the device. -
Page 195: Repair Program
Opening the equipment or performance of any repairs or modifications to the components of the device by unauthorized persons shall relieve us of any liability for its performance. Any such repair or modification performed during the warranty period shall void all warranty. KARL STORZ AIDA ® WD 300... - Page 196 Maintenance 96296081EN / BA...
-
Page 197: Accessories
Accessories Accessories Article/Article no. Designation Quantity 400A Power cord EU length 3 m ‘Not suitable for the wall-mounted solution!’ 400 B Power cord US length 2 m 1460795 AIDA Recovery USB Stick WA1000C DP 1.2 4K 60Hz, DeLock connecting cable length 1.8 m 20040086 DVI connecting cable for WD300 length 2 m... - Page 198 Accessories Article/Article no. Designation Quantity 96296081EN User Manual Contained in Folder 96296084D Instruction manual KARL STORZ AIDA ® WD 300 96296019EN / BA...
-
Page 199: Appendix
Warning: The use of portable and mobile RF equipment may have an impact on this or other pieces of medical equipment. Warning: The use of cables other than those specified in the KARL STORZ instruction manual may result in increased emissions or decreased immunity of the KARL STORZ AIDA ®... - Page 200 Appendix Table 200 Cables by means of which conformity with EN/IEC 60601-1-2 was proven: Length Interface Type Number of shielded unshielded wires AC power cord grounded ACC1-4 Camera head buttons Line In/Out Audio In/Out Lemo 5 pole Footswitch RS232 (1) Control cable RS232 (2) Bar code scanner RS232 (3) 12 VDC SmartScreen Power supply DVI Monitor HDMI 4K...
- Page 201 Appendix Table 201 Guidelines and manufacturer’s declaration – electromagnetic emissions The KARL STORZ AIDA ® WD 300 is intended for use in the electromagnetic environment specified below. The user of the device should make sure that the KARL STORZ AIDA ®...
- Page 202 Appendix Table 202 Guidelines and manufacturer’s declaration – electromagnetic immunity ® WD 300 is intended for use in the electromagnetic environment specified below. The KARL STORZ AIDA The user of the KARL STORZ AIDA ® WD 300 should make sure that they are used in such an environment. Interference IEC 60601-1-2:2007 Electromagnetic Conformity level immunity tests test level...
- Page 203 Appendix Table 203 Test specification for ENCLOSURE PORT IMMUNITY to RF wireless communications equipment (according to IEC 60601-1-2) The KARL STORZ AIDA ® WD 300 is intended for use in the electromagnetic environment specified below. ® WD 300 should make sure that they are used in such an environment. The user of the KARL STORZ AIDA...
- Page 204 Appendix Table 204 Guidance and manufacturer’s declaration – electromagnetic immunity – for equipment and systems that are not life-supporting WD 300 are intended for use in the electromagnetic environment specified The KARL STORZ AIDA ® below. WD 300 should make sure that they are used in such an The user of the KARL STORZ AIDA ®...
- Page 205 P is the maximum output power rating of the transmitter in watts (W) according to the transmitter manufacturer. Note: These guidelines may not apply in all situations. The propagation of electromagnetic quantities is affected by absorptions and reflections of buildings, objects and persons. WD 300 KARL STORZ AIDA ®...
-
Page 206: Regulatory Statements Radio Equipment
Appendix 7. 2 Regulatory Statements Radio Equipment 7. 2. 1 USA This device complies with Part 15 of the FCC Rules. Operation is subject to the following two condi- tions: a. This device may not cause harmful interference, and b. This device must accept any interference received, including interference that may cause undesi- red operation. Contains FCC ID: PD98265NG 7. 2. 2 Canada This device complies with Industry Canada’s licence-exempt RSSs. Operation is subject to the follo- wing two conditions: a. - Page 207 Phone: +386 1 620 5880, Fax: + 386 1 620 5882 Phone: +55 11 3526-4600, Fax: +55 11 3526-4680 E-Mail: pisarna@karlstorz.si E-Mail: info@karlstorz.com.br KARL STORZ Endoskop Polska Marketing Sp. z o.o. KARL STORZ Endoscopia Argentina S.A. ul. Bojkowska 47 Zufriategui 627 6° Piso, B1638 CAA - Vicente Lopez...
- Page 208 Room 02B, 35F Teem Tower, E-Mail: info@karlstorz-emg.com No. 208 Tianhe Road, Tianhe District, Guangzhou, 510620, People’s Republic of China KARL STORZ Endoscopy (South Africa) (Pty) Ltd. Phone: +86 20 8732-1281, Fax: +86 20 8732-1286 P.O. 6061, Roggebaai 8012 E-Mail: info@karlstorz.com.cn...
- Page 210 KARL STORZ SE & Co. KG Dr.-Karl-Storz-Straße 34 78532 Tuttlingen Postfach 230 78503 Tuttlingen Germany Telephone: +49 (0)7461 708-0 Fax: +49 (0)7461 708-105 Email: info@karlstorz.com www.karlstorz.com...
Need help?
Do you have a question about the AIDA WD 300 and is the answer not in the manual?
Questions and answers