
Related Manuals for Numark PRO TT-1


Summary of Contents for Numark PRO TT-1
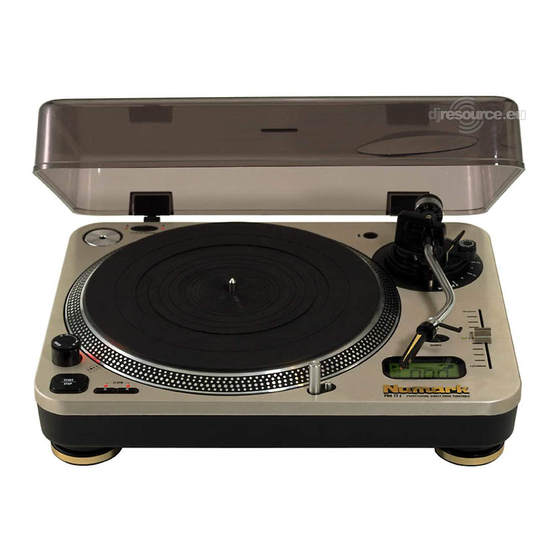
- Page 1 ® Professional Disc Jockey Products PRO TT-1 PROFESSIONAL DIRECT DRIVE TURNTABLE OWNER’S MANUAL INDUSTRIES ©1999 11 Helmsman Avenue, North Kingstown, RI 02852 http://www.numark.com...
-
Page 2: Safety Instructions
Please record the serial number of your unit as shown on the back of the chassis as well as the name of the dealer from whom you purchased the unit. Retain this information for your records. Please return the warranty card enclosed to register your product with us. MODEL: PRO TT-1 SERIAL NUMBER:__________________ ©1999 Industries 7. -
Page 3: Contents Of This Package
5. Dust cover 6. 45-rpm adaptor 7. Counterweight 8. Headshell 8. Operating instructions 9. Registration Card ©1999 Industries PRO TT-1 Professional Turntable INDEX - The Leader in DJ Technology PRO TT-1 Page 2 Page 4 Page 5 Page 6 Page 10... -
Page 4: General System Precautions
• Never attempt to make any adjustments or repairs other than those described in this manual. Take the PRO TT-1 to your dealer or to an authorized Service Center. • Do not place the unit in a location where it will be exposed to direct sun light or near a heating appliance. - Page 5 This unit has been designed by DJs for DJs. With it’s super high-torque platter and large back lit display the PRO TT-1 gives the professional absolute total control. Enjoy this turntable and remember: BE CREATIVE!
- Page 6 To fully appreciate the features of the operation. The PRO TT-1 should be placed on a level sturdy surface. Keep in mind that there are a few features you may never have seen before on a turntable of this type that you will need to read about to use properly.
-
Page 7: Tone Arm Assembly
26. Tone Arm Lever - Controls the up and down action of the Tone Arm Lift - The Leader in DJ Technology specified speed (3) White (L+)Left channel+ Blue (L-)Left channel Red (R+)Right channel+ Green (R-)Right channel http://www.numark.com PRO TT-1 115V 230V... -
Page 8: Lcd Display
PRO TT-1 27. Anti-Skate Control - This applies inward force to the tonearm so it doesn’t skip outward across the record due to the centrifugal force of the record spinning. Cartridge manufacturers usually specify the proper setting of this. 28. Tone Arm Height Adjust - This allows the tone arm to be properly align with the platter surface. - Page 9 47. Power Cord - Plug this into an appropriate power outlet after checking your power setting switch (18) under the platter. Note: Please refer to CAUTION on page 2 concern proper use of power - The Leader in DJ Technology PRO TT-1 http://www.numark.com...
-
Page 10: Maintenance
PRO TT-1 GENERAL OPERATING INSTRUCTIONS... 1. Turn the power dial to turn on, the speed indicator and the strobe-illuminator will light up. 2. Turn on and raise the target light for illuminating the stylus tip by pushing the target light button. -
Page 11: Tonearm Section
1170±1Hz with 78 rpm Static Balanced S-shaped with detachable headshell 234mm 20mm 0-4g 0-7g 6-10g AC110-127V / 220-240V, 50/60Hz 15 Watts 17 3/4” x 13 3/4” x 5 7/8” 10.8Kgs 24 lbs - The Leader in DJ Technology PRO TT-1 http://www.numark.com... -
Page 12: Limited Product Warranty
To obtain an RA# and assistance on where to return the mixer, contact NUMARK customer service at 401-295- 9000.
Need help?
Do you have a question about the PRO TT-1 and is the answer not in the manual?
Questions and answers