Table of Contents
Advertisement
Quick Links
Advertisement
Table of Contents
Troubleshooting

Related Manuals for ripples Ripple Maker II

Summary of Contents for ripples Ripple Maker II
- Page 1 Ripple Maker II User Guide P/N: DOC00100 Rev A02...
- Page 2 Contents This section lists the items that are in the Ripple Maker II package. Check carefully to make sure you have all items on the list. Ripple Maker II Drip Tray Ripples Pod Power Supply AC Cord Top Cover Back Panel...
- Page 3 / barista, keeping in mind the work flow of the bartender / barista and other users. Make sure the Ripple Maker II is placed next to an Ethernet outlet or where there is good Wi-Fi signal. WATCH THE...
- Page 4 Tap Menu --> Maintenance --> Pod replacement and other end of the power supply into the power input follow onscreen wizard located at the back of the Ripple Maker II and the other end to the electrical outlet. When replacing it gently slide the pod into the correct position without force.
- Page 5 Beverage 3.1 Do's & Don'ts | Cocktails Preparation Pour as close to the drink as DO pour foam directly up to possible FOAM the cup rim. DO tap out any remaining FOAM bubbles to ensure a smooth FOAM FOAM canvas. Fill your glass Submerge to the rim...
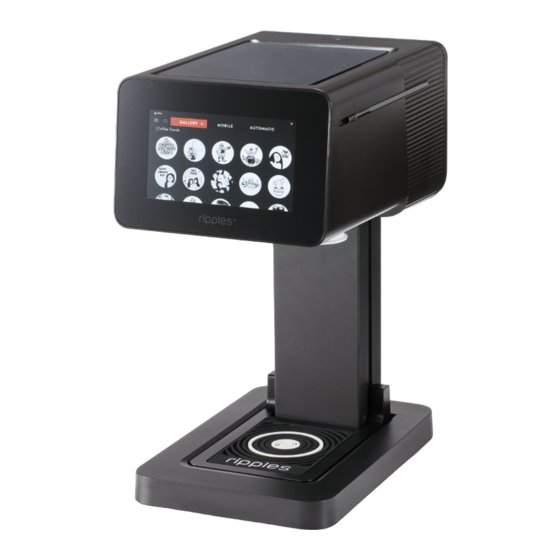
- Page 6 QR Code "Drink Ripples" 3. From your Ripple Maker II screen, select Gallery or Mobile - Tap the design to print 4. Long tap to change the default design setting (size, add to favorites, tags etc.)
- Page 7 Your Ripple Maker II includes dynamic content channels Grayscale provided by Ripples™. Using the Ripples Cloud you can JPEG or PNG control the content that appears on your Ripple Maker II and 1700 x 1700 Pixels in the Ripples App. Here's how: 8 bit High contrast images with bold lines 1.
-
Page 8: Daily Maintenance
Ripples 6.2 Content Sync Maintenance 6.1 Daily Maintenance Tap Menu > Maintenance > Daily Maintenance & follow onscreen wizard Rinse the drip tray Clean the drip tray check your internet twice a day. with water. connection Clean the drink tray Wipe down the surface once a day. -
Page 9: Connectivity Troubleshooting
6.3 Connectivity Troubleshooting WIFI Connected Connected without internet ETHERNET Connected Connected without internet GENERIC No connection -15- -16-... -
Page 10: Print Quality Troubleshooting
On average, a pod can generate 500-1200 prints, depending on print contrast and size of image • To maintan the pod's maximum utlization, keep the pod in the Ripple Maker II and device powered on • Gentley wiggle pod in and out of holder when replacing •... - Page 11 Email support@drinkripples.com Support site support.drinkripples.com ontaCt us via ontaCt us via hats Find the complete list of tutorials on our support site or search “Drink Ripples”on Youtube: Unboxing Maintenance Ripples Cloud Best practices + case studies Ripples Webapp -19- -20-...
- Page 12 +55 800 8925075 Israel World Wide +972 52 543 9089 (Also via SMS) www.drinkripples.com Instagram "@drinkripples" Phone: +1 866 866 8288 Facebook "Ripples" Americas Mail: Support@drinkripples.com YouTube "Ripples" WhatsApp +1 866 866 8288 LinkedIn "Ripples" Argentina USA & Canada SMS +1 866 866 8288 Line "Ripples"...
-
Page 13: Symbol Description
8.1 Warning & Cautions Warnings 1. Do not place the Ripple Maker II, its cord or plug, in water or other liquids. The Ripple Maker II is water-resistant only. 2. Do not handle the cord or plug with wet hands. - Page 14 8.2 Genral Product Safety When using the Ripple Maker II, place it on a stable, level surface, desk, bar, or table. Do not place any heavy objects on top of the Ripple Maker II. Always hold the plug when removing the power cord from or inserting Use only genuine Ripples accessories and supplies.
- Page 15 8.3 Cautions 1. The Ripple Maker II is designed to print on foam and food surfaces only, do not use the device for any other purpose. 2. The manufacturer will not be responsible for misuse or mistreatment of the device.
- Page 16 8.4 Technical Specification Operating temperature: 10° to 40° C Operating environment Recommended relative humidity: 25% to 75% noncondensing Environmental Recommended operating conditions: 15° to 32° C specifications: Storage temperature: -30°C to 70°C Storage environment Storage relative humidity: Up to 90% noncondensing at a temperature of 65°...
Need help?
Do you have a question about the Ripple Maker II and is the answer not in the manual?
Questions and answers