Kostal Smart Energy Meter Operating Manual
Hide thumbs
Also See for Smart Energy Meter:
- Installation instructions manual (348 pages) ,
- Operating manual (122 pages)
Table of Contents
Advertisement
Quick Links
Advertisement
Table of Contents

Related Manuals for Kostal Smart Energy Meter


Summary of Contents for Kostal Smart Energy Meter
- Page 1 Homepage_Cover Operating manual KOSTAL Smart Energy Meter...
- Page 2 All names, trademarks, product names or other designa- tions used in this manual may be legally protected even if not indicated as such (e.g. as a trademark). KOSTAL Solar Electric GmbH assumes no liability or warranty for their free usage. The illustrations and texts have been compiled with great care.
-
Page 3: Table Of Contents
Notes in this manual ......................... 13 Symbols used .......................... 17 Labels on the energy meter ...................... 18 Device and system description Using the KOSTAL Smart Energy Meter ..................20 The KOSTAL Smart Energy Meter ..................... 21 LED statuses ..........................22 Functions ..........................23 Connection variants The KSEM with the PLENTICORE plus .................. - Page 4 General information Faults / maintenance Functions of the Reset button ....................104 Error messages / displays ...................... 105 Exporting log data ........................107 Updating device firmware ....................... 108 Change password ........................109 Index © 2020 KOSTAL Solar Electric GmbH...
-
Page 5: General Information
1. General information Proper use ..........................7 EU declarations of conformity ....................10 About this manual ........................11 Notes in this manual ......................... 13 Symbols used ........................... 17 Labels on the energy meter ...................... 18 © 2020 KOSTAL Solar Electric GmbH... - Page 6 General information Thank you for choosing our KOSTAL Smart Energy Meter (KSEM) from KOSTAL Solar Electric GmbH! We hope you enjoy consistently high energy yields with your photovoltaic system. If you have any technical questions, please call our service hotline:...
-
Page 7: Proper Use
The KOSTAL Smart Energy Meter is approved for use in EU member states. Only use the KOSTAL Smart Energy Meter in accordance with the details provided in the enclosed documentation. - Page 8 Any use that di ers from that described in the “Proper INFORMATION use” chapter or goes beyond the stated intended pur- The KOSTAL Smart Energy Meter pose is considered inappropriate. The manufacturer may only be installed, maintained accepts no liability for any damage resulting from this.
- Page 9 For more details of this, a list of the Open Source soft- ware used and the related licence texts, Ch. 4.5 go to the Licences section on the website ( Webserver) of the KOSTAL Smart Energy Meter. © 2020 KOSTAL Solar Electric GmbH...
-
Page 10: Eu Declarations Of Conformity
General information 1.2 EU declarations of conformity KOSTAL Solar Electric GmbH hereby declares that the KOSTAL Smart Energy Meter described in this document complies with the basic requirements and other relevant conditions of the directives listed below. Directive 2014/30/EU (on the approximation of the laws of the Member States relating to electromagnetic compatibility... -
Page 11: About This Manual
1.3 About this manual Read this manual carefully in its entirety. It contains important information on the installation and operation of the KOSTAL Smart Energy Meter. Pay particular attention to the instructions regarding safe usage. KOSTAL Solar Electric GmbH assumes no liability for damages arising from the non-observance of this manual. - Page 12 Calling up the main table of contents Navigation bar Tables of contents You can navigate to the referenced points in the document within the instruction text using the cross-references. Ch. 1 Fig. 1, It. 2 Fig. 2: Examples of cross-references © 2020 KOSTAL Solar Electric GmbH...
-
Page 13: Notes In This Manual
Other notes Notes have been incorporated into the instruction text. A di erentiation is made in this manual between warnings and information notes. All notes are identified in the text line by an icon. © 2020 KOSTAL Solar Electric GmbH... - Page 14 five minutes so that the capacitors can discharge. Fig. 4: Structure of the warnings Warning symbol Signal word Type of danger Corrective actions Warning symbols Danger Danger due to electrical shock and discharge © 2020 KOSTAL Solar Electric GmbH...
- Page 15 financial loss. IMPORTANT INFORMATION The energy meter may only be installed, operated, maintained and repaired by trained and qualified sta . Fig. 5: Example of an information note © 2020 KOSTAL Solar Electric GmbH...
- Page 16 Damage to property possible Other notes They contain additional information or tips. INFO This is additional information. Fig. 6: Example of an information note Symbols within the additional notes Information or tip Enlarged view © 2020 KOSTAL Solar Electric GmbH...
-
Page 17: Symbols Used
Final result of a handling instruction Cross-reference to other places in the document or Æ to other documents List Tab. 1: Symbols and icons used Abbreviations used Abbrevia- Explanation tion Tab. Table Fig. Figure Item Chapter © 2020 KOSTAL Solar Electric GmbH... -
Page 18: Labels On The Energy Meter
Electrical installations require specialist skills Housing with protective insulation (protective class II). Device may not be disposed of with household waste. Observe the local application of disposal requirements CE marking The product satisfies the applicable EU requirements © 2020 KOSTAL Solar Electric GmbH... -
Page 19: Device And System Description
Navibutton Verlinkung Kapitel 02 2. Device and system description Using the KOSTAL Smart Energy Meter ..................20 The KOSTAL Smart Energy Meter ..................... 21 LED statuses ..........................22 Functions ..........................23 11 / 2020 © 2020 KOSTAL Solar Electric GmbH... -
Page 20: Using The Kostal Smart Energy Meter
Device and system description 2.1 Using the KOSTAL Smart Energy Meter The KOSTAL Smart Energy Meter (KSEM) is a measuring device, which determines electrical measuring values at the grid connection point and is available via LAN or RS485. It can be used in combination with various KOSTAL solar inverters and batteries. -
Page 21: The Kostal Smart Energy Meter
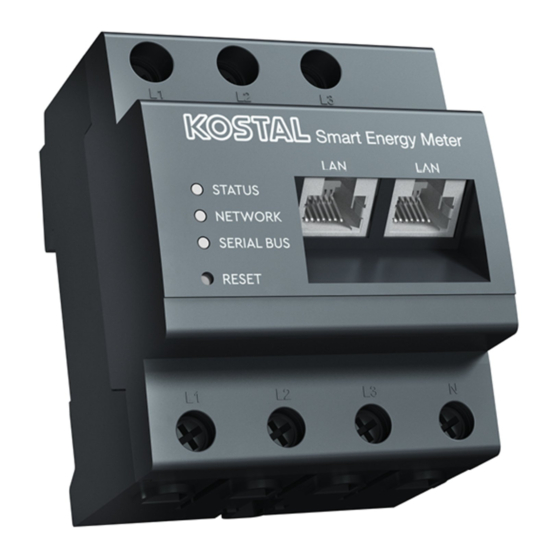
RS485 connection (A) Pre-configured for PIKO IQ/PLENTICORE RS485 connection (B) Pre-configured for PIKO MP plus Outputs for external wires L1, L2, L3 Status LED Network LED Sensor LED for RS485 bus Reset button 11 / 2020 © 2020 KOSTAL Solar Electric GmbH... -
Page 22: Led Statuses
Device and system description 2.3 LED statuses The LEDs inform the user of the status of the KOSTAL Smart Energy Meter. The following statuses are indicated: Col- State Description Orange On (<10 s) Device starting Green Flashes slowly Green Device ready... -
Page 23: Functions
With a multiple-inverter connection, there are several KOSTAL solar inverters in the same home network. By installing the KOSTAL Smart Energy Meter at the grid connection point, the flow of energy from all KOSTAL solar inverters present in the home network can be measured and regulated by the KOSTAL Smart Energy Meter using control information, e.g. - Page 24 The PIKO MP plus is not able to control a connected battery itself. In order to do this, the PIKO MP plus also needs the KOSTAL Smart Energy Meter and a battery activation code, both of which can be obtained from our KOSTAL Solar online shop.
- Page 25 KOSTAL Smart Energy Meter to connect a battery to the PIKO MP plus. Calling up the error log file Backup for saving data and the configuration For more information Ch. 4 11 / 2020 © 2020 KOSTAL Solar Electric GmbH...
- Page 26 The KOSTAL Solar Portal protects your investment in a PV system against yield loss, e.g. through active e-mail alerts of events. You can log into the KOSTAL Solar Portal for free at www.kostal-solar-portal.com. Functions include: Worldwide online access to the portal...
-
Page 27: Connection Variants
The KSEM with the PIKO MP plus ................... 41 The KSEM with the PIKO 4.2-20 / PIKO EPC ................50 The KSEM with the PIKO CI ...................... 53 Multiple-inverter connection of KOSTAL inverters ..............56 Configuring settings in the Webserver ..................66 © 2020 KOSTAL Solar Electric GmbH... -
Page 28: The Ksem With The Plenticore Plus
Installation 3.1 The KSEM with the PLENTICORE plus The KOSTAL Smart Energy Meter (KSEM) can be used in conjunction with the PLENTICORE plus in the following variants. 24-hour load / generation measurement (measuring the current home consumption and out- put power) DC energy storage (from your own PV system) Scope for storage from AC energy sources (e.g. - Page 29 Smart Energy Meter Position 1 STATUS NETWORK SERIAL BUS REST 4 3 2 1 RS485 (A) A B GND RS485 X452 (Modbus) RS485 Modbus X601 Smart Energy Meter STATUS NETWORK SERIAL BUS REST Position 2 © 2020 KOSTAL Solar Electric GmbH...
- Page 30 In this variant, the KOSTAL Smart Energy Meter runs as tions. a slave and transmits data to the inverter. The inverter does not have to be set up in the KOSTAL Smart Energy Meter because it is pre-configured to the Modbus RTU RS485 interface (A) as standard.
- Page 31 Installation Press “Save” button to accept settings. The inverter has been set up. © 2020 KOSTAL Solar Electric GmbH...
- Page 32 In this variant, the KOSTAL Smart Energy Meter runs as tions. a slave and transmits data to the inverter. The inverter does not have to be set up in the KOSTAL Smart Energy Meter because it is pre-configured to the Modbus RTU RS485 interface (A) as standard.
- Page 33 Setting on inverter only possible after logging in as an If changes are to be made to the settings, perform the installer. following steps: Call up online interface of KOSTAL Smart Energy Meter Ch. 4.3 Call up Modbus configuration under Modbus settings.
-
Page 34: The Ksem With The Plenticore Bi
Installation 3.2 The KSEM with the PLENTICORE BI The KOSTAL Smart Energy Meter (KSEM) can be used in conjunction with the PLENTICORE BI in the following variants. Scope for storage from AC energy sources (e.g. from PV systems, wind turbines, combined heat and... - Page 35 In this variant, the KOSTAL Smart Energy Meter runs as tions. a slave and transmits data to the inverter. The inverter does not have to be set up in the KOSTAL Smart Energy Meter because it is pre-configured to the Modbus RTU RS485 interface (A) as standard.
- Page 36 Installation If changes are to be made to the settings, perform the following steps: Call up online interface of KOSTAL Smart Energy Meter Ch. 4.3 Call up Modbus configuration under Modbus settings. Select PIKO IQ/ PLENTICORE from drop-down list. INFO...
-
Page 37: The Ksem With The Piko Iq
Installation 3.3 The KSEM with the PIKO IQ The KOSTAL Smart Energy Meter (KSEM) can be used in conjunction with the PIKO IQ in the following variants. 24-hour load / generation measurement (measuring the current home consumption and out- put power) - Page 38 Smart Energy Meter Position 1 STATUS NETWORK SERIAL BUS REST 4 3 2 1 RS485 (A) A B GND RS485 X452 (Modbus) RS485 Modbus Smart Energy Meter STATUS NETWORK SERIAL BUS REST Position 2 © 2020 KOSTAL Solar Electric GmbH...
- Page 39 In this variant, the KOSTAL Smart Energy Meter runs as tions. a slave and transmits data to the inverter. The inverter does not have to be set up in the KOSTAL Smart Energy Meter because it is pre-configured to the Modbus RTU RS485 interface (A) as standard.
- Page 40 Installation Press “Save” button to accept settings. The inverter has been set up. © 2020 KOSTAL Solar Electric GmbH...
-
Page 41: The Ksem With The Piko Mp Plus
Installation 3.4 The KSEM with the PIKO MP plus The KOSTAL Smart Energy Meter (KSEM) can be used in conjunction with the PIKO MP plus in the following variants. 24-hour load / generation measurement (measuring the current home consumption and out-... - Page 42 Smart Energy Meter Position 1 STATUS NETWORK SERIAL BUS REST 87654321 4 3 2 1 RS485 (B) RS485 (Modbus) COM 2/RJ45 LAN/RJ45 RS485 Modbus Smart Energy Meter STATUS NETWORK SERIAL BUS REST Position 2 © 2020 KOSTAL Solar Electric GmbH...
- Page 43 In this variant, the KOSTAL Smart Energy Meter runs as tions. a slave and transmits data to the inverter. The inverter does not have to be set up in the KOSTAL Smart Energy Meter because it is pre-configured to the Modbus RTU RS485 interface (B) as standard.
- Page 44 Installation Press “Save” button to accept settings. The inverter has been set up. © 2020 KOSTAL Solar Electric GmbH...
- Page 45 Smart Energy Meter STATUS NETWORK SERIAL BUS REST Install KOSTAL Smart Energy Meter as shown at the grid connection point in the home network. INFO Set up RS485 communication cable between inverter The installation position of the KOSTAL Smart Energy Meter can no...
- Page 46 Ch. 4.3 For a battery to be used with the PIKO MP plus, the function for this must be released in the KOSTAL Smart Energy Meter. To do this, release the battery INFO management by going to Inverter > Activation code.
- Page 47 Select the battery type, e.g. Battery type BYD HVM or BYD HVS. Select the number of mod- Number of modules ules that are installed in the battery. © 2020 KOSTAL Solar Electric GmbH...
- Page 48 This must be unique RS485 address for each device and must not already exist. Press “OK” button to accept settings. The PIKO MP plus and battery have been set up in the KOSTAL Smart Energy Meter. © 2020 KOSTAL Solar Electric GmbH...
- Page 49 Press “OK” button to accept settings. The battery must be assigned to a The battery has been set up in the KOSTAL Smart DC input in the PIKO MP plus. This is Energy Meter and linked to a PIKO MP plus. Finally, done in the PIKO MP plus by going to Settings >...
-
Page 50: The Ksem With The Piko 4.2-20 / Piko Epc
Installation 3.5 The KSEM with the PIKO 4.2-20 / PIKO EPC The KOSTAL Smart Energy Meter (KSEM) can be used in conjunction with the PIKO 4.2-20 or PIKO EPC in the INFO following variants. It is possible to use the KOSTAL... - Page 51 Smart Energy Meter STATUS NETWORK SERIAL BUS REST Install KOSTAL Smart Energy Meter as shown at the grid connection point in the home network. Set up LAN communication cable between inverter and KOSTAL Smart Energy Meter and connect. As an option, INFO...
- Page 52 Installation Set up inverter in KOSTAL Smart Energy Meter. Do this by performing the following steps: Call up online interface of KOSTAL Smart Energy Meter Ch. 4.3 Go to Inverter > Devices and use Plus (+) to add the PIKO 4.2-20 or PIKO EPC.
-
Page 53: The Ksem With The Piko Ci
Installation 3.6 The KSEM with the PIKO CI The KOSTAL Smart Energy Meter (KSEM) can be used in conjunction with the PIKO CI in the following variants. 24-hour load / generation measurement (measuring the current home consumption and out- put power) - Page 54 Smart Energy Meter 10/16A STATUS NETWORK SERIAL BUS REST Install KOSTAL Smart Energy Meter as shown at the grid connection point in the home network. INFO For currents above 63A, transformers must be used for measurement on the KOSTAL Smart Energy Meter.
- Page 55 In the KOSTAL Smart Energy Meter, the PIKO CI still has to be selected for the RS485 interface (A). Do this by performing the following steps:...
-
Page 56: Multiple-Inverter Connection Of Kostal Inverters
Installation 3.7 Multiple-inverter connection of KOSTAL inverters With battery storage 4 3 2 1 RS485 (A) A B GND RS485 X452 (Modbus) RS485 Modbus Smart Energy Meter STATUS NETWORK SERIAL BUS REST Without battery storage COM 1/RJ45 4 3 2 1 RS485 (A) - Page 57 In a multiple-inverter connection, up to 10 KOSTAL inverters can be used in the same house grid. INFO Only one KOSTAL Smart Energy Meter is required to In this variant, the KOSTAL Smart monitor power and limit feed-in at the grid connection...
- Page 58 Set power limitation/feed-in limitation for the grid connection point in the KOSTAL Smart Energy Meter Assign all KOSTAL inverters and the KOSTAL Smart Energy Meter to a PV system in the KOSTAL Solar Portal © 2020 KOSTAL Solar Electric GmbH...
- Page 59 Installation Communication connection INFO The following devices must be connected to the KOSTAL Smart Energy Meter and the Internet via a For details, see the KOSTAL inverter operating manual and the KOSTAL LAN connection. Smart Energy Meter installation instructions. LAN interface connection: PIKO IQ/ PLENTICORE plus/ PLENTICORE BI PIKO 4.2-20 and PIKO EPC...
- Page 60 Settings on the inverter are only pos- sible after logging in as an installer. Energy management. PIKO IQ/ PLENTICORE plus/ PLENTICORE BI To enable communication between the KOSTAL Smart Energy Meter and the inverter, the Modbus protocol must be activated. INFO...
- Page 61 Installation Configuring settling time For the KOSTAL Smart Energy Meter to achieve a rapid INFO type of control with a set feed-in limitation (power limita- The setting is only needed when tion) or zero feed-in, the settling time must be configured using two or more KOSTAL solar in- verters and can only be configured by...
- Page 62 Installation Settings in the KOSTAL Smart Energy Meter RS485 interface By default, no changes have to be made to the RS485 interfaces. These arrive preconfigured. The following devices can be connected to the RS485 interfaces: RS485 (A): PLENTICORE plus / PLENTICORE BI...
- Page 63 Energy Meter All KOSTAL inverters in a multiple-inverter connection, which are to be measured and controlled using the KOSTAL Smart Energy Meter, must be set up in the KOSTAL Smart Energy Meter. Do this by performing the following steps: Call up online interface of KOSTAL Smart Energy Ch.
- Page 64 KOSTAL Smart Energy Meter. set, as these are controlled by the KOSTAL Smart Energy Meter. This More information can be found in Ch.
- Page 65 Meter now simply have to be assigned to a PV system in the KOSTAL Solar Portal. To do this, log on to the KOSTAL Solar Portal Create a new system Now add all KOSTAL inverters that are in the multi- ple-inverter connection to this system and also the KOSTAL Smart Energy Meter.
-
Page 66: Configuring Settings In The Webserver
IMPORTANT using the KOSTAL Smart Energy Meter’s online interface. INFORMATION To do this, use your PC or tablet to log into the KOSTAL To log in, you will need the password from the energy meter’s type plate, Smart Energy Meter. You will find a detailed description which can be found on a separate Ch. -
Page 67: Operation
Navibutton Verlinkung Kapitel 4 4. Operation The Webserver ......................... 68 Preparing KOSTAL Smart Energy Meter ..................69 Calling up user interface ......................70 Configuring settings ........................71 The dashboard ......................... 72 Menu - smart meter ........................73 Menu - tari ..........................75 Inverter menu .......................... -
Page 68: The Webserver
The Webserver forms the graphic interface between the work can be recorded. KOSTAL Smart Energy Meter and user. Go to Login to log in to the KOSTAL Smart Energy Meter. IMPORTANT INFORMATION To log in, you will need the password from the energy meter’s type plate,... -
Page 69: Preparing Kostal Smart Energy Meter
Operation and operating the device 4.2 Preparing KOSTAL Smart Energy Meter The KOSTAL Smart Energy Meter has to be connected to an existing local network in order for you to access it. This requires the following steps: Install the KOSTAL Smart Energy Meter in a distribu- tor box on the top-hat rail according to the installation instructions provided and connect by cable. -
Page 70: Calling Up User Interface
The user interface is called up using a standard browser on a PC, tablet or mobile phone. To do this, enter host INFO name or IP address of the KOSTAL Smart Energy Meter This function depends on the router in your browser’s address line. The factory-set host... -
Page 71: Configuring Settings
If you want to make changes to the settings on the KOSTAL Smart Energy Meter interfaces, you can select an inverter for the interface under the Modbus settings. The appropriate values are stored as standard. You can also adapt the values if necessary. -
Page 72: The Dashboard
The dashboard provides the user with an overview of the feed-in or purchase. The values on the lines with arrows show the energy current most important KOSTAL Smart Energy Meter in kWh (active energy), which was data. fed in or purchased over the entire operating period. -
Page 73: Menu - Smart Meter
The graphics provide the user with an overview of whether the entire system is purchasing or feeding in power at the present time. All power and energy values are indicated separately as purchase (+) and feed-in (-). © 2020 KOSTAL Solar Electric GmbH... - Page 74 It is stated in watt-hours. Measuring values per phase The table shows all measuring values recorded by the system per phase. In enhanced mode, apparent and reactive power / energy are also displayed. © 2020 KOSTAL Solar Electric GmbH...
-
Page 75: Menu - Tari
Consumption and tari information for the feed-in and consumption. The tari s for feed-in and consumption The diagram also shows the energy in kWh and the costs in the configured (purchase) are stated under the tari setting. currency. © 2020 KOSTAL Solar Electric GmbH... - Page 76 Here you select the currency and set the monthly basic charge for the tari . The energy rate for the tari for feed-in or consumption (purchase) can be set using the pen symbol next to the tari view. © 2020 KOSTAL Solar Electric GmbH...
- Page 77 If a created energy rate is not as- assign these using the “Assign” button. The colours signed a time window, it is automati- indicate which energy rate/tari applies to which time cally deleted after saving. period. © 2020 KOSTAL Solar Electric GmbH...
-
Page 78: Inverter Menu
This function can be used to release Release additional functions via activation code additional options. This may include e.g. releasing battery management to connect a battery storage system together with the PIKO MP plus. © 2020 KOSTAL Solar Electric GmbH... - Page 79 PIKO MP plus. In addition to this, the KOSTAL Smart Energy Meter can be connected to the KOSTAL Solar Portal to transfer data from the KOSTAL Smart Energy Meter and inverter to the portal.
- Page 80 RS485 interface. To connect the inverter, you will need to state the RS485 interface of the KOSTAL Smart Energy Meter to which the inverter was connected. If there are several inverters, di erent RS485 addresses should be used.
- Page 81 This automat- ically sets the maximum AC output power of the inverter. This type of inverter communicates using TCP (LAN). The IP address has to be stated for the connection. © 2020 KOSTAL Solar Electric GmbH...
- Page 82 Serial interface The battery communicates using the RS485 interface. To connect the battery, you will need to specify which RS485 interface of the KOSTAL Smart Energy Meter the battery’s communication cable was connected Battery type Select the battery type e.g. BYD HVM or BYD HVS.
- Page 83 Explanation of device overview Parameter Explanation Name Indication of name which the user has given to the KOSTAL solar inverter. The name is assigned via the inverter menu interface. Type Shows the type designation of the inverter/battery.
- Page 84 Any modifica- tions only take e ect once confirmed with “OK”. Delete (bin symbol) The bin symbol can be used to delete an inverter from the KOSTAL Smart Energy Meter. © 2020 KOSTAL Solar Electric GmbH...
- Page 85 KOSTAL Smart Energy The connection to the KOSTAL Solar Portal is only made Meter under "Device Settings > or broken after clicking on the “Save” button. Device > Date and Time".
- Page 86 INFO system. If the value set for the feed-in limit is exceeded, Note regarding power limitation the KOSTAL Smart Energy Meter calculates the amount with several inverters by which each connected inverter needs to reduce its When limiting power, every connect- output to avoid exceeding the feed-in limit.
- Page 87 This first has to be purchased from the KOSTAL Solar purchased from the KOSTAL Solar online shop. online shop. Released extra options Overview of options currently released in the KOSTAL Smart Energy Meter. © 2020 KOSTAL Solar Electric GmbH...
-
Page 88: Menu - Modbus Settings
Ethernet (LAN) for the Modbus specification (e.g. see www.modbus.org). Modbus TCP communication purposes. In this case, Modbus TCP forms part of the IEC 61158 standard. communication must also be activated in the inverter. © 2020 KOSTAL Solar Electric GmbH... - Page 89 KOSTAL solar inverters, but also other devices, can be connected to the Modbus RTU RS485 interface. In the “ Modbus RTU slave” mode, the KOSTAL Smart Energy Meter provides the measurement data via the RS485 interface. In the “ Modbus RTU Master” mode on the other hand, measurement data is sent and written to other slave devices in order to control them.
- Page 90 The Modbus slave functionality on the respective RS485 interface is acti- vated. Data can only be retrieved from INFO the KOSTAL Smart Energy Meter via the interface once the interface has If using a PIKO MP plus with con- been activated and the settings have nected battery, the interface has to be deactivated here.
- Page 91 KOSTAL solar inverters can be connected to the Modbus TCP (LAN) interface, e.g. for a multiple-inverter connec- tion, but so too can other devices, which evaluate the KOSTAL Smart Energy Meter’s data or are controlled by the meter. Mode - master INFO In “Master”...
- Page 92 Transmit interval Here, you can set an interval, at which the measure- ment data is to be transmitted from the KOSTAL Smart Energy Meter. The Energy Manager usually transmits its measurement data via the Modbus master as soon as it is available.
- Page 93 KOSTAL Smart Energy Meter can therefore be reduced if all of the registers are not required. This may be nec- essary if lots of devices are connected to the KOSTAL Smart Energy Meter. The arrow on the right can be used to drop down a detailed list of registers, which are contained in the respective groups.
- Page 94 This item can be used to import or export the entire con- figuration of the Modbus configuration. Exporting the configuration allows the configuration currently saved to be downloaded as a file. Importing the configuration allows the configuration to be adopted from a previously exported file. © 2020 KOSTAL Solar Electric GmbH...
-
Page 95: Menu - Device Settings
Shows the status of the serial interface Create or import a backup Device can be used for time settings, a restart, to import updates or produce system logs © 2020 KOSTAL Solar Electric GmbH... - Page 96 Ex factory, this is set as KSEM-serial number designation. The name can be modified under the network settings. IP address IP address of the KOSTAL Smart INFO Energy Meter, which was issued manually or by a DHCP server. More information about the network...
- Page 97 PCs in the same network and displayed in the network environment. This makes it easier for the user to find the device in the network if he or she doesn't know the IP address. © 2020 KOSTAL Solar Electric GmbH...
- Page 98 Operation and operating the device E-mail settings If an event occurs, the KOSTAL Smart Energy Meter can inform you of it. To do this, you can set up configuration to your SMTP server (mail server) here, which will then inform you of various events via e-mail.
- Page 99 Operation and operating the device Internal power meter / transformer INFO The KOSTAL Smart Energy Meter can directly measure You will find a description of the up to 63A per external wire. External transformers are electrical connection for transformers with an indirect measurement in the used for higher currents.
- Page 100 Operation and operating the device Backup Produce a password-protected backup to save the data and settings of the KOSTAL Smart Energy Meter. Parameter Explanation Create This function can be used to save the system settings and data captured. As an option, the Password field can be used to issue a password to pro- tect the data backup.
- Page 101 Operation and operating the device Device Configure general settings on the KOSTAL Smart Energy Meter. Parameter Explanation Date and time Set date and time of device. Your time zone Set the time zone so that calen- dar-based adjustments, such as...
- Page 102 Update device firmware This menu item can be used to load a new device firmware for the KOSTAL Smart Energy Meter Ch. 5.4. System logs This menu item can be used to download system log data as a text file for certain time periods...
-
Page 103: Faults / Maintenance
Navibutton Verlinkung Kapitel 5 5. Faults / maintenance Functions of the Reset button ....................104 Error messages / displays ....................... 105 Exporting log data ........................107 Updating device firmware ....................... 108 Change password ........................109 © 2020 KOSTAL Solar Electric GmbH... -
Page 104: Functions Of The Reset Button
Webserver 5.1 Functions of the Reset button Restarting KOSTAL Smart Energy Meter Press and hold the RESET button for more than 6 seconds with a sharp object. The device will then start. Resetting the online interface password Press the Reset button as follows:... -
Page 105: Error Messages / Displays
The network cable is not correctly connected to the grid connection. Ensure that the network cable is correctly connected to the grid connection. The KOSTAL Smart Energy Meter is not in the same local network. Connect KOSTAL Smart Energy Meter with the same router / switch. - Page 106 Webserver KOSTAL Smart Energy Meter is providing unrealistic measuring values The KOSTAL Smart Energy Meter has been installed the wrong way round. Recheck how L1 to L3 are connected. The transformers are not configured. Go to Device settings > Transformer ratio, activate transformer and set the correct transformer ratio.
-
Page 107: Exporting Log Data
Webserver 5.3 Exporting log data For service purposes, the log files can be downloaded from the KOSTAL Smart Energy Meter. The log data is then used by the service team for error rectification. Do this by performing the following steps:... -
Page 108: Updating Device Firmware
Use the “Browse” button to select the file on your PC. Press "Update" to start the update. Once a prompt has been accepted, the new firm- ware is uploaded and installed on the KOSTAL Smart Energy Meter. Finally the KOSTAL Smart Energy Meter is restarted. -
Page 109: Change Password
Enter the new password. This must contain at least 8 letters and a mixture of upper- and lower-case letters. Enter the password again under “Confirm”. Confirm the input by selecting “Send”. You have changed your password. © 2020 KOSTAL Solar Electric GmbH... -
Page 110: Index
Hotline ................................... 6 KOSTAL Solar Portal ............................26 Language ................................2 Load / generation measurement ....................29, 38, 42, 51, 54 Multiple-inverter connection of KOSTAL inverters ....................56 Notes ..............................11, 13, 16 Power limitation ............................. 61, 64 Proper use ................................7... - Page 111 Index Recording home consumption ..........................23 Resetting KOSTAL Smart Energy Meter to state in which it was delivered ............104 Resetting the network settings ........................... 104 Resetting the online interface password ......................104 Restarting KOSTAL Smart Energy Meter ......................104 Safety instructions ...............................
- Page 112 HOT CONTACT KOSTAL S MDACI, A.S. 79108 F . B . +420 773 988 087 +49 761 47744 - 100 . daca i ali e .c la -elec ic.c HIGH Q ALIT - AD ANCED SOL TIONS - BEST DEALS...
Need help?
Do you have a question about the Smart Energy Meter and is the answer not in the manual?
Questions and answers