Table of Contents
Advertisement
Quick Links
User Manual
SDS 500
MilliporeSigma, Milli-Q, and Sigma-Aldrich are trademarks of Merck KGaA, Darmstadt, Germany or its
affiliates. All other trademarks are the property of their respective owners. Detailed information on
trademarks is available via publicly accessible resources.
© 2021 Merck KGaA, Darmstadt, Germany and/or its affiliates. All Rights Reserved.
The life science business of Merck KGaA, Darmstadt, Germany
operates as MilliporeSigma in the U.S. and Canada.
SigmaAldrich.com
Advertisement
Table of Contents

Summary of Contents for Millipore Sigma Milli-Q SDS 500
- Page 1 SigmaAldrich.com User Manual SDS 500 MilliporeSigma, Milli-Q, and Sigma-Aldrich are trademarks of Merck KGaA, Darmstadt, Germany or its affiliates. All other trademarks are the property of their respective owners. Detailed information on trademarks is available via publicly accessible resources. © 2021 Merck KGaA, Darmstadt, Germany and/or its affiliates. All Rights Reserved. The life science business of Merck KGaA, Darmstadt, Germany operates as MilliporeSigma in the U.S.
-
Page 3: Table Of Contents
Contents Introduction..........................5 Preface..........................5 System Identification.....................5 At A Glance..........................7 System........................10 Consumables......................11 Accessories.........................12 Communication......................13 Operation..........................14 Pumps Control......................14 Tank Flush Schedule....................15 Loop UV Schedule...................... 15 ASM Schedule......................15 How to Power On the SDS 500.................. 15 How to Power Off the SDS 500.................. - Page 4 Accessories.........................45 Consumables......................45 Spare Parts......................... 46...
-
Page 5: Introduction
Introduction Preface Congratulations for purchasing our Water Storage and Distribution System (SDS 500). This User Manual will guide you during its normal operation and maintenance. Installation of this product is meant to be performed by a qualified service representative who will refer to the installation documentation.. Water Purification System is used to refer to any device designed to control the The term SDS 500 and to feed it with purified water. - Page 6 Note SDS500 Range of product are classified as Class A products according EMC standards. A Class A device is a product marketed for commercial or industrial use and is not intended to be used in a home. Applied EMC standards : IEC 61326‐1 Ed.2 : 2012 Electrical equipment for measurement, control and laboratory use –...
-
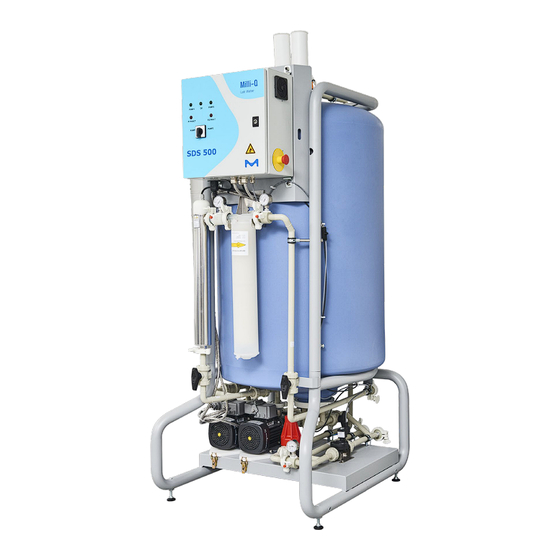
Page 7: At A Glance
At A Glance At A Glance | 7... - Page 8 Filter air entering the tank to protect the stored pure water from Vent filters contaminants. Water is sprayed to ensure tank walls are clean. Spray ball UV light limits the development of bio-film inside the storage ASM (accessory) tank . Refer to control panel drawing.
- Page 9 SDS 500 Single Control Panel SDS 500 Duplex Control Panel At A Glance | 9...
-
Page 10: System
SDS 500 Control Panel Green light when power is supplied. Power On/Off Green light when pump 1 is powered. Pump 1 On/Off Green light when pump 2 is powered. Pump 2 On/Off Refer to Self Help Guide if Red Light. Pump 1 Fault Refer to Self Help Guide if Red Light. -
Page 11: Consumables
Consumables The SDS 500 consumables are dependent on the options installed. Consumable replacement is managed by the Water Purification System using alerts and wizards. Vent filters Vent filters should always be installed, they filter air entering the tank to protect the stored pure water from contaminants. Vent filters protect from bacterial contamination and can also protect high purity water from CO and volatile organic compounds (VOC). -
Page 12: Accessories
Accessories Accessories are available to customize the SDS 500 configuration. Loop UV lamp The loop UV lamp accessory includes a 254 nm bactericidal UV lamp to limit bacterial growth in the distributed water. The UV lamp housing is installed upstream of the loop filter. The loop UV is powered when the distribution pump is powered by the Water Purification System. -
Page 13: Communication
Communication The SDS 500 communicates with the Water Purification System through 2 cables (Single) or 3 cables (Duplex). Cable CH In C2 Out Connects to... Leak detector, tank UV lamp(s), dumping level and overflow Pump 2 valve and pump 1 detector SDS 500 Single SDS 500 Duplex... -
Page 14: Operation
Operation Pumps Control The Water Purification System connected to the SDS 500 controls the operation of the SDS 500 distribution pumps. Setting The selector switch located on the SDS 500 should be set to automatic control (AUTO) in order to give control to the Water Purification System. -
Page 15: Tank Flush Schedule
Tank Flush Schedule Regular tank flushes allow refresh of stored water when water requirement is low. The Water Purification System connected to the SDS 500 controls the frequency of tank flushes. Setting The selector switch located on the SDS 500 should be set to automatic control in order to give control to the Water Purification System. -
Page 16: How To Power Off The Sds 500
1. Verify that it is safe to power on the SDS 500 (no leak or electrical maintenance in progress). 2. Check that the SDS 500 three sampling valves are closed. 3. Check that the tank manual drain valve is closed. 4. -
Page 17: How To Empty The Tank Manually
How to Empty the Tank Manually Manually opening the valve underneath the tank is the only way to ensure 100% of the water is drained. 1. Make sure the SDS 500 is set to automatic control. 2. Put the Water Purification System in STANDBY. 3. - Page 18 Return to normal operation if needed (READY modes). Note: The restart of the distribution process may be delayed as the Water Purification System must fill the tank to a minimum level before the distribution is restarted. 18 | Operation...
-
Page 19: How To Empty The Tank Automatically
How to Empty the Tank Automatically The SDS 500 can be emptied automatically at high speed through the SDS 500 dumping valve using the TANK EMPTYING feature on the Water Purification System. 1. Make sure the SDS 500 is set to automatic control. 2. -
Page 20: Sds Stop
SDS Stop The SDS Stop button located on the right side of the SDS 500 control panel stops the filling and distribution processes immediately when pressed. The SDS Stop button DOES NOT switch off the electric power in the SDS 500 electrical box. -
Page 21: Maintenance
Maintenance The SDS 500 consumables need replacement when prompted by the Water Purification System Interface. Remember: Make sure isolation valves are not left closed before restart of distribution process. Vent filters Vent filters can be replaced by the user with the provided instructions. Loop filter The loop filter can be replaced by the user with the provided instructions. -
Page 22: How To Replace Vent Filters
How to Replace Vent Filters Two vent filters prevent contamination of the stored pure water by filtering air entering the tank. Vent filters should always be installed with their protection on top of the SDS. Initiate the vent filters replacement wizard on the Water Purification System. Warning: Exposure to UV light is possible if an ASM lamp is installed and is activated. - Page 23 6. Push firmly down until filters are fully secured. Finalize the vent filters replacement wizard on the Water Purification System in order to reset the replacement timer. Maintenance | 23...
-
Page 24: How To Replace (Install) Loop Filter
How to Replace (Install) Loop Filter The loop filter is connected using two tri-clamps. The loop filter should be replaced when prompted on the Water Purification System interface or when the pressure drop reaches a preset value (typically 1 bar). If the loop filter is not installed yet, then the by-pass pipe should be replaced by the loop filter (keep the pipe for later use). - Page 25 10. Remove the used filter, or the by-pass pipe, and keep the clamps and gaskets. 11. Position the new filter between the 2 connection clamps. 12. Make sure the seals are correctly seated. 13. Close the clamps on the filter connections and make sure the clamps are well positioned.
-
Page 26: Self Help Guide
Self Help Guide The Self Help Guide covers situations which could occur with your SDS 500 and provides guidance to resolve them yourself. Should you need additional information or support, note the serial number of your water purification system, the serial number of your SDS 500 located on the left side of the control panel and contact your local Service Representative. -
Page 27: Pump Fault Red Light On Sds 500 Duplex
Pump Fault Red Light on SDS 500 Duplex A Pump Fault red light on the Duplex SDS 500 Control Panel can have multiple causes. a) One Pump Fault red light illuminated Issue One Pump Fault Red light illuminated on Control Panel. Causes There is a problem with one of the distribution pump. -
Page 28: Messages On Water Purification System
Messages on Water Purification System The SDS 500 is controlled by the Water Purification System. Alarms and alerts relating to the SDS 500 are displayed on the Water Purification System interface. DISTRIBUTION UV message Issue A Distribution UV message is displayed on the Water Purification System Interface. -
Page 29: Pump Failure Messages (Sds 500 Single)
PUMP FAILURE messages (SDS 500 Single) a) PUMP FAILURE message only Issue A PUMP FAILURE message is displayed on the Water Purification System interface. Causes 1. The control panel selector switch is on the manual override position. 2. There is a problem with the distribution pump. Effect 1. -
Page 30: Pump Failure Messages (Sds 500 Duplex)
PUMP FAILURE messages (SDS 500 Duplex) a) PUMP1 FAILURE or PUMP2 FAILURE messages displayed Issue PUMP1 FAILURE or PUMP2 FAILURE message is displayed on the Water Purification System interface without any TANK LEVEL SENSOR FAILURE message. Cause There is a problem with one pump. Effect The remaining pump is used to maintain normal operation. - Page 31 Solution 1. Make sure the SDS Stop button is not pushed. 2. Contact your Local Service Representative. 3. Power OFF the SDS, wait 10 seconds, power back ON the SDS and then acknowledge message on Water Purification System. Contact your Local Service Representative if the alarm persists.
-
Page 32: Overflow Message
OVERFLOW message Issue An OVERFLOW message is displayed on the Water Purification System Interface. Cause The level of water in the tank has been detected as too high. Effect The Water Purification System stops filling the tank but does not stop the distribution process. - Page 33 Figure 1: SUB D9 Male 2. Make sure the SDS Stop button is not pushed. 3. Contact your Local Service Representative. 4. Contact your Local Service Representative. Self Help Guide | 33...
-
Page 34: How To Dispense Water If The Water Purification System Is Off
How to Dispense Water if the Water Purification System is Off The SDS 500 Control Panel can be used to manually control the Distribution Pump(s) instead of automatic control by the Water Purification System. Using the manual override of the pumps on the SDS 500 Control Panel will trigger several alarms on the Water Purification System Interface, it should therefore be used during a short period and only if the Water Purification System is unable to manage the SDS. -
Page 35: How To Check Power
How to Check Power The SDS 500 control panel is equipped with a POWER light which indicates if the SDS 500 is powered or not. 1. Locate the POWER light on the SDS 500 control panel. 2. Make sure it is illuminated. If POWER is not illuminated, verify the power supply (mains power and power cord) before contacting your local service support (internal circuit breaker may also have tripped). -
Page 36: How To Air Purge A New Loop Filter
How to Air Purge a new Loop Filter The loop filter needs to be purged from trapped air once it has been installed on the SDS 500. A new loop filter has just been installed and isolation valves are still closed. 1. - Page 37 7. Gently open the loop filter top purge valve. 1. If the tank level is above 75%, the loop filter will fill up with water, close the loop filter purge valve when it appears all air has been vented out. This will complete the air purge procedure.
-
Page 38: What To Do When There Is No Flow
What to do when there is No Flow Several checks can be performed if no water can be dispensed from the loop. 1. Verify the SDS 500 is powered. 2. Make sure the pump(s) isolation valves and loop filter isolation valves are open. 3. -
Page 39: Requirements And Specifications
Requirements And Specifications Environmental Requirements Specific environmental conditions have to be respected to ensure normal operation of the SDS 500. Location Indoor use only Ambient storage temperature 5°C< T <40°C Ambient operating temperature 10°C< T <40°C Relative humidity <80% without condensation Altitude ≤... -
Page 40: Feed Water Requirements
Feed Water Requirements The SDS 500 Water Storage and Distribution System has been designed to be fed by a compatible Water Purification System producing ASTM type 2 or type 3 water. Dimensions And Weights Dimensions (mm) Weights (kg) Single SDS 500 Duplex SDS 500 Shipping Weight Dry Weight... -
Page 41: Loop Water Specifications
Loop Water Specifications The SDS 500 is designed to deliver stored high purity water while maintaining a constant flow rate in the loop. Flowrate The SDS 500 flow rate value is set during the SDS 500 installation based on the required water velocity in the loop (typically >... -
Page 42: Health And Safety
Health And Safety Safety Information Symbol What it means This UV RADIATION sticker is used to refer to a position on the system cabinet or inside of it where exposure to UV light is possible. This HAZARD sticker is used to refer to a position on the system cabinet or inside of it that could be hazardous. -
Page 43: Recycling
Recycling Directive 2002/96 EC: For European users only. The symbol "crossed bin" on a product or its packaging indicates that the product should not be treated like household waste when discarded. Instead the product should be disposed of at a location that handles discarded electric or electronic equipment. -
Page 44: Legal Information
Legal information Notice It has always been Millipore S.A.S. policy to continuously improve its products. The information in this document is subject to change without notice and should not be construed as a commitment by Millipore S.A.S. Millipore S.A.S. assumes no responsibility for any errors that might appear in this document. -
Page 45: Ordering Information
Ordering Information Accessories The installation of accessories should only be performed by a qualified service engineer. TANKSDS2UV SDS 500 LOOP UV LAMP ASSEMBLY Includes UV housing, UV lamp and necessary connection parts. TANKSDS2ASM SDS 500 ASM Includes ASM, UV lamp, and necessary connection parts. - Page 46 Spare Parts ZF000PLSV SAMPLING VALVE (x1) Factory installed plastic sampling valve 1/8" NPTM (Luer valve). ZF000LCSV SAMPLING VALVE (x5) SEPTUM Septum to be installed on sampling valve to isolate it from air. FTPF16819 TRI-CLAMP (x1) 1 ½ inch tri-clamp without gasket .
- Page 47 ZF3000607 (x1) SDS500 LOOP (OETICKER 2x) CONNECTOR Fitting to connect the SDS 500 1 ½ inch tri-clamp connection to a 20mm ID flexible pipe (hose barb connection). Ordering Information | 47...
Need help?
Do you have a question about the Milli-Q SDS 500 and is the answer not in the manual?
Questions and answers