Advertisement
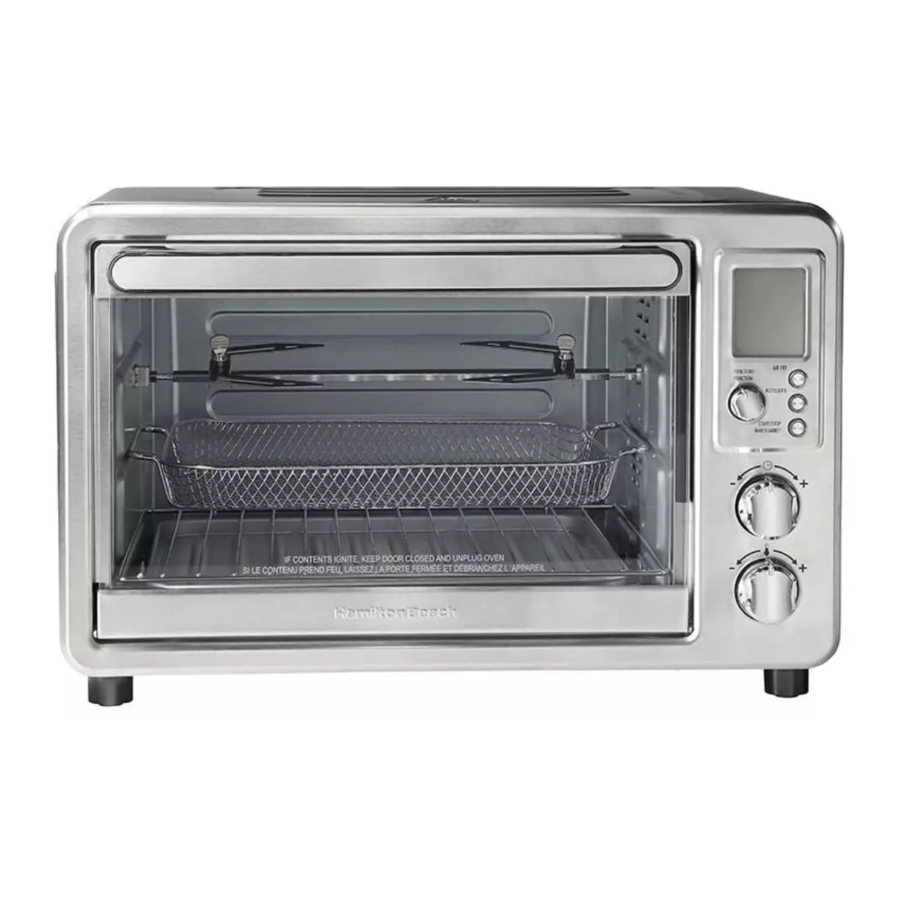
Parts and Features
Read all instructions before use.

To order parts: US: 1.800.851.8900 www.hamiltonbeach.com Canada: 1.800.267.2826 Mexico: 01 800 71 16 100
Before first use: Most heating appliances produce an odor and/or smoke when used for the first time. Plug into outlet. Turn FUNCTION Dial to Bake (  ). Turn Temperature Dial (
  ) to 450°F (232°C). Then, turn the Time Dial (
  ) to 5 minutes. The odor should not be present after this initial preheating. Wash Baking Pan, Rotisserie Skewer, and Oven Rack in hot, soapy water before using.

Hot Surface. The temperature of accessible surfaces may be high when the appliance is operating.
- Rotisserie Forks on Rotisserie Rod (Rotisserie Skewer)
- Rotisserie Lift
- Air Fry Basket – Mesh basket used for air fry cooking in the top rack position. Always slide Baking Pan under Oven Rack in middle rack position to use as a drip tray.
- Oven Rack – Three positions: Bottom for baking large chicken or roasts; middle for toasting and baking 12" pizzas, casseroles, and baked items; and top for air frying and broiling.
- Baking Pan – Use for baking, or slide under Oven Rack to use as a drip tray when air frying, broiling, or using the rotisserie.
- Slide-Out Crumb Tray – Slides out easily to clean.

- LCD Display – Illuminates after any control is used. It will enter standby mode after 30 seconds if START/STOP button is not pressed.
- Toast (
![]() ) Mode – Turn Time Dial (
) Mode – Turn Time Dial ( ![]() ) to select shade and turn Temperature Dial (
) to select shade and turn Temperature Dial (![]() ) to select 1-6 slices.
) to select 1-6 slices. - Pizza (
![]() ) Mode – Default temperature is 400°F (204°C).
) Mode – Default temperature is 400°F (204°C). - Bake (
![]() ) Mode – Default temperature is 350°F (177°C).
) Mode – Default temperature is 350°F (177°C). - Broil (
![]() ) Mode – Set timer to desired time; oven also has auto-shutoff at 30 minutes.
) Mode – Set timer to desired time; oven also has auto-shutoff at 30 minutes. - FUNCTION Dial – Turn dial to select a cooking mode. The icon for the selected mode will illuminate on the Display.
- AIR FRY Button with red power indicator light – Used during Pizza (
![]() ) mode. Press and hold for 3 seconds to change from Fahrenheit to Celsius.
) mode. Press and hold for 3 seconds to change from Fahrenheit to Celsius. - ROTISSERIE Button with red power indicator light – Press button, then press START/STOP button to start cooking.
- START/STOP Button – Can be pressed at any time to turn oven function on or off.
- Time Dial with Auto Shutoff (
![]() ) – Turn to adjust cook time from 1 minute to 4 hours, except in Broil mode. Timer has a stay on feature to use during Pizza (
) – Turn to adjust cook time from 1 minute to 4 hours, except in Broil mode. Timer has a stay on feature to use during Pizza ( ![]() ) and Bake (
) and Bake ( ![]() ) modes, AIR FRY and ROTISSERIE. STAY ON will be on the display. Can be adjusted at any time.
) modes, AIR FRY and ROTISSERIE. STAY ON will be on the display. Can be adjusted at any time.
![warning]()
NOTE: When timer is set, it starts to count down before preheat is complete. Adjust time when adding food. - Temperature Dial ( ) – Turn to adjust temperature from 170°F (77°C) to 450°F (232°C). Can be adjusted at any time.

How to Use
Place Oven Rack in desired position with Slide-Out Crumb Tray in place. Plug into outlet. If Display is blank, press any button to illuminate Display. Rack can be in middle or bottom position for Bake mode, depending on size of food. Oven will beep 3 times when Toast (  ), Pizza (
 ), Bake (
 ) or Broil (
 ) mode is complete.
AIR FRY Mode
Can be used with Pizza () or Bake () mode. Cooks and browns evenly by circulating forced hot air which crisps food with little to no added oil. Check foods for doneness before recommended packaging cook time.
- Place food in a single layer in Air Fry Basket.
- Slide Basket into top rack position, then slide Baking Pan under Oven Rack into middle rack position to use as a drip tray.
- Turn FUNCTION Dial to Pizza (
![]() ) or Bake (
) or Bake (![]() )
) - Set time by turning Time Dial (
![]() ) to desired time.
) to desired time.
Press AIR FRY Button, then press START/STOP Button to start baking. - Most foods cooked in Air Fry Mode will cook between 400º–450ºF (204°–232°C). Adjust Temperature (
![]() ) and Time (
) and Time ( ![]() ) Dials for the food being cooked.
) Dials for the food being cooked. - Check temperature of food for doneness before recommended package cook time.
TIP: Lightly misting fresh foods with oil will produce crispier results. Visit foodsafety.gov for recommended internal food temperatures.
Air Fry Cooking Guide

NOTE: Foods may need to be flipped, stirred, or rotated halfway during cooking. Foods that can't be flipped might need to be lightly covered with foil, if getting too brown.
| Food | Time |
| Snacks & Appetizers | |
| Frozen mozzarella sticks | 8–10 minutes |
| Frozen chicken nuggets | 10–12 minutes |
| Fresh chicken tenders | 5–7 minutes |
| Frozen breaded chicken tenders | 14–16 minutes |
| Fresh whole chicken wings | 16–18 minutes |
| Potatoes & Vegetables | |
| Frozen regular French fries | 18–20 minutes |
| Frozen tater tots | 8–10 minutes |
| Baked potatoes | 40–45 minutes |
| Asparagus spears | 8–10 minutes |
| Brussels sprouts, halved | 13–15 minutes |
| Meat & Poultry | |
| Boneless pork chops (1" [2.5 cm] thick) | 13–15 minutes |
| Uncooked breakfast sausage | 10–12 minutes |
| Hamburger (3/4" [1.9 cm] thick) | 15–18 minutes |
| New York strip steak (1-1/2" [3.8 cm] thick) | 20–25 minutes |
| Fish & Seafood | |
| Salmon | 10–12 minutes |
| Frozen fish sticks | 8–10 minutes |
| Peeled and breaded fresh shrimp | 10–12 minutes |
| Bakery & Desserts | |
| Refrigerated biscuits | 8–10 minutes |
| Corn muffins in silicone baking cups | 8–10 minutes |
| 6" (15 cm) cake in baking pan included in package | 16–20 minutes |
| Frozen apple turnover | 12–15 minutes |
* Times are a guide for different types of foods which vary in cook time. Cook food until desired crispness.
NOTE: Cooking times are based on a preheated oven.
STAY ON Function Broil Mode
The Oven can be set to stay on by turning the Time Dial to STAY ON. "STAY ON" will show in the display.
Broil Mode
Use to brown foods such as beef, chicken, fish, pork, and casseroles. Broil food on Oven Rack in top or middle rack position. Slide Baking Pan under Oven Rack to catch drippings. Food must be a minimum of 1 inch (2.5 cm) from the heating elements.
- Turn FUNCTION Dial to Broil (
![]() ).The Broil (
).The Broil ( ![]() ) icon will show in the display; the time default is 20 minutes. Oven broils on high temperature and may not be adjusted.
) icon will show in the display; the time default is 20 minutes. Oven broils on high temperature and may not be adjusted. - Press START/STOP Button to begin broiling.
Toast Mode
Use for browning and toasting breads, bagels, and English muffins. Rack should be in top or middle position.
- Turn FUNCTION Dial to Toast (
![]() ).
). - Select one of 5 shades of browning by turning Time Dial (
![]() ) to increase or decrease shade, then turn Temperature Dial (
) to increase or decrease shade, then turn Temperature Dial ( ![]() ) to select 1 to 6 slices. Then press START/STOP Button to begin toasting. Oven will beep 3 times when cycle is complete and will automatically shut off.
) to select 1 to 6 slices. Then press START/STOP Button to begin toasting. Oven will beep 3 times when cycle is complete and will automatically shut off.
How to Use the Rotisserie

Fire Hazard.
- If contents ignite, do not open oven door. Unplug oven and allow contents to stop burning and cool before opening door.
- Do not use oven cooking bags.
- Always allow at least 1 inch (2.5 cm) between food and heating element.
- Always unplug oven when not in use.
- Slide Baking Pan under Oven Rack into bottom rack position to use as a drip tray.
- Tie chicken and large pieces of meat tightly with cotton string to prevent meat from hitting drip pan. For instructions on how to truss a chicken, visit our blog at everydaygoodthinking.com and search for "The Ultimate Guide to Trussing a Chicken."
- Insert Rotisserie Rod into center of meat. Place Rotisserie Forks on rod with forks inserted into bottom side of chicken. Center meat lengthwise on rod. Tighten screws on Rotisserie Forks.
- Manually insert pointed end of Rotisserie Rod into Rotisserie Insert on right side of oven, rotating rod if necessary to fit. Place square end of rod into slot in bracket on left side.
- Press ROTISSERIE Button, then turn the Time Dial (
![]() ) to select the desired cook time.
) to select the desired cook time. - Turn the Temperature Dial (
![]() ) to the desired cooking temperature and press the START/STOP Button to begin baking.
) to the desired cooking temperature and press the START/STOP Button to begin baking. ![warning]()
NOTE: Only the upper heating elements are on in Rotisserie mode. To remove cooked meat from oven, place Rotisserie Lift with the hooks under the Rotisserie Rod. Lift and slide the Rotisserie Rod to the left and remove from the oven. Place meat on a clean surface to cool slightly. Using oven mitts, unscrew Rotisserie Forks from Rotisserie Rod.- Slide meat onto a serving tray or cutting surface. Remove Rotisserie Rod and ties before carving.
Care and Cleaning

Electrical Shock Hazard. Do not clean with metal scouring pads. Pieces can break off pad and touch electrical parts, causing a risk of electric shock.
Your Toaster Oven should be cleaned regularly for best performance and long life. Regular cleaning will also reduce the risk of fire hazard.
- Unplug Oven and cool completely.
- Wash Basket, Slide-Out Crumb Tray, Baking Pan and Oven Rack in hot, soapy water. Rinse and dry.
- Wipe base, LCD display, buttons, and dials with a damp sponge and dry.
- Use a damp, soapy sponge to clean inside of Oven.
Repeat with a damp sponge and dry. - Use a razor blade to gently lift baked-on foods. Spray glass cleaner on cloth to clean and wipe with a damp sponge to rinse. Dry with a clean cloth.
- The Rotisserie Forks on the Rotisserie Rod can be washed in hot, soapy water.
Troubleshooting
What size chicken will the Oven handle?
- The Oven will hold a 5-pound (2.3-kg) chicken.
When should I choose BAKE, BROIL, or AIR FRY?
- Choose Bake (
![]() ) for foods such as roasts, potatoes, or cakes.
) for foods such as roasts, potatoes, or cakes. - Choose Broil (
![]() ) to brown foods such as beef, chicken, fish, pork, and casseroles.
) to brown foods such as beef, chicken, fish, pork, and casseroles. - Choose Pizza (
![]() ) for pizza, frozen foods and snacks.
) for pizza, frozen foods and snacks. - Choose AIR FRY Button for fresh or frozen foods to crisp and evenly brown.
If I want to toast bread, what setting is best?
- The Toast (
![]() ) mode is best for toasting both sides of sliced breads. You can also use the Broil (
) mode is best for toasting both sides of sliced breads. You can also use the Broil (![]() ) mode for openfaced sandwiches, baguettes, and crostini. The Broil (
) mode for openfaced sandwiches, baguettes, and crostini. The Broil (![]() ) mode activates the top heating element and is great when toasting is required on one side only. You can also flip the bread when the desired level of browning is reached.
) mode activates the top heating element and is great when toasting is required on one side only. You can also flip the bread when the desired level of browning is reached.
Fire Hazard.
- Do not operate oven unattended.
- If contents ignite, do not open oven door. Unplug oven and allow contents to stop burning and cool before opening door.
- Do not use oven cooking bags.
- Do not heat foods in plastic containers.
- Always allow at least 1 inch (2.5 cm) between food and heating element.
- Follow food manufacturer's instructions.
- Regular cleaning reduces risk of fire hazard.
- Always unplug oven when not in use.
- Do not heat taco shells in toaster oven. Always use full-size conventional oven.
IMPORTANT SAFEGUARDS
When using electrical appliances, basic safety precautions should always be followed to reduce the risk of fire, electric shock, and/or injury to persons, including the following:
- Read all instructions.
- This appliance is not intended for use by persons (including children) with reduced physical, sensory, or mental capabilities, or lack of experience and knowledge, unless they are closely supervised and instructed concerning use of the appliance by a person responsible for their safety.
- Close supervision is necessary when any appliance is used by or near children. Children should be supervised to ensure that they do not play with the appliance.
- Do not touch hot surfaces. Use handles or knobs.
- To protect against electrical shock, do not immerse cord, plug, or oven in water or other liquid.
- Unplug from outlet when not in use and before cleaning. Allow to cool before cleaning appliance and putting on or taking off parts.
- Do not operate any appliance with a damaged cord or plug, or after the appliance malfunctions or has been dropped or damaged in any manner. Supply cord replacement and repairs must be conducted by the manufacturer, its service agent, or similarly qualified persons to avoid a hazard. Call the provided customer service number for information on examination, repair, or adjustment.
- The use of accessory attachments not recommended by the appliance manufacturer may cause injuries.
- Do not use outdoors.
- Do not let cord hang over edge of table or counter or touch hot surfaces, including stove.
- Do not place on or near a hot gas or electric burner, or in a heated oven.
- Extreme caution must be used when moving an appliance containing hot oil or other hot liquids.
- To disconnect, press START/STOP; then remove plug from wall outlet.
- Use extreme caution when removing baking pan or oven rack or disposing of hot grease.
- Do not clean with metal scouring pads. Pieces can break off the pad and touch electrical parts, creating a risk of electrical shock.
- Oversized foods or metal utensils must not be inserted in an oven as they may create a fire or risk of electrical shock.
- The bread may burn. A fire may occur if the oven is covered, touching, or near flammable material, including curtains, draperies, walls, and the like, when in operation.
- Extreme caution should be exercised when using containers constructed of materials other than metal or glass.
- Do not store any materials, other than manufacturer-recommended accessories, in this oven when not in use.
- Do not place any of the following materials in the oven: paper, cardboard, plastic, and the like.
- Do not cover slide-out crumb tray or any part of the oven with metal foil. This will cause overheating of the oven.
- To turn oven off, press START/STOP. See "Parts and Features" section.
- Do not place eyes or face in close proximity with tempered safety glass door, in the event that the safety glass breaks.
- Always use appliance with crumb tray securely in place.
- Do not use appliance for other than intended use.
- Clean oven interior carefully. Do not scratch or damage heating element tube.
- Do not operate the appliance by means of an external timer or separate remote-control system.
![burn hazard]() CAUTION HOT SURFACE. The temperature of accessible surfaces may be high when the appliance is operating.
CAUTION HOT SURFACE. The temperature of accessible surfaces may be high when the appliance is operating.

SAVE THESE INSTRUCTIONS
Other Consumer Safety Information
This appliance is intended for household use only. This appliance is only intended for the preparation, cooking, and serving of foods. This appliance is not intended for use with any nonfood materials or products.
Electrical Shock Hazard: This appliance is provided with a polarized plug (one wide blade) to reduce the risk of electric shock. The plug fits only one way into a polarized outlet. Do not defeat the safety purpose of the plug by modifying the plug in any way or by using an adapter. If the plug does not fit fully into the outlet, reverse the plug. If it still does not fit, have an electrician replace the outlet.
The length of the cord used on this appliance was selected to reduce the hazards of becoming tangled in or tripping over a longer cord. If a longer cord is necessary, an approved extension cord may be used. The electrical rating of the extension cord must be equal to or greater than the rating of the appliance. Care must be taken to arrange the extension cord so that it will not drape over the countertop or tabletop where it can be pulled on by children or accidentally tripped over. To avoid an electrical circuit overload, do not use another high-wattage appliance on the same circuit with this appliance.
For Questions:
1.800.851.8900
For recipes, tips, product information and registration:
hamiltonbeach.com

Documents / Resources
References
Download manual
Here you can download full pdf version of manual, it may contain additional safety instructions, warranty information, FCC rules, etc.
Advertisement


Need help?
Do you have a question about the 31193 and is the answer not in the manual?
Questions and answers