Advertisement
- 1 Before You Start
-
2
Connections
- 2.1 This unit
- 2.2 Preparing the remote control
- 2.3 Name of each remote control button
- 2.4 Connection of power cord and speaker
- 2.5 Connections when using the speaker input wire
- 2.6 Connections when using the RCA input jack
- 2.7 Connections when using the amplifier (sold separately)
- 2.8 Parking brake cable connections
- 3 Installation
- 4 Download Sound Tune
- 5 How to Use This Unit
- 6 Connecting the Smartphone to This Unit
- 7 Using Sound Tune
- 8 About the protection function
- 9 Specifications
- 10 Trademarks
- 11 Videos
- 12 Documents / Resources
Before You Start
Thank you for purchasing this PIONEER product
To ensure proper use, please read through this guide before using this product. It is especially important that you read and observe WARNINGS and CAUTIONS in this guide. Please keep the guide in a safe and accessible place for future reference.
Information for users on collection and disposal of old equipment and used batteries

(Symbol for equipment)

(Symbol examples for batteries)
These symbols on the products, packaging, and/or accompanying documents mean that used electrical and electronic products and batteries should not be mixed with general household waste.
For proper treatment, recovery and recycling of old products and used batteries, please take them to applicable collection points in accordance with your national legislation.
By disposing of these products and batteries correctly, you will help to save valuable resources and prevent any potential negative effects on human health and the environment which could otherwise arise from inappropriate waste handling.
For more information about collection and recycling of old products and batteries, please contact your local municipality, your waste disposal service or the point of sale where you purchased the items.
These symbols are only valid in the European Union.
For countries outside the European Union:
If you wish to discard these items, please contact your local authorities or dealer and ask for the correct method of disposal.

- This product is evaluated in moderate and tropical climate condition under the Audio, video and similar electronic apparatus - Safety requirements, IEC 60065.
Connections


- When installing this unit in a vehicle without an ACC (accessory) position on the ignition switch, failure to connect the red cable to the terminal that detects operation of the ignition key may result in battery drain.
![]()
- Use this unit with a 12-volt battery and negative grounding only. Failure to do so may result in a fire or malfunction.
- To prevent a short-circuit, overheating or malfunction, be sure to follow the directions below.
- Disconnect the negative terminal of the battery before installation.
- Secure the wiring with cable clamps or adhesive tape. Wrap adhesive tape around wiring that comes into contact with metal parts to protect the wiring.
- Place all cables away from moving parts, such as the shift lever and seat rails.
- Place all cables away from hot places, such as near the heater outlet.
- Do not connect the yellow cable to the battery by passing it through the hole to the engine compartment.
- Cover any disconnected cable connectors with insulating tape.
- Use a fuse of the rating prescribed.
- Never wire the negative speaker cable directly to ground.
- Never band together negative cables of multiple speakers.
- The graphical symbol
![]() placed on the product means direct current.
placed on the product means direct current. - Check the connections of the power supply and speakers if this unit fuse blows. Determine and resolve the cause, then replace the fuse with and identical equivalent.
- Always install this unit on a flat surface. Do not install this unit on a surface that is not flat or on a surface with a protrusion. Doing so could result in malfunction.
- When installing this unit, do not allow parts such as extra screws to get caught between this unit and the automobile. Doing so could cause malfunction.
- Do not allow this unit to come into contact with liquids. Electrical shock could result. Also, damage to this unit, smoke, and overheating could result from contact with liquids.
The surfaces of the amplifier and any attached speakers may also heat up and cause minor burns. - Do not attempt to disassemble or modify this unit. Doing so may result in fire, electric shock or other malfunction.

 placed on the product means direct current.
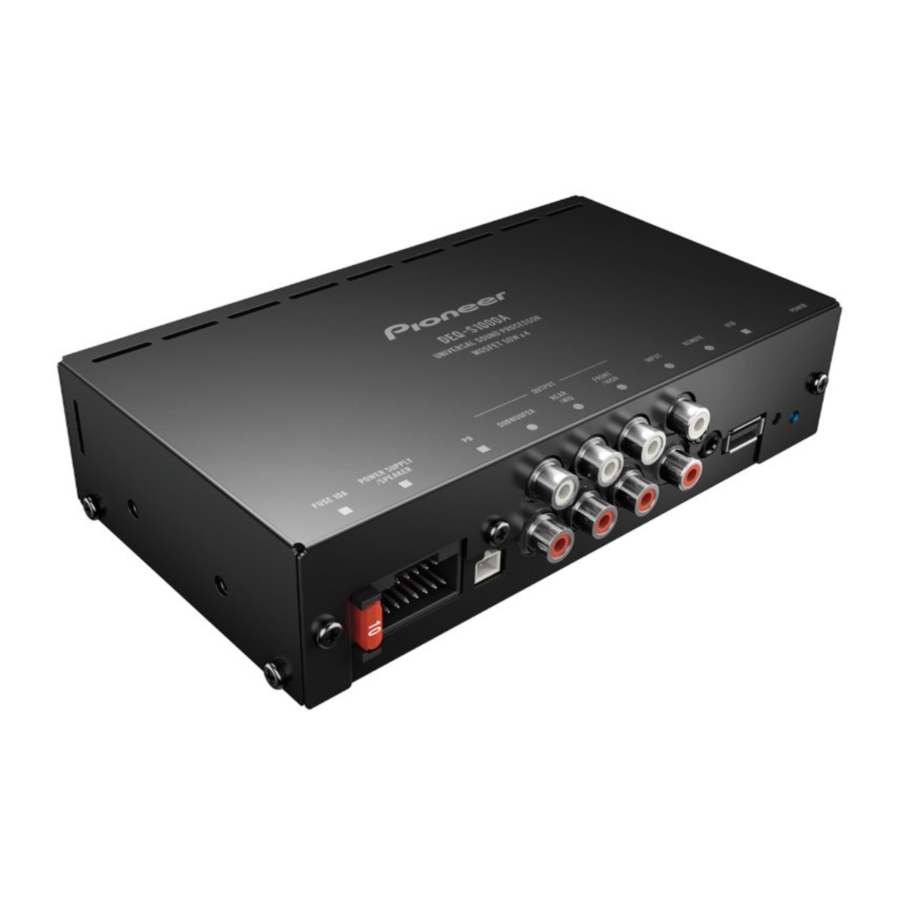
This unit
This unit provides a variety of sound effects by intuitive operation using a smartphone.

- FUSE 10A
- Power cord input
- Parking brake cord input
- Subwoofer output
- Rear output/Middle range output
- Front output/High range output
- RCA input
- Remote control sensor input
- USB port
- Reset button
- Power indicator
- INPUT select switch
- DSP MODE select switch
- Remote control sensor
Preparing the remote control
Remove the insulation sheet before use.
How to replace the battery
Insert the battery with the plus (+) and minus (–) poles orientated properly.

- Do not ingest the battery, Chemical Burn Hazard.
(The remote control supplied with) This product contains a coin/button cell battery. If the coin/button cell battery is swallowed, it can cause severe internal burns in just 2 hours and can lead to death. Keep new and used batteries away from children.
If the battery compartment does not close securely, stop using the product and keep it away from children.
If you think batteries might have been swallowed or placed inside any part of the body, seek immediate medical attention. - Batteries (battery pack or batteries installed) must not be exposed to excessive heat such as sunshine, fire or the like.
- There is a danger of explosion if the battery is incorrectly replaced. Replace only with the same or equivalent type.
- When disposing of used batteries, please comply with governmental regulations or environmental public institution's rules that apply in your country / area.
Name of each remote control button

- VOLUME –
- VOLUME +
- MUTE
- SRC (source)
- Left
Press to select the previous track / song. - Right
Press to select the next track / song. - PLAY/PAUSE
- A
Press and hold to change the connection mode (for iPhone® / AOA connection of smartphone (Android)). - B
Press and hold to change the connection mode (OTG connection of smartphone (Android)).
Connection of power cord and speaker
Cut the attached power cord and then connect it to the vehicle.
The wiring harness kit (sold separately) is also available to connect the cord.

- To power cord input
- Power cord
- Yellow
To terminal supplied with power, regardless of ignition switch position - Red
To electric terminal controlled by ignition switch (12 V DC) ON/OFF - Blue/white
Connect to the system control terminal of the power amp (max. 300 mA 12 V DC). - Black (ground)
To vehicle (metal) body - Left
- Right
- Front speaker (STD) or high range speaker (NW)
- Rear speaker (STD) or middle range speaker (NW)
- White
- White/black
- Gray
- Gray/black
- Green
- Green/black
- Violet
- Violet/black
Connections when using the speaker input wire
Connect the car stereo speaker output wires to this unit using the power cord. Slide the INPUT select switch to the SP position.

- To power cord input
- Power cord
- Orange
- Orange/black
- Brown
- Brown/black
- Left +
- Left −
- Right +
- Right −
- Car stereo / navigation system

Note:
- The input signal of
![]() Car stereo / navigation system is 2ch. The output signal of this unit will not be reflected even when changing settings other than the corresponding channel of the car stereo / navigation system.
Car stereo / navigation system is 2ch. The output signal of this unit will not be reflected even when changing settings other than the corresponding channel of the car stereo / navigation system. - Connect the front speaker output of the car stereo / navigation system.
- Make sure to connect with the speaker input if your vehicle has no ACC (accessory) position.
This unit activates with the power of the car stereo / navigation system.
This unit may not activate depending on the type of car stereo / navigation system.
Connections when using the RCA input jack
Connect the car stereo RCA output jack and the RCA input jack of this unit. Slide the INPUT select switch to the RCA position.

- To RCA input
- RCA cable (sold separately)
- To RCA output
- Car stereo / navigation system
Note
- The input signal of
![]() Car stereo / navigation system is 2ch. The output signal of this unit will not be reflected even when changing settings other than the corresponding channel of the car stereo / navigation system.
Car stereo / navigation system is 2ch. The output signal of this unit will not be reflected even when changing settings other than the corresponding channel of the car stereo / navigation system. - Connect the front RCA output of the car stereo / navigation system.
- Make sure to connect with the speaker input if your vehicle has no ACC (accessory) position.
This unit activates with the power of the car stereo / navigation system. This unit may not activate depending on the type of car stereo / navigation system.
Connections when using the amplifier (sold separately)

- System remote control
Connect to Blue/white cable. - Power amp (sold separately)
- Connect with RCA cable (sold separately)
- To front output (STD) or high range output (NW)
- Front speaker (STD) / High range speaker (NW)
- To rear output (STD) or middle range output (NW)
- Rear speaker (STD) / Middle range speaker (NW)
- To subwoofer output (STD) or low range output (NW)
- Subwoofer (STD) / Low range speaker (NW)
Parking brake cable connections
Connect to the parking brake switch using the parking brake cord.

- To parking brake cord input
- Parking brake cord
Used to detect the ON/OFF status of the parking brake. This lead must be connected to the power supply side of the parking brake switch. - Power supply side
- Parking brake switch
- Ground side
Note: When the parking brake cable is not connected, a part of the exclusive application (Sound Tune) function is limited.
Installation
This unit
- Check all connections and systems before final installation.
- Do not use unauthorized parts as this may cause malfunctions.
- Consult your dealer if installation requires drilling of holes or other modifications to the vehicle.
- Do not install this unit where:
- it may interfere with operation of the vehicle.
- it may cause injury to a passenger as a result of a sudden stop.
- Install this unit away from hot places such as near the heater outlet.
- To enable the setting value, change the setting of the INPUT select switch or the DSP MODE switch and turn the ACC switch OFF/ON.
- Set the DSP MODE select switch.
- Set the INPUT select switch.
- Tighten the screws on each side, then fix the unit.

- Bracket
- Screw (Washer-faced head 4 mm × 8 mm)
- Screw (Tapping screw 4 mm × 12 mm)
- Hole (2 mm to 2.5 mm)
- Car mat or chassis (installation example)
Remote control sensor
- Connect the remote control sensor to the remote control sensor input.
Place the light receiving part of the remote control sensor in a place that can receive the remote control signal.
Wire the cable so that it does not interfere with driving.

- Remote control sensor
Download Sound Tune
To use this unit, download Sound Tune to the iPhone or smartphone (Android). Enter the search term "Pioneer Sound Tune" in the search window or search from the following QR code.


Do not attempt to operate the application while driving. Make sure to pull off the road and park your vehicle in a safe location before attempting to use the controls on the application.
Sound Tune can do the following.
Playing songs saved on iPhone / smartphone (Android)
Playable song formats depend on your device. For details, please read the instruction manual of your device.
Effect settings of iPhone / smartphone (Android) songs and the car stereo / navigation system sound
- Super "Todoroki" Sound
- Live Simulation
Various settings of this unit
- Standard Mode (Front / Rear / Subwoofer)
- Network Mode (3 Way Network)
- Speaker Setting
- Graphics Equalizer
- Time Alignment
- Network Filter
- Speaker Level
- Fader / Balance
- Source Calibration
For details of each function, please refer to Popup Help in Sound Tune.
How to Use This Unit
Depending on the connection method of the iPhone / smartphone (Android), this unit can be used as follows.
When using this unit alone (When not connecting an iPhone or smartphone (Android))
The unit outputs the sound source of the car stereo / navigation system. Only the volume adjustment and mute functions can be operated with the supplied remote control.
For audio adjustment, connection of an iPhone / smartphone (Android) is necessary.
When connecting an iPhone / smartphone (Android) to use
The unit can be used in the following four pattern modes.
When using the remote control, press the SRC button to switch the mode. The mode switches in the order of Car Stereo mode, Through mode, Smartphone mode, and Mix mode.
Car Stereo mode
The unit outputs the sound source of the car stereo / navigation system by passing through the iPhone / smartphone (Android).
Smartphone mode
The unit outputs the sound source of the iPhone / smartphone (Android).
Through mode
The unit outputs the sound source of the car stereo / navigation system without passing through the iPhone / smartphone (Android). (It is the same output as using this unit alone)
This mode is used when video and audio are misaligned during video playback in the Car Stereo mode.
Mix mode
The unit mixes and outputs the sound of the iPhone / smartphone (Android) and the sound of the car stereo / navigation system.
Use this mode when you want to use the voice guidance of the car stereo / navigation system while listening to the source of the iPhone / smartphone (Android). In this case, turn off the source of the car stereo / navigation system and set it so that only the voice guidance is output.
Depending on the car stereo / navigation system, this mode may not be available.
The available functions differ depending on the connection method of the iPhone / smartphone (Android).
| Device | iPhone | Smartphone (Android) | |
| Connection method | - | AOA*1 | OTG*2 |
| Car Stereo mode |  | -(*3) | |
| Smartphone mode | | | (*4) |
| Through mode | | | |
| Mix mode | | | (*4) |
- AOA (Android Open Accessory) is an interface standard for using USB-loaded products as accessories on Android terminals.
- OTG (On-The-Go) is an interface standard that connects USB devices and USB devices directly. Smartphones (Android) cannot be charged using the OTG connection. Pay attention to the battery level of the smartphone (Android).
- For the AOA connection, you cannot use the Car Stereo mode. The operation is the same as Through mode.
- For the OTG connection, sounds from applications other than Sound Tune cannot be output from this unit.
Note:
- When the iPhone / smartphone (Android) is disconnected, some functions such as Super "Todoroki" Sound and Live Simulation cannot be used. Also, even if the iPhone / smartphone (Android) is connected, the above functions may not be used under the following conditions.
- When selecting Through mode
- When playing media by applications other than Sound Tune
- Although this unit can be connected to smartphones (Android), it does not guarantee the availability of all terminals. Depending on the smartphone (Android), the unit may not be operated with an AOA connection. In this case, use an OTG connection. If all else fails, it might be a terminal that cannot be connected or that is out of order. Please contact your dealer or service agent.
Connecting the Smartphone to This Unit
For iPhone users

- USB port
- USB cable (for Type-A)
- Lightning® – USB cable (genuine product or sold separately)
- iPhone
For smartphone (Android) users (AOA connection)
 users (AOA connection)")
- USB port
- USB cable (for Type-A)
- USB - micro USB cable (sold separately)
- Smartphone (Android)
For smartphone (Android) users (OTG connection)
 users (OTG connection)")
- USB port
- USB cable (for Type-A)
- USB A-A cable (sold separately)
- USB OTG cable (sold separately)
- Smartphone (Android)
Note: Smartphone (Android) cannot be charged using the OTG connection.
About USB devices
- For details on handling the iPhone / smartphone (Android), please read each manual.
- Please understand that we do not assume responsibility for compensation even if data, etc. are lost at the time of use in combination with this unit.
- Be sure to fix the iPhone / smartphone (Android) when using it in combination with this unit.
About connection with this unit
- Do not connect devices other than the iPhone / smartphone (Android) (such as USB fan).
- It is not compatible with connection using USB hub.
Using Sound Tune
When connecting an iPhone or smartphone (Android) to this unit, a message is displayed on the iPhone or smartphone (Android). Sound Tune starts when startup is allowed.

Tap the icon at the bottom of the screen to start the operation.
How to reset
Reset this unit if it does not operate properly or you want to return the setting value to the factory default.
- Press the reset button while the unit is in operation.
The settings are initialized when the ignition switch is turned off (ACC OFF).
The factory default setting is applied when the unit is turned on next time.
When the sound does not sound
If you cannot hear the sound after installing this unit, carry out the following.
- Make sure that the iPhone / smartphone (Android) is connected correctly with a USB cable.
- Make sure that switching of OTG / AOA is performed correctly.
- Turn the ACC switch OFF / ON.
Please contact your dealer or service agent if improvements are not made even if you perform the above.
About the protection function
This product has a protection function. When this product detects something abnormal, the following functions will operate to protect the product and speaker output.
- The power indicator will turn Red, blink Red, and then the product will power off in the situations outlined below.
- If the speaker output terminal and speaker wire are short-circuited.
- If a DC voltage is applied to the speaker output terminal.
- If a USB power supply detects something abnormal
- If a USB line has a communication error
Please contact your dealer or service agent if improvements are not made even after you try turning the ACC switch OFF / ON or removing/reinserting the USB.
Specifications
GENERAL
| POWER SOURCE | 14.4V DC (10.8-15.1V allowable) |
| GROUNDING SYSTEM | Negative type |
| MAX. CURRENT CONSUMPTION | 9.2A |
| DIMENSIONS | 170(W) x 40(H) x 95(D)<mm> |
| FUSE | 10A |
| WEIGHT | 0.59kg |
AUDIO
| MAX POWER | 50W x 4 50Wx2ch/4Ω + 70Wx1ch/2Ω (for SUB-WOOFER) |
| CONTINUOUS POWER | 22W x 4 (50Hz to 15kHz, 5%THD, 4Ω LOAD, Both Channels Driven) |
| LOAD IMPEDANCE | 4Ω (4 - 8Ω(2Ω for 1ch) allowable) |
| PREOUT | |
| OUTPUT LEVEL (MAX) | 4.0V |
| IMPEDANCE | 250Ω |
| FREQUENCY RESPONSE | 10Hz to 20kHz (+0dB, -1dB) |
| S/N RATIO | 105dB |
| THD | 0.01% |
| EQUALIZER (13BAND GRAPHIC EQUALIZER) | |
| FREQUENCY | 50Hz, 80Hz, 125Hz, 200Hz, 315Hz, 500Hz 800Hz, 1.25kHz, 2kHz, 3.15kHz, 5kHz, 8kHz, 12.5kHz |
| GAIN | ±12dB(0.1dB step) |
SPEAKER SETTING
<STANDARD MODE>
| FRONT/REAR (HPF) | |
| FREQUENCY | 50Hz, 63Hz, 80Hz, 100Hz, 125Hz, 160Hz, 200Hz |
| SLOPE | 0dB(Pass), -6dB/oct, -12dB/oct, -18dB/oct, -24dB/oct |
| SUB WOOFER (LPF) | |
| FREQUENCY | 50Hz, 63Hz, 80Hz, 100Hz, 125Hz, 160Hz, 200Hz |
| SLOPE | 0dB(Pass), -6dB/oct, -12dB/oct, -18dB/oct, -24dB/oct |
| GAIN | -24 - +10dB (1dB/Step) |
| PHASE | NORMAL/REVERSE |
| SPEAKER LEVEL | -24 - +10dB (1dB/Step) |
| TIME ALIGNMENT | 0cm - 350cm (2.5cm/step) |
<NETWORK MODE>
| HIGH (HPF) | |
| FREQUENCY | 1.25kHz, 1.6kHz, 2kHz, 2.5kHz, 3.15kHz 4kHz, 5kHz, 6.3kHz, 8kHz, 10kHz, 12.5kHz |
| SLOPE | -6dB/oct, -12dB/oct, -18dB/oct, -24dB/oct |
| MID (LPF) | |
| FREQUENCY | 1.25kHz, 1.6kHz, 2kHz, 2.5kHz, 3.15kHz 4kHz, 5kHz, 6.3kHz, 8kHz, 10kHz, 12.5kHz |
| SLOPE | 0dB(Pass), -6dB/oct, -12dB/oct, -18dB/oct, -24dB/oct |
| MID (HPF) | |
| FREQUENCY | 25Hz, 31.5Hz, 40Hz, 50Hz, 63Hz, 80Hz 100Hz, 125Hz, 160Hz, 200Hz, 250Hz |
| SLOPE | 0dB(Pass), -6dB/oct, -12dB/oct, -18dB/oct, -24dB/oct |
| SUB WOOFER (LPF) | |
| FREQUENCY | 25Hz, 31.5Hz, 40Hz, 50Hz, 63Hz, 80Hz 100Hz, 125Hz, 160Hz, 200Hz, 250Hz |
| SLOPE | 0dB(Pass), -12dB/oct, -18dB/oct 24dB/oct, -30dB/oct, -36dB/oct |
| GAIN | -24 - +10dB (1dB/Step) |
| PHASE | NORMAL/REVERSE |
| SPEAKER LEVEL | -24 - +10dB (1dB/Step) |
| TIME ALIGNMENT | 0cm - 350cm (2.5cm/step) |
USB
| USB STANDARD SPEC. | USB2.0 High Speed |
| MAX CURRENT SUPPLY | 1.5A |
Trademarks

http://www.pioneer-car.eu
iPhone, and Lightning are trademarks of Apple Inc., registered in the U.S. and other countries.
Use of the Made for Apple badge means that an accessory has been designed to connect specifically to the Apple product(s) identified in the badge, and has been certified by the developer to meet Apple performance standards.
Apple is not responsible for the operation of this device or its compliance with safety and regulatory standards.
Please note that the use of this accessory with an Apple product may affect wireless performance.
Visit www.pioneer-car.co.uk (or www.pioneer-car.eu) to register your product.

VideosPioneer DEQ-S1000A Installation Video
Documents / Resources
References
![www.pioneer-car.eu]() Car GPS Navigation – Multimedia Receiver – Digital Bass Control | Pioneer
Car GPS Navigation – Multimedia Receiver – Digital Bass Control | Pioneer![www.pioneer-car.co.uk]() Car GPS Navigation – Multimedia Receiver – Digital Bass Control | Pioneer
Car GPS Navigation – Multimedia Receiver – Digital Bass Control | Pioneer![www.apple.com]() App Store - Apple
App Store - Apple![play.google.com]() Google Play
Google Play
Download manual
Here you can download full pdf version of manual, it may contain additional safety instructions, warranty information, FCC rules, etc.
Download Pioneer DEQ-S1000A - Universal Sound Processor Manual
Advertisement


Need help?
Do you have a question about the DEQ-S1000A and is the answer not in the manual?
Questions and answers