Dremel 4300 Operating/Safety Instructions Manual
Hide thumbs
Also See for 4300:
- Original instructions manual (205 pages) ,
- Operating/safety instructions manual (136 pages) ,
- Original instructions manual (204 pages)

Related Manuals for Dremel 4300


Summary of Contents for Dremel 4300
- Page 1 IMPORTANT: Read Before Using Operating/Safety Instructions 4300 GlobalTestSupply www. .com Find Quality Products Online at: sales@GlobalTestSupply.com...
-
Page 2: Safety Symbols
Safety Symbols The definitions below describe the level of severity for each signal word. Please read the manual and pay attention to these symbols. This is the safety alert symbol. It is used to alert you to potential personal injury hazards. Obey all safety messages that follow this symbol to avoid possible injury or death. - Page 3 Prevent unintentional starting. Ensure the Disconnect the plug from the power source switch is in the off-position before and/or the battery pack from the power tool connecting to power source and / or battery before making any adjustments, changing pack, picking up or carrying the tool. accessories, or storing power tools.
- Page 4 Safety Rules for Rotary Tools - (cont.) Mandrel mounted wheels, sanding drums, one hand and the tool in the other hand cutters or other accessories must be fully while in use. Clamping a small workpiece inserted into the collet or chuck. If the allows you to use your hand(s) to control the mandrel is insufficiently held and/or the tool.
- Page 5 Safety Rules for Rotary Tools - (cont.) Kickback and Related Warnings Safety warnings specific for grinding and abrasive cutting-off operations: Kickback is a sudden reaction to a pinched or only wheel types that snagged rotating wheel, backing pad, brush or recommended for your power tool and only any other accessory.
-
Page 6: Additional Safety Warnings
Risk of injury to user. The power cord must only GFCI and personal protection devices like Some dust created by be serviced by a Dremel Service Facility.. electrician’s rubber gloves and footwear will power sanding, sawing, Do not use AC only rated tools with a DC further enhance your personal safety. - Page 7 Symbols IMPORTANT: Some of the following symbols may be used on your tool. Please study them and learn their meaning. Proper interpretation of these symbols will allow you to operate the tool better and safer. Symbol Designation / Explanation Volts (voltage) Amperes (current) Hertz (frequency, cycles per second) Watt (power)
- Page 8 Symbols (continued) IMPORTANT: Some of the following symbols may be used on your tool. Please study them and learn their meaning. Proper interpretation of these symbols will allow you to operate the tool better and safer. Symbol Designation / Explanation Designates Li-ion battery recycling program Designates Ni-Cad battery recycling program Alerts user to read manual...
-
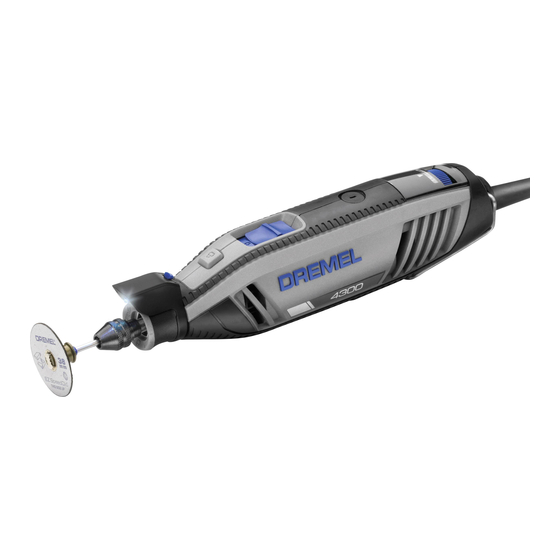
Page 9: Functional Description And Specifications
Functional Description and Specifications Disconnect the plug from the power source before making any assembly, adjustments or changing accessories. Such preventive safety measures reduce the risk of starting the tool accidentally. Model 4300 High Speed Rotary Tool VARIABLE SPEED CORD DIAL BRUSH COVER FIG. -
Page 10: Light Module
Assembly Always unplug Rotary Tool before changing accessories, changing collets or servicing your Rotary Tool. LIGHT MODULE compartment housing from the underside of the module. Slide the old batteries out and replace The light module included with your tool is with new batteries making sure to replicate the intended to provide you with improved visibility orientation of the original batteries. - Page 11 Dremel Chuck 4. Push the end of the chuck firmly against a hard flat surface to be sure the jaws are all • The Dremel Chuck and the collet and collet seated axially. nut system are interchangeable on this tool.
- Page 12 Collet is required Detailers Grip 678-01 Circle cutter / straight edge guide Collet is required Do not use router bit with the Dremel chuck. Bit may become a projectile and cause serious injury. GlobalTestSupply www. .com Find Quality Products Online at:...
- Page 13 COLLETS Dremel 4300 is equipped with a quick shaft lock Four different size collets (see illus tration), to mechanism. This mechanism engages the accommodate different shank sizes, are avail - output shaft in 8 separate locations on the shaft Do not engage lock while able for your Rotary Tool.
- Page 14 Getting the most out of your Rotary Tool is a matter of learning how to let this speed work The Dremel 4300 is the MOST versatile rotary Using the Rotary Tool for you. tool available today. It has a wide speed range...
- Page 15 TOOL HANGER work in one pass. To make a cut, for example, pass the tool back and forth over the work, The hanger is provided for the use of hanging much as you would a small paint brush. Cut a your tool while using the Flex Shaft or for little material on each pass until you reach the storage.
-
Page 16: Operating Speeds
Your tool is equipped with a high performance rotary tool motor. This motor expands the versatility of the rotary tool by driving additional attachments such as the Dremel Right Angle Settings for Approximate Revolutions. ELECTRONIC FEEDBACK Attachment and Dremel Flex Shaft. -
Page 17: Maintenance Information
We recommend that all tool service when tools are used continuously. If your tool runs spo rad ically, loses power, makes be performed by a Dremel Service Facility. CARBON BRUSHES unusual noises or runs at a reduced speed, To continue using the check the brushes. -
Page 18: Extension Cords
This will also extend the total life of your tool since the com mutator BEARINGS surface will “wear” longer. Model 4300 has ball bearing construction. Under normal use no additional lubrication is Cleaning required. avoid... - Page 19 COLLETS EZ Lock Mandrel No 402 If you expect to use a variety of accessories, The Dremel EZ Lock makes accessory we recommend that in the beginning you changes easy as PULL - TWIST - RELEASE. purchase a complete set of four collets. Store...
- Page 20 Dremel Accessories (Continued) Engraving Cutters Silicon Carbide Grinding Stones (blue/green) This group has a wide variety of sizes and shapes, and are made for intricate work on Tougher than aluminum oxide points, these ceramics (greenware), wood carvings, are made es pecially for use on hard jewelry and scrimshaw.
- Page 21 Dremel Accessories (Continued) Bristle Brushes Polishing Accessories These are excellent cleaning tools on silverware, jew elry and antiques. The three These include an impregnated polishing shapes make it possible to get into tight point and an impregnated polishing wheel for corners and other difficult places.
- Page 22 Flapwheels grind and polish flat or contoured Cuts ceramic wall tile, cement board, and surfaces. They are used most effectively as a plaster. Use with Dremel No 565/566 Cutting finishing sander after heavier surface Guide attachment. sanding and material removal is completed.
- Page 23 Dremel Accessories (Continued) Glass Drill Bits Detail Nose Piece Diamond tipped drill bits for use on glass and ceramic wall tile. Lubricant included. For performing precision tasks a separate nose piece is available in some kits. It has a tapered...
- Page 24 Replacing Screw Mandrel Accessories Mandrel No. 401 is used with the felt down straight on the screw Mandrel, and be polishing tip and wheels. Thread the tip on to turned all the way to the collar. the screw carefully. The felt tip must thread Mandrel N°...
- Page 25 When using with Dremel chuck, back the mandrel out FIG. 3 slightly before tightening. 2. Pull spring-loaded sleeve DOWN towards tool with one hand and hold.
- Page 26 EZ Drum Operating Instructions ™ EZ Drum™ Mandrel No. EZ407SA has a FIG. 1 spring loaded sleeve and is used with Always make sure the sanding bands. rotary tool is “OFF” and disconnect the plug from the power source or the battery pack from the tool before changing accessories.
-
Page 27: Speed Settings
Speed Settings Note: Each number settings listed in the speed charts = x 1,000 RPMs * Speed for light cuts, Caution - burning on deep grooves. • Depending on cutting direction relative to grain. High Speed Cutters Catalog Soft Hard Laminates Steel Aluminum, Shell/... - Page 28 Speed Settings (Continued) Note: Each number settings listed in the speed charts = x 1,000 RPMs * Speed for light cuts, Caution - burning on deep grooves. • Depending on cutting direction relative to grain. Tungsten Carbide Cutters Catalog Soft Hard Laminates Steel Aluminum,...
- Page 29 Speed Settings (Continued) Note: Each number settings listed in the speed charts = x 1,000 RPMs * Speed for light cuts, Caution - burning on deep grooves. • Depending on cutting direction relative to grain. Chain Saw Sharpening Stones Catalog Soft Hard Laminates...
- Page 30 Speed Settings (Continued) Note: Each number settings listed in the speed charts = x 1,000 RPMs * Speed for light cuts, Caution - burning on deep grooves. • Depending on cutting direction relative to grain. Flapwheels Catalog Soft Hard Laminates Steel Aluminum, Shell/ Stone Ceramic Glass...
- Page 31 Over bending the rotary tool, THREE items must be removed shaft can generate excessive heat on the from the tool: the nose cap, Dremel Chuck or jacket or hand piece and may cause the collet nut and collet.
- Page 32 To prevent (Fig. A5). damage to tool do not over grease shaft. Too much grease will cause the unit to 6. Refer to “Dremel Chuck” and “Collets” overheat. sections of the rotary tool manual for instructions on how to change accessories.
- Page 33 Cutting Bit (cutting in a clockwise direction). #561 and #562 Cutting Bit When using a template (like an outlet box) into your Dremel Rotary Tool, be sure that behind the drywall, use the drywall bit #560, the bit is securely inserted into the collet.
- Page 34 using the #560 bit you will be able to cut in a material at a 45 degree angle and then slowly counter clockwise direction because the bit bring the bit and tool to a 90 degree angle to has a piloted tip and won’t cut into the outlet begin cutting.
- Page 35 Then press the shaft lock button 4 on your accessories. With the shaft secured, tighten rotary tool, unscrew the collet nut 5 and the collet nut or Dremel chuck 5 using the remove the collet 6. wrench or nose cap 10 (Fig. C6). Remove the...
- Page 36 Shield during use. Always turn tool power off before adjusting position, changing accessory, and removing The Dremel Shield is not recommended for attachment. Dremel Rotary Tools cut, sand, use carving, routing, and drilling accessories. grind, and polish in many directions. To Please refer to the Dremel Rotary Tool’s...
- Page 37 Attachment The guide has a 90 and 45 degree bevel for various sanding applications. The tool with the guide attached can be taken to a secure work piece or can be stationary in the Dremel Multi- Vise. GlobalTestSupply www. .com Find Quality Products Online at: sales@GlobalTestSupply.com...
- Page 38 Separately). loosening the wing nut D and sliding the attachment B off the cylinder E (Fig. E5). 1. Set up Dremel Multi-Vise on secure workbench. Place the tool holder into the 5. Turn the attachment B 180 degrees and Dremel Multi-Vise according to Dremel slide the attachment B onto the cylinder E Multi-Vise instructions.
- Page 39 Grip it is important to get the “feel” of it. (See drawings for recommended way to hold) FIG. F4 The Dremel Detailer’s Grip is intended to be used on applications such as finishing sanding, engraving, carving, etching, polishing, and cleaning, to name a few.
- Page 40 1. Unscrew the nose cap 1 from the tool. Loosen collet nut. See figure G1. 2. Insert a new or newly dressed Dremel #932 Aluminum Oxide Grinding Stone 2 all the way into the collet and tighten the collet nut.
- Page 41 number of times, at the same speed and FIG. G5 pressure to keep the blade in balance until edge is sharp. Stone grabbing on the blade corner can kick back and cause loss of control. Balance Blade Drive a nail into a beam or wall. Leave about one inch of straight nail exposed.
- Page 42 Step Two: Removing nose cap from the Rotary Tool If the Dremel chuck is installed, remove it from the tool and replace it with the collet and collet nut 4. Then remove nose cap 5 from your rotary tool and set nose cap aside.
- Page 43 housing, thread the circle cutting guide onto FIG. H5 the threaded portion of your Rotary Tool clockwise until tight. Do not hold the attachment by the metal rail during installation. Do not overtighten (Fig. H4). Step Five: Set depth guide to required cutting depth As shown (Fig.
- Page 44 4 (Fig. H3). Step Four: Attach circle cutter guide to Dremel Rotary Tool. See Step 4 of Circle Cutter Instructions. Step Five: Set the placement of the cut. Place the flat edge of the guide 11 along the edge of the material to be cut, and place tool in desired location to start cut.
-
Page 45: Dremel Limited Warranty
® Your Dremel product is warranted against defective material or workmanship for a period of two years from date of purchase. In the event of a failure of a product to conform to this written warranty, please take the following action: 1.
Need help?
Do you have a question about the 4300 and is the answer not in the manual?
Questions and answers