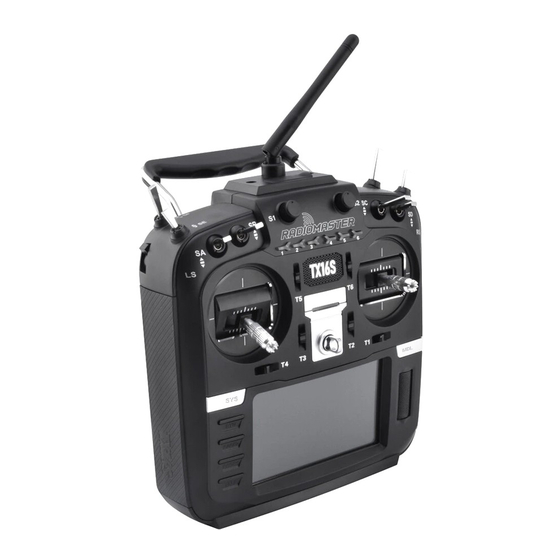
RadioMaster TX16S User Manual
Hide thumbs
Also See for TX16S:
- User manual (59 pages) ,
- Quick start manual (14 pages) ,
- Manual (3 pages)
Table of Contents
Advertisement
Advertisement
Table of Contents

Related Manuals for RadioMaster TX16S


Summary of Contents for RadioMaster TX16S
- Page 1 TX16S User Manual Version:1.2 WWW.RADIOMASTERRC.COM...
-
Page 2: Table Of Contents
Table of Contents 1. Overview.............................4 1.1. Introduction.......................... 4 1.2. Safety instructions......................4 1.3. Manual and Firmware Download..................5 1.4. Important note on firmware.................... 5 1.5. Remote Control Overview....................5 1.6. Important note on Power and charging precautions..........6 1.7. Note about this guide......................6 1.8. - Page 3 4.3.1. Create model and model selection..............29 4.3.2. Channel monitor....................31 4.3.3. Reset function....................... 32 4.4. Model settings (Model Setup)..................33 4.4.1 Model settings(Model setup)............... 33 4.4.2. Flight Mode(Flight Modes)................36 4.4.3. Input Source(Inputs)..................37 4.4.4. Mix control (Mixer).................... 40 4.4.5. Output(Outputs).................... 45 4.4.6 Curves........................45 4.4.7.
-
Page 4: Overview
The information contained in this manual is subject to change without notice. TX16S remote control is suitable for all types of fixed-wing, glider, helicopter and multi-rotor aircraft. The model type can be selected according to the aircraft used, and various setups and mixes can be programmed and used to suit a wide variety of applications. -
Page 5: Manual And Firmware Download
1.3. Manual and Firmware Download The TX16S comes pre-installed with standard OpenTX firmware. To download the latest software manual, visit the RadioMaster website: https://www.radiomasterrc.com To download the latest firmware for your TX16S remote control, visit the OpenTX website: https://www.open-tx.org 1.4. Important note on firmware. -
Page 6: Important Note On Power And Charging Precautions
Never charge your device unattended. Always charge in a safe area away from flammable materials. If the remote control gets wet or damaged in any way, do not charge it. RadioMaster is not responsible for any adverse consequences caused by using or misusing this device. 1.7. Note about this guide. -
Page 7: Specifications
1.9. Warranty and Repair If you experience any problems with your remote-control hardware, please keep proof of purchase and contact the retailer where you purchased TX16s. Also visit https://www.radiomasterrc.com/ for technical support and to find a repair agent in... -
Page 8: Firmware Update And Opentx Information
If you decide to use OpenTX firmware, you are solely responsible for your model. Any injury or damage caused by using OpenTX firmware The authors of OpenTX and RadioMaster assume no responsibility. Use with caution. 1.12. Legal status and copyright... -
Page 9: Opentx Companion Software (Opentx Companion)
2. OpenTX Companion software (OpenTX companion) The OpenTX Companion remote control support software is used for many different tasks, such as loading OpenTX firmware to the remote, backing up model settings, editing model settings, and running the remote simulator. You can run OpenTX Companion software on multiple computer platforms. OpenTX Companion software supports common systems such as Windows, Mac OS X, and Linux. - Page 11 At this point, the OpenTX Companion software installation is complete. Please continue to follow the instructions below to continue setting the software to match the RadioMaster TX16S remote control:...
-
Page 12: Use Companion Software To Upgrade Remote Controller Firmware
After the above settings are completed, click the firmware download button to download the firmware. Note: The RadioMaster TX16S remote control is pre-installed with stable and reliable OpenTX firmware when it leaves the factory. If there is no special need, please do not update the firmware unnecessarily. - Page 13 Before writing the firmware, please make sure that the remote control is turned off, and plug in the supplied USB-C (TYPE-C) cable. The following device name will appear in the computer device manager: Before writing the firmware for the first time, you need to replace the STM32 BOOTLOADER driver to ensure that the OpenTX Companion software can recognize this hardware type and write the firmware correctly.
- Page 14 B. In the Zadig software, select Options-> List All Devices to view the device list C. Drop-down list and find STM32 BOOTLOADER device...
- Page 15 D. Click the Replace Driver button (if the driver has been installed before, Reinstall Driver will be displayed) to replace / install the driver. After the driver installation is completed, you can use OpenTX Companion to write the firmware to the remote controller correctly.
-
Page 16: First Boot
3. First boot Press and hold the power button to boot. Before entering the main interface, the system will check the position of the throttle stick and switch and other startup conditions. If the startup conditions are not met, there will be a corresponding error prompt. - Page 17 Failsafe not set warning: This is a warning that the remote-control fail-safe protection is not set. Alarm Off Warning: A similar warning will appear if the sound mode of the remote-control settings page is set to mute. SD card warning: If the SD card file version used does not match the remote controller firmware version, this warning will appear.
-
Page 18: Calibrate The Battery Voltage
First page: Below is an example of the default first page of the system, you can customize the display elements in the page as required. 3.1. Calibrate the battery voltage This example is for using 2 x 3.7v (2s 7.4v) 18650 Li-ion batteries in the supplied tray batteries sold separately, a 21700 2s 7.4 Li-ion pack (sold separately) or a 2s 7.4v Standard voltage Li-poly pack (sold separately) - Page 19 A. Press and hold the [SYS] button to enter the system settings. Press the [PAGE] key to move to the HARDWARD page, scroll to the bottom of the page, select Battery calibration, and enter the actual measured battery voltage. B. Scroll to RADIO SETUP, and enter the battery level range in the Battery meter range as shown below.
-
Page 20: Calibrating Gimbals
3.2. Calibrating Gimbals Each TX16s is calibrated in the QC process however due to varying shipping conditions we suggest to calibrate your radio before first use. A. In the system settings, scroll to the HARDWARE page, select the Calibration item, and press OK to enter the settings.
Need help?
Do you have a question about the TX16S and is the answer not in the manual?
Questions and answers