Table of Contents
Advertisement
Advertisement
Table of Contents

Related Manuals for PO Fung Electronic DR-1801 UV Series


Summary of Contents for PO Fung Electronic DR-1801 UV Series
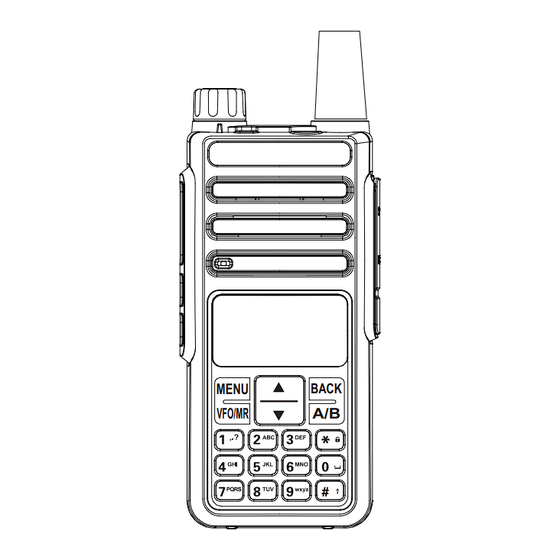
- Page 1 Digital DMR and Analog UHF/VHF Two Way Radio MENU BACK VFO/MR...
- Page 2 PREFACE Thank you very much for choosing our Dual Band Digital DMR and Analog two-way radio. This radio adopts the latest advances in technology, providing reliable communication in today’s demanding communication environment. This radio offers both DMR digital and analog communication, introduces innovative DMR digital processing system to achieve SMS, high-audio quality and digital encryption.
-
Page 3: Table Of Contents
Table of Contents GETTING STARTED 9. Monitor 1. Regulations and Safety Warnings 10. Emergency Alarm 2. Feature Overview 11. Locking or Unlocking Keypad 3. Unpacking and checking the equipment 12. Inputting via Keypad 4. Battery Information 13. Battery voltage test PREPARATION ADVANCED FEATURES 1. -
Page 4: Getting Started
GETTING STARTED 1. Regulations and Safety Warnings FCC Licensing Information This device complies with Part 90 and 15 of the federal Communications Commission (FCC) Rules. Operation is subject to the condition that that this device does not cause harmful interference. The radio operates on radio frequencies that are regulated by the Federal Communications Commission (FCC). - Page 5 - Increase the separation between the equipment and receiver. - Connect the equipment into an outlet on a circuit different from that to which the receiver is connected. - Consult the dealer or an experienced radio/TV technician for help. Changes or modifications not expressly approved by the party responsible for compliance could void the user's authority to operate the equipment.
- Page 6 RSS102 Issue 5 March 2015 • Institute of Electrical and Electronic Engineers (IEEE) C95.1:2005 Edition RF Exposure Compliance and Control Guidelines and Operating Instructions To control your exposure and ensure compliance with the occupational/ controlled environmental exposure limits, always adhere to the following procedures. Guidelines: •...
- Page 7 ■Precautions for Portable Terminals Operating Prohibitions To protect you against any property loss, bodily injury or even death, be sure to observe the following safety instructions: 1. Do not operate the product in a location containing fuels, chemicals, explosive atmospheres and other flammable or explosive materials.
- Page 8 flammable or explosive materials. 2. Do not charge your battery that is wet. Please dry it with a soft and clean cloth prior to charge. 3. Do not charge your battery suffering deformation, leakage and overheat. 4. Do not charge your battery with an unauthorized charger. 5.
-
Page 9: Feature Overview
2. Feature Overview • Large-capacity storage to meet complex application needs 1024 channel storage, 1024 digital contacts can be manually programmed • DMO True 2-Slot Two time slots Direct-mode Dual-Slot communication, enabling two groups of calls to be simultaneously performed at one frequency, to make double communication efficiency;... -
Page 10: Unpacking And Checking The Equipment
3. Unpacking and checking the equipment Unpack the radio carefully. We recommend that you iden�fy the items listed in the following table before discarding the packing materials. NOTE: If any of these items are missing from the box, contact your place of purchase immediately. Supplied Accessories Antenna Li-ion Battery Pack... - Page 11 Use Caution with the Li-ion Battery (1) Do not short the battery terminals or throw the battery into a fire. Never try to remove the case from the battery pack, as our company is not responsible for any accidents caused by modified batteries. (2) The ambient temperature should be between 5℃-40℃...
- Page 12 (5) The radio is fully charged once the charger's green status LED goes steady. Please remove the radio at that time to avoid over-charging your battery. Charger LED codes Red LED Green LED Green LED Status Standby (charger empty) Flashing Steady Error (charger with radio) Steady...
-
Page 13: Preparation
PREPARATION Assembly Before the radio is ready for use we need to attach the antenna and battery pack, as well as charge the battery. 1. Installing / Removing the Battery Before attaching or removing the battery make sure your radio is turn off by turning the power/volume knob all the way counter-clockwise. -
Page 14: Installing The Additional Speaker/Microphone
4. Installing the Additional Speaker/Microphone (Optional) Pry open the rubber MIC-Headset jack cover and then insert the Speaker / Microphone plug into the double jack. Accessory jack The accessory jack on the radios is a Kenwood compatible two (2)-pin design. Typical 2 pin Kenwood headset configuration. -
Page 15: The Main Display
1. The main display 2. Description of LCD Icons Description of product status Icon name Icon The more signal bars, the stronger the signal is Signal strength The current channel transmits at high power Transmission power The current channel transmits at low power Digital mode Digital icon Analog mode... - Page 16 Work in narrowband mode Narrowband mode Receive a text message, or have an unread message Message icon VOX has been turned on VOX icon The current transmission frequency is the reception frequency plus a frequency bias (positive bias) The current transmission frequency is the reception frequency minus a frequency Relay mode icon bias (negative bias) Currently in offline state...
-
Page 17: Status Indications
channel up and down. When double-waiting is turned on and works in analog sub-channel, the icon is In channel mode, the current channel number is 001 (range 1~32) Channel number icon 3. Status Indications The top LED will help you to identify the current radio status. LED Indication Status Flashes Red... - Page 18 VOX On/Off To enable or disable the VOX feature. Quickly turn the scan function on or off. Scan on / off Note: double-segment double-waiting scan does not work. Encryption on/off Quickly turn on/off encryption for channel (only for digital mode). VOX On/Off To enable or disable the VOX feature.
-
Page 19: Basic Operations
BASIC OPERATIONS 1. Power on the Radio Turn on the radio by turning the [Power/Volume] switch clockwise till a click is heard, and the LCD displays will show a start-up message, and you will hear a beep after 7 seconds. 2. -
Page 20: Select A Channel
Operation 1: Go to Menu > Zone, press or navigation key to select a zone, and then press [MENU] key to switch to the selected zone. Operation 2: Press the preprogrammed [Zone Select] key to switch to the selected zone. 7. - Page 21 • Group Call: a call from an individual user in a group to all the other members in the group. • All Call: a call from an individual user to all the other users on the current channel. You can request your dealer to enable all call feature. 8.1 Making a Call You can make a call in any of the following ways: •...
-
Page 22: Monitor
8.2 Receiving and Responding to a Call When receiving a call, you can listen to it without any operation. The radio displays for an incoming private call, group call, and all call respectively. You can press and hold the [PTT] key and speak within call hang time. -
Page 23: Emergency Alarm
10. Emergency Alarm The top orange function key (Top-Key) is pre-programmed as a panic key. Press the emergency alarm key [TK] to turn on the alarm function, and press this key again to exit the emergency alarm. 11. Locking or Unlocking Keypad When the keypad is not in use, it is recommended that you lock it to avoid accidental operations. -
Page 24: Advanced Features
ADVANCED FEATURES 1. Access Advanced Features for Private Call Method 1: To Access a Private Call from Contact list (1) Press the [MENU] key. (2) Go to Contact > Contact List. (3) Press the or navigation key to select the required contact ( Private Call). (4) Press MENU key to access the advanced features. -
Page 25: Main Menu Functions
(4) Radio Active Select Radio Active, and it will send out a active signaling to the killed radio and the target radio will return to standby when it receives this signaling and send back a Active successful message to the transmit radio. (5) Radio Kill Select Radio Kill, and it will send out a kill signaling to the target radio which will be killed (no operation) when receiving the signaling and it will send back a kill successful message to the transmit radio. -
Page 26: Zone
。 Note: The call Logs only Logs the outgoing, answered and missed calls of the Private Call attributes 4. Zone Select a Zone A Zone is a group of channels grouped together. The DMR radio has 150 Zones. A Zone can have the maximum of 32 analog and/or digital channels. -
Page 27: Settings
6. Settings 6.1 Radio Set (1) Analog Squelch Level Adjusts the squelch level to receive signal with different signal strength, with normal and strict options available. NOTE: This function is only valid for analog channel. (2) TX Power Set up the TX power for current channel. NOTE: When set to high power, display ‘H’;... - Page 28 (6) VOX Enable the VOX, you can speak into the microphone to start transmitting instead of pressing the [PTT] key. A total of 3 levels are provided. (7) Double wait • Off: Single channels mode. • Double Wait: Scan main channel and sub-channel in turn; call is locked when the reception is effective; you can press [PTT] to talk with the other party.
- Page 29 b. Call Permit: Options: Off / Digital / Analog. Pressing the [PTT] key will transmit the signal through the channel and will sound a tone that prompts the user to start speaking. • OFF: Turn off this function; • Digital: Enable this tone only for digital channels; •...
- Page 30 Options: On or Off / Changes boot password. On or Off: Turn on if it is turned off, and turn off if itis turned on; when On is selected, you need to enter the correct password and press the [MENU] key to start the unit. Change boot password: You can enter a new password not more than 6 digits;...
-
Page 31: Radio Info
6.2 Radio Info Show the Radio ID, Radio name, serial number, model name, CPS-Version, H-Version, Soft-Version, DSP-Version and Program Time etc. 6.3 Radio Cfg Radio Cfg menu Route: Main Menu > Settings > Radio Cfg. The radio Cfg menu will change accordingly to the channel type. When the channel type is digital, it will automatically hide the analog menus. - Page 32 Enables access of repeaters in VFO/Frequency Mode. (8) Freq Step 2.5K, 5K, 6.25K, 10K, 12.5K, 25K, 30K, 50K, total of 8 frequency steps. (9) Channel Type • Analog: Set up to analog channel. • Digital: Set up to digital channel. ※Chan Set (Available in Analog Channel only) When the channel type is analog, it will automatically hide the digital menu, the below listed menus are for analog channel only, unlisted menus are the same as the digital channel, please refer to Chan Set (Digital Channel).
-
Page 33: Programming Guide
PROGRAMMING GUIDE (1) Programming Flow The programming flow of the CPS is as follows: If you have the configuration file of the radio locally, you can also open the local configuration file in the CPS for configuration, and then write it into the radio. •... - Page 34 (3) Read From Radio This option instructs the PC to read data from radio. Power on the radio and connect it to the PC, select the menu Operation-> Read From Radio, and then a "Read From Radio" window displays. Click "OK" to begin reading. During reading, a progress bar shows the reading process.
- Page 35 • If the message: "Data error detected, please restart the radio. " appears, please restart the radio and try again. • If the message: "Please update CPS software! " appears, please contact your dealer to update the CPS software. • If an incorrect password was given, please give the correct one. Contact the dealer if you forget the password. •...
-
Page 37: Appendix B. - Trouble Shooting Guide
Signal imitation ≥70dB Intermediation (Wide/ narrow) ≥62dB/≥58dB Adjacent channel selectivity(Wide/ ≥65dB/≥60dB narrow) Receive Current ≤380mA FM noise ≥45dB@25KHz /≥40dB @12.5KHz Appendix B. – Trouble shooting guide Phenomena Analysis Solution The battery doesn’t be installed correctly. Remove and re-install the battery. The battery runs out. -
Page 38: Appendix C. - Ctcss Table
Appendix C. - CTCSS Table CTCSS CHART (Hz) Number Frequency Number Frequency Number Frequency Number Frequency Number Frequency 67.0 69.3 71.9 74.4 77.0 79.7 82.5 85.4 88.5 91.5 94.8 97.4 103.5 107.2 110.9 114.8 118.8 123.0 127.3 131.8 136.5 141.3 146.2 151.4 156.7... -
Page 39: Appendix D. - Dcs Table
Appendix D. - DCS Table DCS CODE LIST Number Code Number Code Number Code Number Code Number Code D023N D025N D026N D031N D032N D036N D043N D047N D051N D053N D054N D065N D071N D072N D073N D074N D114N D115N D116N D122N D125N D131N D132N D134N D143N... - Page 40 D731N D732N D734N D743N D754N D023I D025I D026I D031I D032I D036I D043I D047I D051I D053I D054I D065I D071I D072I D073I D074I D114I D115I D116I D122I D125I D131I D132I D134I D143I D145I D152I D155I D156I D162I D165I D172I D174I D205I D212I D223I D225I D226I...
- Page 41 Note to EU users European Users should note that operation of this unit in Transmit mode requires the operator to have a valid Amateur Radio License from their respective Countries Amateur Radio Licensing Authority for the Frequencies and Transmitter Power levels that this Radio transmits on. Failure to comply may be unlawful and liable for prosecution. At this subject, refer to the “EU”...
- Page 42 We do not guarantee, for any par�cular purpose, the accuracy, validity, �meliness, legi�macy or completeness of the third-party products and contents involved in this manual. PO FUNG ELECTRONIC (HK) INTERNATONAL GROUP COMPANY LIMITED Address: Room 1508, 15/F, Office Tower II, Grand Plaza, 625 Nathan Road, Kowloon, Hong Kong www.baofengradio.com...
Need help?
Do you have a question about the DR-1801 UV Series and is the answer not in the manual?
Questions and answers