Table of Contents
Advertisement
Advertisement
Table of Contents

Related Manuals for Pax Technology Aries8


Summary of Contents for Pax Technology Aries8
- Page 1 Aries8 Reference Guide 09-21-2020 V2.1...
- Page 2 Bluetooth SIG, Inc. and any use of such marks by PAX Technology, Inc. is under license. Other trademarks and trade names are those of their respective owners. All other trademarks or brand names are the properties of their respective holders.
- Page 3 Add USB and RS232 cables to Communication Cables section. 09-27-2019 V1.7 Update Communication Cables and Cellular Communications sections. Update power and Micro SD, SIM, and PSAM card FAQs 10-10-2019 V1.8 Remove USB Cable from list of box contents for Aries8 Kit. v2.1 | ii...
- Page 4 ARIES8 REFERENCE GUIDE Date Version Description 06-25-2020 V1.9 Update document per new PAX style guide. Update all images, cabling, screenshots, and communication plate information. Add instructions for Integrated Plate and attaching Stylus Pen to Integrated Plate. Remove Packaging and Part Number information.
-
Page 5: Table Of Contents
Aries8 Smart Tablet ..........................7 Technical Details and Specifications ........................7 Front View ................................... 8 Back View ..................................8 Side Views ................................... 9 Aries8 Pro Smart Tablet ........................10 Technical Details and Specifications .........................10 Front View .................................11 Back View ..................................11 Side Views .................................12 Ports .......................... - Page 6 ARIES8 REFERENCE GUIDE SIM, SAM, and/or Micro SD Card Installation ..............34 Micro SD/SIM Card Installation .......................34 SIM/PSAM Card Installation ......................35 Terminal Location ......................35 Basic Operation Instructions ..................36 Power ON/OFF ..........................36 Power Indicator ..........................37 Adjust Display Brightness .......................39 Adjust Volume ...........................40...
-
Page 7: Introduction
Aries8 Smart Tablet (Payment) This lower cost tablet is different than the Aries8 Pro Smart Tablet in that it does not include the battery, fingerprint reader, or the scanner. Because it does not include the battery, this tablet must be connected to the plate that provides power at all times. -
Page 8: Acronyms And Terms
ARIES8 REFERENCE GUIDE 1 .3 Acronyms and Terms Acronym Definition DHCP Dynamic Host Configuration Protocol – A network management protocol used on IP networks. The DHCP server dynamically assigns an IP address and other network configuration parameters to each device on the network. -
Page 9: Definition Of Major Components
Tablet” on page 7. Aries8 Pro In all cases, “Aries8 Pro” refers to the Payment + POS tablet only. For more information on the Aries8 Pro Smart Tablet features, please see the section titled “Aries8 Pro Smart Tablet” on page 10. -
Page 10: Terminal Identification
ARIES8 REFERENCE GUIDE 2. Terminal Identification This section describes the Aries8 and Aries8 Pro Smart Tablet part number, serial number, and IMEI number locations. 2 .1 Part Number Location The part number is located on the bottom left hand corner at the back of the Smart Tablet terminal. -
Page 11: Imei Number Location
ARIES8 REFERENCE GUIDE 2 .3 IMEI Number Location The IMEI (International Mobile Equipment Identity) number is a 15 or 17 digit code that uniquely identifies mobile hardware for cellular communication. The IMEI number is located in the device settings. 1. Select [Settings]. - Page 12 ARIES8 REFERENCE GUIDE 3. In [Device status], select [Status]. 4. Select [IMEI information] to display the IMEI number. v2.1 | 6...
-
Page 13: Functional Information
The following section covers the various features and specifications of the Aries8 and Aries8 Pro Smart Tablet. 3 .1 Aries8 Smart Tablet This section describes the technical details and specifications of the Aries8 Smart Tablet, as well as its physical features. 3 .1.1 T... -
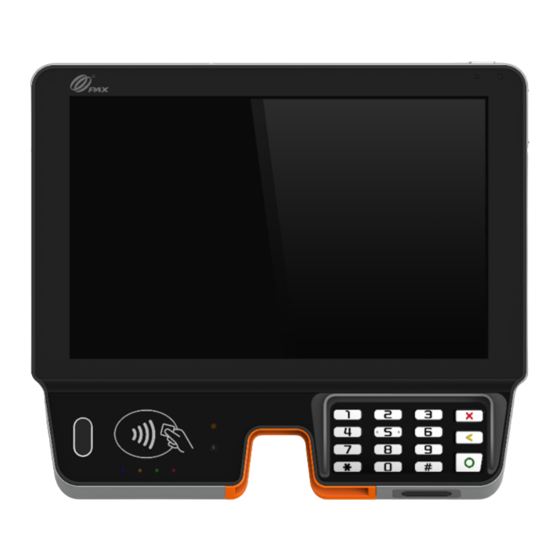
Page 14: Front View
ARIES8 REFERENCE GUIDE 3 .1.2 F RONT Charging Indicator Power Button Light Sensor Volume -/+ Privacy Shield Contactless Reader Keypad RF Indicator Hybrid Card Reader 8 MP Camera 3 .1.3 B Pogo PIN Battery Cover v2.1 | 8... -
Page 15: Side Views
ARIES8 REFERENCE GUIDE 3 .1.4 S IEWS Volume +/- Speaker SIM/Micro SD Slot Audio Jack SIM/PSAM Slot USB Port v2.1 | 9... -
Page 16: Aries8 Pro Smart Tablet
ARIES8 REFERENCE GUIDE 3 .2 Aries8 Pro Smart Tablet This section describes the technical details and specifications of the Aries8 Pro Smart Tablet, as well as its physical features. 3 .2.1 T ECHNICAL ETAILS AND PECIFICATIONS Feature Description PAXBiz Powered by Android... -
Page 17: Front View
ARIES8 REFERENCE GUIDE 3 .2.2 F RONT Power Button Charging Indicator Light Sensor Volume +/- Privacy Shield Fingerprint Scanner RF Indicator Keypad Camera Scanner Contactless Reader IC/MSR Hybrid Card Reader 3 .2.3 B Pogo PIN Battery Cover v2.1 | 11... -
Page 18: Side Views
SIM/PSAM Slot USB Port 4. Ports The Aries8 and Aries8 Pro Smart Tablets have ports on the right and left sides. Please Note: The Communication Box and the Integrated Plate also include peripheral ports. For more information on optional peripheral ports and/or plate installation, please see “Adapter, Plates, and Communication Box”... -
Page 19: Left Side Ports
ARIES8 REFERENCE GUIDE 4 .2 Left Side Ports Audio Jack USB Port v2.1 | 13... -
Page 20: Privacy Shield
5. Privacy Shield While the Aries8 and Aries8 Pro Smart Tablets are PCI-approved without the need for privacy shields, they can be installed with one of two optional privacy shields (high and low) that are included in the box for additional protection against PIN number theft. -
Page 21: Battery
ARIES8 REFERENCE GUIDE 6. Battery The Aries8 Pro Smart Tablet includes a 3.7v, 3800 mAH Li-ion battery for mobile use. 6 .1 Battery Location The Aries8 Pro battery is located behind the cover on the back of the device. Battery Cover 6 .2 Removing Battery... -
Page 22: Charging Battery
2. Using the cloth tab, slide the battery up to remove it from the device. 6 .3 Charging Battery There are two ways to charge the Aries8 Pro Smart Tablet’s battery: 1. Connect the tablet to the Mounting Plate with Communication Box’s Pogo Pin. This will automatically power on the tablet while charging the battery. -
Page 23: Battery Charge Status
6 .4 Battery Charge Status There are two ways to check the battery’s charge status: 1. In the top right corner of the screen, the Aries8 Pro Smart Tablet’s battery icon will show at what percentage the battery is charged. -
Page 24: Charging Indicator
ARIES8 REFERENCE GUIDE 6 .5 Charging Indicator The Aries8 Pro Smart Tablet’s charging indicator is located in the upper right corner of the screen, to the left of the light sensor. Charging Indicator • light means the device is charging. -
Page 25: Ac Power Connection
“Adapter, Plates, and Communication Box” on page 22. Optionally, the Aries8 Pro Smart Tablet may also be powered by connecting a PUSB cable to the Integrated Plate or Mounting Plate with Communication Box. Please see section “Cable Use Cases” on page 20 for more details. -
Page 26: Cable Use Cases
ARIES8 REFERENCE GUIDE 8. Cable Use Cases This section describes Aries8 and Aries8 Pro Smart Tablet-compatible cables, their part numbers, and their use cases. Note that for wireless communication only, no cable is necessary. Cable Part Number Use Case Image... - Page 27 Using any other cable could damage the device and would void the product warranty. • The PX USB Cable will not power the Aries8 or Aries8 Pro Smart Tablets. In some cases, while connected to the PX USB Cable’s power input, the Aries8 Pro Smart Tablet may look like it is connected to power;...
-
Page 28: Adapter, Plates, And Communication Box
Please Note: The Aries8 plates are designed for customers who already have their own stands. Mounted on a plate, the Aries8 and Aries8 Pro Smart Tablets can be installed on almost all kinds of stands on the market. 9 .1 Adapter The Aries8 adapter is used to connect the Aries8 or Aries8 Pro Smart Tablet to the Mounting Plate and Communication Box as well as the Aries8 Pro Smart Tablet to the Aries Handle. -
Page 29: Integrated Plate
9 .2.1 I NTEGRATED LATE ORTS The Integrated Plate is used to mount the Aries8 Smart Tablet to a base and includes 5 peripheral ports: LAN, POWER, PUSB, USB HOST, and Cash Drawer. Stand Holes (3) USB RS232 LAN Cash Drawer... -
Page 30: Integrated Plate Power
9 .2.2 I NTEGRATED LATE OWER 1. Plug the Aries8 cable and power supply into the port marked [Power] on the back of the Integrated Plate. Once plugged in, the device will show its charge status. AC Power Input 9 .2.3 I... - Page 31 ARIES8 REFERENCE GUIDE 9 .2.3.1 Integrated Plate Stylus Holder Installation 1. With the pen holder oriented toward the front of the plate, align the screw holes on the stylus holder with the screw holes located at the top of the Integrated Plate.
-
Page 32: Mounting Plate Communication Box
Additionally, the Communication Box has two USB ports on the opposite side: 9 .3.2 M OUNTING LATE WITH OMMUNICATION OWER 1. Make sure the Aries8 cable and power supply are connected to the port marked [DC-IN 9V] on the mounting plate’s Communication Box. v2.1 | 26... -
Page 33: Mounting Plate Connection Notification
ONNECTION OTIFICATION When the Aries8 Pro Smart Tablet is connected to the power plate while already powered on, a [Plate/ Stand: Connected] notification will appear to indicate power connection. When the Aries8 Pro Smart Tablet is disconnected from the plate while turned on, a [Plate/Stand: Separated] notification will appear to indicate power disruption. -
Page 34: Mounting Plate And Communication Box Connection
ARIES8 REFERENCE GUIDE 9 .3.4 M OUNTING LATE AND OMMUNICATION ONNECTION 1. With a flat tool, remove latch on the back of the mounting plate. 2. Plug Communication Box cable into the port behind the latch, then reinstall the latch. -
Page 35: Mounting Plate Stylus Pen Holder
Please Note: A stylus pen is included if the plate is purchased separately. A stylus pen is not included with the Aries8 Kits, but may be purchased separately. 9 .3.5.1 Mounting Plate Stylus Pen Holder Installation 1. Insert the pen holder into the gap at the back top of the plate. - Page 36 ARIES8 REFERENCE GUIDE 3. Place the two provided screws into the holes at the front of the plate and tighten them with a Phillips-Head screwdriver. v2.1 | 30...
-
Page 37: Aries Handle With Integrated Battery
The Aries Handle is designed to transform Aries Pro products into mobile devices and comes with an integrated 3.6V/3300mAH battery. Please note that unless ordered in the Aries8 Pro Kit, the Aries handle must be ordered separately for use with Aries8 Pro Smart Tablets. Please see the Aries8 Ordering Guide for more information. -
Page 38: Install Handle
ARIES8 REFERENCE GUIDE 10 .1 Install Handle 1. Carefully place the tablet with its underside facing up. Align the six orienting pegs on the handle with the holes on the tablet adapter, then lower the pegs on the handle onto the tablet adapter. -
Page 39: Charging Handle
10 .2 Charging Handle This section describes how to charge the Aries handle. The handle will not charge while it is connected to an Aries8 Pro Smart Tablet that is being charged. The handle must be disconnected from the tablet to charge. -
Page 40: Sim, Sam, And/Or Micro Sd Card Installation
ARIES8 REFERENCE GUIDE 11. SIM, SAM, and/or Micro SD Card Installation The Aries8 and Aries8 Pro has one Micro SD card slot, up to two SIM card slots, and up to two PSAM card slots. PSAM Slot Micro SD and/or SIM Card Tray SIM/PSAM Slot 11 .1 Micro SD/SIM Card Installation... -
Page 41: Sim/Psam Card Installation
11 .2 SIM/PSAM Card Installation The Aries8 and Aries8 Pro comes with two SIM/PSAM card slots. 1. Open the card slot cover and then insert card with chip facing up. When inserted, close the PSAM card slot cover. -
Page 42: Basic Operation Instructions
To power on the terminal, press and hold the power button for 3-5 seconds. Power Button Please Note: The Aries8 Smart Tablet will automatically power on when plugged into a power source while the Aries8 Pro must be turned on via the power button. POWER OFF To power off the tablet, press and hold the power button for 3-5 seconds. -
Page 43: Power Indicator
ARIES8 REFERENCE GUIDE 13 .2 Power Indicator There are two power indicators on the Aries8 Pro Smart Tablet: 1. The battery icon with lightning bolt shows that the device is connected to a power source and/or charging. v2.1 | 37... - Page 44 Please Note: There is no indicator light on the Aries8 Smart Tablet. Additionally, the Aries8 also shows a battery icon when powered on. Though it has no battery, it will show 100% charge. v2.1 | 38...
-
Page 45: Adjust Display Brightness
ARIES8 REFERENCE GUIDE 13 .3 Adjust Display Brightness The display brightness can be adjusted within the device settings. 1. Select [Settings]. 2. Select [Display]. v2.1 | 39... -
Page 46: Adjust Volume
3. In [Brightness level], adjust the level, select [Adaptive brightness], and set screen sleep time. 13 .4 Adjust Volume There are two ways to change the volume on an Aries8 tablet: • Use the toggle switch on the right side of the tablet near the power button. Pressing the top of the toggle switch increases the volume. - Page 47 ARIES8 REFERENCE GUIDE • Another way to raise or lower the volume on an Aries8 is in the settings. 1. Select [Settings]. 2. Select [Sound]. v2.1 | 41...
-
Page 48: Take A Screenshot
ARIES8 REFERENCE GUIDE 3. Select [Device volume], then adjust the volume up or down using the volume control bar at the top of the display screen. 13 .5 Take a Screenshot To take a screen shot, press and hold down the power button and the volume button at the same time. -
Page 49: Set Screen Sleep Time
ARIES8 REFERENCE GUIDE 13 .6 Set Screen Sleep Time 1. Select [Settings]. 2. Select [Display]. v2.1 | 43... - Page 50 ARIES8 REFERENCE GUIDE 3. Select [Sleep]. 4. Select the preferred screen sleep time. v2.1 | 44...
-
Page 51: Cleaning The Device
ARIES8 REFERENCE GUIDE 13 .7 Cleaning the Device WARNING Do not use industrial strength or abrasive cleaner as it may damage or scratch the device. • Do not immerse the device in water or liquid. • Do not spray water or cleaner into EMV Card Reader or ports. -
Page 52: Card Reader
ARIES8 REFERENCE GUIDE 14. Card Reader The Aries8 and Aries8 Pro include a hybrid card reader that can be used as a Magnetic Stripe Reader, an EMV Card Reader, and an NFC/Contactless Card Reader. Hybrid MSR/EMV Card Reader Contactless Card Reader 14 .1 Hybrid Card Reader... -
Page 53: Nfc/Contactless Card Reader
ARIES8 REFERENCE GUIDE 14 .2 NFC/Contactless Card Reader There are two ways to use the NFC/Contactless card reader: • Tap the NFC/Contactless card when the contactless symbol located to lower left corner of the screen lights. The terminal uses an antenna device that detects and retrieves information from the card. -
Page 54: Communications Setup
15 .1 DHCP The Aries8 and Aries8 Pro Smart Tablets support DHCP setup for network and internet access. DHCP stands for Dynamic Host Configuration Protocol. DHCP is a network management protocol used in IP networks. - Page 55 ARIES8 REFERENCE GUIDE 2. Under Wireless & networks, select [WLAN]. 3. Swipe the tab to turn on WLAN. v2.1 | 49...
- Page 56 ARIES8 REFERENCE GUIDE 4. Select the desired WLAN network. 5. Enter the case-sensitive password. v2.1 | 50...
- Page 57 ARIES8 REFERENCE GUIDE 6. Select [Connect]. v2.1 | 51...
-
Page 58: Static Ip
ARIES8 REFERENCE GUIDE 15 .2 Static IP The Aries8 and Aries8 Pro Smart Tablets support Static IP setup for network and internet access. Static IP addresses allow network devices to keep the same IP address instead of automatically assigning IP addresses such as in a DHCP setup. - Page 59 ARIES8 REFERENCE GUIDE 2. Under Wireless & networks, select [WLAN]. 3. Swipe the tab to turn on WLAN. v2.1 | 53...
- Page 60 ARIES8 REFERENCE GUIDE 4. Select the desired WLAN network. 5. Enter the case-sensitive password. v2.1 | 54...
- Page 61 ARIES8 REFERENCE GUIDE 6. Select [Advanced Options]. 7. Scroll down and select [IP settings]. v2.1 | 55...
- Page 62 ARIES8 REFERENCE GUIDE 8. Select [Static]. 9. Scroll down and enter the [IP address], [Gateway], [Network prefix length], [DNS 1], and [DNS 2], then select [Save]. v2.1 | 56...
-
Page 63: Manual Static Ip
ARIES8 REFERENCE GUIDE 15 .3 Manual Static IP If the broadcast SSID is disabled on an access point, the terminal will not display the SSID under available Wi-Fi network listings. In this case, it is necessary to manually configure the terminal for Static IP connection types. - Page 64 ARIES8 REFERENCE GUIDE 2. Under Wireless & networks, select [WLAN]. 3. Swipe the tab to turn on WLAN. v2.1 | 58...
- Page 65 ARIES8 REFERENCE GUIDE 4. Scroll to the bottom of the WLAN screen and select [Add Network]. 5. Enter the case-sensitive [SSID]. v2.1 | 59...
- Page 66 ARIES8 REFERENCE GUIDE 6. Under Security, select the security type from the pull-down menu. Selections include WEP, WPA/WPA2 PSK, and 802.1x EAP. 7. Scroll down and select [Advanced Options]. v2.1 | 60...
- Page 67 ARIES8 REFERENCE GUIDE 8. Scroll down and select [IP settings]. 9. Select [Static]. v2.1 | 61...
- Page 68 ARIES8 REFERENCE GUIDE 10. Scroll down and enter the [IP address], [Gateway], [Network prefix length], [DNS 1], and [DNS 2], then select [Save]. v2.1 | 62...
-
Page 69: Manual Proxy
ARIES8 REFERENCE GUIDE 15 .4 Manual Proxy In Proxy Setup, another computer, or proxy server, acts as a hub where internet requests for the Aries8 or Aries8 Pro Smart Tablets* are processed. By connecting through the server, the Aries8 sends its requests to the server which then processes the request and returns the response to the Aries8. - Page 70 ARIES8 REFERENCE GUIDE 2. Under Wireless & networks, select [WLAN]. 3. Swipe the tab to turn on WLAN. v2.1 | 64...
- Page 71 ARIES8 REFERENCE GUIDE 4. Scroll to the bottom of the WLAN screen and select [Add Network]. 5. Enter the case-sensitive [SSID]. v2.1 | 65...
- Page 72 ARIES8 REFERENCE GUIDE 6. Under Security, select the security type from the pull-down menu. Selections include WEP, WPA/WPA2 PSK, and 802.1x EAP. 7. Scroll down and select [Advanced Options]. v2.1 | 66...
- Page 73 ARIES8 REFERENCE GUIDE 8. Under Proxy, select [Manual]. 9. Scroll down to enter the [Proxy hostname], [Proxy port], and [Bypass proxy]. v2.1 | 67...
- Page 74 ARIES8 REFERENCE GUIDE 10. Scroll down to select [IP settings] and select [Static]. 11. Scroll down and enter the [IP address], [Gateway], [Network prefix length], [DNS 1], and [DNS 2], then select [Save]. v2.1 | 68...
-
Page 75: Cellular
T-Mobile® SIM card is required to support cellular communication. This section includes information about installing a SIM card, but your Aries8 or Aries8 Pro Smart Tablet may come with the SIM card already installed and ready to use when you receive your terminal. - Page 76 ARIES8 REFERENCE GUIDE 2. Under Wireless & networks, select [More]. 3. Select [Cellular networks]. v2.1 | 70...
- Page 77 ARIES8 REFERENCE GUIDE 4. Select [Access Point Names]. 5. Select desired APN. v2.1 | 71...
-
Page 78: Frequently Asked Questions
ARIES8 REFERENCE GUIDE 16. Frequently Asked Questions This section covers answers to frequently asked questions. 1. Can USB-Type C power supply and cable be used to power the Aries tablets? No, the USB Type-C power supply is used for recharging the battery in the Aries tablet when it is removed from its plate, and it is used for recharging the battery in the Aries handle. - Page 79 17. How do I get an Aries kit configured with a Stylus pen? For the Aries8 kit you will need to include a Stylus pen and Stylus pen holder on the order. For Aries8 Pro kits, you merely need to add a Stylus pen to the order. These two configurations already include a stylus pen holder.
- Page 80 ARIES8 REFERENCE GUIDE 18. Is there a way to order/configure an Aries8 Pro tablet alone (no Plate) to include a tethered stylus pen? No. The pen can be ordered separately but there is no way to attach the stylus pen holder.
- Page 81 32. Can the Aries8 download applications from the PAXSTORE? Yes, the Aries8 uses the PAXSTORE client application installed on the Aries6 tablet to access the PAXSTORE. It will display available applications on the PAXSTORE for download and supports applications configured to be pushed from the PAXSTORE which may or may not be displayed on the store.
-
Page 82: Pax Customer Support
The Bluetooth® word mark and logos are registered trademarks owned by Bluetooth SIG, Inc. and any use of such marks by PAX Technology, Inc. is under license. Other trademarks and trade names are those of their respective owners. Other names may be trademarks of their respective owners.
Need help?
Do you have a question about the Aries8 and is the answer not in the manual?
Questions and answers