Table of Contents
Advertisement
Quick Links
Please read all of the operating instructions carefully before use and keep in a safe place for future reference.
Before first use
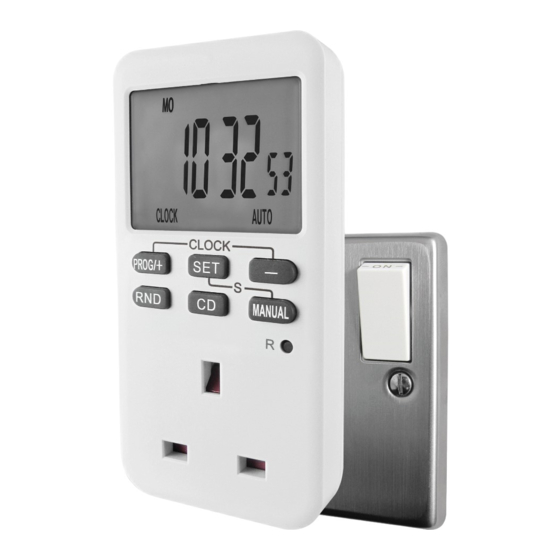
1. Press the R button with a pencil to clear any data in the timers memory.
2. Plug the timer into a mains socket and switch on.
3. Leave for up to a minimum of 1 hour to charge the internal rechargeable battery.
N.B. The internal battery acts as a memory backup and ensures any programmed times are not deleted if there is loss of power to the timer.
Important
The clock display is the home screen. When following any of the below instructions if no button is pressed for 30 seconds the timer will return to the home
screen and you will have to start the programming sequence again from the beginning. If you want to return to the home screen at any time during or after
programming press the PROG/+ and - buttons together.
Setting the time
1. If you are setting the clock in British Summer Time (clocks have previously gone forward an hour) then before you start the process of setting the time
press the SET and MANUAL buttons together. An S will appear within a black box on the right side of the screen.
2. Press and hold the SET button until the words SET (in the bottom left of the screen) and MO (in the upper left of the screen) appear and flash.
3. Press the PROG/+ and - buttons to select the day of the week, this will be displayed along the top of the screen. Press the SET button to confirm.
4. Press the PROG/+ and - buttons to select the hour (24 hour mode). Press the SET button to confirm.
5. Press the PROG/+ and - buttons to select the minutes. Press the SET button to confirm.
6. Press the SET and CD button together to switch between 12 and 24 hour mode.
Programming ON/OFF times
You can program up to 10 different ON/OFF times.
Timer programmes can be set to come individual days or the below stated blocks of days:
MO TU WE TH FR SA SU (everyday)
MO TU WE TH FR
(weekday)
SA SU (weekend)
MO TU WE TH FR SA
MO
WE
FR
TU
TH
SA
MO TU WE
TH FR SA
MO
WE
FR
SU
Example: Using timer programme 4, turn the timer ON at 18:15 and OFF at 22:30 every weekend (Sat/Sun)
1. Press the PROG/+ button until 4 ON is displayed on the left of the screen. Press the SET button.
2. Press the PROG/+ and - buttons until SA and SU are displayed along the top of the screen. Press the SET button.
3. Press the PROG/+ and - buttons to select 18 hours. Press the SET button.
4. Press the PROG/+ and - buttons to select 15 minutes. Press the SET button.
The timer is now programmed to come ON at 18:15 at the weekend. Next the OFF time needs to be programmed.
5. Press the PROG/+ button until 4 OFF is displayed on the left of the screen. Press the SET button.
6. Press the PROG/+ and - buttons until SA and SU are displayed along the top of the screen. Press the SET button.
7. Press the PROG/+ and - buttons to select 22 hours. Press the SET button.
8. Press the PROG/+ and - buttons to select 30 minutes. Press the SET button.
Timer programme 4 is now set as per the example to turn ON at 18:15 and OFF at 22:30 every weekend (Sat/Sun).
N.B. Timer programmes 1,2,3,5,6,7,8,9,10 will be blank and can be set using the same process as above. These will work simultaneously. You could for
example set up a new timer setting on timer programme 2 that turns the timer ON at 06:30 and OFF at 08:00 every weekday (Mon-Fri).
N.B. To clear an ON/OFF programme press the MANUAL button when it is displayed on the screen.
Easy read electronic timer
Model: 67382
Operating instructions
Instructions continue overleaf - please turn over
Advertisement
Table of Contents

Subscribe to Our Youtube Channel
Related Manuals for Uni-Com 67382

Summary of Contents for Uni-Com 67382
- Page 1 Easy read electronic timer Model: 67382 Operating instructions Please read all of the operating instructions carefully before use and keep in a safe place for future reference. Before first use 1. Press the R button with a pencil to clear any data in the timers memory.
- Page 2 This product is guaranteed for one year from the date of purchase against faulty parts or workmanship. It does not cover physical damage to the unit. Proof of purchase required. This does not affect your statutory rights. Uni-Com (Global) Ltd. +44 (0)1732 865238 1 &...
Need help?
Do you have a question about the 67382 and is the answer not in the manual?
Questions and answers