
Related Manuals for Ender 2 Pro


Summary of Contents for Ender 2 Pro
- Page 1 创造现实, 成就梦想 Ender-2 Pro Create reality, achieve dreams Ender-2 Pro 3D Printer User Manual 3D打印机用户使用手册 V1.4...
- Page 3 Dear Consumers, Thank you for choosing our products. For the best experience, please read the instructions before operating the printer. Our teams will always be ready to provide you the best services. Please contact us via the phone number or e-mail address provided at the end when you encounter any problem with the printer.
- Page 4 NOTES 使用须知 Do not use the printer any way other than described herein in order to avoid personal injury or property damage. Do not place the printer near any heat source or flammable or explosive objects. We suggest placing it in a cool and dustless environment. Do not expose the printer to violent vibration or any unstable environment, as this may cause poor print quality.
-
Page 5: Table Of Contents
Contents目录 Introduction 设备简介 01-01 02-02 Equipment Parameters 设备参数 Package Content 零件清单 03-03 Assemble XZ-axis Kit 组装XZ轴组件 04-04 Fix XZ-axis Kit 固定XZ轴组件 05-05 Install the Rack 安装料架组件 06-06 Assemble Handle 组装把手 07-07 Cable Connection 设备连线 08-09 Install Display Screen 安装显示屏 10-10 Solution for V-wheel Jamming V轮卡顿解决方案... -
Page 6: Introduction 设备简介
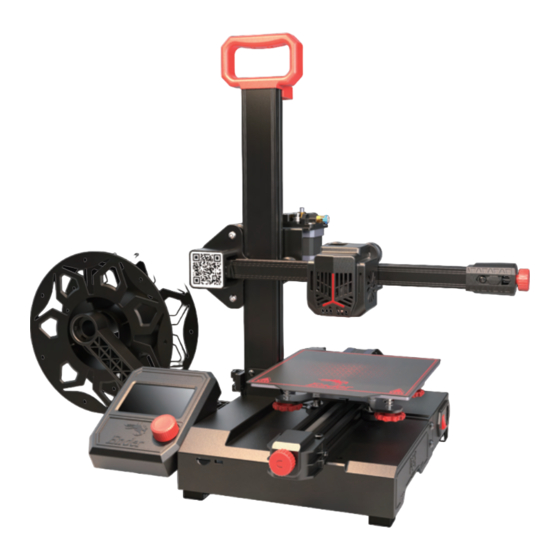
1. Introduction 设备简介 XZ-axis kit Knob Handle XZ轴组件 旋钮 把手 X-axis limit switch Extruder Material rack and material tube X轴限位开关 挤出机 Z-axis limit switch E-axis motor Z轴限位开关 E轴电机 Screen Tool box Toggle switch 显示屏 收纳盒 拨动开关 Nozzle kit Power Coupling 喷头套件... -
Page 7: Equipment Parameters 设备参数
2. Equipment Parameters 设备参数 Basic Parameters 基本参数 Model | 型号 Ender-2 Pro Printing Size | 成型尺寸 165*165*180mm Molding Tech | 成型技术 Nozzle Number | 喷头数量 Slice Thickness | 切片层厚 0.1mm-0.4mm Nozzle Diameter | 喷嘴直径 Standard 0.4mm | 标配0.4mm Precision | 打印精度... -
Page 8: Package Content 零件清单
3. Package Content 零件清单 Handle | Screen kit 显示屏组件 Power cord 电源线 把手 XZ-axis kit | Material tube Material rack Printer base 底座组件 XZ轴组件 料架 料管 M4x16 hexagon socket M5x45 cylinder-head M5x40 hexagon Filament button head screws combination screw socket button head 耗材... -
Page 9: Assemble Xz-Axis Kit 组装Xz轴组件
4.Assemble XZ-axis Kit 组装XZ轴组件 XZ-axis kit are vertically installed on the base. (As shown in the figure) | XZ轴组件垂直安装在底座组件。(如图所示) Printer base 底座组件 XZ-axis kit | XZ轴组件... -
Page 10: Fix Xz-Axis Kit 固定Xz轴组件
5. Fix XZ-axis Kit 固定XZ轴组件 A.Screw up two M4x16 hexagonal socket button head cap screws from the front. | 将两颗M4x16内六角平圆头螺丝从正面扭紧固定。 B.Tighten and secure it with two M5x45 cylinder-head combination screws with washer from the bottom. | 再用两颗M5x45圆柱头带垫组合螺 丝从底部扭紧固定。 M4x16 hexagon socket button head screws M4x16内六角平圆头螺丝... -
Page 11: Install The Rack 安装料架组件
6.Install the Rack 安装料架组件 Fix the threaded end of the material tube on the rack, then align the screw hole of the rack with the position of the base, and finally fix it with one M5x40 hexagonal socket button head cap screw. (As shown in the figure) 将料管带螺纹的一端固定在料架上,再把料架的螺孔对准底座组件的位置,最后用一颗M5x40内六角平圆头螺丝扭紧固定。(如图所示... -
Page 12: Assemble Handle 组装把手
7. Assemble Handle 组装把手 A. Overlap the bottom of the handle with the top surface of the profile. | 将把手的底面与型材上表面定位重合。 B. Fix it with two M5x14 hexagonal socket button head cap screws. | 再用2颗M5x14内六角平圆头螺丝扭紧固定。 Handle x 1 把手 M5x14 hexagon x 2 socket button head screws M5x14内六角平圆头螺丝... -
Page 13: Cable Connection 设备连线
8. Cable Connection 设备接线 A.Connect X, E, Z-axis motor wires according to the yellow label on the 6-pin (5 wires) port. | 按照6-pin(5根线)端口上黄色标签提示连接X、E、Z 轴步进电机。 B.Connect X, Z-axis limit switch wires according to the yellow label on the 3-pin (2wires) port. | 按照3-pin(2根线)端口上黄色标签提示连接X、Z轴 限位开关。... - Page 14 9. Cable Connection 设备接线 A.Align the flat cable socker with the slot at the back of display,and then insert it. | 排线的卡扣与显示屏里面的卡扣吻合,再插入。 B.Plug in the power cord. | 插入电源线。 Power cord 电源线...
-
Page 15: Install Display Screen 安装显示屏
10. Install Display Screen 安装显示屏 Align the two posts on the right side of the display screen with the slots of the base, and move them down to fix. (As shown in the figure) 将显示屏组件右侧处的两个卡柱对准底部组件的卡槽往下移动加以固定。(如图所示) Screen kit 显示屏组件... -
Page 16: Solution For V-Wheel Jamming V轮卡顿解决方案
11. Solution for V-wheel Jamming V轮卡顿解决方案 X/Y/Z axis V-wheel adjustment: After the machine is assembled gently dial the wheel to check whether it is idling or stuck. If this phenom- enon occurs, use an open-end wrench to adjust the hexagonal eccentric isolation column to make it rotate smoothly. X/Y/Z轴滑轮调节:机器组装完成后,用手轻拨滑轮,检查其是否有空转和卡顿,如有此现象请使用开口扳手调节六角偏心隔离柱,使其转动运动顺... -
Page 17: Bed Leveling 调平平台
12. Bed Leveling 调平平台 Motion →Auto Home→ Disable Steppers (Release the motor). | 运动→自动回到原点→ 关闭步进电机(释放电机)... - Page 18 13. Bed Leveling 调平平台...
-
Page 19: Preheating 预热
14. Preheating 预热... - Page 20 15. Preheating 预热...
- Page 21 16. Preheating 预热 When you wait for the temperature to rise, hang the filament over the filament holder. | 当您等待温度上升时,把耗材挂在料架上。...
-
Page 22: Load Filament 装料
17. Load Filament 装料 When target temperature is reached, hold the extruding clamp by hand and insert filament into the small hole of the extruder until the nozzle position. When filaments flow out of the nozzle, meaning that the filaments have been loaded. 当温度达到目标温度时,用手捏住挤出夹,将耗材插入挤出机小孔直至喷嘴位置,看到喷嘴处有耗材流出即表示耗材已经装载完成。... -
Page 23: Start Printing 开始打印
18. Start Printing 开始打印 1.Double click to install the . | 双击安装Creality Slicer 2.Double click to open the Creality Slicer. | 2.双击打开Creality Slicer... - Page 24 19. Start Printing 开始打印 Ender-2 Pro 6.Insert the storage card→press the knob→Print from Card→> Choose the file to be printed. 插入存储卡→按下按钮→存储卡上打 印→要打印的文件 storage card. 。 Please don't insert or remove the storage card during printing. 警告: 在打印过程中, 禁止插拔存储卡。...
-
Page 25: Circuit Wiring电路接线
20. Circuit Wiring 电路接线 X axis motor Y axis motor Z axis motor E axis motor Y轴电机 Z轴电机 X轴电机 E轴电机 Storage card slot 存储卡卡槽 MINI USB Port MINI USB 接口 EXP1/12864 Screen interface EXP1/12864 屏幕接口 Power input BL-Touch Reserved 电源输入 BL-Touch 预留接口... -
Page 26: Trouble-Shooting 故障检修
21. Trouble-shooting Play by storage card home Extrusion gear loose Other motor... - Page 27 22. 故障检修...
-
Page 28: Fdm 3D Print Filaments 3D打印耗材
23 . FDM 3D PRINT FILAMENTS FDM 3D PRINTING FILAMENTS Upgraded environmentally friendly Ender series is widely applied to general formula, matte effect, high toughness, FDM printer design, which meet customers' and fine printing. The raw materials are needs of daily design and different imported from the United States, prototyping needs. - Page 29 Filaments Parameter Information Material Print Temp (℃) Bed Temp (℃) Difficulty Flexibility Shrinkage Ductility Applicable Models Suitable for 99% FDM models HP-PLA 190-220 50-60 Suitable for 99% FDM models HP-PLAx3 190-220 50-60 Series Suitable for 99% FDM models CR-PLA 190-220 50-60 Suitable for 99% FDM models HC/EN-PLA...
- Page 30 25. 3D 打印耗材 3D打印耗材 系列 系列 升级环保配方, 哑光效果, 韧性高, 打印细 广泛适用市面上通用型FDM打印机, 并可以 腻, 原料源自美国, 有丰富的颜色可选。 按照您的需求量身定制, 可以满足您日常的 设计和不同的原型制作需求,让想象插上翅 膀。 系列 系列 定位中高端用户, 透明盘+黑白彩盒设计, 线径 高性价比款, 广泛适用市面上通用型FDM打 公差小, 打印性能稳定。 可以满足您日常的设 印机, 并可以按照您的需求量身定制, 可以 计和原型制作需求。 具有出色的机械性能和打 满足您日常的设计和不同的原型制作需求。 印质量。...
- Page 31 26.线材种类参数信息 材质 打印温度 (℃) 热床温度 (℃) 打印难度 柔软度 收缩率 韧性 适用机型 HP-PLA 190-220 50-60 适配99%FDM机型 HP-PLAx3 190-220 50-60 适配99%FDM机型 系列 CR-PLA 190-220 50-60 适配99%FDM机型 HC/EN-PLA 190-220 50-60 适配99%FDM机型 需要热床, DIY机推荐使用Creality保温罩 220-260 90-110 需要热床, DIY机推荐使用Creality保温罩 PETG 230-250 60-100 210-240 近端挤出机型 Silk 190-220 50-60 适配99%FDM机型...
- Page 32 SHENZHEN CREALITY 3D TECHNOLOGY CO., LTD. Add:18F, JinXiuHongDu Building, Meilong Blvd., Longhua Dist., Shenzhen, China 518131 Official Website: www.creality.com Tel:+86 755-8523 4565 E-mail: info@creality.com cs@creality.com 深 圳 市 创 想 三 维 科 技 股 份 有 限 公 司 深圳市龙华区民治街道新牛社区梅龙大道锦绣鸿都大厦18F Scan To Learn More 公司网站:www.cxsw3d.com 扫...
Need help?
Do you have a question about the 2 Pro and is the answer not in the manual?
Questions and answers