Advertisement
Available languages
Available languages
Advertisement
Table of Contents

Related Manuals for TOMZON A23


Summary of Contents for TOMZON A23
- Page 1 User Manual Email: support@tomzontoys.com support.de@ tomzontoys.com support.it@ tomzontoys.com support.fr@ tomzontoys.com support.es@ tomzontoys.com Web: www.tomzontoys.com support.uk@ tomzontoys.com support.jp@tomzontoys.com FB: www.facebook.com/tomzonofficial...
- Page 2 Catalog 01 - 11 User Manual 12 - 22 Benutzerhandbuch...
-
Page 3: Safety Reminder
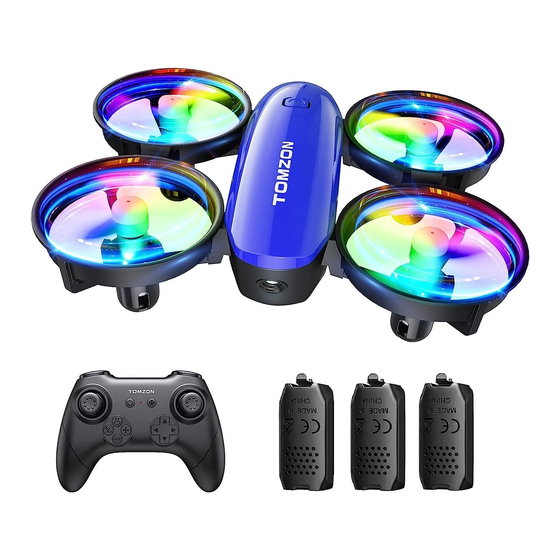
Pack List Drone Remote Control Battery User Manual Email: support@tomzontoys.com support.de@ tomzontoys.com support.it@ tomzontoys.com Web: www.tomzontoys.com support.fr@ tomzontoys.com support.es@ tomzontoys.com FB: www.facebook.com/tomzonofficial support.uk@ tomzontoys.com support.jp@tomzontoys.com Propeller (A / B) USB Charging Cable User Manual Safety Reminder 1. It is forbidden to use all types of drones within a radius of 5,000m and center point area of airfield runway, in order to guarantee the electromagnetic environment requirements of the aviation radio. -
Page 4: Product Description
Product Description Drone Forward Motor Tilt Motor Indicator Light (Correspond to Propeller A) (Correspond to Propeller B) Power Switch Propeller A Propeller B Propeller B Propeller A Battery Tips: The aircraft has two types of propellers (“A” and “B”) marked A and B. Please match the Mark “A”... -
Page 5: Remote Control
Remote Control Calibrate Power Right Left Joystick Joystick One-button Takeoff / Landing WASD Fine- Speed tuning Switch Emergency Stop Headless Mode 360° Rotation Light On / Off Rotation Orbit Flight Tips: The drone supports two control modes: Mode 1 and 2. Mode 1: Use the left joystick to make the drone fly up / down, rotate left / right;... - Page 6 Battery Battery Installation and Charging 1. Place the battery in the drone and buckle it as shown in picture below: 2. Recharge the battery as shown in picture below: USB charger indicator turns red during charging. Once charging is done, the charger indicator turns off. Note: 1.
-
Page 7: Quick Start
Battery Installation of Remote control 1. Open the battery cover of remote control and install 3 AAA batteries (not included in the packaging) as shown in picture below: Tips: 1. Be sure that the batteries of the drone and remote control are fully charged before flying. -
Page 8: Takeoff And Landing
Calibration Press “ ” (calibrate button) to start calibration. The indicator light flashes rapidly during calibration and after the calibration is completed, the indicator light is always on. When drone falls, please calibrate it again (place the drone on horizontal ground during calibration). Takeoff and Landing Method 1 As shown in picture below, press “... -
Page 9: Emergency Stop
Method 2 As shown in picture below, push both joysticks simultaneously to unlock the drone, then push the left one upwards to take off (after the drone takes off, push the right one downwards to land). Unlock Takeoff / Landing Emergency Stop In case of emergency, press and hold the "STOP"... -
Page 10: Headless Mode
Front / Rear, Left / Right Use “right joystick” to control the left / right direction during flight. Headless Mode The drone flies at a fixed direction and does not change with the direction of the drone, as shown in picture below: Front Front Left... -
Page 11: Fine Tuning
Fine-tuning If the drone is tilted to certain direction, instead of a stable state, press the fine-tuning button after takeoff to the opposite flight direction to reach the stable state. Aerobatic Flight 3D Rotation Step 1: Press “ ” (rotate button) to enter the rotation mode and the remote control beeps continuously. -
Page 12: Rotation Mode
Rotation Mode As shown in picture below, shot press “ ” (rotation button) to enable / disable the rotation mode, and the remote control makes a "beep" sound. In this mode, the drone rotates at a fixed speed. Orbit Flight Mode As shown in picture below, short press “... -
Page 13: Low Battery Alarm
Throw Mode The drone can take off automatically after being thrown manually. Please connect the drone to the remote control and calibrate it, then hold the drone in your hand and toss it into the air. As shown in picture below: Safety Low Battery Alarm When voltage is lower than 3.5V, the indicator of the drone flashes... - Page 14 Packliste Drohne Fernsteuerung Batterien User Manual Email: support@tomzontoys.com support.de@ tomzontoys.com support.it@ tomzontoys.com Web: www.tomzontoys.com support.fr@ tomzontoys.com support.es@ tomzontoys.com FB: www.facebook.com/tomzonofficial support.uk@ tomzontoys.com support.jp@tomzontoys.com Propeller (A / B) USB-Ladekabel Benutzerhandbuch Erinnerung an die Sicherheit 1. Um die Anforderungen an die elektromagnetische Umgebung des Flugfunks zu gewährleisten, ist die Verwendung aller Arten von Drohnen in einem Radius von 5000 m und im Bereich des Mittelpunkts der Flughafenlandebahn verboten.
- Page 15 Produktübersicht Drohne Motor Motor rechtsläufig linksläufig Anzeigelicht (passt zum Propeller A) (passt zum Propeller B) Power- schalter Propeller A Propeller B Propeller B Propeller A Batterie Tipp: Die Drohne hat zwei Propellertypen ("A" und "B").Die Zeichen A und B sind auf den Propellern aufgedruckt. Wenn Sie den Propeller austauschen, achten Sie bitte auf entsprechende "A"- oder "B"-Zeichen.
- Page 16 Fernbedienung Kalibrierung Power- Schalter Rechter Linker Joystick Joystick Start- / Landetaste Feinabstimmung Not-Aus vorwärts, rückwärts, Geschwindigkeit- links und rechts seinstellung Kopfloser Modus 360° Flip Lichter an / aus Rotation Kreisflug Tipp: Die Drohne unterstützt zwei Steuerungsmodi, Modus 1 und Modus 2. Modus 1: Der linke Joystick steuert den Aufstieg / Abstieg und die Links / Rechts-Drehung der Drohne;...
- Page 17 Batterien Installation und Aufladen der Batterie der Drohne 1. Setzen Sie die Batterie in die Drohne ein und drücken Sie ihn wie in der Abbildung gezeigt ein. 2. Laden Sie die Batterie wie in der Abbildung gezeigt auf. Das rote Licht des USB-Ladegeräts leuchtet während des Ladevorgangs.
- Page 18 Einsetzen der Fernbedienungsbatterie 1. Öffnen Sie die Batterieabdeckung der Fernbedienung wie in Abb. gezeigt und legen Sie 3 AAA-Batterien ein (nicht im Lieferumfang enthalten, bitte Ihre eigenen Batterien bereitstellen). Tipps: 1. Stellen Sie bitte vor dem Flug sicher, dass die Batterien der Drohne und der Fernbedienung vollständig aufgeladen sind, da die Drohne bei niedrigem Batteriestand nicht starten kann.
- Page 19 Kalibrierung Drücken Sie die " " (Kalibrierungstaste), um die Kalibrierung der Drohne zu starten. Die Drohnenanzeige blinkt während des Kalibrierungsvorgangs schnell und bleibt leuchtend, wenn die Kalibrierung abgeschlossen ist. Wenn die Drohne abstürzt, kalibrieren Sie sie bitte neu (die Drohne sollte während der Kalibrierung auf einer horizontalen Fläche stehen).
- Page 20 Methode 2 Wie im Bild gezeigt, ziehen Sie die beiden Joysticks gleichzeitig 45° nach innen unten, um die Drohne zu entsperren, und ziehen Sie dann den linken Joystick nach oben, um abzuheben (nach dem Start drücken Sie den linken Joystick nach unten, um zu landen). Entsperren Starten / Landen Not-Aus...
- Page 21 Vorwärts- und Rückwärtsflug, Links- und Rechtsflug Mit dem " rechten Joystick " steuern Sie die Drohne vorwärts, rückwärts, nach links oder rechts. Kopfloser Modus Der kopflose Modus bedeutet, dass die Bewegungsrichtung der Drohne während des Flugs festgelegt ist und sich nicht mit der Richtung des Drohnenkopfs ändert, wie in Abb.
- Page 22 Feineinstellung Wenn die Drohne nach dem Start von einer bestimmten Richtung abweicht, anstatt einen relativ stabilen Zustand zu erreichen, bitte drücken Sie die Trimmtaste in der entgegengesetzte Flugrichtung, um stabilen Zustand zu erreichen. Kunstflug 3D-Flip Schritt 1: Drücken Sie die " "...
- Page 23 Rotationsmodus Drücken Sie kurz " " (die Rotationstaste) wie in Abb., um den Rotationsmodus zu aktivieren bzw. zu deaktivieren, woraufhin die Fernbedienung einen "Tick"-Ton von sich gibt. In diesem Modus rotiert die Drohne selbst mit einer bestimmten Geschwindigkeit. Kreisflugmodus Drücken Sie kurz " "...
-
Page 24: Spezifikationen
Werfen Die Drohne unterstützt den automatischen Induktionsstart nach dem manuellen Werfen. Bitte nach der Verbindung mit Fernbedienung und Kalibrierung nehmen Sie die Drohne in die Hand und dann in die Luft werfen, wie in der Abb. gezeigt. Sicherheit Alarm bei schwacher Batterie Das Anzeigelicht wird rot und blinkt langsam, wenn die Spannung unter 3.5V fällt, und die Fernbedienung gibt "Tick"-Töne von sich. - Page 25 Model Shenzhen Deepsea Excellence Technology Co., Ltd. Manufacturer 5th Floor, Building 7, Hongfa High-tech Park, Keji Address 4th Road, Shiyan Street, Baoan District, Shenzhen Battery Information 3.85V 380mAh Charging voltage/current FCC ID 2AYUO-A21 EC REP 1: Like Sun GmbH. Planckstr.59, 45147 Essen, Germany EC REP 2: DST Co., Ltd.
Need help?
Do you have a question about the A23 and is the answer not in the manual?
Questions and answers