Advertisement
Quick Links
Thank you for purchasing a Sealey product. Manufactured to a high standard, this product will, if used according to these instructions,
and properly maintained, give you years of trouble free performance.
IMPORTANT: PLEASE READ THESE INSTRUCTIONS CAREFULLY. NOTE THE SAFE OPERATIONAL REQUIREMENTS, WARNINGS & CAUTIONS. USE
THE PRODUCT CORRECTLY AND WITH CARE FOR THE PURPOSE FOR WHICH IT IS INTENDED. FAILURE TO DO SO MAY CAUSE DAMAGE AND/OR
PERSONAL INJURY AND WILL INVALIDATE THE WARRANTY. KEEP THESE INSTRUCTIONS SAFE FOR FUTURE USE.
Refer to
instruction
manual
1. SAFETY
WARNING! Ensure Health & Safety, local authority and general workshop practice regulations are adhered to when using this stand.
‰
Use the stand in a suitable work area.
9
Keep work area clean, uncluttered and ensure adequate lighting.
9
DO NOT use the stand for a purpose for which it was not designed.
8
DO NOT use stand on uneven ground.
8
DO NOT use stand if any part is significantly damaged.
8
Ensure the SDA01 is securely fixed to the stand using the correct mounting brackets.
9
Keep children and unauthorised persons away from the work area.
9
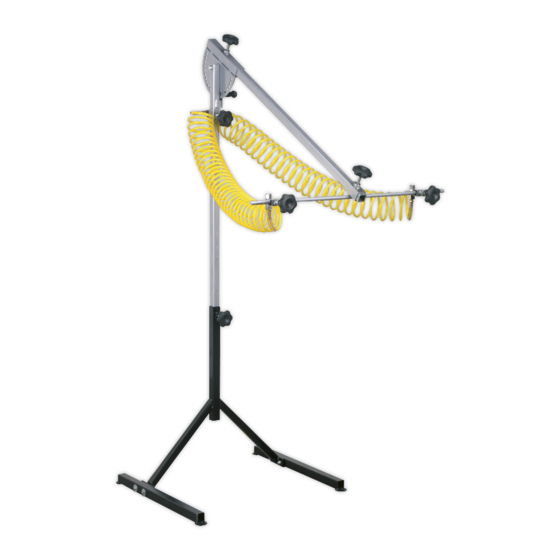
2. INTRODUCTION
Stand will support one or two air panel dryers (Model No's SDA01 or SDA03), allowing operator more time for other tasks. Fully adjustable for
height and dryer angle. Supplied with coiled air hoses and fittings.
3. SPECIFICATION
Model No: ............................................................. SDAST.V2
Maximum Height: ..................................................... 2300mm
Minimum Height: ...............................................Ground Level
4. CONTENTS
4.1.
Unpack product and check contents against attached Parts Diagram. Note: Drier guns (SDA01) not supplied.
5. ASSEMBLY
Numbers refer to attached Parts Diagram.
5.1.
Take the two forks (5) and loosely bolt the two upper brackets together using four bolts (20) and four nuts (5).
5.2.
Slide the square bottom support tube (19) in between the brackets and further tighten the fixings to clamp the bottom end of the tube in
position. Ensure that the hole for the screw (in 2A) is at the top of tube.
5.3.
Attach the two side legs (1) to the two forks (5) using two bolts two washers and two nuts (in 2A) on each side.
Ensure that the feet are offset in the same direction.
5.4.
Slide the set tube (7) onto the upright frame (10) ensuring that the locking knob in (2A) will face the front.
5.5.
Slide the upright frame (10) into the bottom support (19) and lock it at desired height using locking knob from (2A).
5.6.
Attach the adjustable angle bracket (12) to the upright frame (10) using the pivot bolt, two washers and lock nut all in (2A). Screw the
sprung locking pin in (2A) to the bracket welded onto the upright frame (10) allowing the round ended pin to pass into one of the holes in
the adjustable angle bracket (12).
5.7.
Slide the extended tube (13) into the adjustable bracket (12) and secure with the locking knob in (2A).
5.8.
Slide the adjustable shaft (16) onto the extension tube (13) and secure with a locking knob in (2A).
5.9.
Attach the adjustable brackets (15), one on either side of the adjustable shaft (16) and secure using locking knobs in (2A).
5.10.
Screw a joint (17) into the base of each SDA01 dryer gun. Mount each dryer gun to a adjustable bracket (15) by passing the threaded
portion of joint (17) through each bracket and clamping them in place using joint (8A).
5.11.
Attach a coiled air hose (14) to each dryer head by screwing it into the other end of joint (8A).
5.12.
Place the air inlet block (9) onto the set tube (7). Pass the external thread of the connector through the underside of the bracket and
screw it into the underside of the block. Tighten the connector until the air inlet block is firmly clamped onto the bracket.
5.13.
Screw the other end of the two air hoses (14) into either side of the air inlet block.
5.14.
Tighten all fixings.
© Jack Sealey Limited
DOUBLE STAND FOR AIR OPERATED PANEL
DRYER
SDAST.V2
MODEL NO:
Original Language Version
SDAST.V2 Issue:2 (H,F) 05/07/22
Advertisement

Related Manuals for Sealey SDAST.V2


Summary of Contents for Sealey SDAST.V2
- Page 1 SDAST.V2 MODEL NO: Thank you for purchasing a Sealey product. Manufactured to a high standard, this product will, if used according to these instructions, and properly maintained, give you years of trouble free performance. IMPORTANT: PLEASE READ THESE INSTRUCTIONS CAREFULLY. NOTE THE SAFE OPERATIONAL REQUIREMENTS, WARNINGS & CAUTIONS. USE THE PRODUCT CORRECTLY AND WITH CARE FOR THE PURPOSE FOR WHICH IT IS INTENDED.
- Page 2 Important: No Liability is accepted for incorrect use of this product. Warranty: Guarantee is 12 months from purchase date, proof of which is required for any claim. REGISTER YOUR PURCHASE HERE Sealey Group, Kempson Way, Suffolk Business Park, Bury St Edmunds, Suffolk. IP32 7AR 01284 757500 01284 703534 sales@sealey.co.uk www.sealey.co.uk...