Table of Contents
Advertisement
Quick Links
Advertisement
Table of Contents

Related Manuals for Juniper NETSCREEN-5XP


Summary of Contents for Juniper NETSCREEN-5XP
- Page 1 -5XP CREEN User’s Guide Version 5.0 P/N 093-0969-000 Rev. B...
- Page 2 NetScreen-Global PRO, NetScreen-Global PRO Express, NetScreen-Remote Security Client, NetScreen-Remote VPN Client, NetScreen-IDP 10, NetScreen-IDP 100, NetScreen-IDP 500, GigaScreen ASIC, GigaScreen-II ASIC, and NetScreen ScreenOS are trademarks of Juniper Networks, Inc. All other trademarks and registered trademarks are the property of their respective companies.
-
Page 3: Table Of Contents
Desktop Installation Guidelines ..............6 Connecting the Power ................6 Connecting the NetScreen-5XP Device to Your Network ......7 Connecting the Device to an External Router or Modem ....... 7 Connecting the Device to Your Internal Network, Workstation, or Devices..7 Chapter 3 Configuring the Device ................. - Page 4 Table of Contents Index........................IX-I NetScreen-5XP...
-
Page 5: Preface
The NetScreen-5XP device provides IPSec VPN and firewall services for a broadband telecommuter, a branch office, or a retail outlet. While at the entry level of the NetScreen appliance product line, the NetScreen-5XP device uses the same firewall, VPN, and traffic management technology as Juniper’s high-end central site products. -
Page 6: Command Line Interface (Cli) Conventions
Although you can use this shortcut when entering commands, all the commands documented here are presented in their entirety. UNIPER UBLICATIONS To obtain technical documentation for any Juniper Networks NetScreen product, visit www.juniper.net/techpubs/. For technical support, open a support case using the Case Manager link at http:// www.juniper.net/support/... -
Page 7: Chapter 1 Overview
Chapter 1 Overview This chapter provides detailed descriptions of the NetScreen-5XP chassis. Topics explained in this chapter include: • “Port and Power Connectors” on page 2 • “Status LEDs” on page 3 Note: For safety warnings and instructions, please refer to the NetScreen Safety Guide. -
Page 8: Port And Power Connectors
DSL modem, or cable modem. Ethernet The NetScreen-5XP device runs at 5V DC and maximum power consumption is 5 watts. When properly connected to an AC power source, the power LED on the front panel glows solid green. When power fails, the power LED turns off. -
Page 9: Status Leds
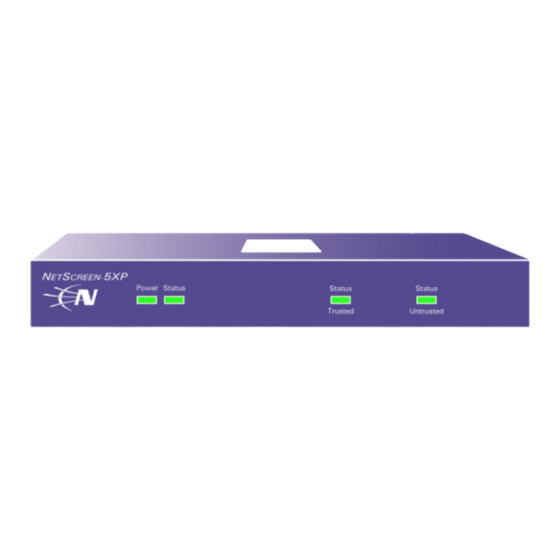
Status LEDs TATUS The front panel of the NetScreen-5XP device has power and status LEDs for the device, and link status LEDs for the Trusted and Untrusted interfaces. Power LED Link Status Status LED LEDs Interpreting Status LEDs for the Device The device status LEDs indicate whether the device is operating properly. - Page 10 Chapter 1 Overview User’s Guide...
-
Page 11: Chapter 2 Installing The Device
Chapter 2 Installing the Device This chapter describes how to install a NetScreen-5XP device on a desktop, connect the power, and connect the device to your network. Topics explained in this chapter include: • “Desktop Installation Guidelines” on page 6 •... -
Page 12: Desktop Installation Guidelines
NetScreen device in a secure environment. ONNECTING THE OWER To connect the power to the NetScreen-5XP device: Plug the DC connector end of the power cable into the DC power receptacle on the back of the system. -
Page 13: Connecting The Netscreen-5Xp Device To Your Network
Connecting the Device to Your Internal Network, Workstation, or Devices You can connect the NetScreen-5XP device to a LAN (via an internal switch or hub) or directly to your workstation. There are two ways to create this connection: •... - Page 14 Chapter 2 Installing the Device User’s Guide...
-
Page 15: Chapter 3 Configuring The Device
Chapter 3 Configuring the Device This chapter describes how to configure a NetScreen-5XP device after you have installed it on a desktop, connected it to a power source, and plugged in the necessary cables. Topics explained in this chapter are: •... -
Page 16: Operational Modes
VPN, and traffic management according to configured security policies. Route Mode In Route mode, the NetScreen-5XP device operates at Layer 3. Because you can configure each interface using an IP address and subnet mask, you can configure individual interfaces to perform NAT. -
Page 17: The Netscreen-5Xp Interfaces
The NetScreen-5XP Interfaces -5XP I CREEN NTERFACES Each NetScreen-5XP device provides Ethernet interfaces for access and connectivity. In addition, there are logical (non-physical) interfaces that perform special Layer-2 or management functions. The configurable interfaces available on a NetScreen-5XP device are as follows:... -
Page 18: Establishing A Console Session
STABLISHING A ONSOLE ESSION The NetScreen-5XP device has a serial port (called the Console port) that enables you to establish a console session with ScreenOS, the device operating system. Important: For the console connection, you will need to obtain a serial cable with a male DB-9 connector on one end and female DB-9 connector on the other end. -
Page 19: Setting An Ip Address For Managing The Device
Set the IP address of the device to this unused IP address by executing the following command: set interface trust ip ip_addr/mask For example, to set the IP address and subnet mask of the NetScreen-5XP device to 10.100.2.183 and 16, respectively: set interface trust ip 10.100.2.183/16... -
Page 20: Using The Webui Wizards To Configure The Device
The NetScreen WebUI application window appears. Note: NetScreen-Security Manager 2004 and NetScreen Rapid Deployment: If you are using NSM, you can optionally configure Juniper appliances with Rapid Deployment. Refer to the Rapid Deployment Getting Started Guide for more information. UI W... -
Page 21: Asset Recovery
If you proceed, the device will return to factory default configuration, which is: System IP: 192.168.1.1; username: netscreen; password: netscreen. Would you like to continue? y/[n] Press the y key to reset the device. You can now login in using netscreen as the default admin name and password. NetScreen-5XP... -
Page 22: Using The Asset Recovery Pinhole To Reset The Device
Chapter 3 Configuring the Device Using the Asset Recovery Pinhole to Reset the Device You can also reset the device and restore the factory default settings by pressing the asset recovery button. To perform this operation, you need to make a console connection, as described in “Establishing a Console Session”... - Page 23 Appendix A Specifications This appendix provides general system specifications for the NetScreen-5XP device. • “NetScreen-5XP Attributes” on page A-II • “Electrical Specification” on page A-II • “Environmental” on page A-II • “Safety Certifications” on page A-II • “EMI Certifications” on page A-II •...
-
Page 24: Appendix A Specifications
Appendix A Specifications -5XP A CREEN TTRIBUTES Height: 1.25 inches (3.18 cm) Depth: 5 inches (13 cm) Width: 6 inches (15 cm) Weight: 1 pound (.5 kg) LECTRICAL PECIFICATION AC voltage: 100-240 VAC +/- 10% 50/60 Hz DC Watts: 7.5 Watts DC voltage: 5 Volts NVIRONMENTAL Temperature... - Page 25 Index Index asset recovery NetScreen publications NetScreen-5XP connecting to a LAN or workstation connecting to a router or modem cables, twisted pair connecting to other devices connecting, system to a router or modem port status LEDs connecting, system to LAN or workstation...
- Page 26 Index IX-II User’s Guide...
Need help?
Do you have a question about the NETSCREEN-5XP and is the answer not in the manual?
Questions and answers