Advertisement
Quick Links
Assembly Instructions
GET STARTED
Assemble Your
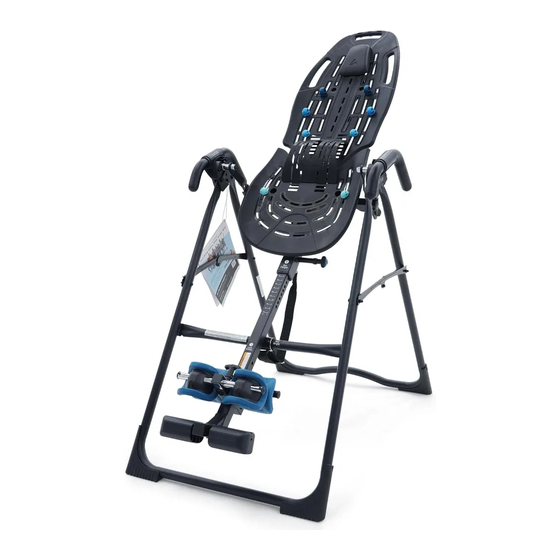
EP-560
Inversion Table
™
For gravity-assisted stretching and decompression
Follow along with these instructions
OR
Scan to download the free BILT app
and search 'Teeter' in app.
EN
* Specifications may vary from this image and are subject to change without notice.
Advertisement

Related Manuals for Bilt Teeter EP-560

Summary of Contents for Bilt Teeter EP-560
- Page 1 EP-560 Inversion Table ™ For gravity-assisted stretching and decompression Follow along with these instructions Scan to download the free BILT app and search ‘Teeter’ in app. * Specifications may vary from this image and are subject to change without notice.
-
Page 2: Table Of Contents
WELCOM E TO THE TEETE R FA M I LY Congratulations on your purchase of a Teeter EP-560 ™ Inversion Table! For the best experience, it is critical that you follow the assembly instructions, and read and fully understand the User Guide attached to the equipment before inverting. -
Page 3: Important Safety Instructions
BEFORE YOU BEGIN: Review all steps before beginning assembly and read all precautions before using the inversion table. Carefully adhere to the Assembly Instructions and User Guide to help ensure safety and product integrity. IMPORTANT SAFETY INSTRUCTIONS READ ALL INSTRUCTIONS BEFORE USING THE INVERSION TABLE WARNING FAILURE TO FOLLOW INSTRUCTIONS AND WARNINGS COULD RESULT IN SERIOUS INJURY OR DEATH. -
Page 4: Items For Assembly
I T E M S FO R A S SE M B LY Parts are not shown to scale. Hardware drawings located on the insert inside each Hardware Kit. ITEM NO. ITEM NAME ITEM NO. ITEM NAME Main Shaft Assembly A-Frame Base Assembly With T-Pin Ankle Lock System E61601B... -
Page 5: A Guide To Your Inversion Table
A GU I DE TO YO U R I NVER S I O N TA B L E Before reading further, study the drawing below to familiarize yourself with the important components of your Teeter Inversion Table. Located on back of table bed. -
Page 6: Safety Warning Labels & Product Specifications
SAF ETY WARNING L ABE LS & PRODU CT SPECIFICATIONS Important: Please review all labels and supporting materials before using your inversion table. This drawing indicates the locations of the warning labels found on your product. If a label is missing, illegible or is removed, contact Teeter Customer Service to request a complimentary replacement label. -
Page 7: Assembly Steps
L E T ’ S GE T STA RTE D Unpack and Prepare Your Workspace • If possible, assemble the equipment at or near the space in which you intend to use it to avoid moving it later. • Unpack all parts and support materials. Set aside packing materials and clear your work area. •... - Page 8 A S S E M B LE RO L L E R H I NG E S S T E P 2 FIGURE 4 FIGURE 4 TO TA BL E B E D Figure 4 Figure 4: Familiarize yourself with the 3-Hole Roller Hinge and Cam Lock terms.
- Page 9 Figure 6: For ease of assembly, rest the Table Bed against the Crossbar at the front of the A-Frame. Figure 6a: On one side of the Table Bed, lift and hold the Cam Lock up all the way to unlock. In your other hand, hold one Roller Hinge near the Pivot Pin.
- Page 10 S T E P 3 ASSEMBLE TABL E BED TO A- F RA M E Figure 9: Face the front of the A-Frame where the Crossbar is located. Grasp both Roller Hinges, right above the Cam Lock, and lift the Table Bed. Allow the top of the Table Bed to rotate toward the floor, so that the back of the Table Bed is now facing you and the top of the Table Bed is in...
- Page 11 ASSEMBLE MAI N S HA F T S T E P 4 TO TABL E BED Figure 13: Stand on the LEFT side of the A-Frame, holding the Main Shaft with the height markings facing up. Begin to slide the end of the Main Shaft into the Main Shaft Housing at the base of the Table Bed.
- Page 12 MISASSEMBLY CHECK WARNING If your Teeter Inversion Table looks like Image A or B, your inversion table has been misassembled and is unfit for use. Improper assembly could result in serious injury or death! Image B Image C Image A Go back to Step 4 Proceed to Go back to Step 3...
- Page 13 AT TACH AN GLE T ETHE R S T E P 5 & HEAD PI LLOW Attach Angle Tether The tether will come pre-assembled to the A-Frame. Figure 16: Unfold the adjustable tether and clip it to the U-Bar on the underside of the Table Bed.
- Page 14 S T E P 6 AT TACH LUMBAR BR I DGE (OPTIONAL) The Lumbar Bridge provides even deeper decompression and improved alignment benefits. Personalize the intensity and target zone of the Lumbar Bridge by adjusting the height and position of the arch within the slots on the Table Bed so it fits comfortably at the small of your back. Stabilize the inversion table to prevent rotation during assembly.
- Page 15 S T E P 7 ATTACH ACUPRESSURE NODES (OPTIONAL) Personalize the intensity and target zone of the Acupressure Nodes by positioning the varying sizes along the bed tracks as desired. Figure 21: Determine your desired node position along the table bed. Unscrew the black backing from the node and insert the backing into the slot from the rear of the bed so the threads are visible from the front.
-
Page 16: Before Inverting (Next Step)
NEXT STEP Locate User Guide and Get Started with Inversion Refer to the User Guide attached to your EP-560 Inversion Table. This is your step-by-step guide to customizing your user settings for a smooth and effortless inversion experience. Ensure User Guide Remains on Product Figure 24 &... -
Page 17: Warranty Terms & Registration
FULL 5 YEAR WARRANTY The Teeter warranty set forth below and on Teeter’s website applies to US and Canadian customers only. For international customers, please consult your local distributor for warranty information which will vary depending on country. During the period starting with the day of retail purchase and continuing for five (5) years, Teeter extends to the owner a repair and replacement warranty against manufacturing defects in materials, workmanship, fabrics and padding. -
Page 18: Terms & Conditions
TERMS & CONDITIONS OF PURCHASE YOUR PURCHASE IMPLIES AGREEMENT TO THE FOLLOWING TERMS, which were made available to you prior to purchase via Teeter-owned web properties (including but not limited to teeter.com and forwarding URL’s like tryteeter.com and tryfreestep.com) (“Sites) or by contacting Teeter Customer Service. - Page 19 TAXES: For current sales tax collection information, go to teeter.com/support/tax-disclaimer. DISPUTE RESOLUTION BY INDIVIDUAL BINDING ARBITRATION: You and Teeter agree that any dispute between us (including disputes against any agent, employee, subsidiary, affiliate, predecessor in interest, successor, or assign of the other) relating to the Sites; any transaction or relationship between us resulting from your use of the Sites;...
- Page 20 Find These Great Products and More at teeter.com! Better Back Foam Rollers Neck Relax & Restore Duo ™ ™ Prepare the body for movement, Provides support of the upper accelerate recovery, minimize neck/cervical spine for muscular imbalances, and improve self-administered suboccipital overall flexibility with the Teeter release, a technique to reduce collection of textured Foam Rollers.
Need help?
Do you have a question about the Teeter EP-560 and is the answer not in the manual?
Questions and answers